Category Archives: Sewing

V9246 – new pattern for spring 6PAC!

Just want to draw reader’s attention to the new Vogue pattern V9246, which is a “five easy pieces” pattern (aka a wardrobe pattern that is less formal).

v9246

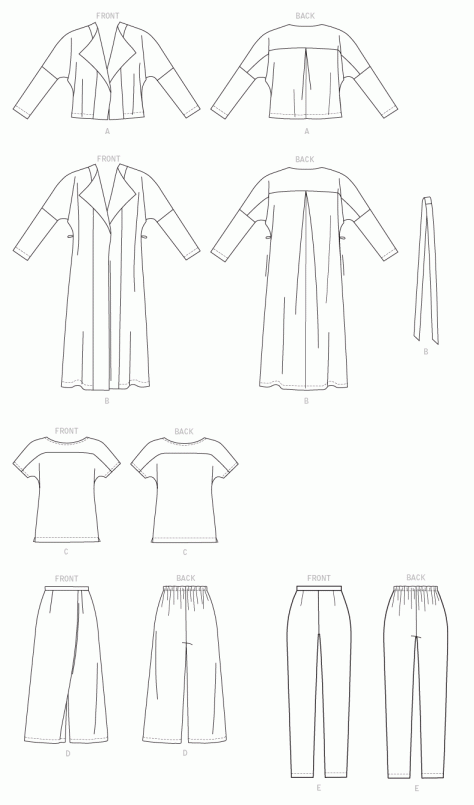
Finally, I think, a pattern that can actually be used well for a 6pac!  2 layers, a top, two bottoms.  Just make the top twice.  And, great opportunities for colour-blocking.  It also I think could be made in both stable knits and light wovens.  And in a modern silhouette with dropped shoulders and narrow sleeves, and a midi length on the wide trousers!

In fact, Vogue shows an ACTUAL 6PAC as their example:

  1. short jacket – dark neutral – indigo linen (matches 3 and 5)
  2. long jacket – light neutral – tan cotton
  3. top – dark neutral – indigo linen (matches 1 and 5)
  4. top – light neutral – white linen
  5. wide trousers – dark neutral – indigo linen (matches 1 and 3)
  6. narrow trousers – medium neutral print – indigo and white stripe linen

They show two sets of shoes, gold and black, and a dark blue bag also.

Now irritatingly they don’t show the finished hip, waist, or bust measurements (why Vogue why).  buyer beware in terms of actual size.  I think these are loose fitting — I’d look for 4 inches of ease on the bust measurement and maybe 8-10 on these loose-fitting jackets.  I would look for 2-3 inches of hip ease in the trousers.  I don’t usually do well with elastic-waist trousers, I might incorporate a zip into the side seam to reduce bulk at the waist accounting for my very large difference between hip and waist.  As with all new trouser patterns, I recommend measuring, then making a muslin in similar fabric and/or cutting with extra wide seam allowances if you are relatively confident in your alterations.

I also think these would be VERY quick to sew — there are no closures on any of the garments.  The jackets are unlined.  I think you could easily make the short jacket with a sheer or floaty lower back panel; while the shoulder yoke on the tee could be made sheer.  Or, break out the embroidery machine for the shoulder yoke pieces.  The long jacket would be great in pointe, possibly also the narrow pants.  The tops would be nice in woven rayon also.

BTW in case you are thinking it (ha ha ha LOL) I don’t receive anything from Vogue, this is my opinion.  Also I haven’t sewn these yet, the patterns could very well have terrible sizing.  But the first impression is VERY good.  Your impressions?

Embroidered top and skirt (Hawaii 6PAC 1&2)

Hey everyone, my winter 6PAC is turning into a Hawaii thing. Or a spring thing.  Or something that seems rather un-wintry.

img_1177
The skirt is a second-hand one I bought many years ago in London.  I really like the embroidery and may add more.

Here’s a close up of the skirt embroidery.

img_1179
This is an Anita Goodesign embroidery design.  I used Sulky Rayon thread and a tear-away stabiliser.  Instead of hooping the skirt next time I may do the embroidery as a patch on felt.  I love all the colours in this embroidery.

And a view of the shirt that shows the reverse appliqué on the sleeve and back.

img_1180
I used a wash-away stabiliser but I haven’t washed the shirt yet.  This shirt used all my main machines: sewing machine, overlocker, coverstitch AND embroidery.  Actually, it was a lot of work for for a t-shirt and although I had planned to re-use this pattern I am not sure I want to.  I will post a close up of the reverse appliqué when I get the shirt out of the wash. Oh – shirt pattern Ottobre 5/2015 number 8; reverse appliqué embroidery is another Anita Goodesign design.

Next up: a lace shirt and skirt. Nice and simple.

Drawstring bag tutorial

Dear readers,

This week in November is always a crazy one.  First of all, we keep Thanksgiving.  I haven’t lived in the US for 22 years now (and isn’t that crazy) but I can’t get by without Thanksgiving.  Fortunately, my husband supports this with his “all the holidays” policy (yep, Thanksgiving, Guy Fawkes, Midsummer — we collect holidays from wherever we’ve lived).  But besides Thanksgiving, which was lovely and involved some very excellent pie, BOTH children have their birthdays in this same week in November.  Johnny on the 25th and Charlotte on the 29th (links are to the posts where they were originally announced, allowing you to calculate that Johnny turned 4 and Charlotte will be 9 tomorrow). (offhand note: I have a friend who researches blogs and says that very few people return to their archives.  I, on the other hand, search my archive all the time to remember the very many things I have forgotten).

I made so far this week three adorable goodie bags with embroidery for the kids who attended Johnny’s pirate party, and a test stitch out for similar for Charlotte’s Pokemon party (which I then abandoned), and a giant gift bag.  I broke four needles on the adorable Urban Threads designs and am serious considering whether I ever dare stitch out one of their designs again.  I also didn’t get any pictures because they were done last minute.  However, I learned a very good method for sewing drawstring bags.  You probably are not drawstring-bag challenged, but if you are, allow me to share, because I was always previously confused about the casing.

Bag Tutorial

Step 1: Cut 2 rectangles, size of bag plus seam allowances plus a bit extra on top.  Not needing to measure is a great pleasure here, I just make the bag about as big as I want.  (If you are embroidering you’ll want to mark the centre point of the bag and do your embroidery now.   Or embroider first and cut later?  That sounds like something I might do). Cut 2 other rectangles slightly shorter than the first if you want to line the bag.

31150776172_2308ce02a9_z
“Pattern” for the bag. Rectangle can really be any shape or size.  Patterns brought to you by Post-It Patterns, the non-professional pattern makers.  Dotted lines are fold lines.

Step 2:  Snip the seam allowances right to the seam line where you want the bottom of the casing to be. This is the crucial step that I always missed previously

Step 3: Sew around bag below snips.  Finish this seam with overcasting if you are not going to line it; clip corners, press seam.

Step 4: Fold in side seam allowances from snips up.

Step 4a: at this point you could also insert a lining by making another bag without snips and slightly shorter – leave open at the sides at the point where the snips would be, then press seams open all the way up.  Insert the outer bag into the lining bag, wrong sides together.

30487038143_4d80d5a0ec_z
Japanese patterns use these side diagrams all the time, and I think they are very helpful.  The dashed line is the casing stitching line.

Step 5: Fold under top edge, then fold down again and stitch around the bag from snip to snip — hey presto nice finished edges on your casing.

Step 6: thread two ribbons through casing, opposite to each other.  In other words you pass one ribbon all the way around the bag and knot it to itself on the side it came from, then start on the non-knotted side and pass the other ribbon all the way around and knot it to itself.  Then if you pull both knots the bag closes like magic.

31179921051_d498ec8f42_z
This diagram is looking down from the top into the bag.  

I can whip one of these up in like 15 minutes and they can be any size, really, so very handy for laundry and such like in larger sizes and for lavender in tiny embroidered sizes from Liberty cotton scraps.  Just saying.  Oh yeah, and in medium sizes for child goodie bags and Pokemon-card-carrying bags.  And they look much better in fabric than in post-it-note form.

(A side note: as I was writing this, I was thinking about fake news and the way people apparently all the time steal content and re-create it to make money via ads.  Then I got to wondering if any of those beautiful photos on Pinterest or in some tutorials are fake — i.e. whether the tutorials have actually been used to create the items they show?  Sometimes there are things I can tell really wouldn’t work… Rest assured, readers, you probably won’t be getting flashy fake photos from me any time soon LOL, which is probably why my venerable blog hasn’t been sought out by the Forces of Commerce yet…)


Thread printer (AKA Brother NV-800E)

So I mentioned in the last post that I bought a Brother embroidery machine with a 6×10 field. I think that freehand machine embroidery is often referred to as “painting with thread,” a description that I think is really warranted.  Machine embroidery with a computer-controlled machine is not painting, but rather printing with thread.

And, it is awesome.

Case in point: my daughter has started figure skating.  She’s always loved skating and we are fortunate enough to have a rink about five minutes bike away.  They have free skating nearly every day, a championship hockey team and a figure skating club that meets on Tuesdays.

I went to the sports store and bought a cheap fleece jacket and trousers.

And now I have these!  Instant birthday presents!

30314449004_e8ee7f6634_z
The design is “Inky Ice Skates” from Embroidery Library plus Charlotte’s name. I used the Embrilliance Essentials program on my Mac to add the lettering.  I hooped this on the 6×10 hoop with tear-away stabiliser and used wash-away film on top of the fleece to help the stitches not fall in.  The thread is rayon Sulky – variegated light blue.
31135406035_7834e5cd2b_z
I used the “Inky Snowflake” design from the same set in a smaller size (4×4) and rotated 90 degrees, plus lettering.  I needed a smaller sized hoop to fit in the pants.

Er… I’m back

It’s been so long since I blogged, dear readers, that WordPress has completely changed it’s blogging interface.  Having spent so long silent I will not waste your time with apologies.  I am still here, and still sewing.  Mostly.

  1. I went to London and met Fabrickated again and got wrapped in cellophane at an excellent dinner party.  I also met Melissa from Fehr Trade whom I continue to admire from afar…
  2. I participated in the Tour de Sock as an “exhibition” knitter and discovered that I hate hand knitting patterns, although I did meet some lovely circular machine knitters and learned how to decipher lace patterns, make lace punchcards, and even make lace on my Brother machine!
  3. I finished decoding the Form computer language with Jenny from BikiBirdKnits.  This  “computer” had many Passap and Superba patterns written for it which can now be decoded and modified.
  4. I don’t remember most of the summer, which is why I should keep my blog more regularly, in addition to my responsibility to my readers.
  5. I made a pair of Perfect Trousers from Ottobre 5/2015 number 9, in men’s wool suiting, currently in heavy rotation.  I also cut a pair of trousers from the Anne Klein peacoat pattern, V1467.  They’ve been fitted but not sewn, in a pretty blue marled wool I’ve had for at least 12 years.
  6. I went to London again for a wedding, and made hats, plus bought two dresses and a top.
  7. I’ve been accepted to a big conference in (drumroll please) HAWAII!  We’ll be saying aloha there around New Year.  Awesome.
  8. My autumn 6PAC is: Perfect Trousers, navy blue/black striped wool suiting; purchased second-hand cropped ruffly jacket, grey/blue silk/cotton broadcloth; dark navy wool pullover, purchased new; grey wool pullover, purchased new; navy double-knit cotton peacoat, purchased new.  Which lacks one pair of trousers (I’m wearing a denim skirt with it mostly) and all kinds of tops, but I’m using the pullovers as tops, they are very thin.  Also added Charlotte’s birthday dress from years ago, which fits me as a vest, who would have thought it, and goes beautifully plus adding a bit of colour.
  9. I very cheekily bought an embroidery machine! A brother NV800-E with a 6×10 field, and am currently making a long series of embroidered animal paper dolls.  Which may be a quilt.  Or not.  I am unclear as to their fate.  BTW embroidery machine is a total misnomer, they should totally be called thread printers.  I want to embroider circuits with conductive thread.  Anyway this is my new obsession, to understand everything about my machine.
  10. I went to London a third time, on my way to a data visualisation conference in Sheffield, and did nothing at all sewing-related, which was sad.  I don’t want that to happen again.
  11. SWAP is about to be announced and I plan to make six tee-shirts, four pairs of nearly identical pants, and a cardigan, job done.  So I can get back to my embroidery machine.  Although it’s really knitting time.  But I bought the children new hats so I’ve bought myself some time there…
  12. I missed you all!  Please let me know if you want pictures or to hear any more about any of these exciting developments.

My 10th blogoversary

I started blogging ten years ago today, according to my blog history.  Thank you, readers, for making it so enjoyable for me.

One thing I am sorry for is that I can no longer share my creations with my mother, who used to read this blog often, since she has been taken ill with dementia and computers are now too complex for her.  She’s always been a strong supporter of my creative work.

This blog has seen me though getting my PhD, recovering my joy in sewing, the birth of both my children (Charlotte and John), and many other trials and tribulations.  I occasionally review the archives to see what I was doing when!

Thank you all for continuing to support me now, and leading me ever onwards in my work.