
I had bought this fabulous woven ombre stripe from The Smuggler’s Daughter. It’s attractive on both sides so an unlined jacket seemed a good fit.
I think most of us looked right past Butterick B6244 with the incredibly plain dress, but the coat caught my eye. There are many similar patterns out there, but I liked that the shoulders were fit and despite all of the fabric it looked slimming on the model. The bonus is when you find that there is actually a dart under the draped collar. There are just 3 pattern pieces, which made matching stripes easy, however I had only ordered 4 repeats (less than 4 yards) of the fabric. After close inspection I discovered that there was absolutely no nap and the stripes were symmetrical so the back is cut one direction and the front is opposite! After laying out the front and back pattern pieces and matching the stripes I still had some fabric left, but the sleeve stripes wouldn’t match, or they would be too short.
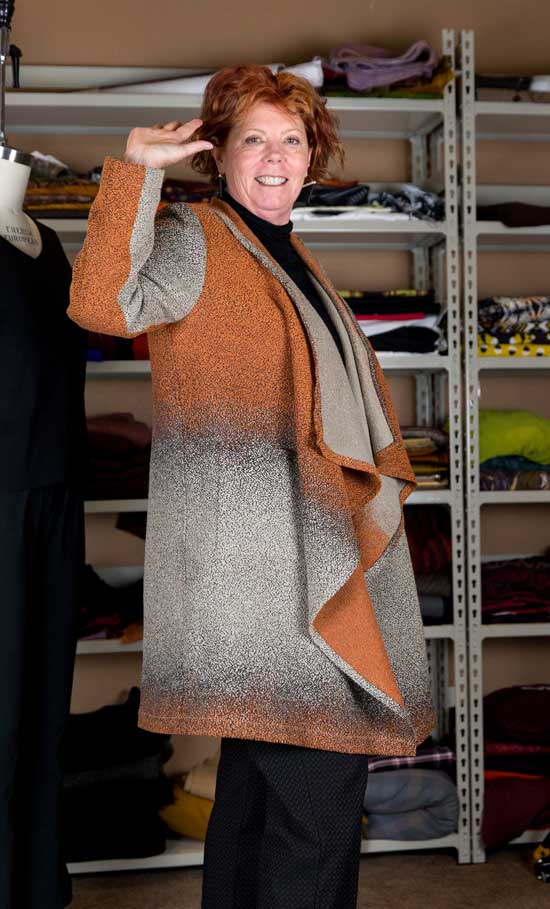 Knowing that there is always a solution I cut out and stitched together the body of the coat. Then I draped the fabric at the arms and decided that it looks even better with the stripe running down the arm. I love that the inside seam is orange against tan. I’m so glad I didn’t have enough fabric! By cutting the sleeves cross grain I gained enough scraps to make two perfectly matched patch pockets lined in a different fabric.
The best part of this project is how well it fits into my existing wardrobe. Buying fabric I love and then finding the perfect pattern seems to be a good way for me to sew. The patterns are out there or you can alter them, but finding fabric you love is much more difficult.
 I’ve been sewing but in such small periods of time that I never had time to photograph and blog. It’s amazing how much can be accomplished with an hour or two here and there, but I find it very inefficient. Each time I have to review what last happened with the project before proceeding to the next step. The holidays are coming up and I need to switch gears to gift giving projects, but for now I’ll try and catch up on what has been on my sewing machine for the last month, and it’s going to take a few photo sessions and blogs to cover it!


 I’m ready to start making fall clothes, my favorite time of the year, but next summer I think I will come back to this pattern with a light linen and maybe some hand stitched details, or some machine embroidery along the placket. It’s nice to think that around March I may already have a project!
 I entered my cat Zatoichi (Ichi for short) for a spot in the calendar of Fort Collins Cat Rescue our wonderful local cat shelter where she came from. She’s now one of the 30 finalists and would dearly love to be a Miss September (or January…) and help the shelter. Please go to


 Arghhh! I have carpal tunnel issues no doubt aggravated by my avid knitting! One handed typing is pretty slow, so this will be a very short post. I do love this vest by Marianne Isager. Both the shape and the color just make me smiled wish for fall weather. The kit came from Tutto, based in Santa Fe, who had a booth at the recent Interweave yarn fest here in Colorado. The yummy Alpaca and Silk Mohair yarns are held together throughout the piece.

 I decided to copy an old favorite unlined coat. I always pull it out between seasons because the single ply of wool is the perfect weight, but it’s grey and looks a little blah in spring. However, the oversized fit gives enough room for anything from dolman sleeves to another layer beneath. To celebrate spring, I wanted embroidered poppies around the hem of the coat. I looked all over for the set of embroideries I evisioned in my mind, but to no avail. Just as I was giving up, my neighbor’s poppies began to bloom! I have software. I can draw. YES, I can do this!
 The second step was to simplify the photograph into a line drawn cartoon. This needed to be done since the number of embroidery threads used should be kept down to a reasonable number. I have a single thread embroidery machine, so I need to rethread for each color and the final embroideries have about 14 colors.
  The third step is to scan the freehand cartoon and open it up as a layer in a drawing program like Adobe Illustrator, then complete a vector drawing. The embroidery software I purchased from Husqvarna Viking has a drawing module that is fairly simple to use, but I’m used to the feature rich Illustrator. This part takes awhile, at least for me. I spent time fussing around with the composition by moving the flowers, changing their sizes and even moving flowers from one photo to another to balance. There are three separate embroideries on the coat plus some small designs for the buttons and the collar.
  I make all of this sound very straightforward but the truth is I’d never attempted such a complex project, and most steps had to be done more than once. The good thing is that I continued to find faster ways to accomplish my goals. Next time should be much more efficient!


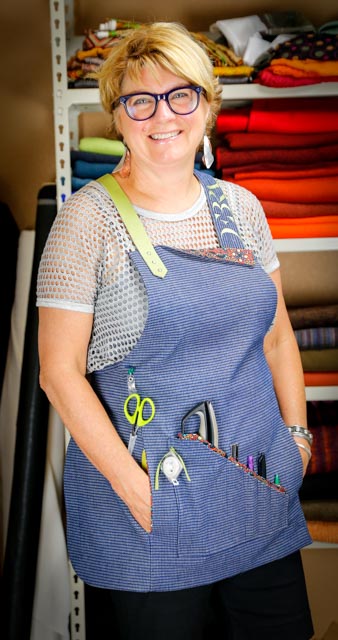
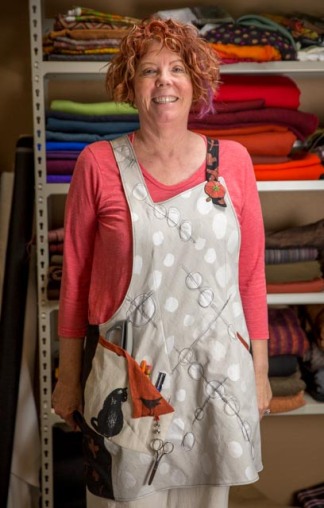

 Since I like to embroider with my machine, I digitized a drawing of my tomato pincushion and placed the embroidery on my shoulder to hold pins. The dot fabric has some free-motion embroidery and I added some color to the black fabric with the help of some Diane Ericson stencils. The linen cat fabric came from Elfriede’s Fabrics and the crow is also from a Diane Ericson stencil.
 The other linen pieces come from my stash and were made into a rectangle of pieced fabric that I then draped on Roxanne. Cool, this is going to be easy!
  The back panel also needed to have a mix of fabrics so I decided to make a diagonal slice on the patchwork piece to make a wedge for the back. This seemed like a great idea and here is the back panel on the floor. However, all the angles started getting confusing on such a large project.
  A shirt would have been much easier to manipulate, but I persevered adding more black linen until I had back and front rectangles to form the caftan. After sewing the shoulders it was time to look at the neck. It’s difficult to see, but I’m intrigued with this idea of a turned rectangle to form an asymmetrical neck. The shoulder seam is the black to black seam starting on the lower left hand side of the photo. The other shoulder continues diagonally across the rectangle to the upper the right hand side of the photo. Unfortunately, in the end the neck was too big, and I’m not a big fan of my bra straps showing. I played around with the neck later and came up with a solution, but I would love to perfect this idea in another project.
 So at this point the project looks cool on Roxanne so I try it on. It looks terrible on me!!! Too much fabric…we’re talking full size tent, and it’s heavy! Time to start chopping!
  I decide that instead of a classic rectangular caftan that I will just cut into the sides forming sleeves as you can see in this photo of the back.
 This reduced the bulk by about half so I decided to focus on a pocket. I’m very fond of how the pocket came out. However at that point the caftan still fit poorly. The photo below is after all the tweaking, and you can see I lost a little of the pocket opening when I took more out of the sides.
 You can also see how I resolved the neck. Hopefully it looks intentional…The outfit is fun, I will wear it and most of all I enjoyed the process and learned a lot!
 I’m back to sewing and blogging! Summer always poses wardrobe difficulties since fall is my favorite season in both colors and weight of fabrics. I’m determined to have a summer wardrobe one of these years, but while I started planning summer sewing in February, life got in the way. I have a spring coat that I’m still working on, but it’s a long slow project that I’m savoring so it’ll get done sometime soon. Hint: machine embroidery is involved.
 Isn’t this an interesting idea? The front basically ends up on the bias at the placket. Drafting this pattern was difficult, since the original shirt kept shifting around. This front idea is what I wanted to capture and beyond that, I made quite a few detail changes from the original.
 I may add some false buttons on the placket. I usually sew plackets up even on RTW that I’ve purchased. I’m just more comfortable knowing I don’t have to watch out for gaposis at the bust!The back pleat adds to the airiness of this top, which you barely feel while wearing. I find it slightly disconcerting and as I said before a little more weight to the fabric will feel better. I am wearing this “muslin” but I think there is great potential in the future. The body pattern is only two pieces so there is room for fabric play. Hope I have time this summer to make another!
 The back pleat adds to the airiness of this top, which you barely feel while wearing. I find it slightly disconcerting and as I said before a little more weight to the fabric will feel and look better. I’m wearing this “muslin” but there is great potential future iterations. The body pattern is only two pieces so there is room for fabric play. Hope I have time this summer to make another!


 I will be sharing some spring sewing on my next blog. It’s time to welcome the warm weather!