
Over the last few days I’ve been tinkering with my Raspberry Pi, an MCP3008 analog/digital converter, a TMP36GZ temperature reader, a breadboard and a bunch of wires. You can get most of these things in a kit here. I’ve learned some great things along the way and I’ll be sharing that with you in an up-coming series. Temperature reading will be just one part. I’m cooking up some fun things to go with it. Maybe humidity sensing, and some other fun stuff. Its still in the works, so things will probably change as we go. Stay tuned for the first part of the series 🙂
Fixing Squeaky Floors
We’ve all walked on a wood floor that’s really squeaky and its quite annoying. Luckily its pretty easy to fix. I’ve been remodeling my basement over the past little while and took advantage of my basement ceiling being ripped open. My upstairs hardwood floor was pretty squeaky. You can’t really expect much else from a house built in the 1960’s. Since the ceiling in the basement was being insulated and an drywall put up, it was really easy to access the joists for the upstairs floor. It only takes a few steps. Here’s how you do it if you have access to a crawl space or from below the floor:
Needed Materials:
Pretty cheap tools for a good floor fix.
Step 1: Use a friend to help you locate squeaky spots
While you are below the squeaky floor, have a friend walk around until they find a squeaky area. Have them rock back an forth on the squeaky spot so you can pinpoint the area from below. If you need a little extra help, have your friend knock on the floor. This makes it easier to hear and, if you need to, feel where the squeak is located.
Step 2: Shim the joists
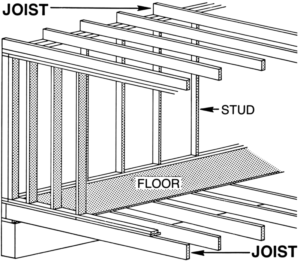
Put a little carpenters glue on the top of the skinny end of a shim and slip it between the floor joist and the sub-flooring where the squeak is occurring. Give it a few taps with your hammer, but don’t push it in too far. Pushing it in too far can raise the floor in other areas and cause more squeaks or other problems. It make take a few shims in an area depending on how much the floor moves.
Step 3: Repeat
Repeat steps 1 and 2 until you’ve eliminated all the squeaky spot.
Congratulations, enjoy your squeak free floor! (Note: You can’t eliminate every single sound your floor makes. As it ages, little pops and creaks are unavoidable. This is for fixing the loud squeaks.)
If you don’t have access to underneath the floor, here’s an instructional video from This Old House:
An Intro to WP-CLI
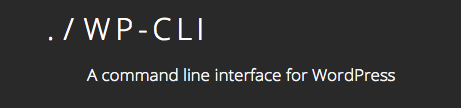
One of the most powerful tools in the WordPress world is the WordPress Command Line Interface or WP-CLI. From user management, to managing plugin and theme updates, WP-CLI can pretty much do anything you need it to do.
User Management
One of the easiest things to do is manage users. From updating email address and display names to user meta, capabilities, and roles. Here’s a quick example on updating a display name for a user.
$ wp user update [email protected] --display_name="WordPress User"
This will update the user with the email address “[email protected]” to have a display name of “WordPress User”. Pretty much any information about a user can be changed with the update command.
Plugin Management
Managing plugins can sometimes be a pain because of many factors, but WP-CLI can alleviate some of that. Here’s a quick list of plugins and information about them.
$ wp plugin list
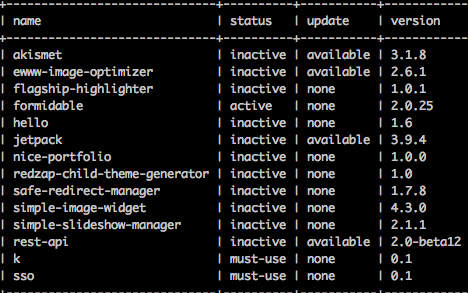
As you can see, we have a few out of date plugins here. Luckily updating those is a breeze.
$ wp plugin update <plugin name>
You can also activate and deactivate plugins easily with:
$ wp plugin activate <plugin name>
and
$ wp plugin deactivate <plugin name>
Or to simplify it $ wp plugin toggle <plugin name> will just switch the status to the opposite of whatever it currently is.
If you’re deactivating plugins because you have a white screen of death (WSOD), you can still deactivate plugins with the --skip-plugins flag.
$ wp plugin deactivate <plugin name > --skip-plugins
This will stop all plugins from loading and allowed WordPress to deactivate plugins correctly.
Protip: $ wp plugin deactivate --all --skip-plugins
WordPress Core Management
Making sure WordPress core (and plugins/themes) are up to date is one of the best ways to keep yourself a little more safe against vulnerabilities. WP-CLI provides some awesome tools for managing WordPress core.
$ wp core verify-checksums
This is one of my favorite commands. It will check all of your WordPress core files and verify that they haven’t been modified or tampered with. This is extremely useful for fixing hacked sites because it will tell you exactly which file has been changed.
Let’s say your site has been hacked and core files have been modified. $ wp core download --force will download the latest version of all WordPress core files and undo any changes. After this you should probably make sure your themes and plugins are up to date. Sometimes, it takes a professional to make sure all hacks are eliminated.
The Power of WP-CLI
A nifty tool I’ve had the opportunity to work on is called wp-tools, which is a Perl wrapper around WP-CLI commands. One of the features of wp-tools is the ability to update core, themes, and plugins. It does this the right way by first taking a backup of your site and updating the components you specify. If any problems are detected on the site after the upgrades, your site will automatically be restored to the backup. This tool has been battle tested and used to update more than 2 million WordPress installations.
If you have any questions or comments about WP-CLI please leave a comment below or use my Contact Page.
Installing a LetsEncrypt SSL on Bluehost
So, letsencrypt is probably one of the best initiatives surrounding building a secure internet, because encryption is important. I really wanted to figure it out on my shared bluehost account, so here it is.
A few notes before we start, you will need access to a secondary server, local machine, or virtual machine that has python and other dependencies required for the letsencrypt client. Details on that can be found here: https://letsencrypt.readthedocs.org/en/latest/intro.html. I’m working on a way to get this to run on the Bluehost shared server itself so access to another server or doing it on your local machine isn’t required.
Once you’ve got letsencrypt and the required dependencies installed, stay ssh’d into your secondary server and run:
$ ./letsencrypt-auto --email [email protected] --text --authenticator manual certonly
And follow the prompts. At a certain point, it will give you some commands to run. The only one you really need is the printf command. SSH into the server you want the cert on and get to the root of the domain you’d like and run that command. It will look something like this:
$ printf "%s" aBuNchOfR4nd0mT3Xt > .well-known/acme-challenge/aBuNchOfR4nd0mT3Xt
Once that’s run, go back to the other shell session and finish following the prompts. This will generate a certificate and drop the necessary files in /etc/letsencrypt/live/(the domain you chose)/.
You’ll then need to follow the instructions here to upload the files correctly. Then contact Bluehost support to get the SSL certificate installed. Once that’s done, and any redirects you need to force people to use SSL on your site.
In the future I’ll be writing a script that automates the renewal process. Well, everything but actually re-installing the SSL certificate. You’ll still have to contact Bluehost to get the cert installed.
Compiling Node on Bluehost Shared Accounts
I’ve used node in a number of places and wanted to get it installed on my shared hosting account. Here’s how I did it. Note: To follow this, you have to have SSH access enabled. You can find instructions for that here.
Once you’re ssh’d into your account, go to your local bin directory. and download the node tarball.
$ cd ~/bin
$ wget http://nodejs.org/dist/v0.10.15/node-v0.10.15.tar.gz
Then unpack the .tar.gz and move into the node directory.
$ tar -xvzf node-v0.10.15.tar.gz
$ cd node-v0.10.15
Here’s where we configure, make, and make install node.
$ ./configure --prefix=$HOME/node
$ make -j"$(nproc)"
$ make install
Now that we have node compiled and installed, test the binary.
$ node --version
You should get v0.10.15 as the version. Now you can go about your way using node on a Bluehost shared account.
If you receive an error about the node command not being found, make sure the ~/bin directory is in your bash $PATH or make an alias to the node binary.
Compiling PHP 7 on Bluehost Shared Accounts
UPDATE: This is no longer required to use PHP 7 as Bluehost has put PHP 7 on their servers. You can now put one of these directives in your .htaccess file depending on how you want PHP configured. If you don’t know what these do, just go with the first one.
AddHandler application/x-httpd-php70 .php for regular PHP
AddHandler application/x-httpd-php70f .php for FastCGI
AddHandler application/x-httpd-php70s .php for Single ini
I’ve been hearing about all these speed increases from lower PHP versions to PHP 7, so I thought I’d see if I could get it compiled on my Bluehost shared account. I was able to get it compiled and running, but I haven’t done any speed comparisons yet. I’ll just show you how I got it compiled for now. To follow this, you have to have SSH access enabled. You can find instructions for that here.
Once you’re ssh’d into your account, go to your local bin directory. and download the PHP 7 tarball.
$ cd ~/bin
$ wget http://us3.php.net/get/php-7.0.0.tar.gz/from/this/mirror
Then unpack the .tar.gz and move into the PHP 7 directory.
$ mv mirror php7.tar.gz
$ tar -xvzf php7.tar.gz
$ cd php-7.0.0
Here’s where we configure, make, and make install PHP 7.
$ ./configure --with-config-file-path=/homedir/username/etc/php/ --with-config-file-scan-dir=/homedir/username/etc/php/conf.d/ --enable-mysqlnd --with-curl --with-openssl --with-readline --with-recode --with-zlib --with-mysqli --prefix=/homedir/username/bin/ --enable-mbstring --with-gd
$ make -j"$(nproc)"
$ make install
Note: Make sure to change “/homedir/username/” to your homedir and username. You can get this with pwd. Additionally, this is compiled with only a few options. You can compile with whatever options you’d like.
Now that we have PHP 7 compiled and installed, test the binary. Make a PHP file with the following:
<?php

echo "ok\n";

?>
Then run it.
$ ~/bin/bin/php filename.php
You should see the output “ok”. The final step is to make .htaccess run your PHP files with PHP 7. Change to whatever directory you want PHP 7 to run in and make a symlink to your php binary.
$ cd ~/public_html
$ ln ~/bin/bin/php-cgi cgi-bin/php
Then drop the following in your .htaccess file:
<FilesMatch "\.php$">

Action application/x-httpd-php7 /cgi-bin/php

SetHandler application/x-httpd-php7

</FilesMatch>
And there you go. Whatever site is in that directory is now running on PHP 7.
A few notes. This isn’t exactly a great way to get on PHP 7, I’m just showing that it’s possible. If you do decide to do this, I’m not responsible for your actions. Use this with caution.
SaintCon 2015
SaintCon was amazing this year. If you aren’t familiar with SaintCon, it’s the premier internet security conference in Utah. I would contend that its one of the best in the country. At SaintCon there is always a hackers challenge (CTF). I’m going to go over some of the challenges so someone can learn the things I learned.
Binary challenge 1
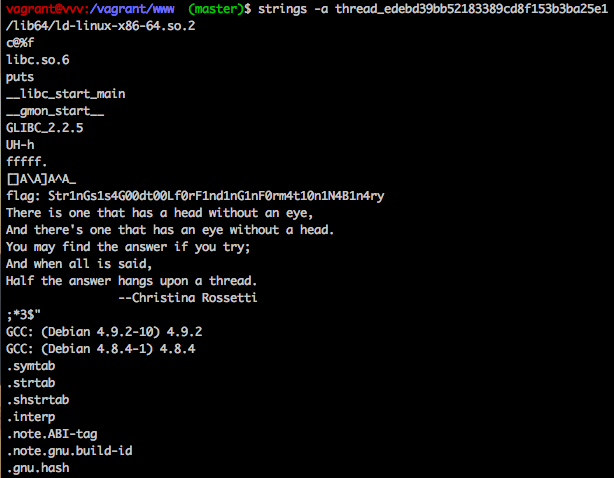
A pretty straight forward challenge. We were given a binary to download. All it took was running ‘strings’ on the binary.
$ strings -a thread_edebd39bb52183389cd8f153b3ba25e1
Which resulted in the output:
As you can see, this grabbed all readable text from the binary and dumped it. The flag was in there followed by a quote.
Binary challenge 2
The title of this binary was “crashme”. To look for clues I ran strings on this file as well:
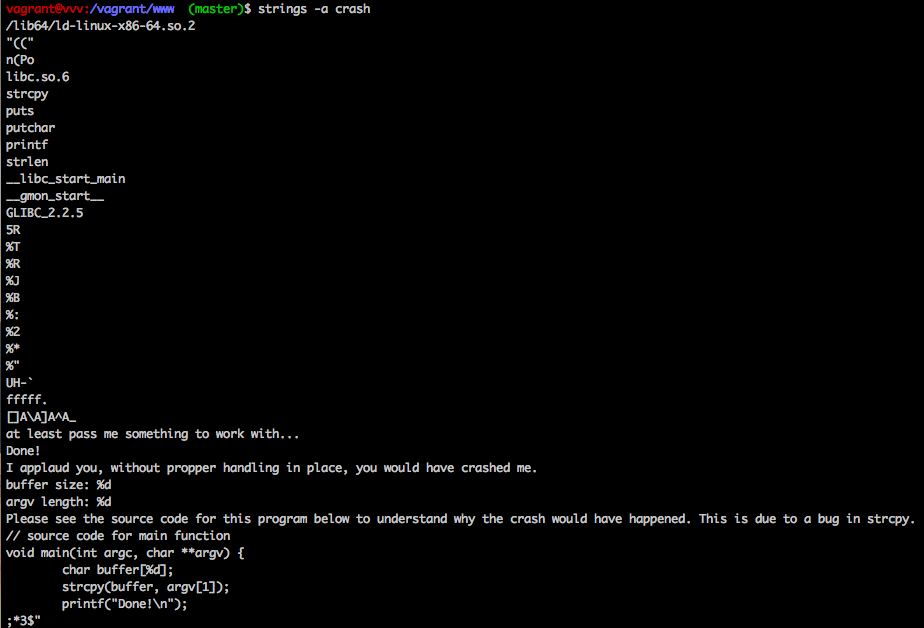
After looking into strcpy(), it was apparent that it was easy to accidentally allow a buffer overflow. We could easily test a 100,000 character buffer with a simple command.
$ ./crash $(python -c "print 'A'*100000")
Which produced the output:
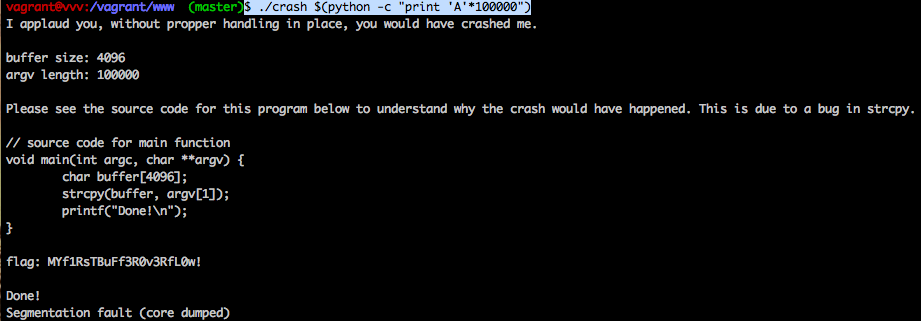
After the buffer overflow, we had retrieved the flag.
Potent Pwnables last challenge
This was one of my favorite challenges. This was pretty much an exact replication of the latest Joomla! session hijacking vulnerability. There were a number of changes such as the database prefix being different and the page_id/item_id being different, but those were trivial to find out once it was identified.
The tool that made this challenge easier is called hackbar. It makes editing your SQL injection a lot easier than in the url bar. For more information on this exploit, I suggest reading the Proof of Concept linked to earlier.
I’ll get some more challenges up as I have time. Thanks for reading.