<?xml version="1.0" encoding="UTF-8"?>
<?xml-stylesheet href="/vendor/feed/atom.xsl" type="text/xsl"?>
<feed xmlns="http://www.w3.org/2005/Atom" xml:lang="en-US">
                        <id>https://ohdear.app/feed</id>
                                <link href="https://ohdear.app/feed" rel="self"></link>
                                <title><![CDATA[ohdear.app]]></title>
                    
                                <subtitle>The description of the feed.</subtitle>
                                                    <updated>2024-01-21T17:28:18+00:00</updated>
                        <entry>
            <title><![CDATA[Making sure Laravel's debug mode is always disabled in production]]></title>
            <link rel="alternate" href="https://ohdear.app/news-and-updates/making-sure-laravels-debug-mode-is-always-disabled-in-production" />
            <id>https://ohdear.app/107</id>
            <author>
                <name><![CDATA[Oh Dear]]></name>
            </author>
            <summary type="html">
                <![CDATA[<p>Recently, people started talking about a malware called  “Androxgh0st” specifically targeting Laravel apps. In a recent edition of <a href="https://securinglaravel.com/p">Securing Laravel</a>,  Stephen Rees-Carter wrote <a href="https://securinglaravel.com/p/laravel-security-androxgh0st-malware">a good explanation</a> of how it works.</p>
<p>The malware targets apps with <code>APP_DEBUG</code> set to <code>true</code>. When enabled, Laravel will give detailed error messages, and some security features will be disabled. In production, you always want this value to be set to <code>false</code>.</p>
<p>You can make sure it's always set to' false' using Oh Dear’s <a href="https://ohdear.app/features/application-health-monitoring">application monitoring</a> feature. We can notify you whenever someone should set it to <code>true</code>. Let’s go through the steps required to set this up.</p>
<h3 id="installing-laravel-health-in-your-laravel-app">Installing Laravel Health in your Laravel app</h3>
<p>The <a href="https://spatie.be/docs/laravel-health">spatie/laravel-health package</a> can monitor the health of your application by registering one of <a href="https://spatie.be/docs/laravel-health/v1/available-checks/overview">the available checks</a>. Out of the box, it can monitor if your application is in debugging mode.</p>
<p>Using Laravel Health, you can check many other things, such as <a href="">used disk space</a>, whether or not <a href="">Horizon is running</a>, and [much more]!</p>
<p>You can install the package using composer.</p>
<pre class="shiki" style="background-color: #2e3440ff"><code><span class="line"><span style="color: #D8DEE9FF">composer </span><span style="color: #81A1C1">require</span><span style="color: #D8DEE9FF"> spatie</span><span style="color: #81A1C1">/</span><span style="color: #D8DEE9FF">laravel</span><span style="color: #81A1C1">-</span><span style="color: #D8DEE9FF">health</span></span>
<span class="line"></span></code></pre>
<p>You’ll find full installation instructions <a href="https://spatie.be/docs/laravel-health/v1/installation-setup">here</a>.</p>
<p>To register the debug mode check, you can put this code in a service provider.</p>
<pre class="shiki" style="background-color: #2e3440ff"><code><span class="line"><span style="color: #616E88">// typically, in a service provider</span></span>
<span class="line"></span>
<span class="line"><span style="color: #81A1C1">use</span><span style="color: #D8DEE9FF"> Spatie</span><span style="color: #ECEFF4">\</span><span style="color: #D8DEE9FF">Health</span><span style="color: #ECEFF4">\</span><span style="color: #D8DEE9FF">Facades</span><span style="color: #ECEFF4">\</span><span style="color: #8FBCBB">Health</span><span style="color: #81A1C1">;</span></span>
<span class="line"><span style="color: #81A1C1">use</span><span style="color: #D8DEE9FF"> Spatie</span><span style="color: #ECEFF4">\</span><span style="color: #D8DEE9FF">Health</span><span style="color: #ECEFF4">\</span><span style="color: #D8DEE9FF">Checks</span><span style="color: #ECEFF4">\</span><span style="color: #D8DEE9FF">Checks</span><span style="color: #ECEFF4">\</span><span style="color: #8FBCBB">UsedDiskSpaceCheck</span><span style="color: #81A1C1">;</span></span>
<span class="line"></span>
<span class="line"><span style="color: #8FBCBB">Health</span><span style="color: #81A1C1">::</span><span style="color: #88C0D0">checks</span><span style="color: #ECEFF4">([</span></span>
<span class="line"><span style="color: #D8DEE9FF">   </span><span style="color: #8FBCBB">DebugModeCheck</span><span style="color: #81A1C1">::</span><span style="color: #88C0D0">new</span><span style="color: #ECEFF4">(),</span></span>
<span class="line"><span style="color: #D8DEE9FF">   </span></span>
<span class="line"><span style="color: #ECEFF4">   </span><span style="color: #616E88">// other checks can come here</span></span>
<span class="line"><span style="color: #ECEFF4">])</span><span style="color: #81A1C1">;</span></span>
<span class="line"></span></code></pre>
<h3 id="adding-a-health-check-endpoint-to-your-laravel-app">Adding a health check endpoint to your Laravel app</h3>
<p>Oh Dear’s application health check works by sending an HTTP request to your application to a specific endpoint to get health check results. Your application should respond with JSON containing the result of health checks.</p>
<p>The spatie/laravel-health package can add such an endpoint to your Laravel app. To do this, must configure the <code>ohdear_endpoint_key</code> in the <code>health</code> config file.</p>
<p>You can publish that <code>health</code> with this command:</p>
<pre class="shiki" style="background-color: #2e3440ff"><code><span class="line"><span style="color: #D8DEE9FF">php artisan vendor:publish --tag=</span><span style="color: #ECEFF4">&quot;</span><span style="color: #A3BE8C">health-config</span><span style="color: #ECEFF4">&quot;</span></span>
<span class="line"></span></code></pre>
<p>These are some of the default values in the published <code>health</code> config file.</p>
<pre class="shiki" style="background-color: #2e3440ff"><code><span class="line"><span style="color: #616E88">// in app/config/health.php</span></span>
<span class="line"></span>
<span class="line"><span style="color: #616E88">/*</span></span>
<span class="line"><span style="color: #616E88"> * You can let Oh Dear monitor the results of all health checks. This way, you&#39;ll</span></span>
<span class="line"><span style="color: #616E88"> * get notified of any problems even if your application goes totally down. Via</span></span>
<span class="line"><span style="color: #616E88"> * Oh Dear, you can also have access to more advanced notification options.</span></span>
<span class="line"><span style="color: #616E88"> */</span></span>
<span class="line"><span style="color: #ECEFF4">&#39;</span><span style="color: #A3BE8C">oh_dear_endpoint</span><span style="color: #ECEFF4">&#39;</span><span style="color: #D8DEE9FF"> </span><span style="color: #81A1C1">=&gt;</span><span style="color: #D8DEE9FF"> </span><span style="color: #ECEFF4">[</span></span>
<span class="line"><span style="color: #D8DEE9FF">    </span><span style="color: #ECEFF4">&#39;</span><span style="color: #A3BE8C">enabled</span><span style="color: #ECEFF4">&#39;</span><span style="color: #D8DEE9FF"> </span><span style="color: #81A1C1">=&gt;</span><span style="color: #D8DEE9FF"> </span><span style="color: #81A1C1">false</span><span style="color: #ECEFF4">,</span></span>
<span class="line"></span>
<span class="line"><span style="color: #D8DEE9FF">    </span><span style="color: #616E88">/*</span></span>
<span class="line"><span style="color: #616E88">     * When this option is enabled, the checks will run before sending a response.</span></span>
<span class="line"><span style="color: #616E88">     * Otherwise, we&#39;ll send the results from the last time the checks have run.</span></span>
<span class="line"><span style="color: #616E88">     */</span></span>
<span class="line"><span style="color: #D8DEE9FF">    </span><span style="color: #ECEFF4">&#39;</span><span style="color: #A3BE8C">always_send_fresh_results</span><span style="color: #ECEFF4">&#39;</span><span style="color: #D8DEE9FF"> </span><span style="color: #81A1C1">=&gt;</span><span style="color: #D8DEE9FF"> </span><span style="color: #81A1C1">true</span><span style="color: #ECEFF4">,</span></span>
<span class="line"></span>
<span class="line"><span style="color: #D8DEE9FF">    </span><span style="color: #616E88">/*</span></span>
<span class="line"><span style="color: #616E88">     * The secret that is displayed at the Application Health settings at Oh Dear.</span></span>
<span class="line"><span style="color: #616E88">     */</span></span>
<span class="line"><span style="color: #D8DEE9FF">    </span><span style="color: #ECEFF4">&#39;</span><span style="color: #A3BE8C">secret</span><span style="color: #ECEFF4">&#39;</span><span style="color: #D8DEE9FF"> </span><span style="color: #81A1C1">=&gt;</span><span style="color: #D8DEE9FF"> </span><span style="color: #88C0D0">env</span><span style="color: #ECEFF4">(</span><span style="color: #ECEFF4">&#39;</span><span style="color: #A3BE8C">OH_DEAR_HEALTH_CHECK_SECRET</span><span style="color: #ECEFF4">&#39;</span><span style="color: #ECEFF4">),</span></span>
<span class="line"></span>
<span class="line"><span style="color: #D8DEE9FF">    </span><span style="color: #616E88">/*</span></span>
<span class="line"><span style="color: #616E88">     * The URL that should be configured in the Application health settings at Oh Dear.</span></span>
<span class="line"><span style="color: #616E88">     */</span></span>
<span class="line"><span style="color: #D8DEE9FF">    </span><span style="color: #ECEFF4">&#39;</span><span style="color: #A3BE8C">url</span><span style="color: #ECEFF4">&#39;</span><span style="color: #D8DEE9FF"> </span><span style="color: #81A1C1">=&gt;</span><span style="color: #D8DEE9FF"> </span><span style="color: #ECEFF4">&#39;</span><span style="color: #A3BE8C">/oh-dear-health-check-results</span><span style="color: #ECEFF4">&#39;</span><span style="color: #ECEFF4">,</span></span>
<span class="line"><span style="color: #ECEFF4">],</span></span>
<span class="line"></span></code></pre>
<p>To get started:</p>
<ul>
<li>set the <code>enabled</code> config option to <code>true</code>
</li>
<li>add a <code>secret</code> (we recommend putting it in the <code>.env</code> file, just like you would do for any application secret or password)</li>
<li>optionally customize the <code>url</code> where the health check endpoint will be registered.</li>
</ul>
<h3 id="configuring-the-health-check-at-oh-dear">Configuring the health check at Oh Dear</h3>
<p>At Oh Dear, you can create a new site to monitor and enable the application health check.</p>
<p>In the application health check settings screen at Oh Dear, you should fill in the URL and secret that you specified in the <code>health</code> config file.</p>
<p><img src="/media/blog/u87FnLilDHErJuldBRJuhH838GnpFMHAqVyZqgW0.jpg" alt="" /></p>
<p>And with this set up, Oh Dear will send you a notification whenever somebody should set <code>APP_DEBUG</code> to <code>true</code>.</p>
<h2 id="in-closing">In closing</h2>
<p>Oh Dear’s <a href="https://ohdear.app/docs/features/application-health-monitoring">application health check</a> can be used to warn you whenever somebody turns on debugging mode of your app, but also a lot more other things can be checked:</p>
<ul>
<li>disk space is running low</li>
<li>the database is down</li>
<li>Redis cannot be reached</li>
<li>mails cannot be sent</li>
<li>a reboot of your app is required</li>
<li>...</li>
</ul>
<p>Next to this application health check, we also offer <a href="https://ohdear.app/docs/features/cron-job-monitoring">a scheduled jobs check</a>. You can sync your application's schedule to Oh Dear using the <a href="https://github.com/spatie/laravel-schedule-monitor">spatie/laravel-schedule-monitor</a> package. We can notify you whenever a scheduled task is not running on time or not running at all.</p>
]]>
            </summary>
                                    <updated>2024-01-21T17:28:18+00:00</updated>
        </entry>
            <entry>
            <title><![CDATA[Laravel Pulse cards to show response times, scheduled jobs, broken links]]></title>
            <link rel="alternate" href="https://ohdear.app/news-and-updates/laravel-pulse-cards-to-show-response-times-scheduled-jobs-broken-links" />
            <id>https://ohdear.app/106</id>
            <author>
                <name><![CDATA[Oh Dear]]></name>
            </author>
            <summary type="html">
                <![CDATA[<p>Today, we released the <a href="https://github.com/ohdearapp/ohdear-pulse">ohdearapp/ohdear-pulse</a> package, which contains Laravel Pulse cards to show you the status of your scheduled jobs, any broken links you have in your Laravel app, and uptime / HTTP performance stats. All of these cards use the Oh Dear API to fetch their data.</p>
<p><a href="https://pulse.laravel.com">Laravel Pulse</a> is a first party package that can display a dashboard with information surrounding usage and performance of your Laravel app. Here’s how a default installation looks like.</p>
<h2 id="discovering-the-cards">Discovering the cards</h2>
<p>The first Pulse card one displays if you site is up, and recent response times.</p>
<p><img src="/media/blog/zOWPnJ060mFu93jkB8mkupKa7afqEkMIjZAKsTbc.jpg" alt="" /></p>
<p>This card, and also the other two, also support dark mode.</p>
<p><img src="/media/blog/rlkIKUV6fKTvYU1uEwydEkWUaPXroVVIPLwfZcNK.jpg" alt="" /></p>
<p>Oh Dear can monitor if the scheduled jobs of a Laravel app run on time. Using the <a href="https://github.com/spatie/laravel-schedule-monitor">spatie/laravel-schedule-monitor</a> package, you can <a href="https://github.com/spatie/laravel-schedule-monitor#getting-notified-when-a-scheduled-task-doesnt-finish-in-time">sync the schedule</a> of your app to Oh Dear.</p>
<p>The cron Pulse card displays when your scheduled jobs have run for the last time, and if they ran on time. Very powerful stuff if you ask me.</p>
<p><img src="/media/blog/GAssL7jgFce2aMU8S5KPnsAU0lm6sfC467CQZYUG.jpg" alt="" /></p>
<p>The last card can display any broken links of your app. This card is powered by <a href="https://ohdear.app/docs/features/broken-links-detection">Oh Dear’s broken links check</a>, which crawls your entire site.</p>
<p><img src="/media/blog/5kqmKgkDbkMJLAL1Z7RSpmL4zXibq8MeOrpMiPWa.jpg" alt="" /></p>
<h2 id="installing-the-cards">Installing the cards</h2>
<p>To use these cards, you have to pull in the package in your app via Composer.</p>
<pre class="shiki" style="background-color: #2e3440ff"><code><span class="line"><span style="color: #D8DEE9FF">composer require ohdearapp/ohdear-pulse</span></span>
<span class="line"></span></code></pre>
<p>In your <code>config/services.php</code> file, add the following lines:</p>
<pre class="shiki" style="background-color: #2e3440ff"><code><span class="line"><span style="color: #ECEFF4">&#39;</span><span style="color: #A3BE8C">oh_dear</span><span style="color: #ECEFF4">&#39;</span><span style="color: #D8DEE9FF"> </span><span style="color: #81A1C1">=&gt;</span><span style="color: #D8DEE9FF"> </span><span style="color: #ECEFF4">[</span></span>
<span class="line"><span style="color: #D8DEE9FF">    </span><span style="color: #ECEFF4">&#39;</span><span style="color: #A3BE8C">pulse</span><span style="color: #ECEFF4">&#39;</span><span style="color: #D8DEE9FF"> </span><span style="color: #81A1C1">=&gt;</span><span style="color: #D8DEE9FF"> </span><span style="color: #ECEFF4">[</span></span>
<span class="line"><span style="color: #D8DEE9FF">        </span><span style="color: #ECEFF4">&#39;</span><span style="color: #A3BE8C">api_key</span><span style="color: #ECEFF4">&#39;</span><span style="color: #D8DEE9FF"> </span><span style="color: #81A1C1">=&gt;</span><span style="color: #D8DEE9FF"> </span><span style="color: #88C0D0">env</span><span style="color: #ECEFF4">(</span><span style="color: #ECEFF4">&#39;</span><span style="color: #A3BE8C">OH_DEAR_API_TOKEN</span><span style="color: #ECEFF4">&#39;</span><span style="color: #ECEFF4">),</span></span>
<span class="line"><span style="color: #D8DEE9FF">        </span><span style="color: #ECEFF4">&#39;</span><span style="color: #A3BE8C">site_id</span><span style="color: #ECEFF4">&#39;</span><span style="color: #D8DEE9FF"> </span><span style="color: #81A1C1">=&gt;</span><span style="color: #D8DEE9FF"> </span><span style="color: #88C0D0">env</span><span style="color: #ECEFF4">(</span><span style="color: #ECEFF4">&#39;</span><span style="color: #A3BE8C">OH_DEAR_SITE_ID</span><span style="color: #ECEFF4">&#39;</span><span style="color: #ECEFF4">),</span></span>
<span class="line"><span style="color: #D8DEE9FF">    </span><span style="color: #ECEFF4">],</span></span>
<span class="line"><span style="color: #ECEFF4">],</span></span>
<span class="line"></span></code></pre>
<p>You can create an API token on the &quot;API Tokens&quot; page at Oh Dear. You'll find the site ID on the &quot;Settings&quot; page of a site on Oh Dear.</p>
<p>You can add the cards to your Pulse dashboard, by first publishing the Pulse's dashboard view:</p>
<pre class="shiki" style="background-color: #2e3440ff"><code><span class="line"><span style="color: #D8DEE9FF">php artisan vendor:publish --tag=pulse-dashboard</span></span>
<span class="line"></span></code></pre>
<p>Next, add the cards to the <code>resources/views/vendor/pulse/dashboard.blade.php</code> file:</p>
<pre class="shiki" style="background-color: #2e3440ff"><code><span class="line"><span style="color: #81A1C1">&lt;x-pulse&gt;</span></span>
<span class="line"><span style="color: #D8DEE9FF">    </span><span style="color: #81A1C1">&lt;</span><span style="color: #D8DEE9">livewire:ohdear.pulse.uptime</span><span style="color: #D8DEE9FF"> </span><span style="color: #8FBCBB">cols</span><span style="color: #ECEFF4">=</span><span style="color: #ECEFF4">&quot;</span><span style="color: #A3BE8C">4</span><span style="color: #ECEFF4">&quot;</span><span style="color: #81A1C1"> /&gt;</span></span>
<span class="line"><span style="color: #D8DEE9FF">    </span></span>
<span class="line"><span style="color: #D8DEE9FF">    </span><span style="color: #81A1C1">&lt;</span><span style="color: #D8DEE9">livewire:ohdear.pulse.cron</span><span style="color: #D8DEE9FF"> </span><span style="color: #8FBCBB">cols</span><span style="color: #ECEFF4">=</span><span style="color: #ECEFF4">&quot;</span><span style="color: #A3BE8C">8</span><span style="color: #ECEFF4">&quot;</span><span style="color: #81A1C1"> /&gt;</span></span>
<span class="line"></span>
<span class="line"><span style="color: #D8DEE9FF">    </span><span style="color: #81A1C1">&lt;</span><span style="color: #D8DEE9">livewire:ohdear.pulse.brokenLinks</span><span style="color: #D8DEE9FF"> </span><span style="color: #8FBCBB">cols</span><span style="color: #ECEFF4">=</span><span style="color: #ECEFF4">&quot;</span><span style="color: #A3BE8C">8</span><span style="color: #ECEFF4">&quot;</span><span style="color: #81A1C1"> /&gt;</span></span>
<span class="line"><span style="color: #D8DEE9FF">    </span></span>
<span class="line"><span style="color: #D8DEE9FF">    {{-- Add more cards here --}}</span></span>
<span class="line"><span style="color: #81A1C1">&lt;/x-pulse&gt;</span></span>
<span class="line"></span></code></pre>
<p>You’ll find the code in <a href="https://github.com/spatie/ohdear-pulse">this repo on GitHub</a>.</p>
]]>
            </summary>
                                    <updated>2024-01-11T08:22:56+00:00</updated>
        </entry>
            <entry>
            <title><![CDATA[Two smallish improvements to our DNS check]]></title>
            <link rel="alternate" href="https://ohdear.app/news-and-updates/two-smallish-improvements-to-our-dns-check" />
            <id>https://ohdear.app/105</id>
            <author>
                <name><![CDATA[Oh Dear]]></name>
            </author>
            <summary type="html">
                <![CDATA[<p>As you probably know, Oh Dear is run by a small but capable team. One of the advantages of being small is that we can implement stuff pretty quickly: there’s no red tape, and our code base is very healthy.</p>
<p>So, when our users have feature requests that make sense to add to Oh Dear, we can move fast. In the past month, we implemented two smallish feature requests for <a href="https://ohdear.app/docs/features/dns-monitoring">our DNS check</a> we got through support.</p>
<p>Here’s what our new DNS settings screens look like. The first option, monitoring different CNAMES, was already added a few months ago.</p>
<p><img src="/media/blog/LOUOOr7Je9i7uRPJfk2TWZsEZVjvRuq09fFqEzyu.jpg" alt="" /></p>
<p>We now added the ability to disable the check whether all of your nameservers are in sync. Under normal circumstances, DNS nameservers of a domain are in check. But in advanced setups, this might not be the case. That’s why we added the option to disable that aspect of our DNS check.</p>
<p>The second option is the ability to monitor the DNS of your main domain. This option is only available if the site you’re monitoring is on a subdomain. Some of our users wanted to simultaneously monitor the site on the subdomain and the DNS records of the main domain.</p>
<p>We hope you like this improvement. Should you have any ideas or feature requests to improve Oh Dear, <a href="mailto:support@ohdear.app">let us know</a>!</p>
]]>
            </summary>
                                    <updated>2024-01-11T08:21:47+00:00</updated>
        </entry>
            <entry>
            <title><![CDATA[Our Lighthouse check has been upgraded to Lighthouse v11]]></title>
            <link rel="alternate" href="https://ohdear.app/news-and-updates/our-lighthouse-check-has-been-upgraded-to-lighthouse-v11" />
            <id>https://ohdear.app/104</id>
            <author>
                <name><![CDATA[Oh Dear]]></name>
            </author>
            <summary type="html">
                <![CDATA[<p>We are happy to announce that we have upgraded our Lighthouse check from v9 to the latest version, Lighthouse v11. Lighthouse is an open-source tool by Google that helps developers improve the quality of their web pages.</p>
<p>Oh Dear can run this check frequently for your site, informing you when SEO-related problems arise. Our check may suggest optimizing images or minifying JavaScript to improve performance. By implementing these suggestions, a website can become faster, more accessible, and more secure, improving its ranking in search engine results.</p>
<p>In our UI, you can watch how your key metrics evolved over time.</p>
<p><img src="/media/blog/divEXkUCIniNLjgAvJ6Qbl88fTx0BmEumljZS5hc.jpg" alt="" /></p>
<p>By upgrading to v11, many more audits have been added. You can learn more in <a href="https://developer.chrome.com/blog/lighthouse-11-0">this announcement post of Lighthouse v11</a>.</p>
<p>We hope you like this improvement. Should you have any ideas or feature requests to improve Oh Dear, <a href="mailto:support@ohdear.app">let us know</a>!</p>
]]>
            </summary>
                                    <updated>2023-12-19T17:06:03+00:00</updated>
        </entry>
            <entry>
            <title><![CDATA[Our DNS check can now monitor hidden CNAME records]]></title>
            <link rel="alternate" href="https://ohdear.app/news-and-updates/our-dns-check-can-now-monitor-hidden-cname-records" />
            <id>https://ohdear.app/103</id>
            <author>
                <name><![CDATA[Oh Dear]]></name>
            </author>
            <summary type="html">
                <![CDATA[<p>Besides monitoring your site's uptime, Oh Dear offers <a href="https://ohdear.app/docs/features/what-checks-does-oh-dear-perform">many other checks</a> to monitor all kinds of aspects of your web app. One of those checks is <a href="https://ohdear.app/docs/features/dns-monitoring">our DNS check</a>.</p>
<p>Whenever we detect problems with your DNS records or when one of the DNS records changes, we can notify you. By default, we only monitor the DNS records of the domain you are monitoring. So when you're monitoring <code>example.com</code>, we'll only monitor the records of that hostname.</p>
<p>A CNAME record is a special kind of DNS record. It can be looked at as an alias or - in Linux terms - a symlink to another record. That record has a name, e.g., <code>mycname</code>, and a value it points to e.g. <code>someotherdomain.com</code>.</p>
<p>In the example above, the hostname of the record is not <code>example.com</code> but <code>mycname.example.com</code>. That is why we don't monitor it by default: it's not part of the main domain, and DNS query responses don't return these records by default. They are hard to discover.</p>
<p>We've now added the ability to specify the CNAMEs of your domain. You can do that in the DNS settings of your site. Here's an example where we want to monitor the <code>technical</code> CNAME record of <code>freek.dev</code></p>
<p><img src="/media/blog/0cNrLETR4UZLpxdxwAKNRBVXBmIGdfGhnCjP6ZVt.jpg" alt="" /></p>
<p>When you've added these CNAMEs, Oh Dear will monitor these records too, and notify you whenever they change or disappear.</p>
<p><img src="/media/blog/ay1zbdfaSQ79jSz93jsBXb0PunHZMgUBH1qdqGAr.jpg" alt="" /></p>
<p>CNAME records are vital to most modern web apps, and we are glad we can now monitor these as part of our DNS check.</p>
]]>
            </summary>
                                    <updated>2023-10-26T11:37:15+00:00</updated>
        </entry>
            <entry>
            <title><![CDATA[Our uptime check can now verify the absence of a string]]></title>
            <link rel="alternate" href="https://ohdear.app/news-and-updates/our-uptime-check-can-now-verify-the-absence-of-a-string" />
            <id>https://ohdear.app/102</id>
            <author>
                <name><![CDATA[Oh Dear]]></name>
            </author>
            <summary type="html">
                <![CDATA[<p>The most popular check that Oh Dear offers is, without a doubt, our uptime check. It's enabled for almost every site we monitor.</p>
<p>By default, this check will notify you when your site returns a non-2xx response, but you can <a href="https://ohdear.app/docs/features/uptime-monitoring">greatly customize that behavior</a>.</p>
<p>You can check if the response has certain headers, if the response contains a particular string, and more!</p>
<p><img src="/media/blog/QtrhxTNTE6vxmKKnTbUWoX46U0BOJmO2HTKbvR6B.jpg" alt="" /></p>
<p>Some of our users requested a new behavior: checking the absence of a string on the response. We're happy to share that we've now added that feature.</p>
<p><img src="/media/blog/3xx25XntAhAvn8EUMylgZeVff2yCb5YIB60RgKzk.jpg" alt="" /></p>
<p>This way, you can ensure that a string like &quot;An error occurred&quot; does not appear on your page. As soon as it does, we'll send you a notification.</p>
<p>We hope you like this little improvement. Should you have any ideas or feature requests to improve Oh Dear, <a href="mailto:support@ohdear.app">let us know</a>!</p>
]]>
            </summary>
                                    <updated>2023-10-01T11:52:39+00:00</updated>
        </entry>
            <entry>
            <title><![CDATA[Make money by referring customers through our new affiliate program]]></title>
            <link rel="alternate" href="https://ohdear.app/news-and-updates/make-money-by-referring-customers-through-our-new-affiliate-program" />
            <id>https://ohdear.app/101</id>
            <author>
                <name><![CDATA[Oh Dear]]></name>
            </author>
            <summary type="html">
                <![CDATA[<p>We're proud to announce that we started <a href="https://ohdear.app/affiliate-program">our affiliate program</a>.</p>
<p>Using this program, you can generate a link (like https://ohdear.app?via=your-name) that you can include in your blog posts, tweets, or anywhere on the web. If somebody clicks that link and subscribes to Oh Dear in the next 30 days, you'll get 25% of the revenue of the first year of that subscription. The more people subscribe via your link, the more money you earn.</p>
<p>When you create your affiliate account, you'll get access to a nice dashboard showing you a clear overview of all your clicks, conversions, and money your links generated.</p>
<p><img src="/media/blog/T454bSiRbCjoZOijqKXmNKA2PbKoq6D0GjydNLiA.png" alt="" /></p>
<p>You'll find more info on all of this on our brand new (and beautiful) <a href="https://ohdear.app/affiliate-program">affiliate program page</a>.</p>
]]>
            </summary>
                                    <updated>2023-07-29T10:48:05+00:00</updated>
        </entry>
            <entry>
            <title><![CDATA[Better handling of bounced emails]]></title>
            <link rel="alternate" href="https://ohdear.app/news-and-updates/better-handling-of-bounced-emails" />
            <id>https://ohdear.app/100</id>
            <author>
                <name><![CDATA[Oh Dear]]></name>
            </author>
            <summary type="html">
                <![CDATA[<p>Whenever we detects something wrong with your site it can send you a notification. We have multiple channels available: Slack, Telegram, webhooks, and many more. The most popular channel our users use is just a simple mail.</p>
<p>Behind the scenes, Oh Dear uses <a href="https://postmarkapp.com">Postmark</a> to send out mails. Postmark will inform us whenever a notification mail results in a hard bounce. A hard bounce means that the mail won't be delivered. The most common reason for this is that the mailbox doesn't exist (anymore). This can occur when somebody changed jobs and the work email address doesn't exist anymore.</p>
<p>Whenever Postmark informs us about a hard bounce, Oh Dear will determine which team that email belongs to. It wil send a mail to the owner of the Oh Dear team asking to correct the email address or to remove the member from the team.</p>
<p>For most cases this is fine, but what if it is the email address of the team owner itself that bounced? In this case we obviously can't mail the team owner anymore.</p>
<p>As of today, whenever an users logs in who's email has bounced (team owner and other members), we'll display a warning to update their email address. Here's how that looks.</p>
<p><img src="/media/blog/5BqUeqAqyLEixHr7Q9thLYV729MFeNTU2nNwJcCR.jpg" alt="" /></p>
<p>We hope that this will be let people understand faster why they didn't get an alert they were expecting.</p>
]]>
            </summary>
                                    <updated>2023-07-27T16:20:24+00:00</updated>
        </entry>
            <entry>
            <title><![CDATA[You can now log in faster using Google and GitHub]]></title>
            <link rel="alternate" href="https://ohdear.app/news-and-updates/you-can-now-log-in-faster-using-google-and-github" />
            <id>https://ohdear.app/98</id>
            <author>
                <name><![CDATA[Oh Dear]]></name>
            </author>
            <summary type="html">
                <![CDATA[<p>Since Oh Dear was launched, we offered a traditional login using the familiar email and password combination.</p>
<p>Today, we've launched our social login. This feature allows you to use your Google or GitHub account to log into Oh Dear.</p>
<p>You'll see these two new buttons on the registration and login page.</p>
<p><img src="/media/blog/eCVwJP12UV7VFwyCNrLyeqShVyrCaqLJZgHFi3e2.jpg" alt="" /></p>
<p>When clicking one, we'll use your Google or GitHub account to log in. When logging in, we'll search for an Oh Dear account whose email matches the email used for your Google / GitHub account.</p>
<p>Using this feature, you can log into your Oh Dear account with a single click.</p>
<p>If you're not using Oh Dear to monitor your site, now's the perfect time to get started. We monitor uptime, SSL certificates, broken links, scheduled tasks, application health, DNS, domain expiry, and more. We send notifications when something's wrong. All that paired with <a href="/docs/api/introduction" class="underline hover:no-underline">a developer-friendly API<a> and <a href="/docs" class="underline hover:no-underline">kick-ass documentation</a>.</p>
]]>
            </summary>
                                    <updated>2023-07-24T06:21:12+00:00</updated>
        </entry>
            <entry>
            <title><![CDATA[Our uptime check can now verify response headers]]></title>
            <link rel="alternate" href="https://ohdear.app/news-and-updates/our-uptime-check-can-now-verify-response-headers" />
            <id>https://ohdear.app/97</id>
            <author>
                <name><![CDATA[Oh Dear]]></name>
            </author>
            <summary type="html">
                <![CDATA[<p>When we make a request to your site to verify that your site is up, the response of your server will contain certain headers. We can verify that those headers contain the values you expect. If these expectations are not met, we'll consider your site as down.</p>
<p>In the &quot;Responses&quot; section of the uptime settings page, you can specify which headers we should verify.</p>
<p>You could add this expectation to ensure your page uses <code>gzip</code> compression.</p>
<p><img src="/media/blog/l7LzO9p1PBwa915YDU2PlN9PI8zRh398tAokfWIt.jpg" alt="" /></p>
<p>If you want to verify that a particular header is set on the response, regardless of its value, you can use the &quot;matches pattern&quot; condition and the <code>*</code> wildcard as the value. In this example, we'll verify that the response contains a header named <code>laravel-responsecache</code> with any value.</p>
<p><img src="/media/blog/kR0F2pku61NPYgNWpjgbfCkk2Ys7htQ6JcW0p8vg.jpg" alt="" /></p>
<p>If you're not using Oh Dear to monitor your site, now's the perfect time to get started. We monitor uptime, SSL certificates, broken links, scheduled tasks, application health, DNS, domain expiry, and more. We send notifications when something's wrong. All that paired with <a href="/docs/api/introduction" class="underline hover:no-underline">a developer-friendly API<a> and <a href="/docs" class="underline hover:no-underline">kick-ass documentation</a>.</p>
]]>
            </summary>
                                    <updated>2023-07-02T17:46:02+00:00</updated>
        </entry>
            <entry>
            <title><![CDATA[We can now notify you through PagerDuty]]></title>
            <link rel="alternate" href="https://ohdear.app/news-and-updates/we-can-now-notify-you-through-pagerduty" />
            <id>https://ohdear.app/96</id>
            <author>
                <name><![CDATA[Oh Dear]]></name>
            </author>
            <summary type="html">
                <![CDATA[<p>When we detect a problem with your site, we can notify you via mail, a Slack message, a webhook, or any of <a href="https://ohdear.app/docs/notifications/notifications">our other notifications channels</a>. This is enough for most of our users, but those who work in larger teams often need more flexibility.</p>
<p>Today, we are launching our <a href="https://www.pagerduty.com">PagerDuty</a> integration. PagerDuty is a cloud-based incident management platform that helps organizations improve operational reliability by providing real-time alerts, on-call scheduling, and incident tracking.</p>
<p>Once the PagerDuty integration is set up, Oh Dear will automatically open and close incidents at PagerDuty when we detect problems. PagerDuty will then notify the right people that are on call through email, SMS, phone calls, and iOS &amp; Android push notifications.</p>
<p>Getting started with our PagerDuty integration is straightforward. Go to the team or site notification screens, and create a new notification destination of type &quot;PagerDuty.&quot;</p>
<p><img src="/media/blog/Y6yxRHLtqfNEUv2vmGJqUMjPDONaKqmYTfdzDozH.jpg" alt="" /></p>
<p>You'll find all the details on getting the values to fill out the form <a href="https://ohdear.app/docs/notifications/pagerduty">in our docs</a>.</p>
<p>If you're not using Oh Dear to monitor your site, now's the perfect time to get started. We monitor uptime, SSL certificates, broken links, scheduled tasks, application health, DNS, domain expiry, and more. We send notifications when something's wrong. All that paired with <a href="/docs/api/introduction" class="underline hover:no-underline">a developer-friendly API<a> and <a href="/docs" class="underline hover:no-underline">kick-ass documentation</a>.</p>
]]>
            </summary>
                                    <updated>2023-06-13T08:05:12+00:00</updated>
        </entry>
            <entry>
            <title><![CDATA[Our redesigned status pages can now show uptime history]]></title>
            <link rel="alternate" href="https://ohdear.app/news-and-updates/our-redesigned-status-pages-can-now-show-uptime-history" />
            <id>https://ohdear.app/95</id>
            <author>
                <name><![CDATA[Oh Dear]]></name>
            </author>
            <summary type="html">
                <![CDATA[<p>Next to <a href="https://ohdear.app/docs/features/what-checks-does-oh-dear-perform">the many checks</a> we can perform, we can also render beautiful status pages to inform your audience about the health of your service.</p>
<p>Today, we've deployed a redesign of these status pages. In this iteration, everything is more polished. We picked a new font and colors and added some icons to make the status page a bit more visually interesting.</p>
<p>In addition to the cosmetic upgrade, we also added a significant new feature. We can now display 60 days of uptime history for your sites. Here's what that looks like (taken from <a href="https://status.flareapp.io">the Flare status page</a>).</p>
<p><img src="/media/blog/XI8Em4nKCosfPRT4M9624T8dAla868uTtuMEjJb0.jpg" alt="" /></p>
<p>Every bar in the graph is a day. It's colored green when uptime is above 99% and orange when it's below that threshold. Of course, you can configure that threshold for your particular status page.</p>
<p>When you hover over a bar, you can see the exact amount of downtime.</p>
<p><img src="/media/blog/W3xW69iwdhkfn0UQHVlPQxU4dmzMMYIfJGUyvNak.jpg" alt="" /></p>
<p>We'll show the uptime history by default for a newly created status page. For the old status page, you'll need to manually enable it in your status page's settings.</p>
<p><img src="/media/blog/UYhcnVNrQmrj2dXcw96copbOHki3gJAVI96t33hN.jpg" alt="" /></p>
<p>We hope that you like this addition to Oh Dear! If you're not using Oh Dear to monitor your site, now's the perfect time to get started. We monitor uptime, SSL certificates, broken links, scheduled tasks, application health, DNS, domain expiry and more. We send notifications when something's wrong. All that paired with <a href="/docs/api/introduction" class="underline hover:no-underline">a developer-friendly API<a> and <a href="/docs" class="underline hover:no-underline">kick-ass documentation</a>.</p>
]]>
            </summary>
                                    <updated>2023-06-11T22:23:55+00:00</updated>
        </entry>
            <entry>
            <title><![CDATA[Our broken links check has been improved]]></title>
            <link rel="alternate" href="https://ohdear.app/news-and-updates/our-broken-links-check-has-been-improved" />
            <id>https://ohdear.app/94</id>
            <author>
                <name><![CDATA[Oh Dear]]></name>
            </author>
            <summary type="html">
                <![CDATA[<p>One of our unique monitoring features is that we crawl your entire site to discover links that might be broken. When we discover a broken link, we'll send you a notification and display every broken link in our Broken Links Report.</p>
<p>We've made a nice quality-of-life improvement to that Broken Links Report. In addition to displaying the broken link URL and the page on which that broken link was found, we now also display the link text of that broken link.</p>
<p><img src="/media/blog/WIgn9r4tRPtRVhQ8fE4i07DYrt0m0tChF6HgjCzF.jpg" alt="" /></p>
<p>That link text will greatly help you to pinpoint the exact location of the broken link on the page where it was found.</p>
<p>This improvement was suggested by one of our users. We're always open for feature requests. If we think a feature might be useful for most of our users, it usually gets implemented pretty quickly.</p>
<p>If you're not using Oh Dear to monitor your site, now's the perfect time to get started. We monitor uptime, SSL certificates, broken links, scheduled tasks, application health, DNS, domain expiry and more. We send notifications when something's wrong. All that paired with <a href="/docs/api/introduction" class="underline hover:no-underline">a developer friendly API<a> and <a href="/docs" class="underline hover:no-underline">kick-ass documentation</a>.</p>
]]>
            </summary>
                                    <updated>2023-06-05T07:09:16+00:00</updated>
        </entry>
            <entry>
            <title><![CDATA[You can now add notes to downtime periods]]></title>
            <link rel="alternate" href="https://ohdear.app/news-and-updates/you-can-now-add-notes-to-downtime-periods" />
            <id>https://ohdear.app/93</id>
            <author>
                <name><![CDATA[Oh Dear]]></name>
            </author>
            <summary type="html">
                <![CDATA[<p>Oh Dear offers <a href="https://ohdear.app/docs/features/what-checks-does-oh-dear-perform">many checks</a> to ensure your website is healthy. The most popular check that is active for almost every site we monitor is <a href="https://ohdear.app/docs/features/uptime-monitoring">the uptime check</a>.</p>
<p>When the uptime check detects that your site is down, it will notify you via one of <a href="https://ohdear.app/docs/notifications/notifications">our many available channels</a>.</p>
<p>The check will also create a downtime period visible on the uptime check results page. Here's what those downtimes might look like.</p>
<p><img src="/media/blog/89wc1ys1K3BhSgVKCm9nH3HG703O6Ogjbk4TgTv3.jpg" alt="" /></p>
<p>The screenshot above shows the new little feature we introduced: you can now add notes to downtime periods. You could use these notes to add extra details on why the downtime happened or what actions you took. Examples could be: &quot;Process X was overloaded&quot; or &quot;We've contacted our hosting partner, and they said they had connectivity issues in their data center.&quot;</p>
<p>If you're not using Oh Dear to monitor your site, now's the perfect time to get started. We monitor uptime, SSL certificates, broken links, scheduled tasks, application health, DNS, domain expiry and more. We send notifications when something's wrong. All that paired with <a href="/docs/api/introduction" class="underline hover:no-underline">a developer friendly API<a> and <a href="/docs" class="underline hover:no-underline">kick-ass documentation</a>.</p>
]]>
            </summary>
                                    <updated>2023-05-13T07:50:13+00:00</updated>
        </entry>
            <entry>
            <title><![CDATA[Our Opsgenie integration is now available]]></title>
            <link rel="alternate" href="https://ohdear.app/news-and-updates/our-opsgenie-integration-is-now-available" />
            <id>https://ohdear.app/92</id>
            <author>
                <name><![CDATA[Oh Dear]]></name>
            </author>
            <summary type="html">
                <![CDATA[<p>When we detect a problem with your site we can notify you via mail, a slack message, a webhook, or any of <a href="https://ohdear.app/docs/notifications/notifications">our other notifications channels</a>. For most of our users this is enough, but those work in larger teams often need more flexibility.</p>
<p>Today, we are launching our <a href="https://www.atlassian.com/software/opsgenie">Opsgenie</a> integration, a modern incident management platform.</p>
<p>Opsgenie’s on-call scheduling allows you to set up escalation policies, so that if a notification isn’t handle within a certain timeframe, it will automatically be escalated to the next person in the on-call rotation. This ensures that critical notifications are always being addressed, even if the first person notified is unavailable or unable to resolve the issue.</p>
<p>Here's an example of such an escalation policy and on-call schedule.</p>
<p><img src="/media/blog/1DimlGmRM1T9Bi4g4WxIDKImf10CtneHVPSWbAuf.webp" alt="" /></p>
<p>Oh Dear can now automatically open and close alerts at Opsgenie when we detect problems with your site. Opsgenie will then notify the right people that are on call as specified by the escalation policy.</p>
<p>Here's how an alert that was created for an incoming Oh Dear notification looks like in Opsgenie. As you can see we send extra information about the particular issue we detected. In this case we added some information on the expired notification.</p>
<p><img src="/media/blog/YVMwkDBozOhsYrbVWQnBzm9Ts1kIGTXkx0ROrmvr.jpg" alt="" /></p>
<p>Configuring Oh Dear to send notifications is pretty easy. All you need to do is to <a href="https://ohdear.app/docs/notifications/opsgenie">get an Opsgenie API key</a> on the team level and use that in the a newly created notification destination.</p>
<p><img src="/media/blog/vPffmfDqmI1pjjlNyLTKNIIG2N6xMpEpi81vS8Na.jpg" alt="" /></p>
<p>If you're not using Oh Dear to monitor your site, now's the perfect time to get started. We monitor uptime, SSL certificates, broken links, scheduled tasks, application health, DNS, domain expiry and more. We send notifications when something's wrong. All that paired with <a href="/docs/api/introduction" class="underline hover:no-underline">a developer friendly API<a> and <a href="/docs" class="underline hover:no-underline">kick-ass documentation</a>.</p>
]]>
            </summary>
                                    <updated>2023-05-11T17:37:33+00:00</updated>
        </entry>
            <entry>
            <title><![CDATA[Our broken links check now highlights application errors ]]></title>
            <link rel="alternate" href="https://ohdear.app/news-and-updates/our-broken-links-check-now-highlights-application-errors" />
            <id>https://ohdear.app/91</id>
            <author>
                <name><![CDATA[Oh Dear]]></name>
            </author>
            <summary type="html">
                <![CDATA[<p>One of the unique features of Oh Dear is that we crawl your entire site and report any broken links.</p>
<p>Our broken links report had two main categories:</p>
<ul>
<li>external broken links: these are links on your site that point towards a page on another site</li>
<li>internal broken links: these are links on your site that point towards a non-existing page on your own site</li>
</ul>
<p>In both categories, the problem is caused by something related to the site's content. In most cases, a page you're linking to was removed or archived. The solution is often letting the content manager of the site fix this.</p>
<p>Today, we're introducing a third category in our report: internal broken links that resulted in a 5xx status code. This 5xx range of status codes signifies that the URL is correct but that the application could not respond appropriately because of an internal error. In most cases, this problem should be solved by a developer.</p>
<p>Because page visits that result in a 5xx response are more noteworthy, we decided to put these on top of our report.</p>
<p>Here's what our broken links report now looks like.</p>
<p><img src="/media/blog/00rLgRqEyuC1o7trlZdJ7f9QRP0fGiQeAwWFoRrR.jpg" alt="" /></p>
<p>We hope that you like this little addition to our UI. It might not be a revolutionary feature, but getting many of these small details right can make a big difference.</p>
<p>If you're not using Oh Dear to monitor your site, now's the perfect time to get started. We monitor uptime, SSL certificates, broken links, scheduled tasks, application health, DNS, domain expiry and more. We send notifications when something's wrong. All that paired with <a href="/docs/api/introduction" class="underline hover:no-underline">a developer friendly API<a> and <a href="/docs" class="underline hover:no-underline">kick-ass documentation</a>.</p>
]]>
            </summary>
                                    <updated>2023-04-14T16:10:29+00:00</updated>
        </entry>
            <entry>
            <title><![CDATA[You can now save notes on a site]]></title>
            <link rel="alternate" href="https://ohdear.app/news-and-updates/you-can-now-save-notes-on-a-site" />
            <id>https://ohdear.app/90</id>
            <author>
                <name><![CDATA[Oh Dear]]></name>
            </author>
            <summary type="html">
                <![CDATA[<p>We implemented a small, but valuable feature requested by some of our users. You can now store some free form notes on a site.</p>
<p>When heading over a site's settings, you'll see the new &quot;notes&quot; field.</p>
<p><img src="/media/blog/yArxYRDchqIRX3OzmncE4KMg6XMNBw8waAeQjsqY.jpg" alt="" /></p>
<p>Here you can add some important information to the site, for example, some details on the SLA or technical details, ...</p>
<p>When you saved notes on a site, we'll show it when hovering over the site on the site list.</p>
<p><img src="/media/blog/djaZFeBTrCmvEGpPzpZlzDXSYDLVZd3C68jpShg3.jpg" alt="" /></p>
<p>Of course, you can also get to these notes via the API.</p>
<p>If you're not using Oh Dear to monitor your site, now's the perfect time to get started. We monitor uptime, SSL certificates, broken links, scheduled tasks, application health, DNS, domain expiry and more. We send notifications when something's wrong. All that paired with <a href="/docs/api/introduction" class="underline hover:no-underline">a developer friendly API<a> and <a href="/docs" class="underline hover:no-underline">kick-ass documentation</a>.</p>
]]>
            </summary>
                                    <updated>2023-03-22T07:30:55+00:00</updated>
        </entry>
            <entry>
            <title><![CDATA[Redesigning Oh Dear: a case study]]></title>
            <link rel="alternate" href="https://ohdear.app/news-and-updates/redesigning-oh-dear-a-case-study" />
            <id>https://ohdear.app/89</id>
            <author>
                <name><![CDATA[Oh Dear]]></name>
            </author>
            <summary type="html">
                <![CDATA[<p>A few months ago, we totally redesigned our service. We didn't to this on our own, but got help from our friends at Digital With You.</p>
<p>On their site, they published an in-depth case study on how they rewrote marketing copy, chose new colours and redesigned entire pages.</p>
<p>Check it out: <a href="https://digitalwithyou.com/cases/oh-dear">https://digitalwithyou.com/cases/oh-dear</a></p>
]]>
            </summary>
                                    <updated>2023-03-21T09:05:35+00:00</updated>
        </entry>
            <entry>
            <title><![CDATA[Changing the owner of the team can now be done in our UI]]></title>
            <link rel="alternate" href="https://ohdear.app/news-and-updates/changing-the-owner-of-the-team-can-now-be-done-in-our-ui" />
            <id>https://ohdear.app/87</id>
            <author>
                <name><![CDATA[Oh Dear]]></name>
            </author>
            <summary type="html">
                <![CDATA[<p>Changing the owner of the team can now be done in our UI</p>
<p>In the past, we've seen users reach out to support to change the owner of a time for a variety of reasons.</p>
<p>You can now change the owner of the team without contacting support. Just head over to the team settings and scroll down. As the owner of a team, you can move ownership to another member of your team.</p>
<p><img src="/media/blog/qBhdXRYrXDaI44ZnuIbywwOzxZaoTHi0UFKCGXJT.jpg" alt="" /></p>
<p>Because this action cannot be reversed, it needs to be confirmed.</p>
<p><img src="/media/blog/7NSb9qpsZYGaR8P162yygnATt7WzGrP1w0LBrUmW.jpg" alt="" /></p>
<p>If you're not using Oh Dear to monitor your site, now's the perfect time to get started. We monitor uptime, SSL certificates, broken links, scheduled tasks, application health, DNS, domain expiry and more. We send notifications when something's wrong. All that paired with <a href="/docs/api/introduction" class="underline hover:no-underline">a developer friendly API<a> and <a href="/docs" class="underline hover:no-underline">kick-ass documentation</a>.</p>
]]>
            </summary>
                                    <updated>2023-03-10T08:42:48+00:00</updated>
        </entry>
            <entry>
            <title><![CDATA[Behind The Scenes Of Oh Dear]]></title>
            <link rel="alternate" href="https://ohdear.app/news-and-updates/behind-the-scenes-of-oh-dear" />
            <id>https://ohdear.app/88</id>
            <author>
                <name><![CDATA[Oh Dear]]></name>
            </author>
            <summary type="html">
                <![CDATA[<p>In this sponsored talk given at Laracon India 2023, I demo all major Oh Dear features. After that, I share how the Laravel app behind Oh Dear is structured using domains.</p>
<p>The audio quality is not perfect, but it should still be understandable.</p>
<iframe width="560" height="315" src="https://www.youtube.com/embed/Iq4L6m8SnFM" title="YouTube video player" frameborder="0" allow="accelerometer; autoplay; clipboard-write; encrypted-media; gyroscope; picture-in-picture; web-share" allowfullscreen></iframe>
]]>
            </summary>
                                    <updated>2023-03-10T13:29:50+00:00</updated>
        </entry>
            <entry>
            <title><![CDATA[You can now add tags to your sites]]></title>
            <link rel="alternate" href="https://ohdear.app/news-and-updates/you-can-now-add-tags-to-your-sites" />
            <id>https://ohdear.app/86</id>
            <author>
                <name><![CDATA[Oh Dear]]></name>
            </author>
            <summary type="html">
                <![CDATA[<p>Some of our users have a lot of sites in their Oh Dear account. A feature often requested is the ability to add a little bit of meta information about each site.</p>
<p>To do that, we've introduced the ability to add tags to a site.</p>
<p>Tags can be used for instance how important it is to fix a problem with the site immediately. Possible tags could be <code>important</code> or <code>has support contract</code>. Another use case would be to add the technology used, tags could be named <code>wordpress</code>, <code>laravel</code>, <code>js</code>.</p>
<p>When adding a site to Oh Dear, you can now create or pick tags for that site.</p>
<p><img src="/media/blog/GnnRumpEMtrlyzXOYkMeeeSbILr24IDjuQdkLJKF.jpg" alt="" /></p>
<p>Picked tags will be visible across our UI.</p>
<p><img src="/media/blog/c537UiFX4tboyvql9fss2YY6pLaL8Tymh19JCSXu.jpg" alt="" /></p>
<p>We will also display the tags in all notifications for a site.</p>
<p>Finally, we'll also add the tags to the response of <a href="/docs/integrations/the-oh-dear-api#sites">any API call that returns a site</a>, and [all webhook notifications](You can use tags to for instance visually mark them as important.).</p>
<p>Should you want to change the tags of a site, head over to the site settings, and take a look at the &quot;Tags&quot; section.</p>
<p><img src="/media/blog/HFytQaqWVH2BTvD7PX4wjiFxtJ1lfY4wuvHot0Od.jpg" alt="" /></p>
<p>You'll also find a &quot;Tags&quot; page in the team settings.</p>
<p><img src="/media/blog/oELpqa153kNMMw4Di2FnRKS7LkmDq6LeSXZmEA3u.jpg" alt="" /></p>
<p>On this screen, you'll see an overview of all tags used across your sites. When you edit or delete tags here, they will be edited or deleted for all sites they are associated with.</p>
<h2 id="in-closing">In closing</h2>
<p>Tags is very handy when you want to add a little bit of information about a site.</p>
<p>We very much try to keep our UI simple. Tags are very easy to easy, and if you don't need tags, they won't get in your way.</p>
<p>If you're not using Oh Dear to monitor your site, now's the perfect time to get started. We monitor uptime, SSL certificates, broken links, scheduled tasks, application health, DNS, domain expiry and more. We send notifications when something's wrong. All that paired with <a href="/docs/api/introduction" class="underline hover:no-underline">a developer friendly API<a> and <a href="/docs" class="underline hover:no-underline">kick-ass documentation</a>.</p>
]]>
            </summary>
                                    <updated>2023-02-20T06:49:27+00:00</updated>
        </entry>
            <entry>
            <title><![CDATA[Status pages can now be displayed in multiple languages]]></title>
            <link rel="alternate" href="https://ohdear.app/news-and-updates/status-pages-can-now-be-displayed-in-multiple-languages" />
            <id>https://ohdear.app/85</id>
            <author>
                <name><![CDATA[Oh Dear]]></name>
            </author>
            <summary type="html">
                <![CDATA[<p>In addition to performing <a href="https://ohdear.app/docs/features/what-checks-does-oh-dear-perform">various checks</a> to monitor your site, Oh Dear also offers <a href="https://ohdear.app/features/status-pages">beautiful status pages</a>. Status pages can now use multiple languages. Using these status pages, you can inform your audience about the status of your service. Here's the beautiful Oh Dear powered <a href="https://status.laravel.com">status page of the Laravel team</a>.</p>
<p>Some of our users have a global, multi-lingual audience. That's why we now added support for a status page to be displayed in multiple languages.</p>
<p>If you want to translate your status page, all you need to do is activate some of the languages at the new &quot;Languages&quot; screen on your status page.</p>
<p><img src="/media/blog/5Jb7KbXbwIZ2Olp5K1SWaPguBC6Q3kdoboBtIwPR.jpg" alt="" /></p>
<p>As soon as a status page has more than one active language, it will display a drop down where a visitor can select a language.</p>
<p><img src="/media/blog/WSPGIdYFF3j5JK0FKp4QDXQQyr1gBSeYs0Zc4jMz.jpg" alt="" /></p>
<p>Of course, you can also add a message in multiple languages on your status page. When multiple languages are activated for a status page, you'll see a language dropdown when creating an update. This will allow you to add a translation for the new update in any language your status page supports.</p>
<p><img src="/media/blog/CiPLyLwml8Wku4DNCrvHOtcRTg9tHIB1AqeS1RlS.jpg" alt="" /></p>
<p>We hope that you like this new feature.</p>
<p>If you're not using Oh Dear to monitor your site, now's the perfect time to get started. We monitor uptime, SSL certificates, broken links, scheduled tasks, application health, DNS, domain expiry and more. We send notifications when something's wrong. All that paired with <a href="/docs/api/introduction" class="underline hover:no-underline">a developer friendly API<a> and <a href="/docs" class="underline hover:no-underline">kick-ass documentation</a>.</p>
]]>
            </summary>
                                    <updated>2023-02-18T12:02:58+00:00</updated>
        </entry>
            <entry>
            <title><![CDATA[Our API tokens can now be scoped by site or status page]]></title>
            <link rel="alternate" href="https://ohdear.app/news-and-updates/our-api-tokens-can-now-be-scoped-by-site-or-status-page" />
            <id>https://ohdear.app/84</id>
            <author>
                <name><![CDATA[Oh Dear]]></name>
            </author>
            <summary type="html">
                <![CDATA[<p>Oh Dear has <a href="https://ohdear.app/docs/integrations/the-oh-dear-api">an extensive API</a> that powers <a href="https://ohdear.app/docs/integrations/3rd-party-integrations-of-oh-dear">various powerful integrations</a>.</p>
<p>To use the API, you first need to create an API Token in the Oh Dear UI. Previously, such a token could be used to make API calls to any site or status page in your Oh Dear account.</p>
<p><img src="/media/blog/af7OVRCh1KHDMGVGXxMKlzBFjdj4dGHLvX9cecOU.jpg" alt="" /></p>
<p>We noticed that some of our users are agencies that use Oh Dear to monitor their clients' sites. When such an agency passes an Oh Dear API Token to one of their clients, then that client could potentially use the broadly scoped token to view the results and settings of other clients of that agency.</p>
<p>In general, it's best practice to scope down the abilities of the token to the bare minimum it needs to do in the integration where it will be used.</p>
<p>Today, we're launching the ability to scope an API Token by site or status page. When creating a token, you can pick the sites and status pages it should have access to.</p>
<p><img src="/media/blog/3JoJ7sxHXb0U7WY3VnOfuqM6l0BN8Yd42OKL2bBc.jpg" alt="" /></p>
<p>We hope that you like this nice addition.</p>
<p>If you're not using Oh Dear to monitor your site, now's the perfect time to get started. We monitor uptime, SSL certificates, broken links, scheduled tasks, application health, DNS, domain expiry and more. We send notifications when something's wrong. All that paired with <a href="/docs/api/introduction" class="underline hover:no-underline">a developer friendly API<a> and <a href="/docs" class="underline hover:no-underline">kick-ass documentation</a>.</p>
]]>
            </summary>
                                    <updated>2023-02-07T18:12:31+00:00</updated>
        </entry>
            <entry>
            <title><![CDATA[Lighthouse SEO monitoring is now available at Oh Dear]]></title>
            <link rel="alternate" href="https://ohdear.app/news-and-updates/lighthouse-seo-monitoring-is-now-available-at-oh-dear" />
            <id>https://ohdear.app/83</id>
            <author>
                <name><![CDATA[Oh Dear]]></name>
            </author>
            <summary type="html">
                <![CDATA[<p>We're proud to announce we have added a new check to our service: <strong>Lighthouse SEO</strong>. Using this check you can detect (and get solution suggestions) for SEO and performance problems.</p>
<h2 id="what-is-lighthouse">What is Lighthouse</h2>
<p>Lighthouse is a tool provided by Google for improving the quality of web pages. It has audits for performance, accessibility, progressive web apps, SEO, and more.</p>
<p>One of the key benefits of this check is that it provides specific, <em>actionable</em> suggestions for improving the quality of a website. For example, it may suggest optimizing images or minifying JavaScript to improve performance. By implementing these suggestions, a website can become faster, more accessible, and more secure, improving its ranking in search engine results.</p>
<p>When the Lighthouse check is enabled for your site, it will be run on a daily basis.</p>
<h2 id="seeing-lighthouse-results-at-oh-dear">Seeing Lighthouse results at Oh Dear</h2>
<p>When the Lighthouse SEO check is enabled for a site, you can see the results for your site on the Lighthouse check page. This page contains the scores, key metrics, and a graph picturing the trends of results</p>
<p>Here's how it might look like.</p>
<p><img src="/media/blog/adgYNMC5cBRbZBpK2N4wB8YKErSLA1zAXdlsaOh5.jpg" alt="" /></p>
<p>When you scroll a bit down, you'll see the full report as it was generated by Lighthouse, that contains the results and recommendations by all Lighthouse audits.</p>
<p><img src="/media/blog/679xPVBX8x5nMhJrx8SEzzGbZgXTpkSGWIsSchTK.jpg" alt="" /></p>
<h2 id="get-notified-when-lighthouse-detects-issues">Get notified when Lighthouse detects issues</h2>
<p>Oh Dear can send you a notification when one of the scores or metrics are not within expectations. On the settings page of the lighthouse check you have fine-grained control of when we should notify you.</p>
<p><img src="/media/blog/3Oz7rHwWulceudPQPoUJOjfMvhnKDmrCySjo3Tqc.jpg" alt="" /></p>
<p>Here's an example notification.</p>
<p><img src="/media/blog/KhaQxZhaTjWdy6CZdMMHsJyLPyzdCawBlwCj3e8Z.jpg" alt="" /></p>
<h2 id="in-closing">In closing</h2>
<p>We think that the Lighthouse SEO check is a very powerful addition to our feature set. It will help you rank better on Google and get notified whenever an update to your site hurts SEO ranking.</p>
<p>If you're not using Oh Dear to monitor your site, now's the perfect time to get started.  We monitor uptime, SSL certificates, broken links, scheduled tasks, application health, DNS, domain expiry and more. We send notifications when something's wrong. All that paired with <a href="/docs/api/introduction" class="underline hover:no-underline">a developer friendly API<a> and <a href="/docs" class="underline hover:no-underline">kick-ass documentation</a>.</p>
]]>
            </summary>
                                    <updated>2023-01-25T12:20:17+00:00</updated>
        </entry>
            <entry>
            <title><![CDATA[We have redesigned our entire service]]></title>
            <link rel="alternate" href="https://ohdear.app/news-and-updates/we-have-redesigned-our-entire-service" />
            <id>https://ohdear.app/82</id>
            <author>
                <name><![CDATA[Oh Dear]]></name>
            </author>
            <summary type="html">
                <![CDATA[<p>As of today, Oh Dear is in a brand new jacket. We've totally redesigned Oh Dear's UI. Our app doesn't only look better, but we've also made it much easier to use.</p>
<p>We feel that our new design should speak for itself, so we highly recommend visiting <a href="https://ohdear.app">the home page</a>, browsing a bit around, <a href="https://ohdear.app/register">register an account</a>, or <a href="https://ohdear.app/login">log in</a>, and discover the redesigned app yourself.</p>
<p>If you've been using Oh Dear before, you'll notice that we polished everything, and the UX should be much better.</p>
<p>To read more about why and how we redesigned the service and want to read some technical details, head over to <a href="https://freek.dev/2343-oh-dear-20-has-been-launched">this extensive blog post on Freek's blog</a>.</p>
<p>We hope you like the redesign as much as we do!</p>
]]>
            </summary>
                                    <updated>2022-10-03T14:08:10+00:00</updated>
        </entry>
            <entry>
            <title><![CDATA[A preview of our upcoming redesign]]></title>
            <link rel="alternate" href="https://ohdear.app/news-and-updates/a-preview-of-our-upcoming-redesign" />
            <id>https://ohdear.app/81</id>
            <author>
                <name><![CDATA[Oh Dear]]></name>
            </author>
            <summary type="html">
                <![CDATA[<p>Earlier this year, we announced that one of our goals for this year is to bring the UI of Oh Dear to the next level. Behind the scenes, our team is working hard on a complete rewrite of our marketing website and app.</p>
<p>We're currently targeting the end of September timeframe to launch our redesign. In this blog post, we'd like to give you a preview of the redesign.</p>
<h2 id="the-marketing-site">The marketing site</h2>
<p>One of the most important pages is, of course, the homepage. Here's what our current one looks like.</p>
<p><img src="/uploads/blogs/redesign-preview/current-homepage.png" alt="screenshot" /></p>
<p>And here's the redesigned one:</p>
<p><img src="/uploads/blogs/redesign-preview/beta-homepage.png" alt="screenshot" /></p>
<p>You can see that together with redesigning our site; we're also updating our logo.</p>
<p>On the redesigned homepage, there's a lot of content below the fold that's not shown in the screenshot above. We explain which features there are, show some testimonials and explain our pricing. Here are some more screenshots of the stuff below the fold.</p>
<p><img src="/uploads/blogs/redesign-preview/beta-homepage-2.png" alt="screenshot" /></p>
<p><img src="/uploads/blogs/redesign-preview/beta-homepage-3.png" alt="screenshot" /></p>
<p>You can't see in these screenshots that there are a lot of subtle animations.</p>
<p>We're also updating our docs section. Here's what it currently looks like.</p>
<p><img src="/uploads/blogs/redesign-preview/current-docs.png" alt="screenshot" /></p>
<p>And here's what the redesigned docs look like.</p>
<p><img src="/uploads/blogs/redesign-preview/beta-docs.png" alt="screenshot" /></p>
<p>This is just a small preview of the new marketing site. I hope it's clear that we're not just updating details but are rebuilding it from the ground up.</p>
<h2 id="the-oh-dear-application-ui">The Oh Dear application UI</h2>
<p>The public marketing pages are important for us as we hope they'll convince more people to use our service. But we didn't stop at the marketing site. We've also totally redesigning the app itself, solving long-standing usability issues in the process.</p>
<h3 id="the-sites-list">The sites list</h3>
<p>The current app UI is now almost five years old. We designed it when Oh Dear only offered its initial four checks. At the moment of writing, we offer nine checks.  Here's what our current site list looks like.</p>
<p><img src="/uploads/blogs/redesign-preview/current-sites.png" alt="screenshot" /></p>
<p>You can see that, with nine checks, it's a bit busy.</p>
<p>Here's what the redesigned list looks like. Don't mind those red dots at the performance checks, that's just because of seeded data.</p>
<p><img src="/uploads/blogs/redesign-preview/beta-sites.png" alt="screenshot" /></p>
<p>You can see that this list is much calmer. We only show the issues that we find. If no issues are found, the dot before the site will be green.</p>
<p>When you click those three dots at the end of a row, you'll see a little submenu that allows you to navigate to common pages for that site.</p>
<p><img src="/uploads/blogs/redesign-preview/site-menu.png" alt="screenshot" /></p>
<p>Let's take a look at the old site overview page.</p>
<p><img src="/uploads/blogs/redesign-preview/current-site-overview.png" alt="screenshot" /></p>
<p>Not too bad, but it's much better in our redesign. We'll show a lot more helpful information by default.</p>
<p><img src="/uploads/blogs/redesign-preview/beta-site-overview.png" alt="screenshot" /></p>
<p>Again, those three dots allow you to take relevant actions or pages for a check.</p>
<p><img src="/uploads/blogs/redesign-preview/check-menu.png" alt="screenshot" /></p>
<h3 id="notifications-preferences">Notifications preferences</h3>
<p>Let's go to another important part of our application. Oh Dear can send you notifications whenever we detect something wrong with your site. There are many notification channels: mail, Slack, Telegram, Discord, ... On the team notifications screen, you can configure for which events we should send on a particular channel.</p>
<p>Here's what the current screens look like. We have screens per channel, and on the list of a channel you can see all the possible notifications we can send.</p>
<p><img src="/uploads/blogs/redesign-preview/current-notifications.png" alt="screenshot" /></p>
<p>The problem with this setup is that it's hard to see which channels you have configured. To do that, you'll have to click &quot;Mail&quot;, &quot;Slack&quot;, &quot;Discord&quot;, ... in the sidebar and check if you have something configured.</p>
<p>In the redesign, we've revamped this screen. Instead of screens per channel, we only have one screen that shows all notification configurations.</p>
<p><img src="/uploads/blogs/redesign-preview/beta-notifications.png" alt="screenshot" /></p>
<p>On the list we don't show all those notifications toggles anymore. Instead, we show how many notifications are configured for the channel. If you want to see which notifications, you can edit a configuration.</p>
<p><img src="/uploads/blogs/redesign-preview/beta-notifications-detail.png" alt="screenshot" /></p>
<h3 id="configuring-status-pages">Configuring status pages</h3>
<p>In addition to monitoring sites and applications, Oh Dear also offers beautiful status pages. The status pages allow you to communicate the health of your service to your audience. Here are some Oh Dear powered status pages for <a href="https://status.laravel.com">the Laravel organization</a> and <a href="https://status.flareapp.io">Flare</a>.</p>
<p>We almost didn't dare to share a screenshot of how the UI now looks to set up a status page. It's kind of messy.</p>
<p><img src="/uploads/blogs/redesign-preview/current-status-pages.png" alt="screenshot" /></p>
<p>Sure, you can do a lot here, but it isn't pleasing to the eyes. In our redesign, we've vastly simplified this list. Here's what it looks like.</p>
<p><img src="/uploads/blogs/redesign-preview/beta-status-pages.png" alt="screenshot" /></p>
<p>If you click on of the status pages, you'll see this status page overview.</p>
<p><img src="/uploads/blogs/redesign-preview/beta-status-page-detail.png" alt="screenshot" /></p>
<p>Notice how similar this all looks to the site list and site overview. This is a benefit to us: if you are already familiar with sites, you'll immediately feel at home when working with status pages.</p>
<h2 id="in-closing">In closing</h2>
<p>We hope that you liked this preview of our upcoming redesign. Currently, we're styling all of the separate settings screens. It's still a lot of work, but we'll get there. As mentioned above, we aim to launch this around end-of-September.</p>
<p>At that time, we'll also write some blog posts with technical details on the redesign. I can already share that we've built this using Laravel, Livewire, Alpine and Tailwind.</p>
<p>Oh Dear is the all-in-one monitoring tool for your entire website. Now is the perfect time to start monitoring your site using <a href="/register">our ten-day free trial</a>. When we launch our redesign, we'll also increase our prices. Old customers will always keep the current prices.</p>
<p>We monitor uptime, SSL certificates, broken links, scheduled tasks, application health, DNS, domain expiry and more. We send notifications when something's wrong. All that paired with a developer-friendly API and kick-ass documentation.</p>
]]>
            </summary>
                                    <updated>2022-08-18T11:14:02+00:00</updated>
        </entry>
            <entry>
            <title><![CDATA[Making sure routes and config files are cached in a Laravel app]]></title>
            <link rel="alternate" href="https://ohdear.app/news-and-updates/making-sure-routes-and-config-files-are-cached-in-a-laravel-app" />
            <id>https://ohdear.app/80</id>
            <author>
                <name><![CDATA[Oh Dear]]></name>
            </author>
            <summary type="html">
                <![CDATA[<p>In a typical Laravel application, you'll likely to have many routes, config files and possible some events. In your development environment these routes and config files will loaded and registered in each request. The performance penalty for this is not too big.</p>
<p>In a production environment, you want to cache these things. Laravel makes this easy by offering a couple of Artisan commands that you can use in your deployment procedure.</p>
<pre class="shiki" style="background-color: #2e3440ff"><code><span class="line"><span style="color: #D8DEE9FF">php artisan optimize </span><span style="color: #616E88"># will cache routes and config</span></span>
<span class="line"><span style="color: #D8DEE9FF">php artisan event:cache </span><span style="color: #616E88"># will cache events</span></span>
<span class="line"></span></code></pre>
<p>By caching these things, you'll improve the performance of your Laravel app</p>
<p>Using our <a href="https://ohdear.app/feature/application-health-monitoring">application health</a> check, you can get notified when things are not cached in production.</p>
<p>Oh Dear will not run any code inside your application or server. Instead, you should perform the checks yourself. Oh Dear will send an HTTP request to your application to a specific endpoint. Your application should respond with JSON containing the result of health checks.</p>
<p>Spatie's <a href="https://spatie.be/docs/laravel-health/v1/introduction">Laravel Health</a> package can build up the JSON the Oh Dear expects. Here are <a href="https://ohdear.app/docs/general/application-health-monitoring/laravel">the docs on how to do that</a>.</p>
<p><a href="https://spatie.be/docs/laravel-health/v1/introduction">Laravel Health</a> is a package that can detect various problems that are going on with your application and server. It can check disk space, cpu usage, if Horizon is running, and much more.</p>
<p>The package has <a href="https://spatie.be/docs/laravel-health/v1/available-checks/cached-config-routes-and-events">a new check</a> that makes sure wether routes, config and events are cached.</p>
<p>This is how you can use it. Check in the package can be registered via <code>Health::check()</code> function.</p>
<pre class="shiki" style="background-color: #2e3440ff"><code><span class="line"><span style="color: #616E88">// typically in a service provider</span></span>
<span class="line"></span>
<span class="line"><span style="color: #81A1C1">use</span><span style="color: #D8DEE9FF"> Spatie</span><span style="color: #ECEFF4">\</span><span style="color: #D8DEE9FF">Health</span><span style="color: #ECEFF4">\</span><span style="color: #D8DEE9FF">Facades</span><span style="color: #ECEFF4">\</span><span style="color: #8FBCBB">Health</span><span style="color: #81A1C1">;</span></span>
<span class="line"><span style="color: #81A1C1">use</span><span style="color: #D8DEE9FF"> Spatie</span><span style="color: #ECEFF4">\</span><span style="color: #D8DEE9FF">Health</span><span style="color: #ECEFF4">\</span><span style="color: #D8DEE9FF">Checks</span><span style="color: #ECEFF4">\</span><span style="color: #D8DEE9FF">Checks</span><span style="color: #ECEFF4">\</span><span style="color: #8FBCBB">OptimizedAppCheck</span><span style="color: #81A1C1">;</span></span>
<span class="line"></span>
<span class="line"><span style="color: #8FBCBB">Health</span><span style="color: #81A1C1">::</span><span style="color: #88C0D0">checks</span><span style="color: #ECEFF4">([</span></span>
<span class="line"><span style="color: #ECEFF4">		</span><span style="color: #616E88">// other checks...</span></span>
<span class="line"></span>
<span class="line"><span style="color: #D8DEE9FF">    </span><span style="color: #8FBCBB">OptimizedAppCheck</span><span style="color: #81A1C1">::</span><span style="color: #88C0D0">new</span><span style="color: #ECEFF4">(),</span></span>
<span class="line"><span style="color: #ECEFF4">])</span><span style="color: #81A1C1">;</span></span>
<span class="line"></span></code></pre>
<p>This check will pass if the config, routes and events are cached.</p>
<p>If you only want to check certain caches, you can call the checkConfig, checkRoutes and checkEvents methods. In this example, we'll only check for cached config and routes.</p>
<pre class="shiki" style="background-color: #2e3440ff"><code><span class="line"><span style="color: #81A1C1">use</span><span style="color: #D8DEE9FF"> Spatie</span><span style="color: #ECEFF4">\</span><span style="color: #D8DEE9FF">Health</span><span style="color: #ECEFF4">\</span><span style="color: #D8DEE9FF">Facades</span><span style="color: #ECEFF4">\</span><span style="color: #8FBCBB">Health</span><span style="color: #81A1C1">;</span></span>
<span class="line"><span style="color: #81A1C1">use</span><span style="color: #D8DEE9FF"> Spatie</span><span style="color: #ECEFF4">\</span><span style="color: #D8DEE9FF">Health</span><span style="color: #ECEFF4">\</span><span style="color: #D8DEE9FF">Checks</span><span style="color: #ECEFF4">\</span><span style="color: #D8DEE9FF">Checks</span><span style="color: #ECEFF4">\</span><span style="color: #8FBCBB">OptimizedAppCheck</span><span style="color: #81A1C1">;</span></span>
<span class="line"></span>
<span class="line"><span style="color: #8FBCBB">Health</span><span style="color: #81A1C1">::</span><span style="color: #88C0D0">checks</span><span style="color: #ECEFF4">([</span></span>
<span class="line"><span style="color: #ECEFF4">		</span><span style="color: #616E88">// other checks,</span></span>
<span class="line"></span>
<span class="line"><span style="color: #D8DEE9FF">    </span><span style="color: #8FBCBB">OptimizedAppCheck</span><span style="color: #81A1C1">::</span><span style="color: #88C0D0">new</span><span style="color: #ECEFF4">()</span></span>
<span class="line"><span style="color: #D8DEE9FF">       </span><span style="color: #81A1C1">-&gt;</span><span style="color: #88C0D0">checkConfig</span><span style="color: #ECEFF4">()</span></span>
<span class="line"><span style="color: #D8DEE9FF">       </span><span style="color: #81A1C1">-&gt;</span><span style="color: #88C0D0">checkRoutes</span><span style="color: #ECEFF4">(),</span></span>
<span class="line"><span style="color: #ECEFF4">])</span><span style="color: #81A1C1">;</span></span>
<span class="line"></span></code></pre>
<p>With that <code>OptimizedAppCheck</code> in place and Oh Dear app configured, this is what it looks like when something is not cached.</p>
<p><img src="/uploads/blogs/cache-config/slack.png" alt="image" /></p>
<p>This is a Slack notification, but it will look similar on all notification channels we offer.</p>
]]>
            </summary>
                                    <updated>2022-07-16T15:16:39+00:00</updated>
        </entry>
            <entry>
            <title><![CDATA[You can now monitor your domain name using Oh Dear]]></title>
            <link rel="alternate" href="https://ohdear.app/news-and-updates/you-can-now-monitor-your-domain-name-using-oh-dear" />
            <id>https://ohdear.app/79</id>
            <author>
                <name><![CDATA[Oh Dear]]></name>
            </author>
            <summary type="html">
                <![CDATA[<p>When registering a domain name, you could assume it is yours forever. Unfortunately, this is false, and most domains must be renewed periodically. If you fail to do this, you risk losing your domain, and ownership could be transferred away from you.</p>
<p>Oh Dear's new Domain check can send you a notification days before your domain expires. This way, you still have time to renew it.</p>
<h2 id="introducing-rdap">Introducing RDAP</h2>
<p>To monitor domain names, we rely on <a href="https://www.icann.org/rdap">RDAP</a>, which stands for Registration Data Access Protocol. It is a standardized protocol managed by <a href="https://www.iana.org">IANA</a>, the non-profit organization that manages IP address allocation, DNS, and more... RDAP is the successor of WHOIS. The most significant improvement is that all information in RDAP is standardized, whereas information in WHOIS is available as unstructured text.</p>
<p>Registry operators of most TLDs (<code>.com</code>, <code>.net</code>, <code>.org</code>, ...) send information about the domains they manage to RDAP so anyone can query the information. Unfortunately, not all TLDs are supported.</p>
<p>Most notably: <code>.be</code> and <code>.nl</code> domains are not supported, but they will be in time.</p>
<h2 id="how-we-monitor-your-domain">How we monitor your domain</h2>
<p>Using RDAP, we can determine important dates of a domain, such as the registration and expiration date. When you turn on domain monitoring for your domain, we'll check RDAP several times a day. We'll send you a notification when your site is not listed in RDAP or if your domain expires in the next 10 days. The number of days can be configured in the domain settings of a site.</p>
<p>We will not spam you with domain check notifications: we'll only send you one per day.</p>
<p>Additionally, we'll also fetch the <em>domain status codes</em>. These are special attributes that can be set on a domain name. You'll find a list of all codes and their meaning on <a href="https://www.icann.org/resources/pages/epp-status-codes-2014-06-16-en">the EPP status codes page of Icann</a>.</p>
<p>One of the most important ones is <code>clientTransferProhibited</code>, which signifies that your registry will automatically reject domain transfer requests, significantly preventing domain theft.</p>
<p>Here's what the domain check results look like in our UI:</p>
<p><img src="/img/docs/domain/domain.png" alt="image" /></p>
<p>As mentioned above, our domain check is not available for all domains because not all domains are supported by RDAP. We expect each domain to be supported in the next couple of years.</p>
<p>You'll find an up to date list of each supported domain <a href="https://ohdear.app/docs/general/domain-monitoring">in our docs</a>.</p>
<h2 id="in-closing">In closing</h2>
<p>We hope that you will like this new check. If you already have an Oh Dear subscription, you can now enable it for any site that you are monitoring.</p>
<p>Behind the scenes, we're working on a couple more improvements to our service. And later this year, we'll launch a total redesign, of which you can already see a preview <a href="https://ohdear.app/blog/building-oh-dears-new-design-implementing-the-design">in this blogpost</a>.</p>
<p>If you're not using Oh Dear to monitor your site, now's the perfect time to get started.  We monitor uptime, SSL certificates, broken links, scheduled tasks, application health, DNS, domain expiry and more. We send notifications when something's wrong. All that paired with <a href="/docs/api/introduction" class="underline hover:no-underline">a developer friendly API<a> and <a href="/docs" class="underline hover:no-underline">kick-ass documentation</a>.</p>
]]>
            </summary>
                                    <updated>2022-06-15T07:06:50+00:00</updated>
        </entry>
            <entry>
            <title><![CDATA[Building Oh Dear’s new design: Creating a color system, why and how]]></title>
            <link rel="alternate" href="https://ohdear.app/news-and-updates/building-oh-dears-new-design-creating-a-color-system-why-and-how" />
            <id>https://ohdear.app/78</id>
            <author>
                <name><![CDATA[Oh Dear]]></name>
            </author>
            <summary type="html">
                <![CDATA[<p>In <a href="https://ohdear.app/blog/building-oh-dears-new-design-implementing-the-design">the previous blog post</a> I talked about how we are implementing the Oh Dear redesign. In this post I go into more detail on why and how we implemented a tailwind-like color system which supports all the colours used throughout the redesign.</p>
<h2 id="from-sketch-to-code">From Sketch to code</h2>
<p>One of the tasks that needs to be done to go from design to code is extracting the colours used in the design. In our case, the designer already put together a specific palette of colours and defined it within the Sketch file. We copied over those colours and renamed them a bit so they fit nicely in our tailwind.config.js.</p>
<pre class="shiki" style="background-color: #2e3440ff"><code><span class="line"><span style="color: #D8DEE9FF">extend: </span><span style="color: #ECEFF4">{</span></span>
<span class="line"><span style="color: #D8DEE9FF">	colors: </span><span style="color: #ECEFF4">{</span></span>
<span class="line"><span style="color: #D8DEE9FF">		</span><span style="color: #ECEFF4">&#39;</span><span style="color: #A3BE8C">bg-blue</span><span style="color: #ECEFF4">&#39;</span><span style="color: #81A1C1">:</span><span style="color: #D8DEE9FF"> </span><span style="color: #ECEFF4">&#39;</span><span style="color: #A3BE8C">#...</span><span style="color: #ECEFF4">&#39;</span><span style="color: #ECEFF4">,</span></span>
<span class="line"><span style="color: #D8DEE9FF">		</span><span style="color: #ECEFF4">&#39;</span><span style="color: #A3BE8C">darkish-blue</span><span style="color: #ECEFF4">&#39;</span><span style="color: #81A1C1">:</span><span style="color: #D8DEE9FF"> </span><span style="color: #ECEFF4">&#39;</span><span style="color: #A3BE8C">#...</span><span style="color: #ECEFF4">&#39;</span><span style="color: #ECEFF4">,</span></span>
<span class="line"><span style="color: #D8DEE9FF">		divide: </span><span style="color: #ECEFF4">&#39;</span><span style="color: #A3BE8C">#...</span><span style="color: #ECEFF4">&#39;</span><span style="color: #ECEFF4">,</span></span>
<span class="line"><span style="color: #D8DEE9FF">		whiteish: </span><span style="color: #ECEFF4">&#39;</span><span style="color: #A3BE8C">#...</span><span style="color: #ECEFF4">&#39;</span><span style="color: #ECEFF4">,</span></span>
<span class="line"><span style="color: #D8DEE9FF">		green: </span><span style="color: #ECEFF4">&#39;</span><span style="color: #A3BE8C">#...</span><span style="color: #ECEFF4">&#39;</span><span style="color: #ECEFF4">,</span></span>
<span class="line"><span style="color: #D8DEE9FF">        </span><span style="color: #81A1C1">...</span></span>
<span class="line"><span style="color: #D8DEE9FF">	</span><span style="color: #ECEFF4">},</span></span>
<span class="line"><span style="color: #D8DEE9FF">	</span><span style="color: #81A1C1">...</span></span>
<span class="line"><span style="color: #ECEFF4">}</span></span>
<span class="line"></span></code></pre>
<h3 id="not-all-colours-were-named">Not all colours were named</h3>
<p>While implementing the design, more and more colours kept popping up that were defined in the inspector as a plain hex code, instead of a named color.</p>
<p><img src="/uploads/blogs/redesign-2022-part-3/color-inspector.png" alt="image" /></p>
<p>As we already had to rename the tracked colours, I didn’t think it would be helpful to ask to designer to go through the document and give every specific color a name. We would have to know the desired naming pattern and we didn’t know what would be the best approach.</p>
<p>The design is also very complex with a lot of gradients and nuances created by use of different opacities. Going through all the layers and track all those colours would be very time consuming. We decided to leave the document as is and look for another alternative.</p>
<h3 id="tailwind-to-the-rescue-or-not">Tailwind to the rescue, or not?</h3>
<p>The first solution we ended up with was using tailwind classes with arbitrary values like <code>text-[#0C0515]</code> or <code>bg-[#0C0515]</code>, which is supported since [JIT mode]. This made it really easy to give an element a very specific color without the need to think of a name and having to define it in the tailwind config file. This felt like a real time-saver.</p>
<p>Although this worked well at the beginning we started to discover more and more colours that kind of looked the same but had a different hex code. As hex codes can vary a lot, while looking visually the same, and vice versa, it wasn’t easy to search occurrences of previously used hex codes that were close to a specific color.</p>
<p><img src="/uploads/blogs/redesign-2022-part-3/hex-codes.jpg" alt="image" /></p>
<p>This also resulted in code that was flooded with arbitrary values that didn’t make the use of color much consistent. Dark mode was also on the list of features to implement, and adding dark mode specific hex codes wouldn’t make it any cleaner.</p>
<p><img src="/uploads/blogs/redesign-2022-part-3/arbitrary-values-example.png" alt="image" /></p>
<h3 id="difficulty-of-going-a-shade-lighter-or-darker">Difficulty of going a shade lighter or darker</h3>
<p>Another difficulty we faced was the ability to play with a slightly lighter of darker shade. Sometimes a different colour would look better on the web compared to what was used in the design. To do that we adjusted the hex code, which then turned into yet another unique arbitrary value. We figured that having all those arbitrary values would lead to more inconsistencies and a bigger than necessary css bundle housing all those colours.</p>
<p>At this point we thought it would be great if we could use Tailwind’s colour system. Going a shade lighter or darker is as easy as lowering or increasing the number in the class. For example <code>text-blue-500</code> is lighter than <code>text-blue-600</code>. There was only one problem, the standard colours didn’t match the used colours in the design. So we had to extend the existing set of colours.</p>
<h2 id="creating-our-own-color-palettes">Creating our own color palettes</h2>
<p>We created our own color palettes through a series of easy to reproduce steps.</p>
<h3 id="1-index-all-colours">1. Index all colours</h3>
<p>The first step we took was index all colours used in the design. And put them in a separate art-board in Sketch. We ended up with something like this:</p>
<p><img src="/uploads/blogs/redesign-2022-part-3/collecting-colors.png" alt="image" /></p>
<h3 id="2-group-the-colours">2. Group the colours</h3>
<p>Next we grouped them by color, and we could already spot different colours that were almost similar and could be consolidated into a single color:</p>
<p><img src="/uploads/blogs/redesign-2022-part-3/group-colors.png" alt="image" /></p>
<h3 id="3-fill-in-the-blanks">3. Fill in the blanks</h3>
<p>After grouping them we started to order them from light to dark. As we didn’t have step-based shades for each colour yet we filled in the blanks where needed. We ended up with five base colours and a few specific colours with fewer shades:</p>
<p><img src="/uploads/blogs/redesign-2022-part-3/complete-color-system.jpg" alt="image" /></p>
<p>As you might notice we ended up with a higher resolution palette than the standard 9 shades per base color. This is because the design contained many colours that were slightly lighter or darker. We tried to replace a specific X50 for a X00 instead, but the difference in color was often too big. So we needed those subtle variations in shades and decided to create shades of the base colours in steps of 50 instead of 100.</p>
<h3 id="but-you-wont-be-using-all-those-colours">But you won’t be using all those colours!</h3>
<p>That’s true, but with Tailwind that’s not a problem. Thanks to the ability to purge all unused styles the final CSS bundle will be small no matter how much colours we define in the config.</p>
<p>The only downside is that your tailwind config can grow pretty large while having so many colours. If you would really dislike that you can always extract the colours to a separate file and then include that in the config file.</p>
<h3 id="4-import-and-replace">4. Import and replace</h3>
<p>After having all the hex codes imported in the tailwind config we replaced all the hex codes in the html with the newly available color classes. The code now looked cleaner as the color + a number was more familiar than a hex code. It’s now also easier to play with the shades as we only need to increase or lower the number in the color class at the end by 50.</p>
<h2 id="in-conclusion">In conclusion</h2>
<p>The best way of exporting colours from design to code is very dependant on the tools and frameworks you use. In our case we use Tailwind as a CSS framework and we were already familiar with its color system. If you don’t use Tailwind a different approach might be  better, although I could still see how the method described in this post can be applied on any project.</p>
<p>Creating the system was a bit tedious and time consuming. Most time was spent on ordering the colours and filling in the blanks which was done by hand. However, many weeks have been passed by now since implementing the color system and we are still very happy with it. It’s definitely an investment worth doing.</p>
<p>In the next post I will go into more detail on how we are implementing dark mode.</p>
<p>Do you have a question or feedback? Feel free to send a reply <a href="https://twitter.com/ohdearapp">via Twitter</a>.</p>
]]>
            </summary>
                                    <updated>2022-05-20T08:41:00+00:00</updated>
        </entry>
            <entry>
            <title><![CDATA[Easily navigate Oh Dear using the command palette]]></title>
            <link rel="alternate" href="https://ohdear.app/news-and-updates/easily-navigate-oh-dear-using-the-command-palette" />
            <id>https://ohdear.app/77</id>
            <author>
                <name><![CDATA[Oh Dear]]></name>
            </author>
            <summary type="html">
                <![CDATA[<p>When you log in Oh Dear, you'll notice a new little search field in the header.</p>
<p><img src="/uploads/blogs/spotlight/search.png" alt="image" /></p>
<p>When you click that, it opens up a nice command palette. You can use this to navigate to anywhere in our service quickly.</p>
<p><img src="/uploads/blogs/spotlight/palette.png" alt="image" /></p>
<p>If you want to go to the performance graph of your site, just type &quot;performance&quot;, ...</p>
<p><img src="/uploads/blogs/spotlight/command.png" alt="image" /></p>
<p>... and type the site's name you want to see the performance results of.</p>
<p><img src="/uploads/blogs/spotlight/site.png" alt="image" /></p>
<p><img src="/uploads/blogs/spotlight/site2.png" alt="image" /></p>
<p>When selecting the site, you'll get taken to the performance results.</p>
<p><img src="/uploads/blogs/spotlight/performance.png" alt="image" /></p>
<p>In many cases, this is much faster than clicking on the site and then going to the right check results yourself.</p>
<p>The command palette has commands to navigate to almost anywhere in our UI, and tasks like logging out, and switching teams.</p>
<p><img src="/uploads/blogs/spotlight/other.png" alt="image" /></p>
<p>If you want to know more details on how this works under the hood, check out <a href="https://freek.dev/2251-how-to-add-a-spotlight-like-search-field-to-your-laravel-app">this blog post on freek.dev</a>.</p>
<p>We hope that you'll like this addition to our UI.</p>
]]>
            </summary>
                                    <updated>2022-05-19T14:05:42+00:00</updated>
        </entry>
            <entry>
            <title><![CDATA[Status pages can now be viewed as JSON or XML]]></title>
            <link rel="alternate" href="https://ohdear.app/news-and-updates/status-pages-can-now-be-viewed-as-json-or-xml" />
            <id>https://ohdear.app/76</id>
            <author>
                <name><![CDATA[Oh Dear]]></name>
            </author>
            <summary type="html">
                <![CDATA[<p>Next to a large collection of checks, Oh Dear offers the ability to easily create beautiful status pages. This way, you can communicate the status of your sites and services to your users. Take a look at the Oh Dear powered status pages for <a href="https://status.flareapp.io">Flare</a> and <a href="https://status.laravel.com">Laravel</a>.</p>
<p><img src="/uploads/blogs/status-json/statuspage.png" alt="image" /></p>
<p>Today, we added the ability to view the status page as JSON (or XML if that is your thing). You just have to append <code>/json</code> (or <code>/xml</code> to the status page URL. So for the Laravel status page, you'll find the JSON at <a href="https://status.laravel.com/json">status.laravel.com/json</a>.</p>
<p>Here's what the response looks like:</p>
<pre class="shiki" style="background-color: #2e3440ff"><code><span class="line"><span style="color: #ECEFF4">{</span></span>
<span class="line"><span style="color: #D8DEE9FF">  </span><span style="color: #ECEFF4">&quot;</span><span style="color: #8FBCBB">title</span><span style="color: #ECEFF4">&quot;</span><span style="color: #ECEFF4">:</span><span style="color: #D8DEE9FF"> </span><span style="color: #ECEFF4">&quot;</span><span style="color: #A3BE8C">Laravel Service Health Dashboard</span><span style="color: #ECEFF4">&quot;</span><span style="color: #ECEFF4">,</span></span>
<span class="line"><span style="color: #D8DEE9FF">  </span><span style="color: #ECEFF4">&quot;</span><span style="color: #8FBCBB">timezone</span><span style="color: #ECEFF4">&quot;</span><span style="color: #ECEFF4">:</span><span style="color: #D8DEE9FF"> </span><span style="color: #ECEFF4">&quot;</span><span style="color: #A3BE8C">America</span><span style="color: #EBCB8B">\/</span><span style="color: #A3BE8C">Chicago</span><span style="color: #ECEFF4">&quot;</span><span style="color: #ECEFF4">,</span></span>
<span class="line"><span style="color: #D8DEE9FF">  </span><span style="color: #ECEFF4">&quot;</span><span style="color: #8FBCBB">pinnedUpdate</span><span style="color: #ECEFF4">&quot;</span><span style="color: #ECEFF4">:</span><span style="color: #D8DEE9FF"> </span><span style="color: #81A1C1">null</span><span style="color: #ECEFF4">,</span></span>
<span class="line"><span style="color: #D8DEE9FF">  </span><span style="color: #ECEFF4">&quot;</span><span style="color: #8FBCBB">sites</span><span style="color: #ECEFF4">&quot;</span><span style="color: #ECEFF4">:</span><span style="color: #D8DEE9FF"> </span><span style="color: #ECEFF4">{</span></span>
<span class="line"><span style="color: #D8DEE9FF">    </span><span style="color: #ECEFF4">&quot;</span><span style="color: #8FBCBB">Ungrouped</span><span style="color: #ECEFF4">&quot;</span><span style="color: #ECEFF4">:</span><span style="color: #D8DEE9FF"> </span><span style="color: #ECEFF4">[</span></span>
<span class="line"><span style="color: #D8DEE9FF">      </span><span style="color: #ECEFF4">{</span></span>
<span class="line"><span style="color: #D8DEE9FF">        </span><span style="color: #ECEFF4">&quot;</span><span style="color: #8FBCBB">label</span><span style="color: #ECEFF4">&quot;</span><span style="color: #ECEFF4">:</span><span style="color: #D8DEE9FF"> </span><span style="color: #ECEFF4">&quot;</span><span style="color: #A3BE8C">envoyer.io</span><span style="color: #ECEFF4">&quot;</span><span style="color: #ECEFF4">,</span></span>
<span class="line"><span style="color: #D8DEE9FF">        </span><span style="color: #ECEFF4">&quot;</span><span style="color: #8FBCBB">url</span><span style="color: #ECEFF4">&quot;</span><span style="color: #ECEFF4">:</span><span style="color: #D8DEE9FF"> </span><span style="color: #ECEFF4">&quot;</span><span style="color: #A3BE8C">https:</span><span style="color: #EBCB8B">\/\/</span><span style="color: #A3BE8C">envoyer.io</span><span style="color: #ECEFF4">&quot;</span><span style="color: #ECEFF4">,</span></span>
<span class="line"><span style="color: #D8DEE9FF">        </span><span style="color: #ECEFF4">&quot;</span><span style="color: #8FBCBB">status</span><span style="color: #ECEFF4">&quot;</span><span style="color: #ECEFF4">:</span><span style="color: #D8DEE9FF"> </span><span style="color: #ECEFF4">&quot;</span><span style="color: #A3BE8C">up</span><span style="color: #ECEFF4">&quot;</span></span>
<span class="line"><span style="color: #D8DEE9FF">      </span><span style="color: #ECEFF4">},</span></span>
<span class="line"><span style="color: #D8DEE9FF">      </span><span style="color: #ECEFF4">{</span></span>
<span class="line"><span style="color: #D8DEE9FF">        </span><span style="color: #ECEFF4">&quot;</span><span style="color: #8FBCBB">label</span><span style="color: #ECEFF4">&quot;</span><span style="color: #ECEFF4">:</span><span style="color: #D8DEE9FF"> </span><span style="color: #ECEFF4">&quot;</span><span style="color: #A3BE8C">forge.laravel.com</span><span style="color: #ECEFF4">&quot;</span><span style="color: #ECEFF4">,</span></span>
<span class="line"><span style="color: #D8DEE9FF">        </span><span style="color: #ECEFF4">&quot;</span><span style="color: #8FBCBB">url</span><span style="color: #ECEFF4">&quot;</span><span style="color: #ECEFF4">:</span><span style="color: #D8DEE9FF"> </span><span style="color: #ECEFF4">&quot;</span><span style="color: #A3BE8C">https:</span><span style="color: #EBCB8B">\/\/</span><span style="color: #A3BE8C">forge.laravel.com</span><span style="color: #ECEFF4">&quot;</span><span style="color: #ECEFF4">,</span></span>
<span class="line"><span style="color: #D8DEE9FF">        </span><span style="color: #ECEFF4">&quot;</span><span style="color: #8FBCBB">status</span><span style="color: #ECEFF4">&quot;</span><span style="color: #ECEFF4">:</span><span style="color: #D8DEE9FF"> </span><span style="color: #ECEFF4">&quot;</span><span style="color: #A3BE8C">up</span><span style="color: #ECEFF4">&quot;</span></span>
<span class="line"><span style="color: #D8DEE9FF">      </span><span style="color: #ECEFF4">},</span></span>
<span class="line"><span style="color: #D8DEE9FF">      </span><span style="color: #ECEFF4">{</span></span>
<span class="line"><span style="color: #D8DEE9FF">        </span><span style="color: #ECEFF4">&quot;</span><span style="color: #8FBCBB">label</span><span style="color: #ECEFF4">&quot;</span><span style="color: #ECEFF4">:</span><span style="color: #D8DEE9FF"> </span><span style="color: #ECEFF4">&quot;</span><span style="color: #A3BE8C">laravel.com</span><span style="color: #ECEFF4">&quot;</span><span style="color: #ECEFF4">,</span></span>
<span class="line"><span style="color: #D8DEE9FF">        </span><span style="color: #ECEFF4">&quot;</span><span style="color: #8FBCBB">url</span><span style="color: #ECEFF4">&quot;</span><span style="color: #ECEFF4">:</span><span style="color: #D8DEE9FF"> </span><span style="color: #ECEFF4">&quot;</span><span style="color: #A3BE8C">https:</span><span style="color: #EBCB8B">\/\/</span><span style="color: #A3BE8C">laravel.com</span><span style="color: #ECEFF4">&quot;</span><span style="color: #ECEFF4">,</span></span>
<span class="line"><span style="color: #D8DEE9FF">        </span><span style="color: #ECEFF4">&quot;</span><span style="color: #8FBCBB">status</span><span style="color: #ECEFF4">&quot;</span><span style="color: #ECEFF4">:</span><span style="color: #D8DEE9FF"> </span><span style="color: #ECEFF4">&quot;</span><span style="color: #A3BE8C">up</span><span style="color: #ECEFF4">&quot;</span></span>
<span class="line"><span style="color: #D8DEE9FF">      </span><span style="color: #ECEFF4">},</span></span>
<span class="line"><span style="color: #D8DEE9FF">      </span><span style="color: #ECEFF4">{</span></span>
<span class="line"><span style="color: #D8DEE9FF">        </span><span style="color: #ECEFF4">&quot;</span><span style="color: #8FBCBB">label</span><span style="color: #ECEFF4">&quot;</span><span style="color: #ECEFF4">:</span><span style="color: #D8DEE9FF"> </span><span style="color: #ECEFF4">&quot;</span><span style="color: #A3BE8C">vapor.laravel.com</span><span style="color: #ECEFF4">&quot;</span><span style="color: #ECEFF4">,</span></span>
<span class="line"><span style="color: #D8DEE9FF">        </span><span style="color: #ECEFF4">&quot;</span><span style="color: #8FBCBB">url</span><span style="color: #ECEFF4">&quot;</span><span style="color: #ECEFF4">:</span><span style="color: #D8DEE9FF"> </span><span style="color: #ECEFF4">&quot;</span><span style="color: #A3BE8C">https:</span><span style="color: #EBCB8B">\/\/</span><span style="color: #A3BE8C">vapor.laravel.com</span><span style="color: #ECEFF4">&quot;</span><span style="color: #ECEFF4">,</span></span>
<span class="line"><span style="color: #D8DEE9FF">        </span><span style="color: #ECEFF4">&quot;</span><span style="color: #8FBCBB">status</span><span style="color: #ECEFF4">&quot;</span><span style="color: #ECEFF4">:</span><span style="color: #D8DEE9FF"> </span><span style="color: #ECEFF4">&quot;</span><span style="color: #A3BE8C">up</span><span style="color: #ECEFF4">&quot;</span></span>
<span class="line"><span style="color: #D8DEE9FF">      </span><span style="color: #ECEFF4">},</span></span>
<span class="line"><span style="color: #D8DEE9FF">      </span><span style="color: #ECEFF4">{</span></span>
<span class="line"><span style="color: #D8DEE9FF">        </span><span style="color: #ECEFF4">&quot;</span><span style="color: #8FBCBB">label</span><span style="color: #ECEFF4">&quot;</span><span style="color: #ECEFF4">:</span><span style="color: #D8DEE9FF"> </span><span style="color: #ECEFF4">&quot;</span><span style="color: #A3BE8C">nova.laravel.com</span><span style="color: #ECEFF4">&quot;</span><span style="color: #ECEFF4">,</span></span>
<span class="line"><span style="color: #D8DEE9FF">        </span><span style="color: #ECEFF4">&quot;</span><span style="color: #8FBCBB">url</span><span style="color: #ECEFF4">&quot;</span><span style="color: #ECEFF4">:</span><span style="color: #D8DEE9FF"> </span><span style="color: #ECEFF4">&quot;</span><span style="color: #A3BE8C">https:</span><span style="color: #EBCB8B">\/\/</span><span style="color: #A3BE8C">nova.laravel.com</span><span style="color: #ECEFF4">&quot;</span><span style="color: #ECEFF4">,</span></span>
<span class="line"><span style="color: #D8DEE9FF">        </span><span style="color: #ECEFF4">&quot;</span><span style="color: #8FBCBB">status</span><span style="color: #ECEFF4">&quot;</span><span style="color: #ECEFF4">:</span><span style="color: #D8DEE9FF"> </span><span style="color: #ECEFF4">&quot;</span><span style="color: #A3BE8C">up</span><span style="color: #ECEFF4">&quot;</span></span>
<span class="line"><span style="color: #D8DEE9FF">      </span><span style="color: #ECEFF4">}</span></span>
<span class="line"><span style="color: #D8DEE9FF">    </span><span style="color: #ECEFF4">]</span></span>
<span class="line"><span style="color: #D8DEE9FF">  </span><span style="color: #ECEFF4">},</span></span>
<span class="line"><span style="color: #D8DEE9FF">  </span><span style="color: #ECEFF4">&quot;</span><span style="color: #8FBCBB">updatesPerDay</span><span style="color: #ECEFF4">&quot;</span><span style="color: #ECEFF4">:</span><span style="color: #D8DEE9FF"> </span><span style="color: #ECEFF4">{</span></span>
<span class="line"><span style="color: #D8DEE9FF">    </span><span style="color: #ECEFF4">&quot;</span><span style="color: #8FBCBB">1652245200</span><span style="color: #ECEFF4">&quot;</span><span style="color: #ECEFF4">:</span><span style="color: #D8DEE9FF"> </span><span style="color: #ECEFF4">[],</span></span>
<span class="line"><span style="color: #D8DEE9FF">    </span><span style="color: #ECEFF4">&quot;</span><span style="color: #8FBCBB">1652158800</span><span style="color: #ECEFF4">&quot;</span><span style="color: #ECEFF4">:</span><span style="color: #D8DEE9FF"> </span><span style="color: #ECEFF4">[],</span></span>
<span class="line"><span style="color: #D8DEE9FF">    </span><span style="color: #ECEFF4">&quot;</span><span style="color: #8FBCBB">1652072400</span><span style="color: #ECEFF4">&quot;</span><span style="color: #ECEFF4">:</span><span style="color: #D8DEE9FF"> </span><span style="color: #ECEFF4">[],</span></span>
<span class="line"><span style="color: #D8DEE9FF">    </span><span style="color: #ECEFF4">&quot;</span><span style="color: #8FBCBB">1651986000</span><span style="color: #ECEFF4">&quot;</span><span style="color: #ECEFF4">:</span><span style="color: #D8DEE9FF"> </span><span style="color: #ECEFF4">[],</span></span>
<span class="line"><span style="color: #D8DEE9FF">    </span><span style="color: #ECEFF4">&quot;</span><span style="color: #8FBCBB">1651899600</span><span style="color: #ECEFF4">&quot;</span><span style="color: #ECEFF4">:</span><span style="color: #D8DEE9FF"> </span><span style="color: #ECEFF4">[],</span></span>
<span class="line"><span style="color: #D8DEE9FF">    </span><span style="color: #ECEFF4">&quot;</span><span style="color: #8FBCBB">1651813200</span><span style="color: #ECEFF4">&quot;</span><span style="color: #ECEFF4">:</span><span style="color: #D8DEE9FF"> </span><span style="color: #ECEFF4">[],</span></span>
<span class="line"><span style="color: #D8DEE9FF">    </span><span style="color: #ECEFF4">&quot;</span><span style="color: #8FBCBB">1651726800</span><span style="color: #ECEFF4">&quot;</span><span style="color: #ECEFF4">:</span><span style="color: #D8DEE9FF"> </span><span style="color: #ECEFF4">[]</span></span>
<span class="line"><span style="color: #D8DEE9FF">  </span><span style="color: #ECEFF4">}</span></span>
<span class="line"><span style="color: #ECEFF4">}</span></span>
<span class="line"></span></code></pre>
<p>By offering JSON (and XML), your users can integrate the status of your service better in their systems. If you forget the exact URL, you can access the JSON (or XML) version via &quot;Subscribe to updates&quot; dropdown in the header of a status page.</p>
<p><img src="/uploads/blogs/status-json/dropdown.png" alt="screenshot" /></p>
<p>Alternatively, your users can also subscribe to updates of your status page via Slack. You'll find more info about that in <a href="https://ohdear.app/blog/status-page-subscriptions-are-now-available">this blog post</a>.</p>
]]>
            </summary>
                                    <updated>2022-05-11T07:01:11+00:00</updated>
        </entry>
            <entry>
            <title><![CDATA[Building Oh Dear’s new design: Implementing the design]]></title>
            <link rel="alternate" href="https://ohdear.app/news-and-updates/building-oh-dears-new-design-implementing-the-design" />
            <id>https://ohdear.app/75</id>
            <author>
                <name><![CDATA[Oh Dear]]></name>
            </author>
            <summary type="html">
                <![CDATA[<p>In the <a href="/blog/building-oh-dears-new-design-project-setup">previous blog post</a> I gave an introduction about the project setup for the redesign of the new Oh Dear frontend. In this blog post I would like to show you how we are implementing the redesign of the Oh Dear frontend. Feel free to provide feedback on the design choices and statements made in this and future blog posts. We’d love to hear what you think of it.</p>
<h2 id="it-all-started-with-sketch">It all started with Sketch</h2>
<p>Before we started the build process we had every page redesigned upfront by the talented team of <a href="https://digitalwithyou.com">DWY</a>. They have been instructed to design something unique that would make Oh Dear look and feel next level. We think they did a perfect job. The result was a Sketch file containing approximately 25 pixel perfect page designs. Each containing about 5 to 10 sections that exist out of multiple components and unique design elements.</p>
<p><img src="/uploads/blogs/redesign-2022-part-2/dns-section.jpg" alt="DNS section" /></p>
<p><img src="/uploads/blogs/redesign-2022-part-2/customize-looks-to-match-your-brand.jpg" alt="Customize the looks to match your brand" /></p>
<p><img src="/uploads/blogs/redesign-2022-part-2/powerful-notifications.jpg" alt="Powerful notifications" /></p>
<p>This resulted in approximately 100 components to be build. Many of those components contain a unique visual sub-component which ideally should become interactive in many cases.</p>
<p>That’s not all, besides light mode all pages should also support dark mode and of course look perfect and be interactive on any screen size. It’s lot of work but nevertheless very exciting to see if we can pull it off!</p>
<p><img src="/uploads/blogs/redesign-2022-part-2/dark-mode-homepage-section.jpg" alt="Dark mode homepage section" /></p>
<h2 id="setting-up-the-project">Setting up the project</h2>
<p>After setting up the project we started scaffolding the page layouts one by one. We had to decide with which one to start. We chose to start with the most complex page, the homepage. The idea behind this was that we had to overcome the hardest challenges first. By doing the hard things first we would gain knowledge on how each component could be structured best, making the lesser complex pages easier to build.</p>
<h3 id="using-the-traditional-approach">Using the traditional approach</h3>
<p>Each page has the traditional setup of a base layout, a header, a main and a footer section. All public facing pages use the same base layout. They are built with blade, and are structured through blade components as much as possible. Therefore our base layout is located in <code>views/components/front/layout</code> as <code>index.blade.php</code>. This allows us to start each page with <code>&lt;x-front.layout&gt;</code>.</p>
<p><quote>a note: the <code>front</code> folder contains all public facing components. We also have an <code>app</code> folder which contains all application frontend components. You can read more about this in our <a href="/blog/building-oh-dears-new-design-project-setup">previous blog post</a>.</quote></p>
<p>The base layout contains two sub components a <code>&lt;x-front.layout.header&gt;</code> and <code>&lt;x-front.layout.footer&gt;</code> with a <code>$slot</code> variable in between. Resulting in something like this:</p>
<pre class="shiki" style="background-color: #2e3440ff"><code><span class="line"><span style="color: #81A1C1">&lt;!DOCTYPE</span><span style="color: #D8DEE9FF"> </span><span style="color: #8FBCBB">html</span><span style="color: #81A1C1">&gt;</span></span>
<span class="line"><span style="color: #81A1C1">&lt;html</span><span style="color: #D8DEE9FF"> </span><span style="color: #8FBCBB">lang</span><span style="color: #ECEFF4">=</span><span style="color: #ECEFF4">&quot;</span><span style="color: #A3BE8C">en</span><span style="color: #ECEFF4">&quot;</span><span style="color: #81A1C1">&gt;</span></span>
<span class="line"><span style="color: #D8DEE9FF">	</span><span style="color: #81A1C1">&lt;head&gt;</span></span>
<span class="line"><span style="color: #D8DEE9FF">	... head tags</span></span>
<span class="line"><span style="color: #D8DEE9FF">	</span><span style="color: #81A1C1">&lt;/head&gt;</span></span>
<span class="line"><span style="color: #81A1C1">&lt;body&gt;</span></span>
<span class="line"><span style="color: #D8DEE9FF">	</span><span style="color: #81A1C1">&lt;x-front.layout.header&gt;</span></span>
<span class="line"><span style="color: #D8DEE9FF">	</span></span>
<span class="line"><span style="color: #D8DEE9FF">	</span><span style="color: #81A1C1">{{$</span><span style="color: #D8DEE9">slot</span><span style="color: #81A1C1">}}</span></span>
<span class="line"></span>
<span class="line"><span style="color: #D8DEE9FF">	</span><span style="color: #81A1C1">&lt;x-front.layout.footer&gt;</span></span>
<span class="line"><span style="color: #81A1C1">&lt;/body&gt;</span></span>
<span class="line"></span>
<span class="line"></span></code></pre>
<h3 id="using-blade-components">Using blade components</h3>
<p>The result of using this approach combined with blade components is a very clean markup which makes it perfect for reuse. For example this is how the homepage is structured:</p>
<pre class="shiki" style="background-color: #2e3440ff"><code><span class="line"><span style="color: #81A1C1">&lt;x-front.layout</span></span>
<span class="line"><span style="color: #D8DEE9FF">    </span><span style="color: #8FBCBB">title</span><span style="color: #ECEFF4">=</span><span style="color: #ECEFF4">&quot;</span><span style="color: #A3BE8C">Oh Dear - The all-in-one monitoring tool for your entire website</span><span style="color: #ECEFF4">&quot;</span></span>
<span class="line"><span style="color: #81A1C1">&gt;</span></span>
<span class="line"><span style="color: #D8DEE9FF">	</span><span style="color: #81A1C1">&lt;x-slot</span><span style="color: #D8DEE9FF"> </span><span style="color: #8FBCBB">name</span><span style="color: #ECEFF4">=</span><span style="color: #ECEFF4">&quot;</span><span style="color: #A3BE8C">header</span><span style="color: #ECEFF4">&quot;</span><span style="color: #81A1C1">&gt;</span></span>
<span class="line"><span style="color: #D8DEE9FF">		... all custom header things specific to the homepage </span></span>
<span class="line"><span style="color: #D8DEE9FF">	</span><span style="color: #81A1C1">&lt;/x-slot&gt;</span></span>
<span class="line"><span style="color: #D8DEE9FF">	</span></span>
<span class="line"><span style="color: #D8DEE9FF">	</span><span style="color: #616E88">&lt;!-- homepage sections --&gt;</span></span>
<span class="line"><span style="color: #D8DEE9FF">	...</span></span>
<span class="line"></span>
<span class="line"><span style="color: #81A1C1">&lt;/x-front.layout&gt;</span></span>
<span class="line"></span></code></pre>
<p>Blade components and slots provide handy means to customise the components for each specific use case. Note the <code>title</code> attribute which sets the <code>&lt;title&gt;</code> within the base layout. Or the header slot which we use to add specific markup for the hero section of the homepage.</p>
<h2 id="lets-build">Lets build</h2>
<p>Now we have the basics covered it was time to start building. But how do you approach building 25 pages consisting of 100 components. Well, you do it one bit at a time. Before we started with the pages we built the base layout, including the header and the footer first.</p>
<p>Next we started with the homepage. We first determined the homepage sections:
<img src="/uploads/blogs/redesign-2022-part-2/homepage-sections.jpg" alt="Homepage sections" /></p>
<p>Next, we took the first section and split that section into smaller components:
<img src="/uploads/blogs/redesign-2022-part-2/homepage-section.jpg" alt="Homepage section" /></p>
<p>We then start building the components one by one. Building each component goes through several stages. They basically come down to:</p>
<h3 id="1-deconstruct-the-design">1. Deconstruct the design</h3>
<p>First we need to understand the design before we can build it. For us it meant diving into the Sketch file and checkout all layers and their properties like colours, fonts and font sizes. Once we identified the ingredients we continued with the markup.</p>
<h3 id="2-start-building">2. Start building</h3>
<p>Next we replicate each layer and its properties. We write the markup and style it at same time thanks to Tailwind CSS. This combined with <a href="https://browsersync.io">Browsersync</a> or a tool like <a href="https://sizzy.co">Sizzy</a> is seeing magic happening in front of you.</p>
<p>It allows us to have the design, the code and the end result in front of us without having to toggle between windows or files too much.</p>
<h3 id="3-refine">3. Refine</h3>
<p>When having built a specific section we constantly refine them which basically means repeating step 1 and 2 up to a point where the end result matches the design.</p>
<h4 id="4-add-interactivity">4. Add interactivity</h4>
<p>We try to go the next mile by adding interactivity to many components. As we build most visuals in html we can make them interactive with Javascript. To make our lives a lot easier we use help of AlpineJS.</p>
<p>AlpineJS fits perfectly with the strategy of using blade components as much as possible. For example on the homepage we have this counter component:</p>
<p><img src="/uploads/blogs/redesign-2022-part-2/counter.jpg" alt="Counter" /></p>
<p>Of which the markup in home.blade.php looks like:
<code>&lt;x-front.home.counter :count=&quot;$publicMetrics['runCount']&quot; /&gt;</code></p>
<p>We often pass an initial values via the component attributes to reuse them in the component itself.</p>
<p>When we take a look at the counter component it is structured as follows:</p>
<pre class="shiki" style="background-color: #2e3440ff"><code><span class="line"><span style="color: #81A1C1">&lt;div</span><span style="color: #D8DEE9FF"> </span><span style="color: #8FBCBB">x-data</span><span style="color: #ECEFF4">=</span><span style="color: #ECEFF4">&quot;</span><span style="color: #A3BE8C">counter</span><span style="color: #ECEFF4">&quot;</span><span style="color: #81A1C1">&gt;</span></span>
<span class="line"><span style="color: #D8DEE9FF">	... all counter markup</span></span>
<span class="line"><span style="color: #81A1C1">&lt;/div&gt;</span></span>
<span class="line"></span>
<span class="line"><span style="color: #81A1C1">@once</span></span>
<span class="line"><span style="color: #D8DEE9FF">    </span><span style="color: #81A1C1">@push</span><span style="color: #D8DEE9FF">(</span><span style="color: #ECEFF4">&#39;</span><span style="color: #A3BE8C">scripts</span><span style="color: #ECEFF4">&#39;</span><span style="color: #D8DEE9FF">)</span></span>
<span class="line"><span style="color: #ECEFF4">        </span><span style="color: #81A1C1">&lt;script&gt;</span></span>
<span class="line"><span style="color: #D8DEE9FF">            </span><span style="color: #D8DEE9">document</span><span style="color: #ECEFF4">.</span><span style="color: #88C0D0">addEventListener</span><span style="color: #D8DEE9FF">(</span><span style="color: #ECEFF4">&#39;</span><span style="color: #A3BE8C">alpine:init</span><span style="color: #ECEFF4">&#39;</span><span style="color: #ECEFF4">,</span><span style="color: #D8DEE9FF"> </span><span style="color: #ECEFF4">()</span><span style="color: #D8DEE9FF"> </span><span style="color: #81A1C1">=&gt;</span><span style="color: #D8DEE9FF"> </span><span style="color: #ECEFF4">{</span></span>
<span class="line"><span style="color: #D8DEE9FF">                </span><span style="color: #D8DEE9">Alpine</span><span style="color: #ECEFF4">.</span><span style="color: #88C0D0">data</span><span style="color: #D8DEE9FF">(</span><span style="color: #ECEFF4">&#39;</span><span style="color: #A3BE8C">counter</span><span style="color: #ECEFF4">&#39;</span><span style="color: #D8DEE9FF"> </span><span style="color: #81A1C1">=&gt;</span><span style="color: #D8DEE9FF"> (</span><span style="color: #ECEFF4">{</span></span>
<span class="line"><span style="color: #D8DEE9FF">                    </span><span style="color: #88C0D0">count</span><span style="color: #ECEFF4">:</span><span style="color: #D8DEE9FF"> </span><span style="color: #ECEFF4">{</span><span style="color: #D8DEE9FF">{ </span><span style="color: #D8DEE9">$count</span><span style="color: #D8DEE9FF"> </span><span style="color: #ECEFF4">}},</span></span>
<span class="line"><span style="color: #D8DEE9FF">                    </span><span style="color: #D8DEE9">digits</span><span style="color: #D8DEE9FF">: []</span><span style="color: #ECEFF4">,</span></span>
<span class="line"><span style="color: #D8DEE9FF">                    </span><span style="color: #88C0D0">init</span><span style="color: #D8DEE9FF">() </span><span style="color: #ECEFF4">{</span></span>
<span class="line"><span style="color: #D8DEE9FF">                        this.recalculateDigits();</span></span>
<span class="line"><span style="color: #D8DEE9FF">                        </span><span style="color: #88C0D0">setInterval</span><span style="color: #ECEFF4">(</span><span style="color: #D8DEE9FF">(</span><span style="color: #ECEFF4">)</span><span style="color: #D8DEE9FF"> </span><span style="color: #81A1C1">=&gt;</span><span style="color: #D8DEE9FF"> </span><span style="color: #ECEFF4">{</span></span>
<span class="line"><span style="color: #D8DEE9FF">                            </span><span style="color: #88C0D0">fetch</span><span style="color: #ECEFF4">(</span><span style="color: #ECEFF4">&#39;</span><span style="color: #A3BE8C">/api/public-metrics</span><span style="color: #ECEFF4">&#39;</span><span style="color: #ECEFF4">)</span></span>
<span class="line"><span style="color: #D8DEE9FF">                                .then</span><span style="color: #ECEFF4">(</span><span style="color: #D8DEE9">response</span><span style="color: #D8DEE9FF"> </span><span style="color: #81A1C1">=&gt;</span><span style="color: #D8DEE9FF"> </span><span style="color: #D8DEE9">response</span><span style="color: #ECEFF4">.</span><span style="color: #88C0D0">json</span><span style="color: #D8DEE9FF">()</span><span style="color: #ECEFF4">)</span></span>
<span class="line"><span style="color: #D8DEE9FF">                                .then(</span><span style="color: #ECEFF4">(</span><span style="color: #D8DEE9">data</span><span style="color: #ECEFF4">)</span><span style="color: #D8DEE9FF"> </span><span style="color: #81A1C1">=&gt;</span><span style="color: #D8DEE9FF"> </span><span style="color: #ECEFF4">{</span><span style="color: #D8DEE9FF">                      </span></span>
<span class="line"><span style="color: #D8DEE9FF">                                    let key </span><span style="color: #81A1C1">=</span><span style="color: #D8DEE9FF"> </span><span style="color: #ECEFF4">`</span><span style="color: #81A1C1">${</span><span style="color: #81A1C1">this</span><span style="color: #ECEFF4">.</span><span style="color: #D8DEE9">type</span><span style="color: #81A1C1">}</span><span style="color: #A3BE8C">_count</span><span style="color: #ECEFF4">`</span></span>
<span class="line"><span style="color: #D8DEE9FF">                                    this</span><span style="color: #ECEFF4">.</span><span style="color: #D8DEE9FF">count </span><span style="color: #81A1C1">=</span><span style="color: #D8DEE9FF"> </span><span style="color: #D8DEE9">data</span><span style="color: #D8DEE9FF">[</span><span style="color: #D8DEE9">key</span><span style="color: #D8DEE9FF">]</span><span style="color: #81A1C1">;</span></span>
<span class="line"><span style="color: #D8DEE9FF">                                </span><span style="color: #ECEFF4">}</span><span style="color: #D8DEE9FF">)</span><span style="color: #81A1C1">;</span></span>
<span class="line"><span style="color: #D8DEE9FF">                        </span><span style="color: #ECEFF4">},</span><span style="color: #D8DEE9FF"> </span><span style="color: #B48EAD">5000</span><span style="color: #88C0D0">);    </span></span>
<span class="line"><span style="color: #D8DEE9FF">                    </span><span style="color: #ECEFF4">},</span></span>
<span class="line"><span style="color: #D8DEE9FF">                }))</span><span style="color: #81A1C1">;</span></span>
<span class="line"><span style="color: #D8DEE9FF">            </span><span style="color: #ECEFF4">}</span><span style="color: #D8DEE9FF">)</span><span style="color: #81A1C1">;</span></span>
<span class="line"><span style="color: #D8DEE9FF">        </span><span style="color: #81A1C1">&lt;/script&gt;</span></span>
<span class="line"><span style="color: #D8DEE9FF">    </span><span style="color: #81A1C1">@endpush</span></span>
<span class="line"><span style="color: #81A1C1">@endonce</span></span>
<span class="line"></span></code></pre>
<p>As you can see we set the x-data property to what is defined below the markup. We create a specific script which is scoped to this component. This setup allows us to set initial values and get it all going in the init() hook. In this case it fetches an API endpoint every five seconds and updates the count.</p>
<p>By using this approach together with toggling tailwind classes we can create slick animations and add interactivity. Big shoutout to <a href="https://twitter.com/sebdedeyne">Seb</a> who initially set up this structure as well as the whole redesign structure. It turned out to be very effective for all other components as well.</p>
<h3 id="5-make-it-responsive">5. Make it responsive</h3>
<p>We often build the design for the desktop viewport first. The reason we don’t develop mobile first (which is a popular approach) is because the designs have been made (mostly) for desktop only. So in many cases we don’t know upfront what the mobile version should look like of a specific page. Therefore making the desktop version first and then see what needs to be adjusted when making the browser smaller is a better approach.</p>
<h2 id="rinse-and-repeat">Rinse and repeat</h2>
<p>When having a specific component or section built we then cleaned it up as much as possible. Refine the code, cleanup any log statements, rename variables and components if needed. Then we just repeat the whole process for the next section or component.</p>
<h2 id="using-components-and-make-them-easy-to-work-with">Using components and make them easy to work with</h2>
<p>As mentioned before, working with components can cleanup your markup a lot. Another benefit of using components is its flexibility. For example variables within a component can be either populated through setting the attribute on the parent, like so:</p>
<pre class="shiki" style="background-color: #2e3440ff"><code><span class="line"><span style="color: #616E88">&lt;!-- counter component --&gt;</span></span>
<span class="line"><span style="color: #81A1C1">&lt;div&gt;</span></span>
<span class="line"><span style="color: #D8DEE9FF">	</span><span style="color: #81A1C1">{{</span><span style="color: #D8DEE9FF"> </span><span style="color: #81A1C1">$</span><span style="color: #D8DEE9">counter</span><span style="color: #D8DEE9FF"> </span><span style="color: #81A1C1">}}</span></span>
<span class="line"><span style="color: #81A1C1">&lt;/div&gt;</span></span>
<span class="line"></span></code></pre>
<p>Use it like: <code>&lt;x-counter count=&quot;12&quot; /&gt;</code></p>
<p>Or you can add specific markup within the component tag:</p>
<pre class="shiki" style="background-color: #2e3440ff"><code><span class="line"><span style="color: #81A1C1">&lt;x-counter&gt;</span></span>
<span class="line"><span style="color: #D8DEE9FF">	</span><span style="color: #81A1C1">&lt;</span><span style="color: #D8DEE9">x-slot:count</span><span style="color: #81A1C1">&gt;</span></span>
<span class="line"><span style="color: #D8DEE9FF">		</span><span style="color: #81A1C1">&lt;span</span><span style="color: #D8DEE9FF"> </span><span style="color: #8FBCBB">class</span><span style="color: #ECEFF4">=</span><span style="color: #ECEFF4">&quot;</span><span style="color: #A3BE8C">text-white font-mono</span><span style="color: #ECEFF4">&quot;</span><span style="color: #81A1C1">&gt;</span><span style="color: #D8DEE9FF">12</span><span style="color: #81A1C1">&lt;/span&gt;</span><span style="color: #D8DEE9FF"> notifications</span></span>
<span class="line"><span style="color: #D8DEE9FF">	</span><span style="color: #81A1C1">&lt;/x-slot&gt;</span></span>
<span class="line"><span style="color: #81A1C1">&lt;x-counter&gt;</span></span>
<span class="line"></span></code></pre>
<p>This comes in very handy for components that must show a description. In some cases the description can be a single paragraph. It can then be passed to the component as follows:</p>
<pre class="shiki" style="background-color: #2e3440ff"><code><span class="line"><span style="color: #81A1C1">&lt;x-feature-highlight</span></span>
<span class="line"><span style="color: #D8DEE9FF">	</span><span style="color: #8FBCBB">title</span><span style="color: #ECEFF4">=</span><span style="color: #ECEFF4">&quot;</span><span style="color: #A3BE8C">Have piece of mind</span><span style="color: #ECEFF4">&quot;</span></span>
<span class="line"><span style="color: #D8DEE9FF">	</span><span style="color: #8FBCBB">subtitle</span><span style="color: #ECEFF4">=</span><span style="color: #ECEFF4">&quot;</span><span style="color: #A3BE8C">that things are running smooth</span><span style="color: #ECEFF4">&quot;</span></span>
<span class="line"><span style="color: #D8DEE9FF">	</span><span style="color: #8FBCBB">description</span><span style="color: #ECEFF4">=</span><span style="color: #ECEFF4">&quot;</span><span style="color: #A3BE8C">This is what your dashboard looks like when all your websites are up. Oh Dear is running checks every minute, so you can sleep on both ears. Happy days!</span></span>
<span class="line"><span style="color: #A3BE8C">/&gt;</span></span>
<span class="line"></span></code></pre>
<p>However, we can’t use this approach if we need to pass more than one paragraph and expect it to look good in the browser.</p>
<p>We can then do:</p>
<pre class="shiki" style="background-color: #2e3440ff"><code><span class="line"><span style="color: #81A1C1">&lt;x-feature-highlight</span></span>
<span class="line"><span style="color: #D8DEE9FF">	</span><span style="color: #8FBCBB">title</span><span style="color: #ECEFF4">=</span><span style="color: #ECEFF4">&quot;</span><span style="color: #A3BE8C">Have piece of mind</span><span style="color: #ECEFF4">&quot;</span></span>
<span class="line"><span style="color: #D8DEE9FF">	</span><span style="color: #8FBCBB">subtitle</span><span style="color: #ECEFF4">=</span><span style="color: #ECEFF4">&quot;</span><span style="color: #A3BE8C">that things are running smooth</span><span style="color: #ECEFF4">&quot;</span></span>
<span class="line"><span style="color: #81A1C1">&gt;</span></span>
<span class="line"><span style="color: #D8DEE9FF">	</span><span style="color: #81A1C1">&lt;</span><span style="color: #D8DEE9">x-slot:description</span><span style="color: #81A1C1">&gt;</span></span>
<span class="line"><span style="color: #D8DEE9FF">		</span><span style="color: #81A1C1">&lt;p&gt;</span><span style="color: #D8DEE9FF">This is what your dashboard looks like when all your websites are up. Oh Dear is running checks every minute, so you can sleep on both ears. Happy days!</span><span style="color: #81A1C1">&lt;/p&gt;</span></span>
<span class="line"></span>
<span class="line"><span style="color: #D8DEE9FF">		</span><span style="color: #81A1C1">&lt;p&gt;</span><span style="color: #D8DEE9FF">Another paragraph can go here</span><span style="color: #81A1C1">&lt;/p&gt;</span></span>
<span class="line"><span style="color: #D8DEE9FF">	</span><span style="color: #81A1C1">&lt;/x-slot&gt;</span></span>
<span class="line"><span style="color: #81A1C1">&lt;x-counter&gt;</span></span>
<span class="line"></span></code></pre>
<h2 id="in-conclusion">In conclusion</h2>
<p>Implementing the design has been challenging, but having a process like described above felt being key in what we completed so far.</p>
<p>The homepage, the docs and almost all feature pages have been completed. So far there are 71,307 lines to be added to the main branch while we still need to start with the work the app side. We’ve done a crazy amount of work and yet there is still a lot to be done.</p>
<p>We keep on building and aim to provide our users with a renewed kick-ass product somewhere this year. Would you like to see more frequent product updates make sure to follow us on <a href="https://twitter.com/OhDearApp">Twitter</a>.</p>
<p>Check out the next post in this series on <a href="https://ohdear.app/blog/building-oh-dears-new-design-creating-a-color-system-why-and-how">why and how we created a color sytem</a>.</p>
]]>
            </summary>
                                    <updated>2022-05-20T08:38:57+00:00</updated>
        </entry>
            <entry>
            <title><![CDATA[Status page subscriptions are now available]]></title>
            <link rel="alternate" href="https://ohdear.app/news-and-updates/status-page-subscriptions-are-now-available" />
            <id>https://ohdear.app/74</id>
            <author>
                <name><![CDATA[Oh Dear]]></name>
            </author>
            <summary type="html">
                <![CDATA[<p>Using Oh Dear you can create beautiful status pages. As from today, you can let your users also subscribe to updates on those status pages. In this blog post we'll tell you all about it.</p>
<h2 id="subscribing-to-status-pages-updates">Subscribing to status pages updates</h2>
<p>In addition to monitoring your site, Oh Dear also provides status page. Here's how such a status page looks like. <a href="https://status.flareapp.io">Click here</a> to view it in your browser.</p>
<p><img src="/uploads/blogs/status-page-subscriptions/status-page.png" alt="image" /></p>
<p>Don't let that URL fool you: &quot;status.flareapp.io&quot; could make you think it's served by the Flare, but that domain points in fact to Oh Dear. We use <a href="https://ohdear.app/blog/how-we-used-caddy-and-laravels-subdomain-routing-to-serve-our-status-pages">some fancy hosting setup</a> to map subdomains to routes in Oh Dear.</p>
<p>Using such a status page you can inform the users of events happening at your service: things like up and down notices, but also things like scheduled maintenance.</p>
<p>When you click the new &quot;Subscribe to updates&quot; button on top of the page, you'll see that we now offer two ways of subscribing: Slack and RSS. We might add more channels in the future.</p>
<p><img src="/uploads/blogs/status-page-subscriptions/subscribe.png" alt="image" /></p>
<p>That dropdown is powered by <a href="https://alpinejs.dev">Alpine JS</a>. More specifically, we used Alpine's <a href="https://alpinejs.dev/component/dropdown">drop down component</a> as a basis. Do check out the <a href="https://alpinejs.dev/components">other Alpine components</a> too.</p>
<p>When you click &quot;Via Slack&quot;, you'll get redirected to a Slack authorization screen, on which you can choose the channel in your workspace where we should send notifications.</p>
<p><img src="/uploads/blogs/status-page-subscriptions/install.png" alt="image" /></p>
<p>To demonstrate that the Slack connection is working, we send immediately send a welcome notification to your Slack channel. This is what it looks like:</p>
<p><img src="/uploads/blogs/status-page-subscriptions/notification.png" alt="image" /></p>
<p>In your browser, you'll get redirected to the notification preferences screen. Where you can customise that message that you'd like to receive.</p>
<p><img src="/uploads/blogs/status-page-subscriptions/preferences.png" alt="image" /></p>
<p>An Oh Dear status page can display the status of multiple sites and updates can concerns different severities. If you only want to receive &quot;high&quot; and &quot;resolved&quot; severity updates of the Flare API you can configure it like this.</p>
<p><img src="/uploads/blogs/status-page-subscriptions/selection.png" alt="image" /></p>
<p>Here's how those notification will look in your Slack channel whenever something goes wrong with Flare's API.</p>
<p><img src="/uploads/blogs/status-page-subscriptions/notification-2.png" alt="image" /></p>
<p>Should too many notifications come in for your taste, then you can even decide to snooze notifications for a certain amount of time.</p>
<p><img src="/uploads/blogs/status-page-subscriptions/snooze.png" alt="image" /></p>
<p><img src="/uploads/blogs/status-page-subscriptions/snoozed.png" alt="image" /></p>
<h2 id="in-closing">In closing</h2>
<p>A while ago, we asked publicly <a href="https://twitter.com/freekmurze/status/1513968509755269130">on Twitter</a> which features we should add to our service.  <a href="https://twitter.com/DustinGTaylor/status/1513977141909630976">Status page updates</a> was one of the nicest suggestions we got. We'll also implement a few others soon.</p>
<p>If you have a feature request, <a href="mailto:support@ohdear.app">get in touch</a>! We're listening!</p>
]]>
            </summary>
                                    <updated>2022-05-05T13:15:08+00:00</updated>
        </entry>
            <entry>
            <title><![CDATA[Building Oh Dear’s new design: Project setup]]></title>
            <link rel="alternate" href="https://ohdear.app/news-and-updates/building-oh-dears-new-design-project-setup" />
            <id>https://ohdear.app/73</id>
            <author>
                <name><![CDATA[Oh Dear]]></name>
            </author>
            <summary type="html">
                <![CDATA[<p>We are currently rebuilding the Oh Dear website and application frontend. The goal is to go next level in aesthetics and user experience. The Oh Dear redesign will be launched later this year.</p>
<p>In this post, you'll read more about the project setup and tools used. This is the first blog post of a series that will share progress and the knowledge gained along the way.</p>
<h2 id="creating-the-design">Creating the design</h2>
<p>To help us come with the new design, we called upon the talented team of <a href="https://digitalwithyou.com">Digital With You - DWY</a>.</p>
<p>They first gave the Oh Dear branding a make-over and then redesigned every page from the ground up. We will dedicate a separate blog post about how the new branding came to be.</p>
<p>With the design being finished for about 95%, it was time to start building. We started with going through the project setup and making adjustments where needed. Let's dig in.</p>
<h2 id="two-apps-in-one">Two apps in one</h2>
<p>The Oh Dear project mainly consists of two parts: the marketing website and the application. They both live in the same Laravel project but are separated by their own Blade files, CSS and JS bundles. Both parts share some resources such as buttons, gradients, and JS logic, and those resources are stored in a shared folder. The project structure looks something like this:</p>
<p><img src="/uploads/blogs/redesign-2022-part-1/redesign_folder_structure.jpg" alt="Folder Structure" /></p>
<p>Using Laravel Mix, we can generate optimized bundles for each part of the project and have complete control of what is included in each bundle. Our webpack.mix.js file looks something like this:</p>
<pre class="shiki" style="background-color: #2e3440ff"><code><span class="line"><span style="color: #81A1C1">const</span><span style="color: #D8DEE9FF"> </span><span style="color: #D8DEE9">mix</span><span style="color: #D8DEE9FF"> </span><span style="color: #81A1C1">=</span><span style="color: #D8DEE9FF"> </span><span style="color: #88C0D0">require</span><span style="color: #D8DEE9FF">(</span><span style="color: #ECEFF4">&#39;</span><span style="color: #A3BE8C">laravel-mix</span><span style="color: #ECEFF4">&#39;</span><span style="color: #D8DEE9FF">)</span><span style="color: #81A1C1">;</span></span>
<span class="line"></span>
<span class="line"><span style="color: #D8DEE9">mix</span><span style="color: #ECEFF4">.</span><span style="color: #88C0D0">js</span><span style="color: #D8DEE9FF">(</span><span style="color: #ECEFF4">&#39;</span><span style="color: #A3BE8C">resources/js/front.js</span><span style="color: #ECEFF4">&#39;</span><span style="color: #ECEFF4">,</span><span style="color: #D8DEE9FF"> </span><span style="color: #ECEFF4">&#39;</span><span style="color: #A3BE8C">public/js</span><span style="color: #ECEFF4">&#39;</span><span style="color: #D8DEE9FF">)</span></span>
<span class="line"><span style="color: #D8DEE9FF">    </span><span style="color: #ECEFF4">.</span><span style="color: #88C0D0">js</span><span style="color: #D8DEE9FF">(</span><span style="color: #ECEFF4">&#39;</span><span style="color: #A3BE8C">resources/js/app.js</span><span style="color: #ECEFF4">&#39;</span><span style="color: #ECEFF4">,</span><span style="color: #D8DEE9FF"> </span><span style="color: #ECEFF4">&#39;</span><span style="color: #A3BE8C">public/js</span><span style="color: #ECEFF4">&#39;</span><span style="color: #D8DEE9FF">)</span></span>
<span class="line"><span style="color: #D8DEE9FF">    </span><span style="color: #ECEFF4">.</span><span style="color: #88C0D0">js</span><span style="color: #D8DEE9FF">(</span><span style="color: #ECEFF4">&#39;</span><span style="color: #A3BE8C">resources/js/status-page.js</span><span style="color: #ECEFF4">&#39;</span><span style="color: #ECEFF4">,</span><span style="color: #D8DEE9FF"> </span><span style="color: #ECEFF4">&#39;</span><span style="color: #A3BE8C">public/js</span><span style="color: #ECEFF4">&#39;</span><span style="color: #D8DEE9FF">)</span></span>
<span class="line"><span style="color: #D8DEE9FF">    </span><span style="color: #ECEFF4">.</span><span style="color: #88C0D0">postCss</span><span style="color: #D8DEE9FF">(</span><span style="color: #ECEFF4">&#39;</span><span style="color: #A3BE8C">resources/css/app/app.css</span><span style="color: #ECEFF4">&#39;</span><span style="color: #ECEFF4">,</span><span style="color: #D8DEE9FF"> </span><span style="color: #ECEFF4">&#39;</span><span style="color: #A3BE8C">public/css</span><span style="color: #ECEFF4">&#39;</span><span style="color: #ECEFF4">,</span><span style="color: #D8DEE9FF"> [</span></span>
<span class="line"><span style="color: #D8DEE9FF">        </span><span style="color: #88C0D0">require</span><span style="color: #D8DEE9FF">(</span><span style="color: #ECEFF4">&#39;</span><span style="color: #A3BE8C">tailwindcss</span><span style="color: #ECEFF4">&#39;</span><span style="color: #D8DEE9FF">)(</span><span style="color: #ECEFF4">{</span></span>
<span class="line"><span style="color: #D8DEE9FF">            </span><span style="color: #88C0D0">content</span><span style="color: #ECEFF4">:</span><span style="color: #D8DEE9FF"> [</span></span>
<span class="line"><span style="color: #D8DEE9FF">                </span><span style="color: #81A1C1">...</span></span>
<span class="line"><span style="color: #D8DEE9FF">            ]</span><span style="color: #ECEFF4">,</span></span>
<span class="line"><span style="color: #D8DEE9FF">            </span><span style="color: #81A1C1">...</span><span style="color: #88C0D0">require</span><span style="color: #D8DEE9FF">(</span><span style="color: #ECEFF4">&#39;</span><span style="color: #A3BE8C">./tailwind.config.js</span><span style="color: #ECEFF4">&#39;</span><span style="color: #D8DEE9FF">)</span><span style="color: #ECEFF4">,</span></span>
<span class="line"><span style="color: #D8DEE9FF">        </span><span style="color: #ECEFF4">}</span><span style="color: #D8DEE9FF">)</span><span style="color: #ECEFF4">,</span></span>
<span class="line"><span style="color: #D8DEE9FF">    ])</span></span>
<span class="line"><span style="color: #D8DEE9FF">    </span><span style="color: #ECEFF4">.</span><span style="color: #88C0D0">postCss</span><span style="color: #D8DEE9FF">(</span><span style="color: #ECEFF4">&#39;</span><span style="color: #A3BE8C">resources/css/front/front.css</span><span style="color: #ECEFF4">&#39;</span><span style="color: #ECEFF4">,</span><span style="color: #D8DEE9FF"> </span><span style="color: #ECEFF4">&#39;</span><span style="color: #A3BE8C">public/css</span><span style="color: #ECEFF4">&#39;</span><span style="color: #ECEFF4">,</span><span style="color: #D8DEE9FF"> [</span></span>
<span class="line"><span style="color: #D8DEE9FF">        </span><span style="color: #88C0D0">require</span><span style="color: #D8DEE9FF">(</span><span style="color: #ECEFF4">&#39;</span><span style="color: #A3BE8C">tailwindcss</span><span style="color: #ECEFF4">&#39;</span><span style="color: #D8DEE9FF">)(</span><span style="color: #ECEFF4">{</span></span>
<span class="line"><span style="color: #D8DEE9FF">            </span><span style="color: #88C0D0">content</span><span style="color: #ECEFF4">:</span><span style="color: #D8DEE9FF"> [</span></span>
<span class="line"><span style="color: #D8DEE9FF">                </span><span style="color: #81A1C1">...</span></span>
<span class="line"><span style="color: #D8DEE9FF">            ]</span><span style="color: #ECEFF4">,</span></span>
<span class="line"><span style="color: #D8DEE9FF">            </span><span style="color: #81A1C1">...</span><span style="color: #88C0D0">require</span><span style="color: #D8DEE9FF">(</span><span style="color: #ECEFF4">&#39;</span><span style="color: #A3BE8C">./tailwind.config.js</span><span style="color: #ECEFF4">&#39;</span><span style="color: #D8DEE9FF">)</span><span style="color: #ECEFF4">,</span></span>
<span class="line"><span style="color: #D8DEE9FF">        </span><span style="color: #ECEFF4">}</span><span style="color: #D8DEE9FF">)</span><span style="color: #ECEFF4">,</span></span>
<span class="line"><span style="color: #D8DEE9FF">    ])</span></span>
<span class="line"><span style="color: #D8DEE9FF">    </span><span style="color: #ECEFF4">.</span><span style="color: #88C0D0">postCss</span><span style="color: #D8DEE9FF">(</span><span style="color: #ECEFF4">&#39;</span><span style="color: #A3BE8C">resources/css/status-page/status-page.css</span><span style="color: #ECEFF4">&#39;</span><span style="color: #ECEFF4">,</span><span style="color: #D8DEE9FF"> </span><span style="color: #ECEFF4">&#39;</span><span style="color: #A3BE8C">public/css</span><span style="color: #ECEFF4">&#39;</span><span style="color: #ECEFF4">,</span><span style="color: #D8DEE9FF"> [</span></span>
<span class="line"><span style="color: #D8DEE9FF">        </span><span style="color: #88C0D0">require</span><span style="color: #D8DEE9FF">(</span><span style="color: #ECEFF4">&#39;</span><span style="color: #A3BE8C">tailwindcss</span><span style="color: #ECEFF4">&#39;</span><span style="color: #D8DEE9FF">)(</span><span style="color: #ECEFF4">{</span></span>
<span class="line"><span style="color: #D8DEE9FF">            </span><span style="color: #88C0D0">content</span><span style="color: #ECEFF4">:</span><span style="color: #D8DEE9FF"> [</span></span>
<span class="line"><span style="color: #D8DEE9FF">				</span><span style="color: #81A1C1">...</span></span>
<span class="line"><span style="color: #D8DEE9FF">			]</span><span style="color: #ECEFF4">,</span></span>
<span class="line"><span style="color: #D8DEE9FF">            </span><span style="color: #81A1C1">...</span><span style="color: #88C0D0">require</span><span style="color: #D8DEE9FF">(</span><span style="color: #ECEFF4">&#39;</span><span style="color: #A3BE8C">./tailwind.config.js</span><span style="color: #ECEFF4">&#39;</span><span style="color: #D8DEE9FF">)</span><span style="color: #ECEFF4">,</span></span>
<span class="line"><span style="color: #D8DEE9FF">        </span><span style="color: #ECEFF4">}</span><span style="color: #D8DEE9FF">)</span><span style="color: #ECEFF4">,</span></span>
<span class="line"><span style="color: #D8DEE9FF">    ])</span><span style="color: #81A1C1">;</span></span>
<span class="line"></span>
<span class="line"><span style="color: #D8DEE9">mix</span><span style="color: #ECEFF4">.</span><span style="color: #88C0D0">version</span><span style="color: #D8DEE9FF">()</span><span style="color: #81A1C1">;</span></span>
<span class="line"></span></code></pre>
<p>As you can see, we end up with a dedicated front and app JS and CSS files. As the status pages are isolated from the front and the app, we generate specific bundles for that as well. This helps reduce the loading time of the status pages and make them feel as snappy as possible.</p>
<h2 id="using-the-tall-stack">Using the TALL stack</h2>
<p>Both parts of the project are made out of php and blade files. This makes it ideal for applying the TALL stack, being Tailwind CSS, AlpineJS, Laravel and Livewire. The current version of Oh Dear is already using this stack, and the new design is being implemented with it as well.</p>
<p>For the new design, there were many ideas to make each section of the home page and feature pages interactive. For those pages, we rely heavily on AlpineJS and Tailwind CSS, which is a golden combination to get the job done:</p>
<p><img src="/uploads/blogs/redesign-2022-part-1/redesign_notification_switcher.gif" alt="Notification Switcher" /></p>
<p><img src="/uploads/blogs/redesign-2022-part-1/slider-and-scheduler.gif" alt="Status page slider and task scheduler" /></p>
<p>As AlpineJS is being used for the public-facing pages, we use Livewire for the more complex components on the application side.</p>
<h2 id="other-tools-being-used">Other tools being used</h2>
<p>For formatting our PHP code, we use PHP CS Fixer. Prettier is used for frontend files like JS and CSS. Unfortunately, there is still no good support for Blade/HTML, we format those files by hand.</p>
<p>The formatting is being automated as much as possible. For example, upon committing code, we trigger Prettier via a pre-commit hook powered by Husky. PHP CS fixer is being applied via GitHub actions.</p>
<p>I can highly recommend setting up PHP CS Fixer and Prettier locally, as you can set those up to be triggered when saving a file. This saves a lot of time thinking about formatting and lets you enjoy nicely formatted code instantly. When setting up PHP CS Fixer or wanting to tweak your current config, make sure to check out the config provided by <a href="https://gist.github.com/laravel-shift/cab527923ed2a109dda047b97d53c200">Laravel Shift</a>. That config is very extensive and provides a great starting point, and it might be all you need.</p>
<h2 id="how-we-used-git">How we used Git</h2>
<p>As mentioned, we use GitHub for version control. The new design is being developed on a dedicated branch. This is where I do most of my work, as I'm responsible for implementing the new design. Every day when I work on Oh Dear I branch off from the design branch. At the end of the day I make a PR and merge the changes into the redesign branch. This gives me a clean starting point each day while <a href="https://twitter.com/mattiasgeniar">Mattias</a> and <a href="https://twitter.com/freekmurze">Freek</a> can more easily keep track of what I've been adding.</p>
<p>Freek keeps the redesign branch up to date with changes being applied to the main branch. For example, he updated the <a href="https://nova.laravel.com">Nova</a> installation to V4 this week and recently updated all tests from PHPUnit to <a href="https://pestphp.com">PEST</a>. He then makes sure those changes also get merged into the redesign branch. The goal is to end up with a branch that has no merge conflicts with the main branch and can eventually be merged without problems. Spoiler alert: there is still a lot of work to be done to get to that point :)</p>
<h2 id="closing-thoughts">Closing thoughts</h2>
<p>As you might have noticed, the project setup is not overly complex. This is the result of the excellent work that has been put into the Laravel framework and tools like TailwindCSS, AlpineJS and Livewire. The real complexity for Oh Dear lies within the code and the database structure.</p>
<p>In future blog posts, we will go into more detail about implementing the design. We'd love to hear what you think of it. If there is anything you'd like to know more about, feel free to ask it <a href="https://twitter.com/ohdearapp">on Twitter</a>.</p>
]]>
            </summary>
                                    <updated>2022-04-08T11:25:09+00:00</updated>
        </entry>
            <entry>
            <title><![CDATA[Introducing Nick and Sean to the Oh Dear team]]></title>
            <link rel="alternate" href="https://ohdear.app/news-and-updates/introducing-nick-and-sean-to-the-oh-dear-team" />
            <id>https://ohdear.app/72</id>
            <author>
                <name><![CDATA[Oh Dear]]></name>
            </author>
            <summary type="html">
                <![CDATA[<p>We're growing the team at Oh Dear with two very strong additions: Nick and Sean.</p>
<p>Ever since we started Oh Dear (almost 5 years ago 😱) we've been adding new features, scaling out our infrastructure and growing our user base.</p>
<p>That growth has lead us to two important realisations:</p>
<ol>
<li>Slowly but surely, Oh Dear is growing beyond our ability to manage it with just Freek &amp; Me (Mattias)</li>
<li>The growth has provided us the funding to look for strong hires to enhance our team</li>
</ol>
<p>As a result, we're very proud to introduce both Nick and Sean that are working on Oh Dear!</p>
<h2 id="sean">Sean</h2>
<p>Sean is working on our client support &amp; bugfixes. His background in both Finance and Laravel development gives him a unique perspective and skillset to tackle our client questions and implement long-lasting fixes for recurring problems in our support queue.</p>
<p>Where to find Sean online:</p>
<ul>
<li>
<a href="https://twitter.com/resohead">@resohead</a> on Twitter</li>
</ul>
<h2 id="nick">Nick</h2>
<p>Nick's implementing a brand new redesign for Oh Dear, something we started working on months ago, and is in the final stages of being converted to working HTML &amp; CSS.</p>
<p>That redesign contains <em>a lot</em> of frontend challenges, as we're really going <em>all out</em> in the new design. Nick's vast experience in frontend frameworks is being put to the test in order to implement every little detail.</p>
<p>The results are already looking slick! 💪</p>
<p><img src="/uploads/blogs/redesign-2022-tease-1/redesign-ohdear-teaser.png" alt="Redesign Oh Dear 2022 - Teaser" /></p>
<p>(But, more on that redesign in later blogposts. #tease)</p>
<p>Where to find Nick online:</p>
<ul>
<li>
<a href="https://twitter.com/nckrtl">@nckrtl</a> on Twitter</li>
<li>
<a href="https://nckrtl.com/">nckrtl.com</a>
</li>
</ul>
<p>Both were hired for their unique skillsets, not for their amount of Twitter followers. If you want to stay up-to-date with some behind the scenes leaks, make sure to give them a follow. 😁</p>
]]>
            </summary>
                                    <updated>2022-03-14T11:08:03+00:00</updated>
        </entry>
            <entry>
            <title><![CDATA[You can now monitor the health of your application and server]]></title>
            <link rel="alternate" href="https://ohdear.app/news-and-updates/you-can-now-monitor-the-health-of-your-application-and-server" />
            <id>https://ohdear.app/70</id>
            <author>
                <name><![CDATA[Oh Dear]]></name>
            </author>
            <summary type="html">
                <![CDATA[<p>We're proud to announce that we have added a major new feature to Oh Dear: Application Health monitoring.</p>
<p><img src="/img/docs/application-health-monitoring/checks-list.png" alt="screenshot" /></p>
<p>Using Oh Dear, you can now monitor various aspects of your application and server. This way, you could get alerts when:</p>
<ul>
<li>disk space is running low</li>
<li>the database is down</li>
<li>the load on your server is too high</li>
<li>Redis cannot be reached</li>
<li>mails cannot be sent</li>
<li>there are many application errors in a small timeframe (via <a href="https://flareapp.io">Flare</a>)</li>
<li>whenever the load crosses a certain threshold</li>
<li>a reboot of your server is required</li>
<li>...</li>
</ul>
<p>You can monitor any aspect of your app that you want.</p>
<h2 id="how-application-monitor-works">How application monitor works</h2>
<p>Oh Dear will not run any code inside of your application or server. Instead, you should perform the checks yourself. Oh Dear will periodically send an HTTP request to your application to a specific endpoint, and your application should respond with JSON containing the result of health checks.</p>
<p>Oh Dear's request to your app will contain a secret value in the oh-dear-health-check-secret header. To ensure that a request comes from Oh Dear, you should verify if the secret value is correct.</p>
<p>The endpoint to which the request will be sent, and the secret in the header can be specified in the application health check settings.</p>
<p><img src="https://ohdear.app/img/docs/application-health-monitoring/settings.png" alt="screenshot" /></p>
<p>If a health check fails, we can send you a notification. We'll also let you know when we detect that a problem is resolved.</p>
<h2 id="welcoming-all-applications">Welcoming all applications</h2>
<p>For Laravel applications, setting health check monitoring up is a breeze. You can use <a href="https://spatie.be/docs/laravel-health">Spatie's Laravel Health package</a> to run health checks and send the results to Oh Dear. To know more about this, check out t<a href="https://spatie.be/docs/laravel-health">he Laravel Health docs</a>, or <a href="https://freek.dev/2143-a-laravel-package-to-monitor-the-health-of-your-application">this introductory post at freek.dev</a>.</p>
<p>Want to monitor the health of a non-Laravel application, no problem! In our docs, you'll find detailed instructions on running health checks and transmitting results to Oh Dear. <a href="https://ohdear.app/docs/general/application-health-monitoring/any-php-application">For PHP applications</a>, we even made a small package to quickly write health checks results to JSON format we expect.</p>
<p>For all non-PHP applications, we've <a href="https://ohdear.app/docs/general/application-health-monitoring/all-other-languages">described</a> the expected format in great detail.</p>
<h2 id="viewing-application-health-results-in-oh-dear">Viewing application health results in Oh Dear</h2>
<p>Oh Dear will check the health results endpoint of your app every few minutes. You can view the results on the application health check screen.</p>
<p><img src="/img/docs/application-health-monitoring/checks-list.png" alt="screenshot" /></p>
<p>You can click any of the checks to see the history of results for that particular check.</p>
<p><img src="/img/docs/application-health-monitoring/check-detail.png" alt="screenshot" /></p>
<p>We only store the history for a couple of days. If you need to keep the history longer, consider <a href="/docs/integrations/api/application-health-monitoring">using our API</a> to fetch the results, and save them on storage of your own.</p>
<h2 id="give-it-a-try">Give it a try!</h2>
<p>You can try out the application health check right now. We offer <a href="https://ohdear.app/register">a ten trial</a>, no credit card needed.</p>
<p>Oh Dear is the all-in-one solution for website monitoring. We monitor uptime, SSL certificates, broken links, scheduled tasks, application health, DNS and more. We send notifications when something's wrong. All that paired with <a href="https://ohdear.app/docs/integrations/api/introduction">a developer-friendly API</a> and <a href="https://ohdear.app/docs">kick-ass documentation</a>.</p>
]]>
            </summary>
                                    <updated>2022-02-21T10:47:45+00:00</updated>
        </entry>
            <entry>
            <title><![CDATA[How we improved our service in 2021]]></title>
            <link rel="alternate" href="https://ohdear.app/news-and-updates/how-we-improved-our-service-in-2021" />
            <id>https://ohdear.app/71</id>
            <author>
                <name><![CDATA[Oh Dear]]></name>
            </author>
            <summary type="html">
                <![CDATA[<p>We launched in January of 2018, and not a year has gone by where we made significant improvements to our service. Last year we wrote a recap of everything that we did in 2020. With the end of 2021 quickly approaching, let's take a look at all the things we did in the past 12 months.</p>
<h2 id="adding-more-uptime-check-locations">Adding more uptime check locations</h2>
<p>As Oh Dear is gaining popularity, we see that new users come from all continents.</p>
<p>An uptime checker server does the uptime check and performance measurement. For each site, you can pick the location of the uptime checker service that we should use for your site.</p>
<p>In January, we added more uptime check locations and improved capacity:</p>
<ul>
<li>Asia: Seoul &amp; Singapore</li>
<li>US West: San Francisco &amp; Los Angeles</li>
<li>Middle-East: Bahrain</li>
<li>United Kingdom: London</li>
<li>South America: Sao Paulo</li>
<li>Africa: Cape Town</li>
</ul>
<p><img src="https://ohdear.app/uploads/blogs/uptime-locations-2021/uptime-locations-2021.gif" alt="map" /></p>
<p>Our most popular ones still include Europe (Frankfurt is #1, Paris is #2), with Dallas (US mid) at a close #3.</p>
<p><a href="">Read more in this post</a></p>
<h2 id="introducing-monthly-site-reports">Introducing monthly site reports</h2>
<p>In February, we've added a monthly site report.  In such a report, you get a bird's eye summary of everything we know of a site in a particular month. These reports can be mailed automatically at the end of every month to people outside of your team. If you're an agency and manage sites for your clients, you could use this feature to send a monthly report of all broken links to your client.</p>
<p><img src="https://ohdear.app/uploads/blogs/site-report/report.png" alt="report" /></p>
<p><a href="">Read more in this post</a></p>
<h2 id="snoozing-notifications-until-the-next-workday">Snoozing notifications until the next workday</h2>
<p>Still in February, we added a minor feature: snoozing notifications until the next workday. This way, we won't interrupt your evening and weekend with reminder notifications.</p>
<p><img src="https://ohdear.app/uploads/blogs/workday/snooze.jpg" alt="slack" /></p>
<p><a href="https://ohdear.app/blog/snooze-notifications-until-the-next-workday">Read more in this post</a></p>
<h2 id="adding-support-for-microsoft-teams">Adding support for Microsoft teams</h2>
<p>At the end of February, a group of our users asked for support for notifications for Microsoft teams, so we added just that.</p>
<p><a href="https://ohdear.app/img/docs/notifications/microsoft_teams_example.png">support</a></p>
<h2 id="a-new-coat-of-paint-for-the-user-team-and-billing-sections">A new coat of paint for the user, team and billing sections</h2>
<p>In March, we revamped the user, team and billing sections.</p>
<p>Here's how the new team section looks like:</p>
<p><img src="https://ohdear.app/uploads/blogs/spark/team.png" alt="screenshot" /></p>
<p>We also added support for multiple invoice recipients, a new admin role for your team, and improved two-factor authentication.</p>
<p><a href="https://ohdear.app/blog/user-team-and-billing-sections-have-been-revamped">Read more in this post</a></p>
<h2 id="private-status-pages">Private status pages</h2>
<p>In April, we've added the ability to mark status pages as private, guarding them against the outside world unless you have the secret passphrase.</p>
<p><a href="https://ohdear.app/blog/introducing-private-status-pages">Read more in this post</a></p>
<h2 id="grouping-sites">Grouping sites</h2>
<p>Teams that monitor many sites requested a way to group related sites. So, in early May, we added that feature.</p>
<p><img src="https://ohdear.app/uploads/blogs/groups/site-settings.png" alt="screenshot" /></p>
<p><a href="https://ohdear.app/blog/sites-can-now-be-grouped">Read more in this post</a></p>
<h2 id="advanced-user-management-and-guests">Advanced user management and guests</h2>
<p>For larger teams, we added more improvements in early May.</p>
<p>First, we introduced a new <code>guest</code> role that cannot add sites to Oh Dear.</p>
<p><img src="https://ohdear.app/uploads/blogs/user-management/add-team-member.png" alt="screenshot" /></p>
<p>Secondly, you can also choose which sites and status pages a user should have access to.</p>
<p><img src="https://ohdear.app/uploads/blogs/user-management/site-selection.png" alt="screenshot" /></p>
<p><a href="https://ohdear.app/blog/introducing-advanced-user-management-for-large-teams">Read more in this post</a></p>
<h2 id="priority-messages-in-pushover">Priority messages in Pushover</h2>
<p>We have supported Pushover since we launched a couple of years ago. In August, we've added a nice option that several of our users asked for: setting the priority.</p>
<p><img src="https://ohdear.app/uploads/blogs/pushover-priority/priority.png" alt="screenshot" /></p>
<h2 id="introducing-our-new-support-bubble">Introducing our new support bubble</h2>
<p>After the summer, we introduced a little support bubble at the bottom of every page to make it easier for our users to pass us feature requests and report bugs. When you click the support bubble, a form opens to send us a mail quickly. Here's what it looks like.</p>
<p><img src="https://ohdear.app/uploads/blogs/support-bubble/form2.png" alt="screenshot" /></p>
<p><a href="https://ohdear.app/blog/introducing-our-new-support-bubble">Read more in this post</a></p>
<h2 id="monitoring-password-protected-sites">Monitoring password protected sites</h2>
<p>In September, we added the ability to easily monitor password protected sites using our new &quot;Expected response status codes&quot; setting. Using this setting, you can specify which status codes Oh Dear should consider ok.</p>
<p><img src="https://ohdear.app/uploads/blogs/response-status/status.jpg" alt="screenshot" /></p>
<p>By default, this setting is set to 2*, which means everything in the 200 range is ok. For a password-protected site, you could set this to 4O1.</p>
<p><a href="https://ohdear.app/blog/monitoring-password-protected-sites-using-oh-dear">Read more in this post</a></p>
<h2 id="refactoring-for-performance">Refactoring for performance</h2>
<p>One of the most significant improvements this year wasn't user-facing. End of September, we deployed a much more performant version of our application. Behind the scenes, the optimised codebase performs a lot fewer database queries, which ensures Oh Dear's future growth.</p>
<p>You can read many technical details in <a href="https://freek.dev/2075-strategies-for-decreasing-the-number-of-queries-in-a-laravel-app">this blog post at freek.dev</a>. Recommended reading if you're a PHP or Laravel developer.</p>
<h2 id="adding-support-for-telegram-notifications">Adding support for Telegram notifications</h2>
<p>A lot of our users was asking for Telegram support. In early October, we added it as a new notification channel, and we went the full mile and made those notifications interactive. This means that you can snooze notifications or request a new run directly from within Telegram.</p>
<p><img src="https://ohdear.app/img/docs/notifications/telegram/up.png" alt="screenshot" /></p>
<p><a href="https://ohdear.app/blog/introducing-our-new-interactive-telegram-notifications">Read more in this post</a></p>
<h2 id="customising-redirect-behaviour">Customising redirect behaviour</h2>
<p>In October, we've added a new setting to determine how many times a redirect may happen before considering your site down.</p>
<p><img src="https://ohdear.app/uploads/blogs/redirects/settings.png" alt="screenshot" /></p>
<p>On the uptime check report screen, we list the redirects we detected while running the check.</p>
<p><img src="https://ohdear.app/uploads/blogs/redirects/redirects.png" alt="screenshot" /></p>
<p><a href="https://ohdear.app/blog/you-can-now-customise-how-we-handle-redirects">Read more in this post</a></p>
<h2 id="monitoring-your-dns-records">Monitoring your DNS records</h2>
<p>We've saved the most prominent new features for last. In November, we added DNS monitoring to Oh Dear. We can now notify you of changing DNS records and let you know when we've detected a problem with your domain nameservers.</p>
<p><img src="https://ohdear.app/uploads/blogs/dns-monitoring-feature/dns-monitoring-changed-records.png" alt="screenshot" /></p>
<p><a href="https://ohdear.app/blog/you-can-now-monitor-your-dns-records-using-oh-dear">Read more in this post</a></p>
<h2 id="monitoring-the-health-of-your-application">Monitoring the health of your application</h2>
<p>Closely after DNS monitoring, we added another major feature: application health monitoring.</p>
<p>Using Oh Dear, you can now monitor various aspects of your application and server. This way, you could get alerts when:</p>
<ul>
<li>disk space is running low</li>
<li>the database is down</li>
<li>the load on your server is too high</li>
<li>Redis cannot be reached</li>
<li>mails cannot be sent</li>
<li>...</li>
</ul>
<p><img src="https://ohdear.app/img/docs/application-health-monitoring/checks-list.png" alt="screenshot" /></p>
<p><a href="https://ohdear.app/blog/you-can-now-monitor-the-health-of-your-application-and-server">Read more in this post</a></p>
<h2 id="whats-in-store-for-2022">What's in store for 2022?</h2>
<p>One thing that we can already share is that we are going to revamp our entire user interface. Our UI has stayed more or less the same since we launched, and after four years, it's time for a big refresh. These screenshots are still a work in progress, but they give you a little taste of how Oh Dear will look like early next year.</p>
<p><img src="https://ohdear.app/uploads/blogs/end-2021/home.png" alt="screenshot" /></p>
<p><img src="https://ohdear.app/uploads/blogs/end-2021/app.png" alt="screenshot" /></p>
<p>Should you have any suggestions to improve our service, do let us know. There's a little bubble in the bottom right of this page. We're listening!</p>
]]>
            </summary>
                                    <updated>2021-12-15T21:03:59+00:00</updated>
        </entry>
            <entry>
            <title><![CDATA[You can now monitor your DNS records using Oh Dear]]></title>
            <link rel="alternate" href="https://ohdear.app/news-and-updates/you-can-now-monitor-your-dns-records-using-oh-dear" />
            <id>https://ohdear.app/69</id>
            <author>
                <name><![CDATA[Oh Dear]]></name>
            </author>
            <summary type="html">
                <![CDATA[<p>We can now notify you of changing DNS records <em>and</em> let you know when we've detected a problem with your domain nameservers. Woohoo! 🥳</p>
<h2 id="what-is-dns-record-monitoring">What is DNS record monitoring?</h2>
<p>Behind just about every website is a translation service that converts what we humans can read (the &quot;domain name&quot;) to something a computer can interpret (the &quot;IP address&quot;). This conversion or translation is <em>crucial</em> to the functioning of your website.</p>
<p>If the Domain Name Service (DNS) does not work properly and <em>can't</em> translate the domain to an IP address, the web-browser cannot connect to your server and your site is offline.</p>
<p>Most of the time, DNS <em>just works ™️</em>. But sometimes, very subtle problems can occur. And, as webdevelopers ourselves, we've seen a fair few of those.</p>
<p>That's why we're launching DNS record monitoring to have the ability to:</p>
<ol>
<li>Notify you <strong>when DNS records change</strong>
</li>
<li>Alert you whenever <strong>nameservers stop responding</strong>
</li>
<li>Offer confirmation that all <strong>nameservers are returning the same records</strong>
</li>
</ol>
<p>All of this is the same convenient packaging you know as <em>Oh Dear</em>. 🤓</p>
<h2 id="receive-confirmation-of-dns-changes">Receive confirmation of DNS changes</h2>
<p>For many, changing DNS records is a scary action. What can go wrong? Are you sure you're changing the right value? What's the potential fall-out?</p>
<p>With our DNS change monitoring, we can notify you and show you the records that <em>have</em> changed, so you can confirm that those were <em>intended</em> to change.</p>
<p>Take this example for instance: we changed a DNS record and can show you the new (green) and old (red) value.</p>
<p><img src="/uploads/blogs/dns-monitoring-feature/dns-monitoring-changed-records.png" alt="DNS records changed" /></p>
<p>We can offer you the final confirmation you need to make DNS changes with peace of mind.</p>
<p>As always, <a href="/feature/notifications">we can notify you in a lot of ways</a>. Most users opt for the Slack notifications, and every DNS change gets reported there nicely:</p>
<p><img src="/uploads/blogs/dns-monitoring-feature/dns-monitoring-slack-alert.png" alt="DNS records changed" /></p>
<p>Showing <em>which</em> records get updated, added or removed isn't very convenient in a small notification, so we can show you a full report more easily right in the Oh Dear website.</p>
<h2 id="a-back-up-of-all-your-necessary-dns-records">A back-up of all your necessary DNS records</h2>
<p>By default, we'll show you the records we found for your domain. This is a convenient back-up of all the necessary records you can use to rebuild your DNS setup, in case it ever fails.</p>
<p><img src="/uploads/blogs/dns-monitoring-feature/dns-monitoring-overview-records.png" alt="DNS records changed" /></p>
<p>You'll find a full history of all the changes and all records we've ever found, going back to the day you enabled the DNS monitoring. Handy if you ever need to revert to a former value!</p>
<p><img src="/uploads/blogs/dns-monitoring-feature/dns-monitoring-history.png" alt="DNS records history" /></p>
<p>Not quite sure what each record can mean? Click on the label in the front (A, AAAA, MX, ...) and you'll be taken to <a href="/docs/general/dns-monitoring">our extensive documentation on DNS records</a> to help explain it great detail.</p>
<h2 id="notifications-when-nameservers-are-out-of-sync">Notifications when nameservers are out-of-sync</h2>
<p>There are cases where not all nameservers are <em>in-sync</em>. Let's say you have 4 nameservers for your domain and you make a DNS record change. 3 out of those 4 pick up the changes instantly, but the 4th one happens to miss it.</p>
<p>Sure, it's a problem for your hosting- or nameserver-provider, but the trouble falls onto you. About a quarter of your visitors can't reach your site now, because they happen to (randomly) query that 4th nameserver.</p>
<p>How would you know, if your tests happen to hit one of the first 3 nameservers?</p>
<p>Well, we'll let you know when we detect that. That way, you can escalate to your hosting- or nameserver-provider quicker and have less downtime. Win!</p>
<h2 id="detecting-domain-name-hijacks">Detecting domain name hijacks</h2>
<p>Imagine the following, scary, example:</p>
<ol>
<li>Someone manages to take over your domain name and transfer it into their name</li>
<li>They put the very same site online as the one you have, they just change the payment details for incoming payments</li>
</ol>
<p>Would your current monitor be able to detect this? The site is still up and your <a href="https://ohdear.app/docs/general/uptime#uptime-check-options">checkstring</a> may still be valid. It's actually a case where Oh Dear would <em>also</em> think your site is still online!</p>
<p>But, there are 2 crucial changes that would happen in such a hostile takeover of your domain:</p>
<ol>
<li>The SSL certificate would change: the attacker would have to retrieve a new one (unless they managed to get hold of your private key)</li>
<li>The DNS has to change, to point to a server the attacker controls</li>
</ol>
<p>We can now proudly say we can detect and alert on both!</p>
<p>We could already offer <a href="/feature/certificate-monitoring">SSL change alerts</a> but can now <em>also</em> notify you of <a href="/feature/dns-monitoring">changing DNS records</a>.</p>
<p>Just another feature to offer you the certainty that your site both online and actually <em>your</em> site.</p>
<h2 id="useful-when-your-clients-manage-the-domain-name">Useful when your clients manage the domain name</h2>
<p>As a web agency or 3rd party supplier, you may not always be in control of the DNS of the websites you're building.</p>
<p>It's often the case the client has full control over the domain name <em>and</em> the DNS, but you're responsible for the website and the hosting.</p>
<p>With our DNS monitoring, you'll know <em>instantly</em> when your client made a change to the DNS records that <em>could</em> impact you.</p>
<p>And as always with DNS, the sooner you can catch those changes and react, the better. The longer it goes without being detected, the more chances you'll have of the wrong DNS record being cached on recursive resolvers worldwide.</p>
<p>And that means it'll take longer for the corrective DNS record to be found too!</p>
<h2 id="opt-in-for-all-clients">Opt-in for all clients</h2>
<p>We don't enable the DNS checks for everyone, because we do realize it's a little bit technical and not all our clients are interested in this.</p>
<p>Everyone can now enable it for their sites and be prompted to enable DNS monitoring whenever they add a new one. The feature is live for everyone!</p>
<p><img src="/uploads/blogs/dns-monitoring-feature/dns-monitoring-add-screen.png" alt="Add a new site - enable DNS" /></p>
<p>Whenever you add a new site, you can choose to enable DNS monitoring or not.</p>
<h2 id="granularity-on-which-dns-records-you-care-about">Granularity on which DNS records you care about</h2>
<p>You can toggle the alerts per <em>type</em> of DNS record you care about.</p>
<p><img src="/uploads/blogs/dns-monitoring-feature/dns-monitoring-settings.png" alt="DNS record settings" /></p>
<p>Maybe you're behind Cloudflare or another DDoS protection service and your A &amp; AAAA records change often? You can then disable the alerts <em>specifically</em> for those records. Leave the MX and TXT record alerts online and you'll receive notifications whenever those change.</p>
<p>If you're monitoring <code>awesomesite.tld</code>, we'll monitor the DNS records we can find on that domain.</p>
<p>If you care extra about <code>secretpage.awesomesite.tld</code>, you can add that to Oh Dear as well and simply enable the DNS monitoring for that domain, and we'll find &amp; alert on those records too. You decide which domains matter and which you want to receive alerts on.</p>
<h2 id="give-it-a-try">Give it a try!</h2>
<p>As always, <a href="https://ohdear.app/register">we offer a 10-day trial</a> with no credit card requirements. Just an email address and you can test us out.</p>
<p>Don't like it? Simple ignore our emails and we'll delete your account after a few weeks. You don't even have to ask. 😇</p>
]]>
            </summary>
                                    <updated>2021-11-23T16:01:53+00:00</updated>
        </entry>
            <entry>
            <title><![CDATA[You can now customise how we handle redirects]]></title>
            <link rel="alternate" href="https://ohdear.app/news-and-updates/you-can-now-customise-how-we-handle-redirects" />
            <id>https://ohdear.app/68</id>
            <author>
                <name><![CDATA[Oh Dear]]></name>
            </author>
            <summary type="html">
                <![CDATA[<p>A good deal of sites redirect visitors to a specific more relevant page. Think, for instance, of a site that redirects you from <code>/</code> to a page in a relevant language, for instance <code>/en</code> or <code>/nl</code>.</p>
<p>A single redirect is often not a problem, but having multiple redirects in a chain can hinder your site's user experience. Modern browsers also limit the number of redirects.</p>
<p>At our uptime check settings screen, we've added a new option that allows you to specify how many redirects your site can have before we consider it a problem.</p>
<p><img src="/uploads/blogs/redirects/settings.png" alt="screenshot" /></p>
<p>Under the hood, we've always allowed five redirects before we considered the site as down. That's why we are now using five as the default value for this setting.</p>
<p>Should your website redirect more than the allowed limit, we'll send you a notification and consider your site down.</p>
<p>On the uptime check report screen, we list the redirects that we have detected while running the check.</p>
<p><img src="/uploads/blogs/redirects/redirects.png" alt="screenshot" /></p>
<p>We hope you like these improvements on how we handle redirects. We're <a href="/blog">constantly improving</a> our service. If you have any feature requests or feedback, let us know. You can use the support bubble in the bottom right corner of this page to send us a message. We're listening!</p>
]]>
            </summary>
                                    <updated>2021-10-07T09:29:22+00:00</updated>
        </entry>
            <entry>
            <title><![CDATA[Introducing our new interactive Telegram notifications]]></title>
            <link rel="alternate" href="https://ohdear.app/news-and-updates/introducing-our-new-interactive-telegram-notifications" />
            <id>https://ohdear.app/67</id>
            <author>
                <name><![CDATA[Oh Dear]]></name>
            </author>
            <summary type="html">
                <![CDATA[<p>When something is wrong with your site, we can already notify you via a lot of different channels: mail, Slack, SMS, Webhooks, ...</p>
<p>Today, we're adding support for Telegram notifications. We've polished the entire connection flow and made the notifications themselves interactive.</p>
<p>To get started, click the <strong>Telegram</strong> notification channel at either the team or site level.</p>
<p><img src="/img/docs/notifications/telegram/telegram-settings.png" alt="screenshot" /></p>
<p>First, you need to invite <code>@OhDearAppBot</code> to your Telegram channel.</p>
<p>Next, you must copy the start command we generated and paste it into the Telegram channel.</p>
<img src="/img/docs/notifications/telegram/start-token.png" class="max-w-md" />
<p>At Oh Dear, the start command will be acknowledged too.</p>
<p><img src="/img/docs/notifications/telegram/connected.png" alt="screenshot" /></p>
<p>Finally, you must choose for which events you want to receive notifications and save the Telegram settings.</p>
<p><img src="/img/docs/notifications/telegram/saved.png" alt="screenshot" /></p>
<p>Whenever something is wrong with your site, we'll send you a notification. Let's take a look at what happens when the site is down.</p>
<img src="/img/docs/notifications/telegram/down.png" class="max-w-md" />
<p>Notice that there are buttons underneath the notification to view the full report, snooze further notifications, and to rerun the check. Pretty handy.</p>
<p>When you press &quot;Snooze&quot;, you'll see the various snoozing options.</p>
<img src="/img/docs/notifications/telegram/snooze.png" class="max-w-md" />
<p>Let's give this post a happy ending by showing what the notification looks like when a site comes back online.</p>
<img src="/img/docs/notifications/telegram/up.png" class="max-w-md" />
<p>We hope you like this new notification channel.</p>
]]>
            </summary>
                                    <updated>2021-10-01T16:06:20+00:00</updated>
        </entry>
            <entry>
            <title><![CDATA[Let's Encrypt DST Root CA X3 certificate set to expire]]></title>
            <link rel="alternate" href="https://ohdear.app/news-and-updates/lets-encrypt-dst-root-ca-x3-certificate-set-to-expire" />
            <id>https://ohdear.app/65</id>
            <author>
                <name><![CDATA[Oh Dear]]></name>
            </author>
            <summary type="html">
                <![CDATA[<p>If you've been using Let's Encrypt for a while, you may have noticed that their certificates are signed by a root certificate titled <em>DST Root CA X3</em>.</p>
<p>That root certificate is set to expire in a few hours. Any certificates still signed by that root will no longer be valid. But luckily, that shouldn't form a problem for most Let's Encrypt users.</p>
<p>For a while now, new SSL issuances by Let's Encrypt have issued certificates against DST Root CA X3 (the one that is about to expire) <em>and</em> ISRG Root X1. The former will expire, the latter remains valid for years to come.</p>
<p>If Oh Dear detects you're sending along the older, about to expire, intermediate certificate in your certificate chain, we'll notify you to take action:</p>
<p><img src="/uploads/blogs/letsencrypt-r3-expires/letsencrypt_r3_expire.png" alt="Lets Encrypt R3 expiration" /></p>
<p>The fix would be to re-issue certificates <em>or</em> manually change the certificate chain in your configuration that you're sending along via your webserver.</p>
<p>While this will only affect much older devices (ie: iPhone 4 or older), we feel it's important we notify our clients should this affect them.</p>
<p>For more details, we kindly refer to the <a href="https://letsencrypt.org/docs/dst-root-ca-x3-expiration-september-2021/">official Let's Encrypt explanation of their expiring root certificate</a>.</p>
]]>
            </summary>
                                    <updated>2021-09-29T19:17:28+00:00</updated>
        </entry>
            <entry>
            <title><![CDATA[We've increased our performance by decreasing the number of queries]]></title>
            <link rel="alternate" href="https://ohdear.app/news-and-updates/weve-increased-our-performance-by-decreasing-the-number-of-queries" />
            <id>https://ohdear.app/64</id>
            <author>
                <name><![CDATA[Oh Dear]]></name>
            </author>
            <summary type="html">
                <![CDATA[<p>Under the hood, Oh Dear is a large Laravel application that performs many queries all of the time. To power future features, we've recently changed our database structure and refactored some pieces in our code base. We increased performance by decreasing the number of queries.</p>
<p>As an Oh Dear user, you've probably not noticed any changes. Our UI has always been very responsive. Most of the changes impacted the work that we perform on a queue, which is where 99% of our workload happens.</p>
<p>To learn more about the specific changes we made, check out <a href="https://freek.dev/2075-strategies-for-decreasing-the-number-of-queries-in-a-laravel-app">this extensive blog published on freek.dev</a>. If you're a PHP or Laravel developer, you could leverage some of our techniques in your projects.</p>
]]>
            </summary>
                                    <updated>2021-09-18T16:52:09+00:00</updated>
        </entry>
            <entry>
            <title><![CDATA[Monitoring password protected sites using Oh Dear]]></title>
            <link rel="alternate" href="https://ohdear.app/news-and-updates/monitoring-password-protected-sites-using-oh-dear" />
            <id>https://ohdear.app/63</id>
            <author>
                <name><![CDATA[Oh Dear]]></name>
            </author>
            <summary type="html">
                <![CDATA[<p>Keeping an eye on your site and sending you a notification when it goes down is one of the core features of Oh Dear. Under the hood, we'll send a request to your site and take a look if the response code is in the <code>200</code>-<code>299</code> range, which is the default response code range to indicate that everything is ok.</p>
<p>Some of our users are monitoring password protected sites. In such cases, the web server might reply with status code <code>401</code> (unauthorised). Sure, extra headers can be specified on Oh Dear to hint to your server it should respond <code>200</code> from our particular request, but that's rather cumbersome.</p>
<p>You can now easily monitor password protected sites using our new &quot;Expected response status codes&quot; setting. Using this setting, you can specify which status codes Oh Dear should consider ok.</p>
<p><img src="https://ohdear.app/uploads/blogs/response-status/status.jpg" alt="screenshot" /></p>
<p>By default, this setting is set to <code>2*</code>, which means everything in the <code>200</code> range is ok. For a password-protected site, you could set this to <code>4O1</code>. That's certainly easier than having to add some headers.</p>
<p>A nice side effect of setting the expected response code to <code>401</code> is that if you misconfigured your password protection, we have got your back.  When making your page accidentally make your page publicly visible, it will probably respond with <code>200</code>, which isn't expected, and we'll send a notification.</p>
<p>Like you can see in the screenshot above, you can tweak our uptime monitor in various ways. If there is any setting you feel is missing, let us know. We're listening.</p>
]]>
            </summary>
                                    <updated>2021-09-29T19:16:26+00:00</updated>
        </entry>
            <entry>
            <title><![CDATA[Introducing our new support bubble]]></title>
            <link rel="alternate" href="https://ohdear.app/news-and-updates/introducing-our-new-support-bubble" />
            <id>https://ohdear.app/62</id>
            <author>
                <name><![CDATA[Oh Dear]]></name>
            </author>
            <summary type="html">
                <![CDATA[<p>Like most SaaS products, Oh Dear is a living platform. We add new features proposed by our users, fix bugs that get reported, and regrettable also sometimes introduce new bugs.</p>
<p>Most users use email to communicate with us. Even though sending an email is often perceived as friction-free, it can be a minor hurdle.</p>
<p>We've introduced a little support bubble at the bottom of every page to make it easier for our users to pass us feature requests and report bugs. When you click the support bubble, a form opens to quickly send us a mail. Here's what it looks like.</p>
<p><img src="https://ohdear.app/uploads/blogs/support-bubble/form.png" alt="screenshot" /></p>
<p>When you are logged in, you don't even have to provide your email; we'll simply use your account's email.</p>
<p><img src="https://ohdear.app/uploads/blogs/support-bubble/form2.png" alt="screenshot" /></p>
<p>Behind the scenes, we're using the <a href="https://github.com/spatie/laravel-support-bubble">spatie/support-bubble-package</a> to power this feature. In this video, you'll learn more about the internals of the package.</p>
<iframe width="560" height="315" src="https://www.youtube.com/embed/IucDLJI2mvQ" title="YouTube video player" frameborder="0" allow="accelerometer; autoplay; clipboard-write; encrypted-media; gyroscope; picture-in-picture" allowfullscreen></iframe>
]]>
            </summary>
                                    <updated>2021-09-13T19:44:42+00:00</updated>
        </entry>
            <entry>
            <title><![CDATA[We now support Pushover's priority messages]]></title>
            <link rel="alternate" href="https://ohdear.app/news-and-updates/we-now-support-pushovers-priority-messages" />
            <id>https://ohdear.app/61</id>
            <author>
                <name><![CDATA[Oh Dear]]></name>
            </author>
            <summary type="html">
                <![CDATA[<p>When we detect something wrong with your site (it is down, a broken link is detected, the certificate is invalid, ...), we can notify you via one of the many notification channels we support.</p>
<p>One of those channels is <a href="https://pushover.net">Pushover</a>, an excellent service to send native notifications to mobile devices. We have supported Pushover since we launched a couple of years ago. Now, we've added a nice option that several of our users we're asking for: setting the priority.</p>
<p>When you define Pushover notifications in our UI, you'll notice a new priority field.</p>
<p><img src="/uploads/blogs/pushover-priority/priority.png" alt="screenshot" /></p>
<p>In the Pushover docs, you'll <a href="https://pushover.net/api#priority">find</a> a description of the behaviour of each priority. The lowest priority will not generate a notification on a mobile device but will increment the badge number. The &quot;emergency&quot; priority will keep on notifying you until you explicitly acknowledge the notification.</p>
<p>Adding support for Pushover's priorities is a minor feature, but a useful one for our customers using this service.</p>
]]>
            </summary>
                                    <updated>2021-08-14T20:29:09+00:00</updated>
        </entry>
            <entry>
            <title><![CDATA[Sites can now be grouped]]></title>
            <link rel="alternate" href="https://ohdear.app/news-and-updates/sites-can-now-be-grouped" />
            <id>https://ohdear.app/59</id>
            <author>
                <name><![CDATA[Oh Dear]]></name>
            </author>
            <summary type="html">
                <![CDATA[<p>Our users sometimes have a large number of applications that are being monitored by Oh Dear. Some of these applications are related to each other. Think for instance of a marketing site and an API that are part of the same application.</p>
<p>To better emphasise that some of the things that are monitored are related, you can now use groups.</p>
<p>When you start monitoring a site at Oh Dear, you can now optionally specify a group name.</p>
<p><img src="/uploads/blogs/groups/add-site.png" alt="screenshot" /></p>
<p>This is how the list of sites looks for the <a href="https://spatie.be">Spatie</a> team, who grouped some of their sites.</p>
<p><img src="/uploads/blogs/groups/grouped-list.png" alt="screenshot" /></p>
<p>If you want to change the name of a group, you can do so at the settings of a site that belongs to a group.</p>
<p><img src="/uploads/blogs/groups/site-settings.png" alt="screenshot" /></p>
<p>We hope that this feature allows you bring structure to your list of sites.</p>
]]>
            </summary>
                                    <updated>2021-05-03T13:20:32+00:00</updated>
        </entry>
            <entry>
            <title><![CDATA[Introducing advanced user management for large teams]]></title>
            <link rel="alternate" href="https://ohdear.app/news-and-updates/introducing-advanced-user-management-for-large-teams" />
            <id>https://ohdear.app/60</id>
            <author>
                <name><![CDATA[Oh Dear]]></name>
            </author>
            <summary type="html">
                <![CDATA[<p>If we look at the number of sites that our users monitor, we can split our user base into two large groups. Teams in the first group only monitor one or a couple of sites. The second group monitors 30 or more sites.</p>
<p>We've just launched new features that make user management more flexible for large teams. In this blog post, we'd like to tell you all about it.</p>
<h2 id="managing-access-for-team-members">Managing access for team members</h2>
<p>We assume that the teams with more than 30 sites consist of web agencies that monitor websites for their clients.</p>
<p>Wouldn't it be nice if business owners of the monitored sites could also see their sites in Oh Dear? Using our new user management features that's now possible.</p>
<p>To give people access to your Oh Dear account, you can invite them to your team on the team settings screen.</p>
<p><img src="/uploads/blogs/user-management/add-team-member.png" alt="screenshot" /></p>
<p>That <code>guest</code> role is new. This type of user cannot add a site to your Oh Dear account.</p>
<p>In addition to picking a role, you can also choose which sites and status pages the invitee should have access to.</p>
<p><img src="/uploads/blogs/user-management/site-selection.png" alt="screenshot" /></p>
<p>Of course, the role and the selection of sites and status pages can also be changed for existing team members. Just click one of the links after the team member name.</p>
<p><img src="/uploads/blogs/user-management/members.png" alt="screenshot" /></p>
<h2 id="in-closing">In closing</h2>
<p>We think that these changes are a very nice addition for people who monitor many sites. We've implemented this in a simple way. For people with only a handful of site sites, everything in our UI stays simple.</p>
<p>We hope that you like these changes. If you got feature requests, <a href="mailto:support@ohdear.app">let us know</a>!</p>
]]>
            </summary>
                                    <updated>2021-05-04T18:39:30+00:00</updated>
        </entry>
            <entry>
            <title><![CDATA[Introducing private status pages]]></title>
            <link rel="alternate" href="https://ohdear.app/news-and-updates/introducing-private-status-pages" />
            <id>https://ohdear.app/58</id>
            <author>
                <name><![CDATA[Oh Dear]]></name>
            </author>
            <summary type="html">
                <![CDATA[<p>You can now mark status pages as private, guarding them from the outside world unless you have the secret passphrase.</p>
<h2 id="public-status-pages">Public status pages</h2>
<p>We've had <a href="/feature/status-pages">public status pages</a> for quite a while. Many big brand names are also using them, like <a href="https://status.laravel.com/">Laravel</a>, <a href="https://status.vuetifyjs.com/">VuetifyJS</a>, <a href="https://status.sex.com/">Sex.com</a>, ... and so many others.</p>
<p>They're a convenient way of communicating to your clients in times of crisis.</p>
<p>And, as you can tell from the examples, they're suitable for - well, every industry. 😉</p>
<p>But sometimes, you want things a little more private.</p>
<h2 id="private-status-pages">Private status pages</h2>
<p>You can now, optionally, add a <em>secret</em> to each status page. If you know the secret, you can see the status page - if you don't, you're blocked from viewing.</p>
<p>It's similar to a password or HTTP Basic Authentication, but a bit more easy to use: configure a secret, of your choice, in the settings page and add <code>?secret=$YOUR-SECRET</code> to the URL of your status page to view it.</p>
<p>Wrong secret? No access. Correct secret? Bingo, you're in!</p>
<p>This works on status pages on custom domains or hosted on Oh Dear's own domain.</p>
<p>This'll make it easier to share status pages for internal sites, dev-specific environments and clients that want a dashboard in their office, but don't necessarily want it all public.</p>
]]>
            </summary>
                                    <updated>2021-08-11T06:42:18+00:00</updated>
        </entry>
            <entry>
            <title><![CDATA[User, team and billing sections have been revamped]]></title>
            <link rel="alternate" href="https://ohdear.app/news-and-updates/user-team-and-billing-sections-have-been-revamped" />
            <id>https://ohdear.app/57</id>
            <author>
                <name><![CDATA[Oh Dear]]></name>
            </author>
            <summary type="html">
                <![CDATA[<p>When you log into your account, you'll notice some subtle and <em>not so subtle</em> changes.</p>
<p>We slightly updated our theme, you'll see more rounded corners and tweaked colours of various things in our UI.</p>
<h2 id="new-looks">New looks...</h2>
<p>The big changes are to be seen in the user, team and billing sections. These screens have a totally new design.</p>
<p>Here's what the new team section looks like:</p>
<p><img src="/uploads/blogs/spark/team.png" alt="screenshot" /></p>
<p>Here's a screenshot of the new user profile:</p>
<p><img src="/uploads/blogs/spark/profile.png" alt="screenshot" /></p>
<p>Billing has been totally revamped:</p>
<p><img src="/uploads/blogs/spark/billing.png" alt="screenshot" /></p>
<h2 id="and-new-features">... and new features</h2>
<p>There are a couple of new features as well!</p>
<p>In the billing section you can now specify multiple people to which we should send all invoice receipts. Here's what that looks like:</p>
<p><img src="/uploads/blogs/spark/receipts.png" alt="screenshot" /></p>
<p>You can now invite admins to your team. Regular team members cannot modify the team or the billing settings, only admins can.</p>
<p><img src="/uploads/blogs/spark/member.png" alt="screenshot" /></p>
<p>When you enable 2 factor authentication, we'll now generate recover codes that you can use should you lose access to your 2FA device. Don't try these recovery codes, they are from our testing environment. 😉</p>
<p><img src="/uploads/blogs/spark/2fa.png" alt="screenshot" /></p>
<p>On your user profile you can now see all devices where you are currently logged in.</p>
<p><img src="/uploads/blogs/spark/sessions.png" alt="screenshot" /></p>
<h2 id="behind-the-scenes">Behind the scenes</h2>
<p>Since launching Oh Dear, we've handled billing and team management using <a href="https://spark.laravel.com">Laravel Spark</a>.  Recently a new major version was released. Most improvements in our UI are available because we upgraded to the newest release of Spark and <a href="https://jetstream.laravel.com">Jetstream</a>.</p>
<p>You can read more technical details of how and why we upgraded Spark and Jetstream <a href="https://freek.dev/1912-how-to-customize-jetstream-and-laravel-spark">in this blog post</a>.</p>
]]>
            </summary>
                                    <updated>2021-03-02T14:16:28+00:00</updated>
        </entry>
            <entry>
            <title><![CDATA[Microsoft Teams notifications now available in Oh Dear]]></title>
            <link rel="alternate" href="https://ohdear.app/news-and-updates/microsoft-teams-notifications-now-available-in-oh-dear" />
            <id>https://ohdear.app/56</id>
            <author>
                <name><![CDATA[Oh Dear]]></name>
            </author>
            <summary type="html">
                <![CDATA[<p>We've added Microsoft Teams notifications to Oh Dear for uptime, certificate, performance and broken links alerts!</p>
<h2 id="microsoft-teams-notifications">Microsoft Teams notifications</h2>
<p>Users of Microsoft Teams can now add their MS Teams webhook to Oh Dear, and we'll be able to send notifications to the channel linked to that webhook.</p>
<p>Here's what that looks like:</p>
<p><img src="/img/docs/notifications/microsoft_teams_example.png" alt="Microsoft Teams notification" /></p>
<p>You can add a custom icon to the MS Teams notifications, <a href="/logos">our logo</a> is available on our website.</p>
<h2 id="add-the-webhook-per-site-or-on-a-team-level">Add the webhook per site or on a team-level</h2>
<p>We have 2 ways to receive MS Teams notifications: globally, on a team-level, or on a per-site basis.</p>
<p>Most users add the webhook on their <a href="/team-settings/notifications/microsoft-teams">Team Notification page</a>. Every site added on your account inherits those settings.</p>
<p>Alternatively, you can add them per-site too for more granular control.</p>
<p>We hope you'll enjoy the new notification option available in Oh Dear!</p>
]]>
            </summary>
                                    <updated>2021-02-28T18:49:25+00:00</updated>
        </entry>
            <entry>
            <title><![CDATA[Snooze notifications until the next workday]]></title>
            <link rel="alternate" href="https://ohdear.app/news-and-updates/snooze-notifications-until-the-next-workday" />
            <id>https://ohdear.app/55</id>
            <author>
                <name><![CDATA[Oh Dear]]></name>
            </author>
            <summary type="html">
                <![CDATA[<p>When a site is down, Oh Dear sends a notification every hour. Since last year, our notifications can be snoozed for a fixed amount of time (5 minutes, 1 hour, 4 hours, one day).</p>
<p>In the evenings and weekends, you might not want to receive repeated notifications. That's why we've added a nice human touch: all notifications can now be snoozed until the start of the next workday.</p>
<p>You can choose this new options in the snooze settings of a check.</p>
<p><img src="/uploads/blogs/workday/snooze-check.png" alt="screenshot" /></p>
<p>If you're using Slack notifications, you can also use that new option right within the Slack notification itself.</p>
<p><img src="/uploads/blogs/workday/snooze.jpg" alt="screenshot" /></p>
<p>By default, we'll assume that you and your team work every weekday from nine to five. You can customise your business hours on team settings.</p>
<p><img src="/uploads/blogs/workday/team-settings.jpg" alt="screenshot" /></p>
<p>Enjoy the calm this new snooze option brings!</p>
]]>
            </summary>
                                    <updated>2021-02-09T12:28:12+00:00</updated>
        </entry>
            <entry>
            <title><![CDATA[We're giving away a MacBook Air (M1) to one of our users!]]></title>
            <link rel="alternate" href="https://ohdear.app/news-and-updates/were-giving-away-a-macbook-air-m1-to-one-of-our-users" />
            <id>https://ohdear.app/53</id>
            <author>
                <name><![CDATA[Oh Dear]]></name>
            </author>
            <summary type="html">
                <![CDATA[<p>In a few weeks, we'll be giving away a new MacBook Air (M1) to one of our clients.</p>
<p><strong>Update: we have a winner! See below for more details.</strong></p>
<h2 id="rewarding-our-existing-clients">Rewarding our existing clients</h2>
<p>Most marketing efforts are focussed on attracting <em>new</em> clients. Thousands of dollars are being spent there. Yet, existing clients often go neglected or unnoticed. They're taken <em>for granted</em>.</p>
<p>Not anymore! 🥳</p>
<p><img src="/uploads/blogs/macbook-air-giveaway/macbook-air.png" alt="Image of MacBook Air" /></p>
<p>To reward our loyal customers, we'll be giving away a brand new MacBook Air to one of our existing, paying, customers in just a few weeks time.</p>
<p>The <em>when</em> of the giveaway is variable, but we'll get to that bit in a second.</p>
<h2 id="what-do-you-need-to-do-to-be-eligible-to-win">What do you need to do to be eligible to win?</h2>
<p>Be a customer of Oh Dear. That's it.</p>
<p>If you're a paying customer for Oh Dear, no matter how large or small your subscription is, you're automatically entered into our giveaway. Everyone that is a paying customer <em>and</em> has sites that are being monitored, is eligible to win.</p>
<h2 id="how-do-we-pick-the-winner">How do we pick the winner?</h2>
<p>Well, this is the fun part!</p>
<p>Since we're pretty close to crossing 4,000,000,000 checks performed on our platform, why not celebrate with making the 4 billionth run the winner of this new MacBook Air?</p>
<p>If you're a paying customer, your sites automatically get queued to be checked for uptime every minute. If you're the lucky client that triggers the 4,000,000,000'th run, you've won! 🥳</p>
<p>We've got a <a href="https://ohdear.app/#metrics">live counter of the checks performed on our homepage</a>, once that crosses the 4B mark - the giveaway comes to an end.</p>
<p><em>(Yes, if you have more sites, you'll have more chances to win, as you'll have more jobs queued to be checked.)</em></p>
<h2 id="why-do-we-do-this">Why do we do this?</h2>
<p>It's because of you, our paying customers, that Freek &amp; I get to work on Oh Dear and continue to build a better &amp; better website monitoring service.</p>
<p>It's mind-boggling and immensely gratifying to see so many of our users trust us to keep watch over their sites.</p>
<p>And now, it's time we return the favour. Instead of spending money on acquiring new users, we'll (happily) spend money to reward existing ones.</p>
<p>We'll announce our winner <strong>just after the 4B'th run</strong> on this blog, <a href="https://twitter.com/ohdearapp">our Twitter</a>, <a href="https://www.facebook.com/OhDearApp">Facebook page</a> &amp; <a href="https://www.linkedin.com/company/oh-dear/">LinkedIn Profile</a>. Of course, we'll reach out to the winner personally. 😄</p>
<h2 id="macbook-air-details">MacBook Air details</h2>
<p>For the geeks among us, we're talking about the latest MacBook Air with these specs:</p>
<ul>
<li>Apple M1 chip with 8‑core CPU, 8‑core GPU, and 16‑core Neural Engine</li>
<li>16GB unified memory</li>
<li>512GB SSD storage</li>
</ul>
<p>Valued at $1,449.00. We're not buying the cheap one. 😉</p>
<p>We'll be in touch with the winner to decide on the keyboard layout (Azerty/Qwerty etc) so you'll get exactly what you can use. We'll have it shipped directly to your door, anywhere in the world.</p>
<h2 id="and-the-winner-is">And the winner is ...</h2>
<p>Our 4,000,000,000th check was performed by AJ from <a href="https://www.druva.com/">Druva Inc</a>!</p>
<p>Congratulations AJ, the MacBook is on its way to you now. Enjoy! 🎉</p>
]]>
            </summary>
                                    <updated>2021-03-04T14:10:59+00:00</updated>
        </entry>
            <entry>
            <title><![CDATA[Introducing monthly site reports]]></title>
            <link rel="alternate" href="https://ohdear.app/news-and-updates/introducing-monthly-site-reports" />
            <id>https://ohdear.app/54</id>
            <author>
                <name><![CDATA[Oh Dear]]></name>
            </author>
            <summary type="html">
                <![CDATA[<p>Today, we're introducing a new major feature: monthly site reports. In such a report, you get a bird's eye summary of everything we know of a site in a particular month.</p>
<p>We've gone the extra mile and added the ability to <strong>mail these reports to people outside of your team</strong> automatically. If you're an agency and manage sites for your clients, you could use this feature to send a monthly report of all broken links to your client.</p>
<p>In this blog post, we'll tell you all about the feature.</p>
<h2 id="what-is-a-site-report">What is a site report</h2>
<p>Since Oh Dear was launched in 2017, we've been sending monthly uptime mails to all our users. In these emails, we list every site we monitor for a user and its uptime percentage for the past month.</p>
<p><img src="/uploads/blogs/site-report/uptime-mail.png" alt="screenshot" /></p>
<p>Our users seem to love the monthly uptime mails. They don't have to actively log into Oh Dear to see how their sites are doing. We sometimes get responses from clients who are so happy that we reported 100% uptime for all their sites.</p>
<p>But why only mention the uptime percentage? Wouldn't it be nice to have a summary of all checks we perform? Starting from next month, our monthly mail will also, for every site, include a link to a full report that summarises everything that happened at that site.</p>
<p><img src="/uploads/blogs/site-report/uptime-mail-with-report.png" alt="screenshot" /></p>
<p>Here's what such a report looks like.</p>
<p><img src="/uploads/blogs/site-report/report.png" alt="screenshot" /></p>
<p>In the screenshot, you only see the uptime statistics, but the report contains a performance report, a list of all broken links and mixed content and more, ...</p>
<p><strong>Here's <a href="https://ohdear.app/site-report/703?signature=5cbf8802090ccac99c1cf21f0809094a9c5e8ed630c2fdf358a02469b464df48">an actual report</a> so you can see what it looks like in the browser.</strong></p>
<p>You can also view a report and all past ones, in &quot;Past reports&quot; tab of a site.</p>
<p><img src="/uploads/blogs/site-report/past-reports.png" alt="screenshot" /></p>
<h2 id="automatically-mailing-site-reports">Automatically mailing site reports</h2>
<p>We figure that some of our clients want to send a report for a particular site to somebody that is not an Oh Dear user.</p>
<p>For example, if you run an agency, you probably handle websites for your clients. Wouldn't it be nice if you could send an uptime report, or a report mentioning all broken links to your client?</p>
<p>On the &quot;Settings&quot; tab of monthly reports, you can specify a couple of e-mail addresses to automatically send monthly reports to. You can even specify what information should go in the report.</p>
<p><img src="/uploads/blogs/site-report/mail-reports.png" alt="screenshot" /></p>
<h2 id="reports-without-logging-in">Reports without logging in</h2>
<p>These reports are available to anyone that received the e-mail or the direct link. You don't need an Oh Dear account to view them.</p>
<p>Behind the scenes, it's using signed URLs (much like our <a href="/blog/adding-action-links-to-oh-dear-email-notifications">action links in notification emails</a> that provide a secure and convenient way to view the report without having to log in.</p>
<h2 id="in-closing">In closing</h2>
<p>We think these new site reports will be a welcome addition for our users.
We regularly add new features to Oh Dear, but still keep the service easy to use. Here's a <a href="https://ohdear.app/blog/how-we-improved-our-service-in-2020">list of all the things we improved on Oh Dear in the past year</a>.</p>
<p>If you have any questions or feedback, let us know!</p>
]]>
            </summary>
                                    <updated>2021-03-04T08:55:44+00:00</updated>
        </entry>
            <entry>
            <title><![CDATA[Making our Laravel test suite ready for parallel testing]]></title>
            <link rel="alternate" href="https://ohdear.app/news-and-updates/making-our-laravel-test-suite-ready-for-parallel-testing" />
            <id>https://ohdear.app/52</id>
            <author>
                <name><![CDATA[Oh Dear]]></name>
            </author>
            <summary type="html">
                <![CDATA[<p>To make sure that our service is working correctly, we have a suite of automated tests. The test suite is executed when we make changes and deploy something to production.</p>
<p>Using the new <a href="https://laravel.com/docs/8.x/testing#running-tests-in-parallel">parallel testing</a> feature that recently landed in Laravel, we managed to run our testsuite <strong>about four times faster</strong>.</p>
<p>Here is the test output when running all tests sequentially. The time needed is <strong>4m28</strong>s.</p>
<p><img src="/uploads/blogs/parallel/single.jpg" alt="single" /></p>
<p>And here's the test output when using parallel testing. It only took <strong>1m05s</strong>.</p>
<p><img src="/uploads/blogs/parallel/parallel.jpg" alt="parallel" /></p>
<p>In this blogpost you'll learn what parallel testing is, and what changes we needed to make to our tests to make use of this awesome feature.</p>
<h2 id="what-is-parallel-testing">What is parallel testing?</h2>
<p>By default, PHPUnit runs each test in our suite sequentially. A test will only start if a previous one has finished. While this has the advantage of being a very simple strategy, it's not an optimal approach.</p>
<p>Most of our tests make use of the database. At the start of each test, the database is cleared. At the end of the test we verify if the expected results are written in the db. Now, if multiple tests were running at the same time, we could get unexpected results, as the a test would also see the changes in the db made by other tests.</p>
<p>In the latest version of Laravel, you can run tests in parallel by using <a href="https://laravel.com/docs/master/testing#running-tests-in-parallel">the <code>parallel</code> option</a> when running tests.</p>
<pre class="shiki" style="background-color: #2e3440ff"><code><span class="line"><span style="color: #D8DEE9FF">php artisan test </span><span style="color: #81A1C1">--</span><span style="color: #D8DEE9FF">parallel</span></span>
<span class="line"></span></code></pre>
<p>Under the hood Laravel will leverage <a href="https://github.com/paratestphp/paratest"><code>ParaTest</code></a> by <a href="https://github.com/brianium">Brian Scaturro</a> to run multiple PHPUnit processes concurrently. Most of the heavy work for parallel testing is performed in <code>ParaTest</code>. By default, ParaTest will create one test process per core in your computer.</p>
<p>The parallel testing additions in Laravel also handle the creationg and migration of databases. Per PHPUnit process, Laravel will automatically <a href="https://laravel.com/docs/master/testing#parallel-testing-and-databases">create and configure a database</a>, so each test still can use an isolated database. If your computer has 4 cores, then 4 databases will be created, and Laravel will make sure that each database is only used by 1 test at a given time.</p>
<h2 id="additional-changes-to-our-test-suite">Additional changes to our test suite</h2>
<p>It's really nice that Laravel takes care of making sure each test has its own database to work with. However, the are also other resource that, when used concurrently, can mess up the assertions a test makes. Let's dive in two concrete examples in the Oh Dear test suite.</p>
<h2 id="checking-contents-of-mails-in-parallel-tests">Checking contents of mails in parallel tests</h2>
<p>
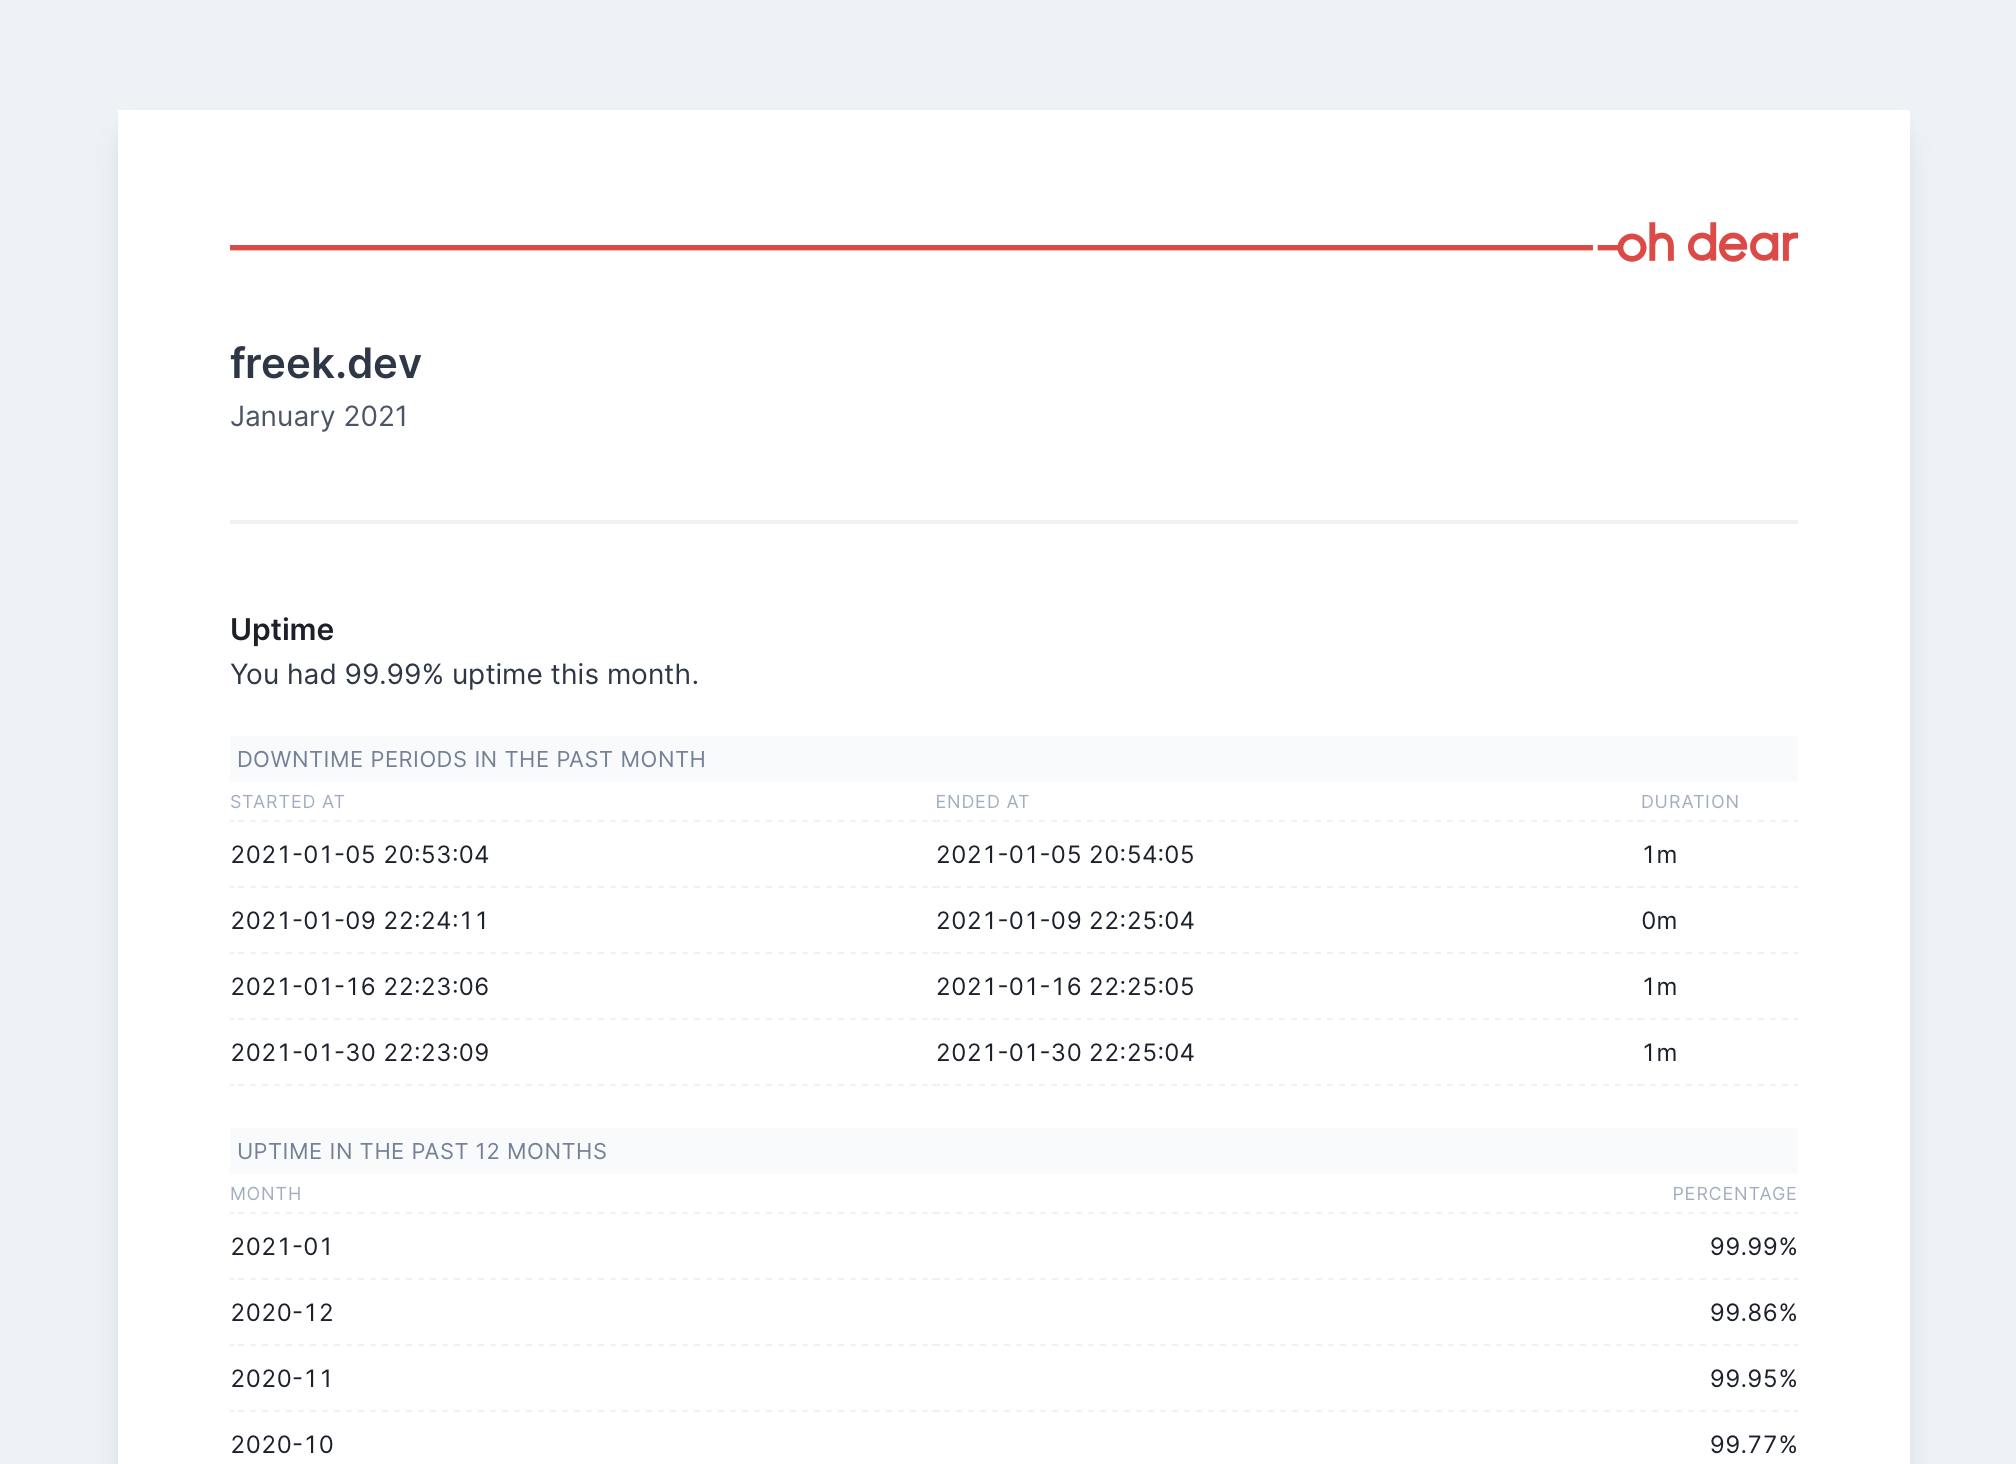
Oh Dear sends several emails to all users. In our tests we make sure that those emails work correctly. One of those mails is the uptime report we send in the beginning of every month.</p>
<p>In Laravel you can <a href="https://laravel.com/docs/master/mocking#mail-fake">fake all mails</a>. This allows you to assert that it was sent, and who it was sent to. Mails won't actually <em>be</em> sent or rendered, so you can't make assertions on the content. To test the content of mails, Laravel provides <a href="https://laravel.com/docs/8.x/mail#testing-mailables">a few handy assertion methods</a> on a <code>Mailable</code>.</p>
<p>In Oh Dear we use both methods, but we also use a third approach. Using the <a href="https://github.com/spatie/laravel-mail-preview">spatie/laravel-mail-preview</a> package, each mail will not be sent, but be written to disk. This allows us to make assertions against those written mails. In our tests we can just call code that sends mails, there's no need for <code>Mail::fake()</code> or having to hold an instance of <code>Mailable</code> in the test.</p>
<p>Here's a concrete example. In this test we call an Artisan command that sends mails, and we assert that the right content is in the sent mail.</p>
<pre class="shiki" style="background-color: #2e3440ff"><code><span class="line"><span style="color: #616E88">/** @test */</span></span>
<span class="line"><span style="color: #81A1C1">public</span><span style="color: #D8DEE9FF"> </span><span style="color: #81A1C1">function</span><span style="color: #D8DEE9FF"> </span><span style="color: #88C0D0">it_can_report_the_uptime_statistics</span><span style="color: #ECEFF4">()</span></span>
<span class="line"><span style="color: #ECEFF4">{</span></span>
<span class="line"><span style="color: #D8DEE9FF">    </span><span style="color: #8FBCBB">Site</span><span style="color: #81A1C1">::</span><span style="color: #88C0D0">factory</span><span style="color: #ECEFF4">()</span><span style="color: #81A1C1">-&gt;</span><span style="color: #88C0D0">create</span><span style="color: #ECEFF4">([</span><span style="color: #ECEFF4">&#39;</span><span style="color: #A3BE8C">url</span><span style="color: #ECEFF4">&#39;</span><span style="color: #D8DEE9FF"> </span><span style="color: #81A1C1">=&gt;</span><span style="color: #D8DEE9FF"> </span><span style="color: #ECEFF4">&#39;</span><span style="color: #A3BE8C">https://spatie.be</span><span style="color: #ECEFF4">&#39;</span><span style="color: #ECEFF4">])</span><span style="color: #81A1C1">;</span></span>
<span class="line"></span>
<span class="line"><span style="color: #ECEFF4">    </span><span style="color: #616E88">// will seed uptime history records with 99.98% uptime </span></span>
<span class="line"><span style="color: #D8DEE9FF">    </span><span style="color: #81A1C1">$this-&gt;</span><span style="color: #88C0D0">generateUpAndDownTime</span><span style="color: #ECEFF4">()</span><span style="color: #81A1C1">;</span></span>
<span class="line"></span>
<span class="line"><span style="color: #D8DEE9FF">    </span><span style="color: #8FBCBB">TestTime</span><span style="color: #81A1C1">::</span><span style="color: #88C0D0">addMonth</span><span style="color: #ECEFF4">()</span><span style="color: #81A1C1">;</span></span>
<span class="line"></span>
<span class="line"><span style="color: #D8DEE9FF">    </span><span style="color: #81A1C1">$this-&gt;</span><span style="color: #88C0D0">artisan</span><span style="color: #ECEFF4">(</span><span style="color: #ECEFF4">&#39;</span><span style="color: #A3BE8C">ohdear:email-monthly-uptime-reports</span><span style="color: #ECEFF4">&#39;</span><span style="color: #ECEFF4">)</span><span style="color: #81A1C1">;</span></span>
<span class="line"></span>
<span class="line"><span style="color: #D8DEE9FF">    </span><span style="color: #81A1C1">$this</span></span>
<span class="line"><span style="color: #D8DEE9FF">        </span><span style="color: #81A1C1">-&gt;</span><span style="color: #88C0D0">assertLatestSentMailContains</span><span style="color: #ECEFF4">(</span><span style="color: #ECEFF4">&quot;</span><span style="color: #A3BE8C">spatie.be</span><span style="color: #ECEFF4">&quot;</span><span style="color: #ECEFF4">)</span></span>
<span class="line"><span style="color: #D8DEE9FF">        </span><span style="color: #81A1C1">-&gt;</span><span style="color: #88C0D0">assertLatestSentMailContains</span><span style="color: #ECEFF4">(</span><span style="color: #ECEFF4">&quot;</span><span style="color: #A3BE8C">99.98%</span><span style="color: #ECEFF4">&quot;</span><span style="color: #ECEFF4">)</span><span style="color: #81A1C1">;</span></span>
<span class="line"><span style="color: #ECEFF4">}</span></span>
<span class="line"></span></code></pre>
<p>Here's the implementation of that <code>assertLatestSentMailContains</code> method. It will find the latest sent mail, and make an assert if the passed <code>substring</code> is in the content of the mail.</p>
<pre class="shiki" style="background-color: #2e3440ff"><code><span class="line"><span style="color: #81A1C1">protected</span><span style="color: #D8DEE9FF"> </span><span style="color: #81A1C1">function</span><span style="color: #D8DEE9FF"> </span><span style="color: #88C0D0">assertLatestSentMailContains</span><span style="color: #ECEFF4">(</span><span style="color: #81A1C1">string</span><span style="color: #D8DEE9FF"> </span><span style="color: #81A1C1">$</span><span style="color: #D8DEE9">substring</span><span style="color: #ECEFF4">)</span><span style="color: #81A1C1">:</span><span style="color: #D8DEE9FF"> </span><span style="color: #81A1C1">self</span></span>
<span class="line"><span style="color: #ECEFF4">{</span></span>
<span class="line"><span style="color: #D8DEE9FF">    </span><span style="color: #81A1C1">$</span><span style="color: #D8DEE9">mailStorageDirectory</span><span style="color: #D8DEE9FF"> </span><span style="color: #81A1C1">=</span><span style="color: #D8DEE9FF"> </span><span style="color: #88C0D0">config</span><span style="color: #ECEFF4">(</span><span style="color: #ECEFF4">&#39;</span><span style="color: #A3BE8C">mail-preview.storage_path</span><span style="color: #ECEFF4">&#39;</span><span style="color: #ECEFF4">)</span><span style="color: #81A1C1">;</span></span>
<span class="line"></span>
<span class="line"><span style="color: #D8DEE9FF">    </span><span style="color: #81A1C1">$</span><span style="color: #D8DEE9">sentMails</span><span style="color: #D8DEE9FF"> </span><span style="color: #81A1C1">=</span><span style="color: #D8DEE9FF"> </span><span style="color: #88C0D0">collect</span><span style="color: #ECEFF4">(</span><span style="color: #8FBCBB">File</span><span style="color: #81A1C1">::</span><span style="color: #88C0D0">allFiles</span><span style="color: #ECEFF4">(</span><span style="color: #81A1C1">$</span><span style="color: #D8DEE9">mailStorageDirectory</span><span style="color: #ECEFF4">))</span><span style="color: #81A1C1">;</span></span>
<span class="line"></span>
<span class="line"><span style="color: #D8DEE9FF">    </span><span style="color: #81A1C1">$</span><span style="color: #D8DEE9">latestMailPath</span><span style="color: #D8DEE9FF"> </span><span style="color: #81A1C1">=</span><span style="color: #D8DEE9FF"> </span><span style="color: #81A1C1">$</span><span style="color: #D8DEE9">sentMails</span></span>
<span class="line"><span style="color: #D8DEE9FF">        </span><span style="color: #81A1C1">-&gt;</span><span style="color: #88C0D0">sortByDesc</span><span style="color: #ECEFF4">(</span><span style="color: #81A1C1">fn</span><span style="color: #ECEFF4">(</span><span style="color: #8FBCBB">SplFileInfo</span><span style="color: #D8DEE9FF"> </span><span style="color: #81A1C1">$</span><span style="color: #D8DEE9">file</span><span style="color: #ECEFF4">)</span><span style="color: #D8DEE9FF"> </span><span style="color: #ECEFF4">=&gt;</span><span style="color: #D8DEE9FF"> </span><span style="color: #81A1C1">$</span><span style="color: #D8DEE9">file</span><span style="color: #81A1C1">-&gt;</span><span style="color: #88C0D0">getMTime</span><span style="color: #ECEFF4">())</span></span>
<span class="line"><span style="color: #D8DEE9FF">        </span><span style="color: #81A1C1">-&gt;</span><span style="color: #88C0D0">first</span><span style="color: #ECEFF4">()</span></span>
<span class="line"><span style="color: #D8DEE9FF">        </span><span style="color: #81A1C1">-&gt;</span><span style="color: #88C0D0">getPathName</span><span style="color: #ECEFF4">()</span><span style="color: #81A1C1">;</span></span>
<span class="line"></span>
<span class="line"><span style="color: #D8DEE9FF">    </span><span style="color: #81A1C1">$</span><span style="color: #D8DEE9">latestMailContent</span><span style="color: #D8DEE9FF"> </span><span style="color: #81A1C1">=</span><span style="color: #D8DEE9FF"> </span><span style="color: #88C0D0">file_get_contents</span><span style="color: #ECEFF4">(</span><span style="color: #81A1C1">$</span><span style="color: #D8DEE9">latestMailPath</span><span style="color: #ECEFF4">)</span><span style="color: #81A1C1">;</span></span>
<span class="line"></span>
<span class="line"><span style="color: #D8DEE9FF">    </span><span style="color: #81A1C1">$this-&gt;</span><span style="color: #88C0D0">assertStringContainsString</span><span style="color: #ECEFF4">(</span><span style="color: #81A1C1">$</span><span style="color: #D8DEE9">substring</span><span style="color: #ECEFF4">,</span><span style="color: #D8DEE9FF"> </span><span style="color: #81A1C1">$</span><span style="color: #D8DEE9">latestMailContent</span><span style="color: #ECEFF4">)</span><span style="color: #81A1C1">;</span></span>
<span class="line"></span>
<span class="line"><span style="color: #D8DEE9FF">    </span><span style="color: #81A1C1">return</span><span style="color: #D8DEE9FF"> </span><span style="color: #81A1C1">$this;</span></span>
<span class="line"><span style="color: #ECEFF4">}</span></span>
<span class="line"></span></code></pre>
<p>If all our test run sequentially our tests run just fine. Using parallel testing, this tests, and all others where <code>assertLatestSentMailContains</code> start to fail.</p>
<p>Why? Because all those tests write mails in the same directory, so the latest sent mail could have been sent in the code from another test.</p>
<p>This can be fixed by using a separate directory per test process. When using parallel testing, the <code>ParallelTesting::token()</code> method will return a token that is guaranteed to be unique for all concurrently running tests. In the <code>setUp</code> method in our base <code>TestCase</code> is performed before each test. In that <code>setUp</code> method we're calling this new method <code>configureMailPreviewDirectory()</code>.</p>
<pre class="shiki" style="background-color: #2e3440ff"><code><span class="line"><span style="color: #81A1C1">protected</span><span style="color: #D8DEE9FF"> </span><span style="color: #81A1C1">function</span><span style="color: #D8DEE9FF"> </span><span style="color: #88C0D0">configureMailPreviewDirectory</span><span style="color: #ECEFF4">()</span><span style="color: #81A1C1">:</span><span style="color: #D8DEE9FF"> </span><span style="color: #81A1C1">void</span></span>
<span class="line"><span style="color: #ECEFF4">{</span></span>
<span class="line"><span style="color: #D8DEE9FF">    </span><span style="color: #81A1C1">$</span><span style="color: #D8DEE9">previewMailDirectory</span><span style="color: #D8DEE9FF"> </span><span style="color: #81A1C1">=</span><span style="color: #D8DEE9FF"> </span><span style="color: #ECEFF4">&#39;</span><span style="color: #A3BE8C">storage/email-previews-</span><span style="color: #ECEFF4">&#39;</span><span style="color: #D8DEE9FF"> </span><span style="color: #81A1C1">.</span><span style="color: #D8DEE9FF"> </span><span style="color: #8FBCBB">ParallelTesting</span><span style="color: #81A1C1">::</span><span style="color: #88C0D0">token</span><span style="color: #ECEFF4">()</span><span style="color: #81A1C1">;</span></span>
<span class="line"></span>
<span class="line"><span style="color: #D8DEE9FF">    </span><span style="color: #88C0D0">config</span><span style="color: #ECEFF4">()</span><span style="color: #81A1C1">-&gt;</span><span style="color: #88C0D0">set</span><span style="color: #ECEFF4">(</span><span style="color: #ECEFF4">&#39;</span><span style="color: #A3BE8C">mail-preview.storage_path</span><span style="color: #ECEFF4">&#39;</span><span style="color: #ECEFF4">,</span><span style="color: #D8DEE9FF"> </span><span style="color: #81A1C1">$</span><span style="color: #D8DEE9">previewMailDirectory</span><span style="color: #ECEFF4">)</span><span style="color: #81A1C1">;</span></span>
<span class="line"></span>
<span class="line"><span style="color: #D8DEE9FF">    </span><span style="color: #81A1C1">if</span><span style="color: #D8DEE9FF"> </span><span style="color: #ECEFF4">(</span><span style="color: #8FBCBB">File</span><span style="color: #81A1C1">::</span><span style="color: #88C0D0">exists</span><span style="color: #ECEFF4">(</span><span style="color: #81A1C1">$</span><span style="color: #D8DEE9">previewMailDirectory</span><span style="color: #ECEFF4">))</span><span style="color: #D8DEE9FF"> </span><span style="color: #ECEFF4">{</span></span>
<span class="line"><span style="color: #D8DEE9FF">        </span><span style="color: #8FBCBB">File</span><span style="color: #81A1C1">::</span><span style="color: #88C0D0">deleteDirectory</span><span style="color: #ECEFF4">(</span><span style="color: #81A1C1">$</span><span style="color: #D8DEE9">previewMailDirectory</span><span style="color: #ECEFF4">)</span><span style="color: #81A1C1">;</span></span>
<span class="line"><span style="color: #D8DEE9FF">    </span><span style="color: #ECEFF4">}</span></span>
<span class="line"><span style="color: #D8DEE9FF">    </span></span>
<span class="line"><span style="color: #D8DEE9FF">    </span><span style="color: #8FBCBB">File</span><span style="color: #81A1C1">::</span><span style="color: #88C0D0">makeDirectory</span><span style="color: #ECEFF4">(</span><span style="color: #81A1C1">$</span><span style="color: #D8DEE9">previewMailDirectory</span><span style="color: #ECEFF4">)</span><span style="color: #81A1C1">;</span></span>
<span class="line"><span style="color: #ECEFF4">}</span></span>
<span class="line"></span></code></pre>
<p>In the <code>configureMailPreviewDirectory</code> we will ensure an empty directory exists per value that the testing token returns. We will also dynamically change the configuration of the <code>laravel-mail-preview</code> package so that directory is used to save sent mails of a particular test.</p>
<h2 id="preparing-the-internal-test-server-for-parallel-tests">Preparing the internal test server for parallel tests</h2>
<p>The second place where we had to make some changes to make parallel test work, is on test test server that is booted within our tests. This way of testing is not that common, but I wanted to mention it here for those of you interested how tests specific to Oh Dears core functionality look like.</p>
<p>
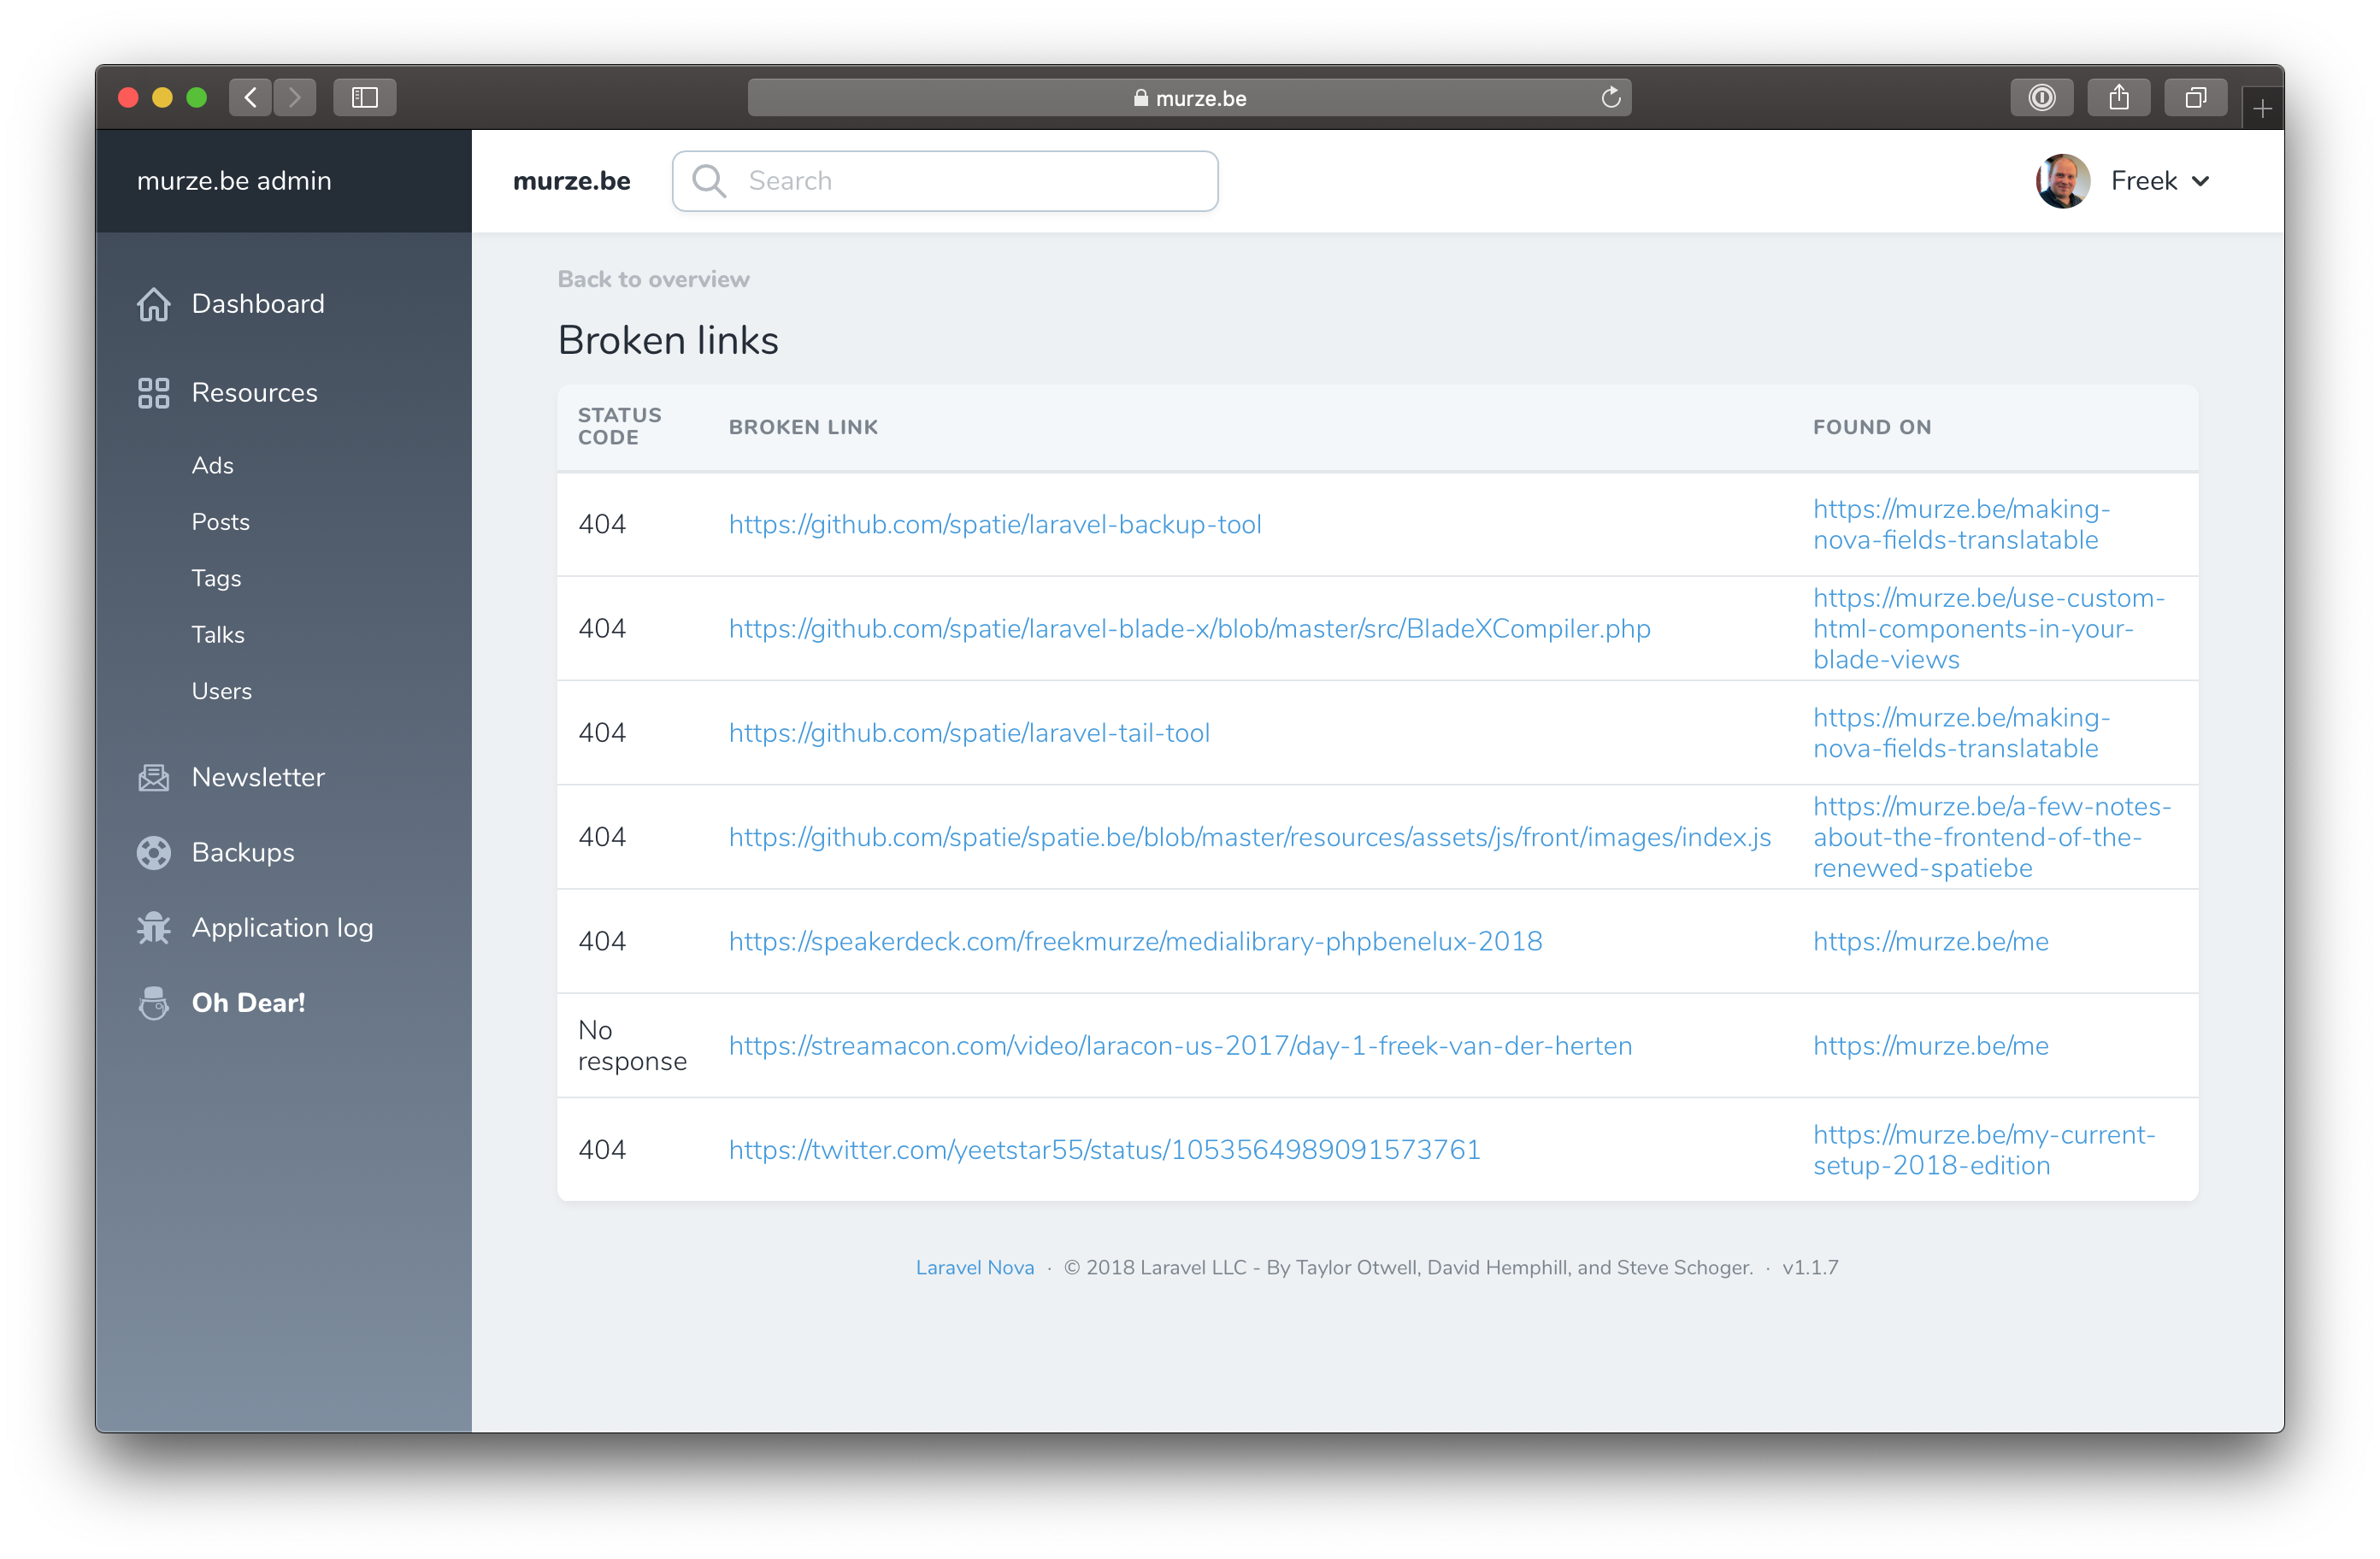
Oh Dear can checks if a site is up, if there are broken links on a page of site, and much more. To speed up some of the tests, we're not using a real world site to check against.</p>
<p>Instead, our tests suite starts a <a href="https://lumen.laravel.com">Lumen</a> based web server. Here's the content of one of the tests where are Lumen server is used.</p>
<pre class="shiki" style="background-color: #2e3440ff"><code><span class="line"><span style="color: #D8DEE9FF"> </span><span style="color: #81A1C1">protected</span><span style="color: #D8DEE9FF"> </span><span style="color: #81A1C1">function</span><span style="color: #D8DEE9FF"> </span><span style="color: #88C0D0">setUp</span><span style="color: #ECEFF4">()</span><span style="color: #81A1C1">:</span><span style="color: #D8DEE9FF"> </span><span style="color: #81A1C1">void</span></span>
<span class="line"><span style="color: #ECEFF4">{</span></span>
<span class="line"><span style="color: #D8DEE9FF">    </span><span style="color: #81A1C1">parent::</span><span style="color: #88C0D0">setUp</span><span style="color: #ECEFF4">()</span><span style="color: #81A1C1">;</span></span>
<span class="line"></span>
<span class="line"><span style="color: #D8DEE9FF">    </span><span style="color: #81A1C1">$this-&gt;</span><span style="color: #D8DEE9">check</span><span style="color: #D8DEE9FF"> </span><span style="color: #81A1C1">=</span><span style="color: #D8DEE9FF"> </span><span style="color: #8FBCBB">Check</span><span style="color: #81A1C1">::</span><span style="color: #88C0D0">factory</span><span style="color: #ECEFF4">()</span><span style="color: #81A1C1">-&gt;</span><span style="color: #88C0D0">create</span><span style="color: #ECEFF4">([</span></span>
<span class="line"><span style="color: #D8DEE9FF">        </span><span style="color: #ECEFF4">&#39;</span><span style="color: #A3BE8C">type</span><span style="color: #ECEFF4">&#39;</span><span style="color: #D8DEE9FF"> </span><span style="color: #81A1C1">=&gt;</span><span style="color: #D8DEE9FF"> </span><span style="color: #8FBCBB">CheckType</span><span style="color: #81A1C1">::</span><span style="color: #D8DEE9FF">BROKEN_LINKS</span><span style="color: #ECEFF4">,</span></span>
<span class="line"><span style="color: #D8DEE9FF">        </span><span style="color: #ECEFF4">&#39;</span><span style="color: #A3BE8C">site_id</span><span style="color: #ECEFF4">&#39;</span><span style="color: #D8DEE9FF"> </span><span style="color: #81A1C1">=&gt;</span><span style="color: #D8DEE9FF"> </span><span style="color: #8FBCBB">Site</span><span style="color: #81A1C1">::</span><span style="color: #88C0D0">factory</span><span style="color: #ECEFF4">()</span><span style="color: #81A1C1">-&gt;</span><span style="color: #88C0D0">create</span><span style="color: #ECEFF4">([</span></span>
<span class="line"><span style="color: #D8DEE9FF">            </span><span style="color: #ECEFF4">&#39;</span><span style="color: #A3BE8C">url</span><span style="color: #ECEFF4">&#39;</span><span style="color: #D8DEE9FF"> </span><span style="color: #81A1C1">=&gt;</span><span style="color: #D8DEE9FF"> </span><span style="color: #ECEFF4">&#39;</span><span style="color: #A3BE8C">http://localhost:8181</span><span style="color: #ECEFF4">&#39;</span><span style="color: #ECEFF4">,</span></span>
<span class="line"><span style="color: #D8DEE9FF">            </span><span style="color: #ECEFF4">&#39;</span><span style="color: #A3BE8C">broken_links_check_include_external_links</span><span style="color: #ECEFF4">&#39;</span><span style="color: #D8DEE9FF"> </span><span style="color: #81A1C1">=&gt;</span><span style="color: #D8DEE9FF"> </span><span style="color: #81A1C1">true</span><span style="color: #ECEFF4">,</span></span>
<span class="line"><span style="color: #D8DEE9FF">        </span><span style="color: #ECEFF4">]),</span></span>
<span class="line"><span style="color: #D8DEE9FF">    </span><span style="color: #ECEFF4">])</span><span style="color: #81A1C1">;</span></span>
<span class="line"></span>
<span class="line"><span style="color: #D8DEE9FF">    </span><span style="color: #81A1C1">$this-&gt;</span><span style="color: #D8DEE9">run</span><span style="color: #D8DEE9FF"> </span><span style="color: #81A1C1">=</span><span style="color: #D8DEE9FF"> </span><span style="color: #8FBCBB">Run</span><span style="color: #81A1C1">::</span><span style="color: #88C0D0">createForCheck</span><span style="color: #ECEFF4">(</span><span style="color: #81A1C1">$this-&gt;</span><span style="color: #D8DEE9">check</span><span style="color: #ECEFF4">)</span><span style="color: #81A1C1">;</span></span>
<span class="line"></span>
<span class="line"><span style="color: #D8DEE9FF">    </span><span style="color: #8FBCBB">Server</span><span style="color: #81A1C1">::</span><span style="color: #88C0D0">boot</span><span style="color: #ECEFF4">()</span><span style="color: #81A1C1">;</span></span>
<span class="line"></span>
<span class="line"><span style="color: #D8DEE9FF">    </span><span style="color: #8FBCBB">Event</span><span style="color: #81A1C1">::</span><span style="color: #88C0D0">fake</span><span style="color: #ECEFF4">()</span><span style="color: #81A1C1">;</span></span>
<span class="line"><span style="color: #ECEFF4">}</span></span>
<span class="line"></span>
<span class="line"><span style="color: #D8DEE9FF"> </span><span style="color: #616E88">/** @test */</span></span>
<span class="line"><span style="color: #81A1C1">public</span><span style="color: #D8DEE9FF"> </span><span style="color: #81A1C1">function</span><span style="color: #D8DEE9FF"> </span><span style="color: #88C0D0">it_can_perform_a_run_and_detect_broken_links</span><span style="color: #ECEFF4">()</span></span>
<span class="line"><span style="color: #ECEFF4">{</span></span>
<span class="line"><span style="color: #D8DEE9FF">    </span><span style="color: #8FBCBB">Server</span><span style="color: #81A1C1">::</span><span style="color: #88C0D0">activateRoutes</span><span style="color: #ECEFF4">(</span><span style="color: #ECEFF4">&#39;</span><span style="color: #A3BE8C">brokenLinks</span><span style="color: #ECEFF4">&#39;</span><span style="color: #ECEFF4">)</span><span style="color: #81A1C1">;</span></span>
<span class="line"></span>
<span class="line"><span style="color: #D8DEE9FF">    </span><span style="color: #88C0D0">app</span><span style="color: #ECEFF4">(</span><span style="color: #8FBCBB">CrawlerChecker</span><span style="color: #81A1C1">::class</span><span style="color: #ECEFF4">)</span><span style="color: #81A1C1">-&gt;</span><span style="color: #88C0D0">perform</span><span style="color: #ECEFF4">([</span><span style="color: #81A1C1">$this-&gt;</span><span style="color: #D8DEE9">run</span><span style="color: #ECEFF4">])</span><span style="color: #81A1C1">;</span></span>
<span class="line"></span>
<span class="line"><span style="color: #D8DEE9FF">    </span><span style="color: #81A1C1">$this-&gt;</span><span style="color: #D8DEE9">run</span><span style="color: #81A1C1">-&gt;</span><span style="color: #88C0D0">refresh</span><span style="color: #ECEFF4">()</span><span style="color: #81A1C1">;</span></span>
<span class="line"></span>
<span class="line"><span style="color: #D8DEE9FF">    </span><span style="color: #81A1C1">$this-&gt;</span><span style="color: #88C0D0">assertEquals</span><span style="color: #ECEFF4">(</span><span style="color: #B48EAD">7</span><span style="color: #ECEFF4">,</span><span style="color: #D8DEE9FF"> </span><span style="color: #81A1C1">$this-&gt;</span><span style="color: #D8DEE9">run</span><span style="color: #81A1C1">-&gt;</span><span style="color: #88C0D0">crawledUrlsForBrokenLinks</span><span style="color: #ECEFF4">()</span><span style="color: #81A1C1">-&gt;</span><span style="color: #88C0D0">count</span><span style="color: #ECEFF4">())</span><span style="color: #81A1C1">;</span></span>
<span class="line"></span>
<span class="line"><span style="color: #D8DEE9FF">    </span><span style="color: #81A1C1">$</span><span style="color: #D8DEE9">brokenLinks</span><span style="color: #D8DEE9FF"> </span><span style="color: #81A1C1">=</span><span style="color: #D8DEE9FF"> </span><span style="color: #81A1C1">$this-&gt;</span><span style="color: #D8DEE9">run</span><span style="color: #81A1C1">-&gt;</span><span style="color: #88C0D0">brokenLinks</span><span style="color: #ECEFF4">()</span><span style="color: #81A1C1">-&gt;</span><span style="color: #88C0D0">toArray</span><span style="color: #ECEFF4">()</span><span style="color: #81A1C1">;</span></span>
<span class="line"></span>
<span class="line"><span style="color: #D8DEE9FF">    </span><span style="color: #81A1C1">$this-&gt;</span><span style="color: #88C0D0">assertEquals</span><span style="color: #ECEFF4">([</span></span>
<span class="line"><span style="color: #D8DEE9FF">        </span><span style="color: #ECEFF4">[</span></span>
<span class="line"><span style="color: #D8DEE9FF">            </span><span style="color: #ECEFF4">&#39;</span><span style="color: #A3BE8C">crawled_url</span><span style="color: #ECEFF4">&#39;</span><span style="color: #D8DEE9FF"> </span><span style="color: #81A1C1">=&gt;</span><span style="color: #D8DEE9FF"> </span><span style="color: #ECEFF4">&#39;</span><span style="color: #A3BE8C">https:::///invalidLink</span><span style="color: #ECEFF4">&#39;</span><span style="color: #ECEFF4">,</span></span>
<span class="line"><span style="color: #D8DEE9FF">            </span><span style="color: #ECEFF4">&#39;</span><span style="color: #A3BE8C">status_code</span><span style="color: #ECEFF4">&#39;</span><span style="color: #D8DEE9FF"> </span><span style="color: #81A1C1">=&gt;</span><span style="color: #D8DEE9FF"> </span><span style="color: #81A1C1">null</span><span style="color: #ECEFF4">,</span></span>
<span class="line"><span style="color: #D8DEE9FF">            </span><span style="color: #ECEFF4">&#39;</span><span style="color: #A3BE8C">found_on_url</span><span style="color: #ECEFF4">&#39;</span><span style="color: #D8DEE9FF"> </span><span style="color: #81A1C1">=&gt;</span><span style="color: #D8DEE9FF"> </span><span style="color: #ECEFF4">&#39;</span><span style="color: #A3BE8C">http://localhost:8181/</span><span style="color: #ECEFF4">&#39;</span><span style="color: #ECEFF4">,</span></span>
<span class="line"><span style="color: #D8DEE9FF">        </span><span style="color: #ECEFF4">],</span></span>
<span class="line"><span style="color: #D8DEE9FF">        </span><span style="color: #ECEFF4">[</span></span>
<span class="line"><span style="color: #D8DEE9FF">            </span><span style="color: #ECEFF4">&#39;</span><span style="color: #A3BE8C">crawled_url</span><span style="color: #ECEFF4">&#39;</span><span style="color: #D8DEE9FF"> </span><span style="color: #81A1C1">=&gt;</span><span style="color: #D8DEE9FF"> </span><span style="color: #ECEFF4">&#39;</span><span style="color: #A3BE8C">http://localhost:8181/broken</span><span style="color: #ECEFF4">&#39;</span><span style="color: #ECEFF4">,</span></span>
<span class="line"><span style="color: #D8DEE9FF">            </span><span style="color: #ECEFF4">&#39;</span><span style="color: #A3BE8C">status_code</span><span style="color: #ECEFF4">&#39;</span><span style="color: #D8DEE9FF"> </span><span style="color: #81A1C1">=&gt;</span><span style="color: #D8DEE9FF"> </span><span style="color: #B48EAD">404</span><span style="color: #ECEFF4">,</span></span>
<span class="line"><span style="color: #D8DEE9FF">            </span><span style="color: #ECEFF4">&#39;</span><span style="color: #A3BE8C">found_on_url</span><span style="color: #ECEFF4">&#39;</span><span style="color: #D8DEE9FF"> </span><span style="color: #81A1C1">=&gt;</span><span style="color: #D8DEE9FF"> </span><span style="color: #ECEFF4">&#39;</span><span style="color: #A3BE8C">http://localhost:8181/link3</span><span style="color: #ECEFF4">&#39;</span><span style="color: #ECEFF4">,</span></span>
<span class="line"><span style="color: #D8DEE9FF">        </span><span style="color: #ECEFF4">],</span></span>
<span class="line"><span style="color: #D8DEE9FF">        </span><span style="color: #ECEFF4">[</span></span>
<span class="line"><span style="color: #D8DEE9FF">            </span><span style="color: #ECEFF4">&#39;</span><span style="color: #A3BE8C">crawled_url</span><span style="color: #ECEFF4">&#39;</span><span style="color: #D8DEE9FF"> </span><span style="color: #81A1C1">=&gt;</span><span style="color: #D8DEE9FF"> </span><span style="color: #ECEFF4">&#39;</span><span style="color: #A3BE8C">https://ohdearthisdomaincertainlydoesntexist</span><span style="color: #ECEFF4">&#39;</span><span style="color: #ECEFF4">,</span></span>
<span class="line"><span style="color: #D8DEE9FF">            </span><span style="color: #ECEFF4">&#39;</span><span style="color: #A3BE8C">status_code</span><span style="color: #ECEFF4">&#39;</span><span style="color: #D8DEE9FF"> </span><span style="color: #81A1C1">=&gt;</span><span style="color: #D8DEE9FF"> </span><span style="color: #81A1C1">null</span><span style="color: #ECEFF4">,</span></span>
<span class="line"><span style="color: #D8DEE9FF">            </span><span style="color: #ECEFF4">&#39;</span><span style="color: #A3BE8C">found_on_url</span><span style="color: #ECEFF4">&#39;</span><span style="color: #D8DEE9FF"> </span><span style="color: #81A1C1">=&gt;</span><span style="color: #D8DEE9FF"> </span><span style="color: #ECEFF4">&#39;</span><span style="color: #A3BE8C">http://localhost:8181/</span><span style="color: #ECEFF4">&#39;</span><span style="color: #ECEFF4">,</span></span>
<span class="line"><span style="color: #D8DEE9FF">        </span><span style="color: #ECEFF4">],</span></span>
<span class="line"><span style="color: #D8DEE9FF">    </span><span style="color: #ECEFF4">],</span><span style="color: #D8DEE9FF"> </span><span style="color: #81A1C1">$</span><span style="color: #D8DEE9">brokenLinks</span><span style="color: #ECEFF4">)</span><span style="color: #81A1C1">;</span></span>
<span class="line"></span>
<span class="line"><span style="color: #D8DEE9FF">    </span><span style="color: #8FBCBB">Event</span><span style="color: #81A1C1">::</span><span style="color: #88C0D0">assertDispatched</span><span style="color: #ECEFF4">(</span><span style="color: #8FBCBB">BrokenLinksFound</span><span style="color: #81A1C1">::class</span><span style="color: #ECEFF4">)</span><span style="color: #81A1C1">;</span></span>
<span class="line"><span style="color: #D8DEE9FF">    </span><span style="color: #8FBCBB">Event</span><span style="color: #81A1C1">::</span><span style="color: #88C0D0">assertNotDispatched</span><span style="color: #ECEFF4">(</span><span style="color: #8FBCBB">BrokenLinksFixed</span><span style="color: #81A1C1">::class</span><span style="color: #ECEFF4">)</span><span style="color: #81A1C1">;</span></span>
<span class="line"><span style="color: #ECEFF4">}</span></span>
<span class="line"></span></code></pre>
<p>There's a lot going on in the code above.</p>
<p>In short, this test will instruct our <code>Server</code> (this is our lumen test server) to load up the <code>brokenLinks</code> routes files. This route file contains routes whose responses contain a couple of broken links.</p>
<p>A check being performed is called a <code>run</code> in Oh Dear. In the test above we are going to let our <code>Crawler</code> checker perform a run of type <code>CheckType::BROKEN_LINKS</code>. After the check is done, we can assert that the expected number of pages was crawled, and that broken links were found.</p>
<p>Let's take a look at the code of the <code>Server</code> class. It's a lot of code, but don't be scared. This code will:</p>
<ul>
<li>run <code>composer install</code> to install the server's dependencies if they are not install yet.</li>
<li>start up the Lumen server in the background, it can also wait until the boot process is complete</li>
<li>shuts down the server after the test has run</li>
<li>provide a method to dynamically change the route file used by the Lumen app</li>
</ul>
<pre class="shiki" style="background-color: #2e3440ff"><code><span class="line"><span style="color: #81A1C1">use</span><span style="color: #D8DEE9FF"> </span><span style="color: #8FBCBB">ErrorException</span><span style="color: #81A1C1">;</span></span>
<span class="line"><span style="color: #81A1C1">use</span><span style="color: #D8DEE9FF"> GuzzleHttp</span><span style="color: #ECEFF4">\</span><span style="color: #8FBCBB">Client</span><span style="color: #81A1C1">;</span></span>
<span class="line"></span>
<span class="line"><span style="color: #81A1C1">class</span><span style="color: #D8DEE9FF"> </span><span style="color: #8FBCBB">Server</span></span>
<span class="line"><span style="color: #ECEFF4">{</span></span>
<span class="line"><span style="color: #D8DEE9FF">    </span><span style="color: #81A1C1">protected</span><span style="color: #D8DEE9FF"> </span><span style="color: #8FBCBB">Client</span><span style="color: #D8DEE9FF"> </span><span style="color: #81A1C1">$</span><span style="color: #D8DEE9">client</span><span style="color: #81A1C1">;</span></span>
<span class="line"></span>
<span class="line"><span style="color: #D8DEE9FF">    </span><span style="color: #81A1C1">public</span><span style="color: #D8DEE9FF"> </span><span style="color: #81A1C1">function</span><span style="color: #D8DEE9FF"> </span><span style="color: #88C0D0">__construct</span><span style="color: #ECEFF4">(</span><span style="color: #8FBCBB">Client</span><span style="color: #D8DEE9FF"> </span><span style="color: #81A1C1">$</span><span style="color: #D8DEE9">client</span><span style="color: #D8DEE9FF"> </span><span style="color: #81A1C1">=</span><span style="color: #D8DEE9FF"> </span><span style="color: #81A1C1">null</span><span style="color: #ECEFF4">)</span></span>
<span class="line"><span style="color: #D8DEE9FF">    </span><span style="color: #ECEFF4">{</span></span>
<span class="line"><span style="color: #D8DEE9FF">        </span><span style="color: #81A1C1">static::</span><span style="color: #88C0D0">boot</span><span style="color: #ECEFF4">()</span><span style="color: #81A1C1">;</span></span>
<span class="line"></span>
<span class="line"><span style="color: #D8DEE9FF">        </span><span style="color: #81A1C1">$this-&gt;</span><span style="color: #D8DEE9">client</span><span style="color: #D8DEE9FF"> </span><span style="color: #81A1C1">=</span><span style="color: #D8DEE9FF"> </span><span style="color: #81A1C1">$</span><span style="color: #D8DEE9">client</span><span style="color: #D8DEE9FF"> </span><span style="color: #81A1C1">??</span><span style="color: #D8DEE9FF"> </span><span style="color: #81A1C1">new</span><span style="color: #D8DEE9FF"> </span><span style="color: #8FBCBB">Client</span><span style="color: #ECEFF4">()</span><span style="color: #81A1C1">;</span></span>
<span class="line"><span style="color: #D8DEE9FF">    </span><span style="color: #ECEFF4">}</span></span>
<span class="line"></span>
<span class="line"><span style="color: #D8DEE9FF">    </span><span style="color: #81A1C1">public</span><span style="color: #D8DEE9FF"> </span><span style="color: #81A1C1">static</span><span style="color: #D8DEE9FF"> </span><span style="color: #81A1C1">function</span><span style="color: #D8DEE9FF"> </span><span style="color: #88C0D0">boot</span><span style="color: #ECEFF4">()</span></span>
<span class="line"><span style="color: #D8DEE9FF">    </span><span style="color: #ECEFF4">{</span></span>
<span class="line"><span style="color: #D8DEE9FF">        </span><span style="color: #81A1C1">if</span><span style="color: #D8DEE9FF"> </span><span style="color: #ECEFF4">(</span><span style="color: #81A1C1">!</span><span style="color: #D8DEE9FF"> </span><span style="color: #88C0D0">file_exists</span><span style="color: #ECEFF4">(</span><span style="color: #81A1C1">__DIR__</span><span style="color: #81A1C1">.</span><span style="color: #ECEFF4">&#39;</span><span style="color: #A3BE8C">/vendor</span><span style="color: #ECEFF4">&#39;</span><span style="color: #ECEFF4">))</span><span style="color: #D8DEE9FF"> </span><span style="color: #ECEFF4">{</span></span>
<span class="line"><span style="color: #D8DEE9FF">            </span><span style="color: #88C0D0">exec</span><span style="color: #ECEFF4">(</span><span style="color: #ECEFF4">&#39;</span><span style="color: #A3BE8C">cd &quot;</span><span style="color: #ECEFF4">&#39;</span><span style="color: #81A1C1">.</span><span style="color: #81A1C1">__DIR__</span><span style="color: #81A1C1">.</span><span style="color: #ECEFF4">&#39;</span><span style="color: #A3BE8C">&quot;; composer install</span><span style="color: #ECEFF4">&#39;</span><span style="color: #ECEFF4">)</span><span style="color: #81A1C1">;</span></span>
<span class="line"><span style="color: #D8DEE9FF">        </span><span style="color: #ECEFF4">}</span></span>
<span class="line"></span>
<span class="line"><span style="color: #D8DEE9FF">        </span><span style="color: #81A1C1">if</span><span style="color: #D8DEE9FF"> </span><span style="color: #ECEFF4">(</span><span style="color: #81A1C1">static::</span><span style="color: #88C0D0">serverHasBooted</span><span style="color: #ECEFF4">())</span><span style="color: #D8DEE9FF"> </span><span style="color: #ECEFF4">{</span></span>
<span class="line"><span style="color: #D8DEE9FF">            </span><span style="color: #81A1C1">return;</span></span>
<span class="line"><span style="color: #D8DEE9FF">        </span><span style="color: #ECEFF4">}</span></span>
<span class="line"></span>
<span class="line"><span style="color: #D8DEE9FF">        </span><span style="color: #81A1C1">$</span><span style="color: #D8DEE9">startServerCommand</span><span style="color: #D8DEE9FF"> </span><span style="color: #81A1C1">=</span><span style="color: #D8DEE9FF"> </span><span style="color: #ECEFF4">&#39;</span><span style="color: #A3BE8C">php -S </span><span style="color: #ECEFF4">&#39;</span><span style="color: #81A1C1">.</span><span style="color: #88C0D0">rtrim</span><span style="color: #ECEFF4">(</span><span style="color: #81A1C1">static::</span><span style="color: #88C0D0">getServerUrl</span><span style="color: #ECEFF4">(),</span><span style="color: #88C0D0"> </span><span style="color: #ECEFF4">&#39;</span><span style="color: #A3BE8C">/</span><span style="color: #ECEFF4">&#39;</span><span style="color: #ECEFF4">)</span><span style="color: #81A1C1">.</span><span style="color: #ECEFF4">&#39;</span><span style="color: #A3BE8C"> -t ./tests/Server/public &gt; /dev/null 2&gt;&amp;1 &amp; echo $!</span><span style="color: #ECEFF4">&#39;</span><span style="color: #81A1C1">;</span></span>
<span class="line"></span>
<span class="line"><span style="color: #D8DEE9FF">        </span><span style="color: #81A1C1">$</span><span style="color: #D8DEE9">pid</span><span style="color: #D8DEE9FF"> </span><span style="color: #81A1C1">=</span><span style="color: #D8DEE9FF"> </span><span style="color: #88C0D0">exec</span><span style="color: #ECEFF4">(</span><span style="color: #81A1C1">$</span><span style="color: #D8DEE9">startServerCommand</span><span style="color: #ECEFF4">)</span><span style="color: #81A1C1">;</span></span>
<span class="line"></span>
<span class="line"><span style="color: #D8DEE9FF">        </span><span style="color: #81A1C1">while</span><span style="color: #D8DEE9FF"> </span><span style="color: #ECEFF4">(</span><span style="color: #81A1C1">!</span><span style="color: #D8DEE9FF"> </span><span style="color: #81A1C1">static::</span><span style="color: #88C0D0">serverHasBooted</span><span style="color: #ECEFF4">())</span><span style="color: #D8DEE9FF"> </span><span style="color: #ECEFF4">{</span></span>
<span class="line"><span style="color: #D8DEE9FF">            </span><span style="color: #88C0D0">sleep</span><span style="color: #ECEFF4">(</span><span style="color: #B48EAD">1</span><span style="color: #ECEFF4">)</span><span style="color: #81A1C1">;</span></span>
<span class="line"><span style="color: #D8DEE9FF">        </span><span style="color: #ECEFF4">}</span></span>
<span class="line"></span>
<span class="line"><span style="color: #D8DEE9FF">        </span><span style="color: #88C0D0">register_shutdown_function</span><span style="color: #ECEFF4">(</span><span style="color: #81A1C1">function</span><span style="color: #88C0D0"> </span><span style="color: #ECEFF4">()</span><span style="color: #88C0D0"> </span><span style="color: #81A1C1">use</span><span style="color: #88C0D0"> </span><span style="color: #ECEFF4">(</span><span style="color: #81A1C1">$</span><span style="color: #D8DEE9">pid</span><span style="color: #ECEFF4">)</span><span style="color: #88C0D0"> </span><span style="color: #ECEFF4">{</span></span>
<span class="line"><span style="color: #88C0D0">            </span><span style="color: #81A1C1">@</span><span style="color: #88C0D0">exec</span><span style="color: #ECEFF4">(</span><span style="color: #ECEFF4">&quot;</span><span style="color: #A3BE8C">kill </span><span style="color: #81A1C1">{$</span><span style="color: #D8DEE9">pid</span><span style="color: #81A1C1">}</span><span style="color: #A3BE8C"> 2&gt;/dev/null</span><span style="color: #ECEFF4">&quot;</span><span style="color: #ECEFF4">)</span><span style="color: #81A1C1">;</span></span>
<span class="line"><span style="color: #88C0D0">        </span><span style="color: #ECEFF4">})</span><span style="color: #81A1C1">;</span></span>
<span class="line"><span style="color: #D8DEE9FF">    </span><span style="color: #ECEFF4">}</span></span>
<span class="line"></span>
<span class="line"><span style="color: #D8DEE9FF">    </span><span style="color: #81A1C1">public</span><span style="color: #D8DEE9FF"> </span><span style="color: #81A1C1">static</span><span style="color: #D8DEE9FF"> </span><span style="color: #81A1C1">function</span><span style="color: #D8DEE9FF"> </span><span style="color: #88C0D0">getServerUrl</span><span style="color: #ECEFF4">(</span><span style="color: #81A1C1">string</span><span style="color: #D8DEE9FF"> </span><span style="color: #81A1C1">$</span><span style="color: #D8DEE9">endPoint</span><span style="color: #D8DEE9FF"> </span><span style="color: #81A1C1">=</span><span style="color: #D8DEE9FF"> </span><span style="color: #ECEFF4">&#39;&#39;</span><span style="color: #ECEFF4">)</span><span style="color: #81A1C1">:</span><span style="color: #D8DEE9FF"> </span><span style="color: #81A1C1">string</span></span>
<span class="line"><span style="color: #D8DEE9FF">    </span><span style="color: #ECEFF4">{</span></span>
<span class="line"><span style="color: #D8DEE9FF">        </span><span style="color: #81A1C1">return</span><span style="color: #D8DEE9FF"> </span><span style="color: #ECEFF4">&#39;</span><span style="color: #A3BE8C">localhost:</span><span style="color: #ECEFF4">&#39;</span><span style="color: #81A1C1">.</span><span style="color: #88C0D0">getenv</span><span style="color: #ECEFF4">(</span><span style="color: #ECEFF4">&#39;</span><span style="color: #A3BE8C">TEST_SERVER_PORT</span><span style="color: #ECEFF4">&#39;</span><span style="color: #ECEFF4">)</span><span style="color: #81A1C1">.</span><span style="color: #ECEFF4">&#39;</span><span style="color: #A3BE8C">/</span><span style="color: #ECEFF4">&#39;</span><span style="color: #81A1C1">.</span><span style="color: #81A1C1">$</span><span style="color: #D8DEE9">endPoint</span><span style="color: #81A1C1">;</span></span>
<span class="line"><span style="color: #D8DEE9FF">    </span><span style="color: #ECEFF4">}</span></span>
<span class="line"></span>
<span class="line"><span style="color: #D8DEE9FF">    </span><span style="color: #81A1C1">public</span><span style="color: #D8DEE9FF"> </span><span style="color: #81A1C1">static</span><span style="color: #D8DEE9FF"> </span><span style="color: #81A1C1">function</span><span style="color: #D8DEE9FF"> </span><span style="color: #88C0D0">serverHasBooted</span><span style="color: #ECEFF4">()</span><span style="color: #81A1C1">:</span><span style="color: #D8DEE9FF"> </span><span style="color: #81A1C1">bool</span></span>
<span class="line"><span style="color: #D8DEE9FF">    </span><span style="color: #ECEFF4">{</span></span>
<span class="line"><span style="color: #D8DEE9FF">        </span><span style="color: #81A1C1">$</span><span style="color: #D8DEE9">context</span><span style="color: #D8DEE9FF"> </span><span style="color: #81A1C1">=</span><span style="color: #D8DEE9FF"> </span><span style="color: #88C0D0">stream_context_create</span><span style="color: #ECEFF4">([</span><span style="color: #ECEFF4">&#39;</span><span style="color: #A3BE8C">http</span><span style="color: #ECEFF4">&#39;</span><span style="color: #88C0D0"> </span><span style="color: #81A1C1">=&gt;</span><span style="color: #88C0D0"> </span><span style="color: #ECEFF4">[</span></span>
<span class="line"><span style="color: #88C0D0">            </span><span style="color: #ECEFF4">&#39;</span><span style="color: #A3BE8C">timeout</span><span style="color: #ECEFF4">&#39;</span><span style="color: #88C0D0"> </span><span style="color: #81A1C1">=&gt;</span><span style="color: #88C0D0"> </span><span style="color: #B48EAD">1</span><span style="color: #ECEFF4">,</span></span>
<span class="line"><span style="color: #88C0D0">        </span><span style="color: #ECEFF4">]])</span><span style="color: #81A1C1">;</span></span>
<span class="line"></span>
<span class="line"><span style="color: #D8DEE9FF">        </span><span style="color: #81A1C1">try</span><span style="color: #D8DEE9FF"> </span><span style="color: #ECEFF4">{</span></span>
<span class="line"><span style="color: #D8DEE9FF">            </span><span style="color: #81A1C1">$</span><span style="color: #D8DEE9">result</span><span style="color: #D8DEE9FF"> </span><span style="color: #81A1C1">=</span><span style="color: #D8DEE9FF"> </span><span style="color: #88C0D0">file_get_contents</span><span style="color: #ECEFF4">(</span><span style="color: #ECEFF4">&#39;</span><span style="color: #A3BE8C">http://</span><span style="color: #ECEFF4">&#39;</span><span style="color: #81A1C1">.</span><span style="color: #81A1C1">self::</span><span style="color: #88C0D0">getServerUrl</span><span style="color: #ECEFF4">(</span><span style="color: #ECEFF4">&#39;</span><span style="color: #A3BE8C">booted</span><span style="color: #ECEFF4">&#39;</span><span style="color: #ECEFF4">),</span><span style="color: #88C0D0"> </span><span style="color: #81A1C1">false</span><span style="color: #ECEFF4">,</span><span style="color: #88C0D0"> </span><span style="color: #81A1C1">$</span><span style="color: #D8DEE9">context</span><span style="color: #ECEFF4">)</span><span style="color: #D8DEE9FF"> </span><span style="color: #81A1C1">!=</span><span style="color: #D8DEE9FF"> </span><span style="color: #81A1C1">false;</span></span>
<span class="line"><span style="color: #D8DEE9FF">        </span><span style="color: #ECEFF4">}</span><span style="color: #D8DEE9FF"> </span><span style="color: #81A1C1">catch</span><span style="color: #D8DEE9FF"> </span><span style="color: #ECEFF4">(</span><span style="color: #8FBCBB">ErrorException</span><span style="color: #ECEFF4">)</span><span style="color: #D8DEE9FF"> </span><span style="color: #ECEFF4">{</span></span>
<span class="line"><span style="color: #D8DEE9FF">            </span><span style="color: #81A1C1">$</span><span style="color: #D8DEE9">result</span><span style="color: #D8DEE9FF"> </span><span style="color: #81A1C1">=</span><span style="color: #D8DEE9FF"> </span><span style="color: #81A1C1">false;</span></span>
<span class="line"><span style="color: #D8DEE9FF">        </span><span style="color: #ECEFF4">}</span></span>
<span class="line"></span>
<span class="line"><span style="color: #D8DEE9FF">        </span><span style="color: #81A1C1">return</span><span style="color: #D8DEE9FF"> </span><span style="color: #81A1C1">$</span><span style="color: #D8DEE9">result</span><span style="color: #81A1C1">;</span></span>
<span class="line"><span style="color: #D8DEE9FF">    </span><span style="color: #ECEFF4">}</span></span>
<span class="line"></span>
<span class="line"><span style="color: #D8DEE9FF">    </span><span style="color: #81A1C1">public</span><span style="color: #D8DEE9FF"> </span><span style="color: #81A1C1">static</span><span style="color: #D8DEE9FF"> </span><span style="color: #81A1C1">function</span><span style="color: #D8DEE9FF"> </span><span style="color: #88C0D0">activateRoutes</span><span style="color: #ECEFF4">(</span><span style="color: #81A1C1">string</span><span style="color: #D8DEE9FF"> </span><span style="color: #81A1C1">$</span><span style="color: #D8DEE9">routeConfiguration</span><span style="color: #ECEFF4">)</span></span>
<span class="line"><span style="color: #D8DEE9FF">    </span><span style="color: #ECEFF4">{</span></span>
<span class="line"><span style="color: #D8DEE9FF">        </span><span style="color: #81A1C1">$</span><span style="color: #D8DEE9">token</span><span style="color: #D8DEE9FF"> </span><span style="color: #81A1C1">=</span><span style="color: #D8DEE9FF"> </span><span style="color: #8FBCBB">ParallelTesting</span><span style="color: #81A1C1">::</span><span style="color: #88C0D0">token</span><span style="color: #ECEFF4">()</span><span style="color: #81A1C1">;</span></span>
<span class="line"></span>
<span class="line"><span style="color: #D8DEE9FF">        </span><span style="color: #88C0D0">file_put_contents</span><span style="color: #ECEFF4">(</span><span style="color: #81A1C1">__DIR__</span><span style="color: #88C0D0"> </span><span style="color: #81A1C1">.</span><span style="color: #ECEFF4">&quot;</span><span style="color: #A3BE8C">/public/config-</span><span style="color: #81A1C1">{$</span><span style="color: #D8DEE9">token</span><span style="color: #81A1C1">}</span><span style="color: #A3BE8C">.json</span><span style="color: #ECEFF4">&quot;</span><span style="color: #ECEFF4">,</span><span style="color: #88C0D0"> json_encode</span><span style="color: #ECEFF4">([</span><span style="color: #ECEFF4">&#39;</span><span style="color: #A3BE8C">routes</span><span style="color: #ECEFF4">&#39;</span><span style="color: #88C0D0"> </span><span style="color: #81A1C1">=&gt;</span><span style="color: #88C0D0"> </span><span style="color: #81A1C1">$</span><span style="color: #D8DEE9">routeConfiguration</span><span style="color: #ECEFF4">]))</span><span style="color: #81A1C1">;</span></span>
<span class="line"><span style="color: #D8DEE9FF">    </span><span style="color: #ECEFF4">}</span></span>
<span class="line"><span style="color: #ECEFF4">}</span></span>
<span class="line"></span></code></pre>
<p>In the  <code>activateRoutes</code> you see that we now use the <code>ParallelTesting::token()</code>. The method will use that token to write a config file per concurrent test that contains the route configuration to use. Before we supported parallel testing we only had one config file.</p>
<p>Here's how the entire <code>Server</code> directory looks like in our tests looks like. Those grayed out files are not under version control (as they are generated). You can see that we have config files per test token (I have 8 cores on my development machine).</p>
<p><img src="/uploads/blogs/parallel/server-dir.png" alt="directory" /></p>
<p>The <code>index.php</code> file contains the entire Lumen server setup. Let's take a look.</p>
<pre class="shiki" style="background-color: #2e3440ff"><code><span class="line"><span style="color: #81A1C1">use</span><span style="color: #D8DEE9FF"> Laravel</span><span style="color: #ECEFF4">\</span><span style="color: #D8DEE9FF">Lumen</span><span style="color: #ECEFF4">\</span><span style="color: #D8DEE9FF">Http</span><span style="color: #ECEFF4">\</span><span style="color: #8FBCBB">Request</span><span style="color: #81A1C1">;</span></span>
<span class="line"></span>
<span class="line"><span style="color: #81A1C1">require_once</span><span style="color: #D8DEE9FF"> </span><span style="color: #81A1C1">__DIR__</span><span style="color: #81A1C1">.</span><span style="color: #ECEFF4">&#39;</span><span style="color: #A3BE8C">/../vendor/autoload.php</span><span style="color: #ECEFF4">&#39;</span><span style="color: #81A1C1">;</span></span>
<span class="line"></span>
<span class="line"><span style="color: #88C0D0">putenv</span><span style="color: #ECEFF4">(</span><span style="color: #ECEFF4">&#39;</span><span style="color: #A3BE8C">APP_DEBUG=true</span><span style="color: #ECEFF4">&#39;</span><span style="color: #ECEFF4">)</span><span style="color: #81A1C1">;</span></span>
<span class="line"></span>
<span class="line"><span style="color: #81A1C1">$</span><span style="color: #D8DEE9">app</span><span style="color: #D8DEE9FF"> </span><span style="color: #81A1C1">=</span><span style="color: #D8DEE9FF"> </span><span style="color: #81A1C1">new</span><span style="color: #D8DEE9FF"> Laravel</span><span style="color: #ECEFF4">\</span><span style="color: #D8DEE9FF">Lumen</span><span style="color: #ECEFF4">\</span><span style="color: #8FBCBB">Application</span><span style="color: #ECEFF4">(</span></span>
<span class="line"><span style="color: #D8DEE9FF">    </span><span style="color: #88C0D0">realpath</span><span style="color: #ECEFF4">(</span><span style="color: #81A1C1">__DIR__</span><span style="color: #81A1C1">.</span><span style="color: #ECEFF4">&#39;/</span><span style="color: #EBCB8B">..</span><span style="color: #ECEFF4">/&#39;</span><span style="color: #ECEFF4">)</span></span>
<span class="line"><span style="color: #ECEFF4">)</span><span style="color: #81A1C1">;</span></span>
<span class="line"></span>
<span class="line"><span style="color: #81A1C1">$</span><span style="color: #D8DEE9">app</span><span style="color: #81A1C1">-&gt;</span><span style="color: #88C0D0">configure</span><span style="color: #ECEFF4">(</span><span style="color: #ECEFF4">&#39;</span><span style="color: #A3BE8C">app</span><span style="color: #ECEFF4">&#39;</span><span style="color: #ECEFF4">)</span><span style="color: #81A1C1">;</span></span>
<span class="line"></span>
<span class="line"><span style="color: #81A1C1">$</span><span style="color: #D8DEE9">app</span><span style="color: #81A1C1">-&gt;</span><span style="color: #D8DEE9">router</span><span style="color: #81A1C1">-&gt;</span><span style="color: #88C0D0">group</span><span style="color: #ECEFF4">([</span></span>
<span class="line"><span style="color: #D8DEE9FF">    </span><span style="color: #ECEFF4">&#39;</span><span style="color: #A3BE8C">namespace</span><span style="color: #ECEFF4">&#39;</span><span style="color: #D8DEE9FF"> </span><span style="color: #81A1C1">=&gt;</span><span style="color: #D8DEE9FF"> </span><span style="color: #ECEFF4">&#39;</span><span style="color: #A3BE8C">App\Http\Controllers</span><span style="color: #ECEFF4">&#39;</span><span style="color: #ECEFF4">,</span></span>
<span class="line"><span style="color: #ECEFF4">],</span><span style="color: #D8DEE9FF"> </span><span style="color: #81A1C1">function</span><span style="color: #D8DEE9FF"> </span><span style="color: #ECEFF4">(</span><span style="color: #81A1C1">$</span><span style="color: #D8DEE9">router</span><span style="color: #ECEFF4">)</span><span style="color: #D8DEE9FF"> </span><span style="color: #81A1C1">use</span><span style="color: #D8DEE9FF"> </span><span style="color: #ECEFF4">(</span><span style="color: #81A1C1">$</span><span style="color: #D8DEE9">app</span><span style="color: #ECEFF4">)</span><span style="color: #D8DEE9FF"> </span><span style="color: #ECEFF4">{</span></span>
<span class="line"><span style="color: #D8DEE9FF">    </span><span style="color: #81A1C1">$</span><span style="color: #D8DEE9">router</span><span style="color: #81A1C1">-&gt;</span><span style="color: #88C0D0">get</span><span style="color: #ECEFF4">(</span><span style="color: #ECEFF4">&#39;</span><span style="color: #A3BE8C">booted</span><span style="color: #ECEFF4">&#39;</span><span style="color: #ECEFF4">,</span><span style="color: #D8DEE9FF"> </span><span style="color: #81A1C1">fn</span><span style="color: #D8DEE9FF"> </span><span style="color: #ECEFF4">()</span><span style="color: #D8DEE9FF"> </span><span style="color: #ECEFF4">=&gt;</span><span style="color: #D8DEE9FF"> </span><span style="color: #ECEFF4">&#39;</span><span style="color: #A3BE8C">app has booted</span><span style="color: #ECEFF4">&#39;</span><span style="color: #ECEFF4">)</span><span style="color: #81A1C1">;</span></span>
<span class="line"></span>
<span class="line"><span style="color: #D8DEE9FF">    </span><span style="color: #81A1C1">if</span><span style="color: #D8DEE9FF"> </span><span style="color: #ECEFF4">(</span><span style="color: #81A1C1">$</span><span style="color: #D8DEE9">token</span><span style="color: #D8DEE9FF"> </span><span style="color: #81A1C1">=</span><span style="color: #D8DEE9FF"> </span><span style="color: #8FBCBB">Request</span><span style="color: #81A1C1">::</span><span style="color: #88C0D0">createFromGlobals</span><span style="color: #ECEFF4">()</span><span style="color: #81A1C1">-&gt;</span><span style="color: #88C0D0">header</span><span style="color: #ECEFF4">(</span><span style="color: #ECEFF4">&#39;</span><span style="color: #A3BE8C">testtoken</span><span style="color: #ECEFF4">&#39;</span><span style="color: #ECEFF4">))</span><span style="color: #D8DEE9FF"> </span><span style="color: #ECEFF4">{</span></span>
<span class="line"><span style="color: #D8DEE9FF">        </span><span style="color: #81A1C1">$</span><span style="color: #D8DEE9">routesFile</span><span style="color: #D8DEE9FF"> </span><span style="color: #81A1C1">=</span><span style="color: #D8DEE9FF"> </span><span style="color: #88C0D0">routesFileForToken</span><span style="color: #ECEFF4">(</span><span style="color: #81A1C1">$</span><span style="color: #D8DEE9">token</span><span style="color: #ECEFF4">)</span><span style="color: #81A1C1">;</span></span>
<span class="line"></span>
<span class="line"><span style="color: #D8DEE9FF">        </span><span style="color: #81A1C1">require</span><span style="color: #D8DEE9FF"> </span><span style="color: #81A1C1">$</span><span style="color: #D8DEE9">routesFile</span><span style="color: #81A1C1">;</span></span>
<span class="line"><span style="color: #D8DEE9FF">    </span><span style="color: #ECEFF4">}</span></span>
<span class="line"><span style="color: #ECEFF4">})</span><span style="color: #81A1C1">;</span></span>
<span class="line"></span>
<span class="line"><span style="color: #81A1C1">$</span><span style="color: #D8DEE9">app</span><span style="color: #81A1C1">-&gt;</span><span style="color: #88C0D0">run</span><span style="color: #ECEFF4">()</span><span style="color: #81A1C1">;</span></span>
<span class="line"></span>
<span class="line"><span style="color: #81A1C1">function</span><span style="color: #D8DEE9FF"> </span><span style="color: #88C0D0">routesFileForToken</span><span style="color: #ECEFF4">(</span><span style="color: #81A1C1">string</span><span style="color: #D8DEE9FF"> </span><span style="color: #81A1C1">$</span><span style="color: #D8DEE9">token</span><span style="color: #ECEFF4">)</span><span style="color: #81A1C1">:</span><span style="color: #D8DEE9FF"> </span><span style="color: #81A1C1">string</span></span>
<span class="line"><span style="color: #ECEFF4">{</span></span>
<span class="line"><span style="color: #D8DEE9FF">    </span><span style="color: #81A1C1">$</span><span style="color: #D8DEE9">configFile</span><span style="color: #D8DEE9FF"> </span><span style="color: #81A1C1">=</span><span style="color: #D8DEE9FF"> </span><span style="color: #81A1C1">__DIR__</span><span style="color: #D8DEE9FF"> </span><span style="color: #81A1C1">.</span><span style="color: #D8DEE9FF"> </span><span style="color: #ECEFF4">&quot;</span><span style="color: #A3BE8C">/config-</span><span style="color: #81A1C1">{$</span><span style="color: #D8DEE9">token</span><span style="color: #81A1C1">}</span><span style="color: #A3BE8C">.json</span><span style="color: #ECEFF4">&quot;</span><span style="color: #81A1C1">;</span></span>
<span class="line"></span>
<span class="line"><span style="color: #D8DEE9FF">    </span><span style="color: #81A1C1">$</span><span style="color: #D8DEE9">config</span><span style="color: #D8DEE9FF"> </span><span style="color: #81A1C1">=</span><span style="color: #D8DEE9FF"> </span><span style="color: #88C0D0">json_decode</span><span style="color: #ECEFF4">(</span><span style="color: #88C0D0">file_get_contents</span><span style="color: #ECEFF4">(</span><span style="color: #81A1C1">$</span><span style="color: #D8DEE9">configFile</span><span style="color: #ECEFF4">),</span><span style="color: #88C0D0"> </span><span style="color: #81A1C1">true</span><span style="color: #ECEFF4">)</span><span style="color: #81A1C1">;</span></span>
<span class="line"></span>
<span class="line"><span style="color: #D8DEE9FF">    </span><span style="color: #81A1C1">$</span><span style="color: #D8DEE9">routesFile</span><span style="color: #D8DEE9FF"> </span><span style="color: #81A1C1">=</span><span style="color: #D8DEE9FF"> </span><span style="color: #81A1C1">__DIR__</span><span style="color: #D8DEE9FF"> </span><span style="color: #81A1C1">.</span><span style="color: #D8DEE9FF"> </span><span style="color: #ECEFF4">&quot;</span><span style="color: #A3BE8C">/routeFiles/</span><span style="color: #81A1C1">{$</span><span style="color: #D8DEE9">config</span><span style="color: #ECEFF4">[&#39;</span><span style="color: #A3BE8C">routes</span><span style="color: #ECEFF4">&#39;]</span><span style="color: #81A1C1">}</span><span style="color: #A3BE8C">.php</span><span style="color: #ECEFF4">&quot;</span><span style="color: #81A1C1">;</span></span>
<span class="line"></span>
<span class="line"><span style="color: #D8DEE9FF">    </span><span style="color: #81A1C1">return</span><span style="color: #D8DEE9FF"> </span><span style="color: #81A1C1">$</span><span style="color: #D8DEE9">routesFile</span><span style="color: #81A1C1">;</span></span>
<span class="line"><span style="color: #ECEFF4">}</span></span>
<span class="line"></span></code></pre>
<p>In the code above you see that we use the value in the <code>testtoken</code> header to determine which of the config files should be read.</p>
<p>In our <code>CrawlerChecker</code> class we added this piece of code in the function that determines the headers to be used.</p>
<pre class="shiki" style="background-color: #2e3440ff"><code><span class="line"><span style="color: #81A1C1">if</span><span style="color: #D8DEE9FF"> </span><span style="color: #ECEFF4">(</span><span style="color: #88C0D0">app</span><span style="color: #ECEFF4">()</span><span style="color: #81A1C1">-&gt;</span><span style="color: #88C0D0">environment</span><span style="color: #ECEFF4">(</span><span style="color: #ECEFF4">&#39;</span><span style="color: #A3BE8C">testing</span><span style="color: #ECEFF4">&#39;</span><span style="color: #ECEFF4">))</span><span style="color: #D8DEE9FF"> </span><span style="color: #ECEFF4">{</span></span>
<span class="line"><span style="color: #D8DEE9FF">    </span><span style="color: #81A1C1">$</span><span style="color: #D8DEE9">defaultHeaders</span><span style="color: #ECEFF4">[</span><span style="color: #ECEFF4">&#39;</span><span style="color: #A3BE8C">testtoken</span><span style="color: #ECEFF4">&#39;</span><span style="color: #ECEFF4">]</span><span style="color: #D8DEE9FF"> </span><span style="color: #81A1C1">=</span><span style="color: #D8DEE9FF"> </span><span style="color: #8FBCBB">ParallelTesting</span><span style="color: #81A1C1">::</span><span style="color: #88C0D0">token</span><span style="color: #ECEFF4">()</span><span style="color: #81A1C1">;</span></span>
<span class="line"><span style="color: #ECEFF4">}</span></span>
<span class="line"></span></code></pre>
<p>Now you've seen everything that makes this work.</p>
<p>Let's summarise: in our <code>it_can_perform_a_run_and_detect_broken_links</code> test we use <code>Server::activateRoutes('brokenLinks');</code> which configures the internal Lumen server responses with routes/responses that are in the <code>brokenLinks</code> routes files. This configuration is written to a file that contains the test token in its name. The <code>CrawlerChecker</code> adds the token to the headers of each request so the Lumen server knows which configuration to use.</p>
<h2 id="why-is-the-difference-so-big">Why is the difference so big</h2>
<p>
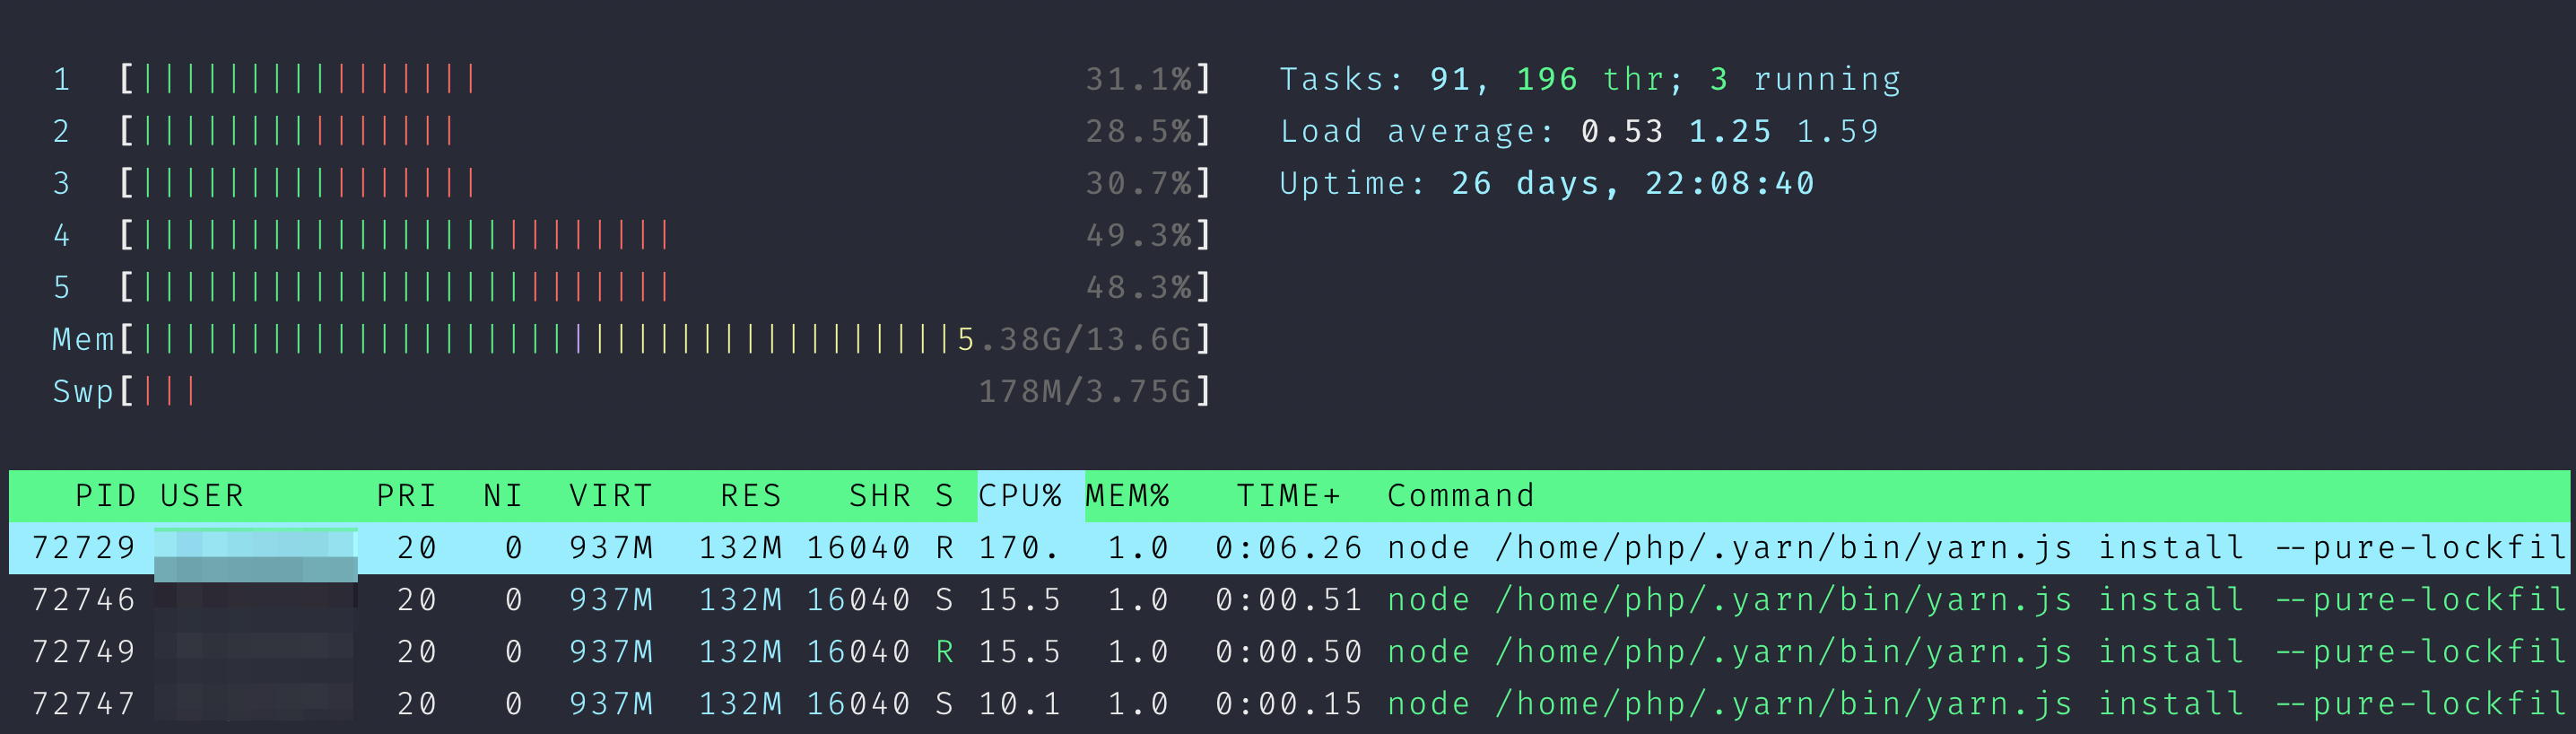
Besides tests that use our Lumen server, the Oh Dear test suite contains a lot of tests that reach out to real world sites to test things. The tests that make sure that our certificate check is working correctly, will reach out to <a href="https://badssl.com">badsll.com</a>, a site that provides examples of broken certificates. Reaching out to this site takes time. Our test suite is mostly constrained by the network, and not by CPU / memory.</p>
<p>Without all tests running sequentially a lot of time was lost just waiting for network requests to finish. With parallel testing other tests are being performed instead of just waiting around.</p>
<h2 id="in-closing">In closing</h2>
<p>We think parallel testing is a very nice addition to Laravel. This feature was already available for quite some time <a href="https://bigbinary.com/blog/rails-6-adds-parallel-testing">in Rails</a>. I'm sure that this inspired the Laravel team to add the feature.</p>
<p>Even though people could already use ParaTest directly, having Laravel take care of databases so nicely in parallel test will surely help drive adoption. After the feature was released in Laravel, a lot of happy people tweeted out screenshots of dramatically improved testing times, and we were one of them.</p>
<blockquote class="twitter-tweet"><p lang="en" dir="ltr">I spent some time cleaning up the test suite of <a href="https://twitter.com/OhDearApp?ref_src=twsrc%5Etfw">@OhDearApp</a> <br><br>Here are the results when using sequential and parallel testing.<br><br>Sequential: 04m28s - 320 MB<br>Parallel: 01m05s - 44.5 MB<a href="https://t.co/stLO4y3AdI">https://t.co/stLO4y3AdI</a><a href="https://twitter.com/hashtag/php?src=hash&amp;ref_src=twsrc%5Etfw">#php</a> <a href="https://twitter.com/hashtag/laravel?src=hash&amp;ref_src=twsrc%5Etfw">#laravel</a> <a href="https://t.co/HlYFPkIrb9">pic.twitter.com/HlYFPkIrb9</a></p>&mdash; Freek Van der Herten 📯 (@freekmurze) <a href="https://twitter.com/freekmurze/status/1354217443418374152?ref_src=twsrc%5Etfw">January 26, 2021</a></blockquote> <script async src="https://platform.twitter.com/widgets.js" charset="utf-8"></script>
<p>To know more about Laravel testing check out <a href="https://laravel.com/docs/master/testing#running-tests-in-parallel">the Laravel docs</a>.</p>
]]>
            </summary>
                                    <updated>2021-02-01T12:32:05+00:00</updated>
        </entry>
            <entry>
            <title><![CDATA[Adding even more uptime check locations to Oh Dear]]></title>
            <link rel="alternate" href="https://ohdear.app/news-and-updates/adding-even-more-uptime-check-locations-to-oh-dear" />
            <id>https://ohdear.app/51</id>
            <author>
                <name><![CDATA[Oh Dear]]></name>
            </author>
            <summary type="html">
                <![CDATA[<p>We're starting this new year strong with an additional new 8 locations to check your websites from!</p>
<h2 id="increasing-our-website-monitoring-coverage">Increasing our website monitoring coverage</h2>
<p>We've just finished adding uptime capacity in the following locations:</p>
<ul>
<li>Asia: Seoul &amp; Singapore</li>
<li>US West: San Francisco &amp; Los Angeles</li>
<li>Middle-East: Bahrain</li>
<li>United Kingdom: London</li>
<li>South America: Sao Paulo</li>
<li>Africa: Cape Town</li>
</ul>
<p>That's 8 new locations to configure any website monitoring from!</p>
<p>In all our previous locations, we've increased our server capacity to support our continued growth.</p>
<h2 id="world-wide-locations">World-wide locations</h2>
<p>We're proud to say we have uptime capacity in just about any location around the world.</p>
<p><img src="/uploads/blogs/uptime-locations-2021/uptime-locations-2021.gif" alt="An interactive map of the Oh Dear locations" /></p>
<p>Our most popular ones still include Europe (Frankfurt is #1, Paris is #2) with Dallas (US mid) at a close #3.</p>
<p>We'll revisit those numbers in a year to see how the user-base is shifting. 😀</p>
<h2 id="all-our-monitoring-ips-in-one-place">All our monitoring IPs in one place</h2>
<p>We've updated <a href="/docs/faq/what-ips-does-oh-dear-monitor-from">our page with all our monitoring IPs</a> as well. You can now get the list of IPs in a few handy formats:</p>
<ul>
<li>Plain text: <a href="/used-ips">ohdear.app/used-ips</a>
</li>
<li>As JSON: <a href="/used-ips.json">ohdear.app/used-ips.json</a>
</li>
<li>As CSV: <a href="/used-ips.csv">ohdear.app/used-ips.csv</a>
</li>
<li>As a CloudFlare rule: <a href="/used-ips.cf">ohdear.app/used-ips.cf</a>
</li>
</ul>
<p>As we've added new capacity, you'll find new IP addresses in those lists.</p>
<h2 id="brexit-proof">Brexit-proof</h2>
<p>With the new European reality of the UK, the need for a dedicated UK location was clear. We were already starting to receive the first questions from clients about a UK-based location, as they are restricting who can visit their websites using GEO-location of the IP address.</p>
<p>With our new London capacity, uptime checks will be coming directly from within the UK and any IP-to-location check will match the UK.</p>
]]>
            </summary>
                                    <updated>2021-01-04T13:42:19+00:00</updated>
        </entry>
            <entry>
            <title><![CDATA[How we improved our service in 2020]]></title>
            <link rel="alternate" href="https://ohdear.app/news-and-updates/how-we-improved-our-service-in-2020" />
            <id>https://ohdear.app/50</id>
            <author>
                <name><![CDATA[Oh Dear]]></name>
            </author>
            <summary type="html">
                <![CDATA[<p>In 2020 we slowly, but surely, improved our service. The UI has vastly improved and we added two major new features. Time for a recap!</p>
<h2 id="a-fresh-new-look">A fresh new look</h2>
<p>In the first months of the year, we adopted <a href="https://ohdear.app/blog/a-fresh-new-look-for-oh-dear">a new logo and corporate identity</a>.</p>
<p><img src="/uploads/blogs/redesign-202002/ohdear-logo-2020.png" alt="New logo for Oh Dear - 2020" /></p>
<p>This also meant a redesigned <em>marketing</em> site to highlight our features.</p>
<h2 id="simpler-testing-of-notifications">Simpler testing of notifications</h2>
<p>In March, we vastly <a href="https://ohdear.app/blog/improvements-to-our-notification-system-for-sending-alerts">improved the notification settings</a> and added the ability to send test notifications for all channels.</p>
<p><img src="/uploads/blogs/new-notification-screens/test-notification.png" alt="Send test notifications in Oh Dear" /></p>
<p>On top of that, the notifications UI got a big redesign, making it easier to add new recipients and fine-tune the delivery.</p>
<h2 id="webhook-improvements">Webhook improvements</h2>
<p>A lot of customers rely on webhook notifications, so we made them a lot better. You can now see a detailed log of our outgoing event notifications and the response we received back from your endpoint.</p>
<p><img src="/uploads/blogs/webhook-logs/webhook-logs-in-detail.png" alt="Webhook improvements" /></p>
<p>You can even resend old notifications. You can read more about these features <a href="https://ohdear.app/blog/seeing-detailed-logs-for-webhook-events">in this blog post</a>.</p>
<h2 id="time-for-a-nap-snooze">Time for a n̶a̶p̶ snooze</h2>
<p>In April, we added the ability to <a href="https://ohdear.app/blog/snoozing-alerts-and-advanced-slack-notifications#snoozing-alerts">snooze notifications</a>.</p>
<p><img src="/uploads/blogs/advanced-slack-notifications/snooze-via-ohdear-dashboard.png" alt="Snoozing notifications" /></p>
<p>Oh, and we've made Slack notifications <a href="https://ohdear.app/blog/snoozing-alerts-and-advanced-slack-notifications#snoozing-alerts">interactive</a>.</p>
<video autoplay loop controls width="100%">
<source src="/uploads/blogs/advanced-slack-notifications/test-notification-inspire-me.mp4" type="video/mp4">
</video>
<p>It's now possible to rerun a check, or snooze one, right in your Slack workspace! 🤯</p>
<h2 id="new-feature-performance-monitoring">New feature: performance monitoring</h2>
<p>In May, we launched a new major feature our customers were asking for: <a href="/blog/introducing-new-performance-monitoring-for-your-websites">performance monitoring</a>.</p>
<p><img src="/img/features/performance-graphs.png" alt="Performance monitoring" /></p>
<p>For each site, you can now see graphs that display how fast your site is responding. Oh Dear can now also send out alerts when there are big jumps in performance.</p>
<h2 id="new-feature-scheduled-taskcron-job-monitoring">New feature: scheduled task/cron job monitoring</h2>
<p>In September, another new check was introduced: <a href="https://ohdear.app/blog/scheduled-task-monitoring-now-available-to-all-our-users">scheduled task monitoring</a>.</p>
<p><img src="/img/features/cron_example_listing.png" alt="Cron job monitoring" /></p>
<p>Using this check we will notify you when one of your scheduled tasks didn't run on time.</p>
<h2 id="redesigning-the-dashboard">Redesigning the dashboard</h2>
<p>In November, <a href="https://twitter.com/sebdedeyne">Seb</a> from <a href="https://spatie.be">Spatie</a> designed <a href="https://ohdear.app/blog/a-fresh-new-dashboard-look">a new fresh look for our dashboard</a>.</p>
<p><img src="/img/dashboard-screenshot-for-homepage-2020.png" alt="A fresh new dashboard look" /></p>
<p>We also took care of <a href="https://ohdear.app/blog/how-we-added-a-favicons-to-our-site-list">importing and displaying favicons</a> next to each site.</p>
<p>In this stream you can see Freek coding up that feature from scratch.</p>
<iframe width="560" height="315" src="https://www.youtube.com/embed/-sMu9fYz1zA?start=172" frameborder="0" allow="accelerometer; autoplay; clipboard-write; encrypted-media; gyroscope; picture-in-picture" allowfullscreen></iframe>
<h2 id="quotbehind-the-scenesquot-talk">&quot;Behind the scenes&quot; talk</h2>
<p>In December, Freek gave a talk at the PHPBenelux meetup about how we run Oh Dear behind the scenes. He talks about how the service was started, how we promote it, and you'll also see some parts of our code.</p>
<iframe width="560" height="315" src="https://www.youtube.com/embed/euwpqDmDVUM?start=855" frameborder="0" allow="accelerometer; autoplay; clipboard-write; encrypted-media; gyroscope; picture-in-picture" allowfullscreen></iframe>
<h2 id="whats-next-in-2021">What's next in 2021?</h2>
<p>We're already working for the first new features that we'll introduce in 2021!</p>
<p>Somewhere around the end of Janurary we'll introduce <em>site snapshots</em>. These are reports on the status of your site that will be automatically be generated and can be mailed to an e-mail addresses of your choice.</p>
<p>You can think of that monthly uptime mail that we send you, <em>but on steroids</em>. In Janurary we'll also revamp our public website.</p>
<p>We hope that you like the improvements we're making to Oh Dear. If you have any suggestions for us, do <a href="/contact">let us know</a>.</p>
]]>
            </summary>
                                    <updated>2020-12-26T15:08:34+00:00</updated>
        </entry>
            <entry>
            <title><![CDATA[How we added a favicons to our site list]]></title>
            <link rel="alternate" href="https://ohdear.app/news-and-updates/how-we-added-a-favicons-to-our-site-list" />
            <id>https://ohdear.app/49</id>
            <author>
                <name><![CDATA[Oh Dear]]></name>
            </author>
            <summary type="html">
                <![CDATA[<p>Today we've added favicons to the site list you see when you log in to Oh Dear.</p>
<p><img src="/uploads/blogs/favicons-dashboard/ohdear-dashboard-favicons.png" alt="Site list with favicons" /></p>
<p>Using the favicon, you quickly recognize a particular site. It also just looks nice visually.</p>
<p>In this blog post, we'd like to share how we achieved this.</p>
<h2 id="watch-it-being-code-up">Watch it being code up</h2>
<p>In this stream, I live coded the favicon import. You can see our actual codebase, my thinking process, and the little mistakes I made along the way.</p>
<p>If you prefer reading how we go about import favicons, you can continue reading underneath the video.</p>
<iframe width="560" height="315" src="https://www.youtube.com/embed/-sMu9fYz1zA" frameborder="0" allow="accelerometer; autoplay; clipboard-write; encrypted-media; gyroscope; picture-in-picture" allowfullscreen></iframe>
<h2 id="using-a-third-party-api">Using a third-party API</h2>
<p>Oh Dear is a large Laravel application. To handle any files, we rely on <a href="https://spatie.be">Spatie</a>'s <a href="https://spatie.be/docs/laravel-medialibrary">Media Library package</a>.</p>
<p>Using this package, you can associate all sorts of files with Eloquent models. In this case, the file is a favicon, and the model is the <code>Site</code> model used in our codebase.</p>
<h2 id="grabbing-the-favicon">Grabbing the favicon</h2>
<p>But let's first take a look at how we grab the favicon. <a href="https://twitter.com/JamesIvings/status/1334050619481595904">This tweet</a>, mentioning third party APIs to grab a favicon, inspired us to add favicons to the list.</p>
<blockquote class="twitter-tweet"><p lang="en" dir="ltr">Google has a secret API that you can use to show *any* website&#39;s icon on your site 🐳<a href="https://t.co/pcHygeE6wd">https://t.co/pcHygeE6wd</a> <a href="https://t.co/Hv9vvSVZ4V">pic.twitter.com/Hv9vvSVZ4V</a></p>&mdash; James Ivings (@JamesIvings) <a href="https://twitter.com/JamesIvings/status/1334050619481595904?ref_src=twsrc%5Etfw">December 2, 2020</a></blockquote> <script async src="https://platform.twitter.com/widgets.js" charset="utf-8"></script>
<p>We decided to go for Duck Duck Go's favicon service because that one is the only one that gives a 404 when grabbing a favicon for a nonexisting site. That 404 is important because we don't want to import a generic favicon.</p>
<p>Using Duck Duck Go's favicon service is easy. All you need to do is mention the domain inside the URL of the API. Here's an example where we <a href="https://icons.duckduckgo.com/ip3/ohdear.app.ico">grab the favicon for Oh Dear</a>.</p>
<pre class="shiki" style="background-color: #2e3440ff"><code><span class="line"><span style="color: #D8DEE9FF">https:</span><span style="color: #616E88">//icons.duckduckgo.com/ip3/ohdear.app.ico</span></span>
<span class="line"></span></code></pre>
<h2 id="configuring-spatielaravel-medialibary">Configuring spatie/laravel-medialibary</h2>
<p>We don't want to link to that URL in our views directly. If we would do that, then Duck Duck Go would receive traffic each time a site list is displayed, making us a bad internet citizen. We want to import that favicon when a site is being added to the account, and maybe once a week or month from then on.</p>
<p>Luckily, grabbing, storing, and displaying the favicon is very easy using <a href="https://spatie.be/docs/laravel-medialibrary">laravel-medialibrary</a>. We're not going over how you should install the package in your Laravel project; you can find instructions for that <a href="https://spatie.be/docs/laravel-medialibrary/v9/handling-uploads-with-media-library-pro/installation">in the media library docs</a>.</p>
<p>With the package installed in a project, you can prepare an Eloquent model to handle media. This can be done by adding an interface a trait to the model, in our case, the <code>Site</code> model.</p>
<pre class="shiki" style="background-color: #2e3440ff"><code><span class="line"><span style="color: #81A1C1">namespace</span><span style="color: #D8DEE9FF"> App</span><span style="color: #ECEFF4">\</span><span style="color: #D8DEE9FF">Domain</span><span style="color: #ECEFF4">\</span><span style="color: #D8DEE9FF">Site</span><span style="color: #ECEFF4">\</span><span style="color: #D8DEE9FF">Models</span><span style="color: #81A1C1">;</span></span>
<span class="line"></span>
<span class="line"><span style="color: #81A1C1">use</span><span style="color: #D8DEE9FF"> Illuminate</span><span style="color: #ECEFF4">\</span><span style="color: #D8DEE9FF">Database</span><span style="color: #ECEFF4">\</span><span style="color: #D8DEE9FF">Eloquent</span><span style="color: #ECEFF4">\</span><span style="color: #8FBCBB">Model</span><span style="color: #81A1C1">;</span></span>
<span class="line"><span style="color: #81A1C1">use</span><span style="color: #D8DEE9FF"> Spatie</span><span style="color: #ECEFF4">\</span><span style="color: #D8DEE9FF">MediaLibrary</span><span style="color: #ECEFF4">\</span><span style="color: #8FBCBB">HasMedia</span><span style="color: #81A1C1">;</span></span>
<span class="line"><span style="color: #81A1C1">use</span><span style="color: #D8DEE9FF"> Spatie</span><span style="color: #ECEFF4">\</span><span style="color: #D8DEE9FF">MediaLibrary</span><span style="color: #ECEFF4">\</span><span style="color: #8FBCBB">InteractsWithMedia</span><span style="color: #81A1C1">;</span></span>
<span class="line"></span>
<span class="line"><span style="color: #81A1C1">class</span><span style="color: #D8DEE9FF"> </span><span style="color: #8FBCBB">Site</span><span style="color: #D8DEE9FF"> </span><span style="color: #81A1C1">extends</span><span style="color: #D8DEE9FF"> </span><span style="color: #8FBCBB; font-weight: bold">Model</span><span style="color: #D8DEE9FF"> </span><span style="color: #81A1C1">implements</span><span style="color: #D8DEE9FF"> </span><span style="color: #8FBCBB; font-weight: bold">HasMedia</span></span>
<span class="line"><span style="color: #ECEFF4">{</span></span>
<span class="line"><span style="color: #D8DEE9FF">   </span><span style="color: #81A1C1">use</span><span style="color: #D8DEE9FF"> </span><span style="color: #8FBCBB">InteractsWithMedia</span><span style="color: #81A1C1">;</span></span>
<span class="line"><span style="color: #ECEFF4">}</span></span>
<span class="line"></span></code></pre>
<p>The media library allows a model to hold multiple collections of media. If you have a <code>BlogPost</code> model, you might have a collection <code>images</code> with all the images that need to be displayed, and a collect <code>downloads</code> that holds all the files that can be downloaded for a particular <code>BlogPost</code>.</p>
<p>In our case, we need a <code>favicon</code> collection. Though it is not strictly required, you can define a collection on the model.</p>
<pre class="shiki" style="background-color: #2e3440ff"><code><span class="line"><span style="color: #616E88">// in the site model</span></span>
<span class="line"></span>
<span class="line"><span style="color: #81A1C1">public</span><span style="color: #D8DEE9FF"> </span><span style="color: #81A1C1">function</span><span style="color: #D8DEE9FF"> </span><span style="color: #88C0D0">registerMediaCollections</span><span style="color: #ECEFF4">()</span><span style="color: #81A1C1">:</span><span style="color: #D8DEE9FF"> </span><span style="color: #81A1C1">void</span></span>
<span class="line"><span style="color: #ECEFF4">{</span></span>
<span class="line"><span style="color: #D8DEE9FF">   </span><span style="color: #81A1C1">$this</span></span>
<span class="line"><span style="color: #D8DEE9FF">       </span><span style="color: #81A1C1">-&gt;</span><span style="color: #88C0D0">addMediaCollection</span><span style="color: #ECEFF4">(</span><span style="color: #ECEFF4">&#39;</span><span style="color: #A3BE8C">favicon</span><span style="color: #ECEFF4">&#39;</span><span style="color: #ECEFF4">)</span></span>
<span class="line"><span style="color: #D8DEE9FF">       </span><span style="color: #81A1C1">-&gt;</span><span style="color: #88C0D0">useDisk</span><span style="color: #ECEFF4">(</span><span style="color: #ECEFF4">&#39;</span><span style="color: #A3BE8C">favicons</span><span style="color: #ECEFF4">&#39;</span><span style="color: #ECEFF4">)</span></span>
<span class="line"><span style="color: #D8DEE9FF">       </span><span style="color: #81A1C1">-&gt;</span><span style="color: #88C0D0">singleFile</span><span style="color: #ECEFF4">()</span><span style="color: #81A1C1">;</span></span>
<span class="line"><span style="color: #D8DEE9FF">	</span></span>
<span class="line"><span style="color: #ECEFF4">}</span></span>
<span class="line"></span></code></pre>
<p><a href="https://spatie.be/docs/laravel-medialibrary/v9/working-with-media-collections/defining-media-collections">Defining a collection</a> allows you to define some behavior on it. Using <code>useDisk</code> we specify that any file added to the collection should be stored with the disk with a given name. In case you're not familiar with disks, it's Laravel's way of <a href="https://laravel.com/docs/master/filesystem#introduction">abstracting the filesytem</a>. In our production environment, this disk points to an S3 bucket.</p>
<p>The <code>singleFile</code> collection call will <a href="https://spatie.be/docs/laravel-medialibrary/v9/working-with-media-collections/defining-media-collections#single-file-collections">guarantee</a> that there is, at any given time, only a maximum of one file present in the collection. When a second file is added to the collection, the first one will be deleted. This will be handy for updating the favicon. We can just add the latest one to the collection, and the older one will get deleted automatically.</p>
<p>A nice thing to know is that when a model gets deleted, the media library will automatically delete any associated files.</p>
<h2 id="importing-a-favicon-for-a-site">Importing a favicon for a site</h2>
<p>Fetching a favicon from an external service might take a second, so it's a perfect fit for a queued job. Here's the <code>AddFaviconToSiteJob</code> in our code base.</p>
<pre class="shiki" style="background-color: #2e3440ff"><code><span class="line"><span style="color: #81A1C1">namespace</span><span style="color: #D8DEE9FF"> App</span><span style="color: #ECEFF4">\</span><span style="color: #D8DEE9FF">Domain</span><span style="color: #ECEFF4">\</span><span style="color: #D8DEE9FF">Site</span><span style="color: #ECEFF4">\</span><span style="color: #D8DEE9FF">Jobs</span><span style="color: #81A1C1">;</span></span>
<span class="line"></span>
<span class="line"><span style="color: #81A1C1">use</span><span style="color: #D8DEE9FF"> App</span><span style="color: #ECEFF4">\</span><span style="color: #D8DEE9FF">Domain</span><span style="color: #ECEFF4">\</span><span style="color: #D8DEE9FF">Site</span><span style="color: #ECEFF4">\</span><span style="color: #D8DEE9FF">Models</span><span style="color: #ECEFF4">\</span><span style="color: #8FBCBB">Site</span><span style="color: #81A1C1">;</span></span>
<span class="line"><span style="color: #81A1C1">use</span><span style="color: #D8DEE9FF"> </span><span style="color: #8FBCBB">Exception</span><span style="color: #81A1C1">;</span></span>
<span class="line"><span style="color: #81A1C1">use</span><span style="color: #D8DEE9FF"> Illuminate</span><span style="color: #ECEFF4">\</span><span style="color: #D8DEE9FF">Bus</span><span style="color: #ECEFF4">\</span><span style="color: #8FBCBB">Queueable</span><span style="color: #81A1C1">;</span></span>
<span class="line"><span style="color: #81A1C1">use</span><span style="color: #D8DEE9FF"> Illuminate</span><span style="color: #ECEFF4">\</span><span style="color: #D8DEE9FF">Contracts</span><span style="color: #ECEFF4">\</span><span style="color: #D8DEE9FF">Queue</span><span style="color: #ECEFF4">\</span><span style="color: #8FBCBB">ShouldQueue</span><span style="color: #81A1C1">;</span></span>
<span class="line"><span style="color: #81A1C1">use</span><span style="color: #D8DEE9FF"> Illuminate</span><span style="color: #ECEFF4">\</span><span style="color: #D8DEE9FF">Foundation</span><span style="color: #ECEFF4">\</span><span style="color: #D8DEE9FF">Bus</span><span style="color: #ECEFF4">\</span><span style="color: #8FBCBB">Dispatchable</span><span style="color: #81A1C1">;</span></span>
<span class="line"><span style="color: #81A1C1">use</span><span style="color: #D8DEE9FF"> Illuminate</span><span style="color: #ECEFF4">\</span><span style="color: #D8DEE9FF">Queue</span><span style="color: #ECEFF4">\</span><span style="color: #8FBCBB">InteractsWithQueue</span><span style="color: #81A1C1">;</span></span>
<span class="line"><span style="color: #81A1C1">use</span><span style="color: #D8DEE9FF"> Illuminate</span><span style="color: #ECEFF4">\</span><span style="color: #D8DEE9FF">Queue</span><span style="color: #ECEFF4">\</span><span style="color: #8FBCBB">SerializesModels</span><span style="color: #81A1C1">;</span></span>
<span class="line"></span>
<span class="line"><span style="color: #81A1C1">class</span><span style="color: #D8DEE9FF"> </span><span style="color: #8FBCBB">AddFaviconToSiteJob</span><span style="color: #D8DEE9FF"> </span><span style="color: #81A1C1">implements</span><span style="color: #D8DEE9FF"> </span><span style="color: #8FBCBB; font-weight: bold">ShouldQueue</span></span>
<span class="line"><span style="color: #ECEFF4">{</span></span>
<span class="line"><span style="color: #D8DEE9FF">    </span><span style="color: #81A1C1">use</span><span style="color: #D8DEE9FF"> </span><span style="color: #8FBCBB">Dispatchable</span><span style="color: #81A1C1">;</span></span>
<span class="line"><span style="color: #D8DEE9FF">    </span><span style="color: #81A1C1">use</span><span style="color: #D8DEE9FF"> </span><span style="color: #8FBCBB">InteractsWithQueue</span><span style="color: #81A1C1">;</span></span>
<span class="line"><span style="color: #D8DEE9FF">    </span><span style="color: #81A1C1">use</span><span style="color: #D8DEE9FF"> </span><span style="color: #8FBCBB">Queueable</span><span style="color: #81A1C1">;</span></span>
<span class="line"><span style="color: #D8DEE9FF">    </span><span style="color: #81A1C1">use</span><span style="color: #D8DEE9FF"> </span><span style="color: #8FBCBB">SerializesModels</span><span style="color: #81A1C1">;</span></span>
<span class="line"></span>
<span class="line"><span style="color: #D8DEE9FF">    </span><span style="color: #81A1C1">public</span><span style="color: #D8DEE9FF"> </span><span style="color: #81A1C1">$</span><span style="color: #D8DEE9">deleteWhenMissingModels</span><span style="color: #D8DEE9FF"> </span><span style="color: #81A1C1">=</span><span style="color: #D8DEE9FF"> </span><span style="color: #81A1C1">true;</span></span>
<span class="line"></span>
<span class="line"><span style="color: #D8DEE9FF">    </span><span style="color: #81A1C1">public</span><span style="color: #D8DEE9FF"> </span><span style="color: #8FBCBB">Site</span><span style="color: #D8DEE9FF"> </span><span style="color: #81A1C1">$</span><span style="color: #D8DEE9">site</span><span style="color: #81A1C1">;</span></span>
<span class="line"></span>
<span class="line"><span style="color: #D8DEE9FF">    </span><span style="color: #81A1C1">public</span><span style="color: #D8DEE9FF"> </span><span style="color: #81A1C1">function</span><span style="color: #D8DEE9FF"> </span><span style="color: #88C0D0">__construct</span><span style="color: #ECEFF4">(</span><span style="color: #8FBCBB">Site</span><span style="color: #D8DEE9FF"> </span><span style="color: #81A1C1">$</span><span style="color: #D8DEE9">site</span><span style="color: #ECEFF4">)</span></span>
<span class="line"><span style="color: #D8DEE9FF">    </span><span style="color: #ECEFF4">{</span></span>
<span class="line"><span style="color: #D8DEE9FF">        </span><span style="color: #81A1C1">$this-&gt;</span><span style="color: #D8DEE9">site</span><span style="color: #D8DEE9FF"> </span><span style="color: #81A1C1">=</span><span style="color: #D8DEE9FF"> </span><span style="color: #81A1C1">$</span><span style="color: #D8DEE9">site</span><span style="color: #81A1C1">;</span></span>
<span class="line"></span>
<span class="line"><span style="color: #D8DEE9FF">        </span><span style="color: #81A1C1">$this-&gt;</span><span style="color: #D8DEE9">queue</span><span style="color: #D8DEE9FF"> </span><span style="color: #81A1C1">=</span><span style="color: #D8DEE9FF"> </span><span style="color: #ECEFF4">&#39;</span><span style="color: #A3BE8C">import-favicons</span><span style="color: #ECEFF4">&#39;</span><span style="color: #81A1C1">;</span></span>
<span class="line"><span style="color: #D8DEE9FF">    </span><span style="color: #ECEFF4">}</span></span>
<span class="line"></span>
<span class="line"><span style="color: #D8DEE9FF">    </span><span style="color: #81A1C1">public</span><span style="color: #D8DEE9FF"> </span><span style="color: #81A1C1">function</span><span style="color: #D8DEE9FF"> </span><span style="color: #88C0D0">handle</span><span style="color: #ECEFF4">()</span></span>
<span class="line"><span style="color: #D8DEE9FF">    </span><span style="color: #ECEFF4">{</span></span>
<span class="line"><span style="color: #D8DEE9FF">        </span><span style="color: #81A1C1">$</span><span style="color: #D8DEE9">url</span><span style="color: #D8DEE9FF"> </span><span style="color: #81A1C1">=</span><span style="color: #D8DEE9FF"> </span><span style="color: #ECEFF4">&quot;</span><span style="color: #A3BE8C">https://icons.duckduckgo.com/ip3/</span><span style="color: #81A1C1">{$this-&gt;</span><span style="color: #D8DEE9">site</span><span style="color: #81A1C1">-&gt;</span><span style="color: #88C0D0">getDomainWithoutProtocol</span><span style="color: #ECEFF4">()</span><span style="color: #81A1C1">}</span><span style="color: #A3BE8C">.ico</span><span style="color: #ECEFF4">&quot;</span><span style="color: #81A1C1">;</span></span>
<span class="line"></span>
<span class="line"><span style="color: #D8DEE9FF">        </span><span style="color: #81A1C1">try</span><span style="color: #D8DEE9FF"> </span><span style="color: #ECEFF4">{</span></span>
<span class="line"><span style="color: #D8DEE9FF">            </span><span style="color: #81A1C1">$this</span></span>
<span class="line"><span style="color: #D8DEE9FF">                </span><span style="color: #81A1C1">-&gt;</span><span style="color: #D8DEE9">site</span></span>
<span class="line"><span style="color: #D8DEE9FF">                </span><span style="color: #81A1C1">-&gt;</span><span style="color: #88C0D0">addMediaFromUrl</span><span style="color: #ECEFF4">(</span><span style="color: #81A1C1">$</span><span style="color: #D8DEE9">url</span><span style="color: #ECEFF4">)</span></span>
<span class="line"><span style="color: #D8DEE9FF">                </span><span style="color: #81A1C1">-&gt;</span><span style="color: #88C0D0">toMediaCollection</span><span style="color: #ECEFF4">(</span><span style="color: #ECEFF4">&#39;</span><span style="color: #A3BE8C">favicon</span><span style="color: #ECEFF4">&#39;</span><span style="color: #ECEFF4">)</span><span style="color: #81A1C1">;</span></span>
<span class="line"><span style="color: #D8DEE9FF">        </span><span style="color: #ECEFF4">}</span><span style="color: #D8DEE9FF"> </span><span style="color: #81A1C1">catch</span><span style="color: #D8DEE9FF"> </span><span style="color: #ECEFF4">(</span><span style="color: #8FBCBB">Exception</span><span style="color: #D8DEE9FF"> </span><span style="color: #81A1C1">$</span><span style="color: #D8DEE9">exception</span><span style="color: #ECEFF4">)</span><span style="color: #D8DEE9FF"> </span><span style="color: #ECEFF4">{</span></span>
<span class="line"><span style="color: #D8DEE9FF">            </span><span style="color: #88C0D0">report</span><span style="color: #ECEFF4">(</span><span style="color: #81A1C1">$</span><span style="color: #D8DEE9">exception</span><span style="color: #ECEFF4">)</span><span style="color: #81A1C1">;</span></span>
<span class="line"><span style="color: #D8DEE9FF">        </span><span style="color: #ECEFF4">}</span></span>
<span class="line"><span style="color: #D8DEE9FF">    </span><span style="color: #ECEFF4">}</span></span>
<span class="line"><span style="color: #ECEFF4">}</span></span>
<span class="line"></span></code></pre>
<p>In the snippet above, you can see that the media library offers a convenient <code>addMediaFromUrl</code> method that will download a file from a URL.</p>
<p>We wrap the logic in try/catch block to prevent that job from failing if Duck Duck Go is down for any reason. We don't report the error to our exception tracking service <a href="https://flareapp.io">Flare</a>, so we can still get a notification that something happened.</p>
<p>In our codebase, we like to put isolated pieces of logic into action classes. An action class is nothing more than a regular class, where, by convention, there is an <code>execute</code> method to execute it. If you want to know more about action classes, check out <a href="https://freek.dev/1371-refactoring-to-actions">this blog post</a>.</p>
<p>We have an action called <code>CreateSiteAction</code> to create a new site. It gets called from the controller that handles site creations for our web app and from our API endpoint to create a site. We can dispatch the job inside of that action.</p>
<pre class="shiki" style="background-color: #2e3440ff"><code><span class="line"><span style="color: #81A1C1">namespace</span><span style="color: #D8DEE9FF"> App</span><span style="color: #ECEFF4">\</span><span style="color: #D8DEE9FF">Domain</span><span style="color: #ECEFF4">\</span><span style="color: #D8DEE9FF">Site</span><span style="color: #ECEFF4">\</span><span style="color: #D8DEE9FF">Actions</span><span style="color: #81A1C1">;</span></span>
<span class="line"></span>
<span class="line"><span style="color: #81A1C1">use</span><span style="color: #D8DEE9FF"> App</span><span style="color: #ECEFF4">\</span><span style="color: #D8DEE9FF">Domain</span><span style="color: #ECEFF4">\</span><span style="color: #D8DEE9FF">Site</span><span style="color: #ECEFF4">\</span><span style="color: #D8DEE9FF">Jobs</span><span style="color: #ECEFF4">\</span><span style="color: #8FBCBB">AddFaviconToSiteJob</span><span style="color: #81A1C1">;</span></span>
<span class="line"><span style="color: #81A1C1">use</span><span style="color: #D8DEE9FF"> App</span><span style="color: #ECEFF4">\</span><span style="color: #D8DEE9FF">Domain</span><span style="color: #ECEFF4">\</span><span style="color: #D8DEE9FF">Site</span><span style="color: #ECEFF4">\</span><span style="color: #D8DEE9FF">Models</span><span style="color: #ECEFF4">\</span><span style="color: #8FBCBB">Site</span><span style="color: #81A1C1">;</span></span>
<span class="line"></span>
<span class="line"><span style="color: #81A1C1">class</span><span style="color: #D8DEE9FF"> </span><span style="color: #8FBCBB">CreateSiteAction</span></span>
<span class="line"><span style="color: #ECEFF4">{</span></span>
<span class="line"><span style="color: #D8DEE9FF">    </span><span style="color: #81A1C1">public</span><span style="color: #D8DEE9FF"> </span><span style="color: #81A1C1">function</span><span style="color: #D8DEE9FF"> </span><span style="color: #88C0D0">execute</span><span style="color: #ECEFF4">(</span><span style="color: #81A1C1">array</span><span style="color: #D8DEE9FF"> </span><span style="color: #81A1C1">$</span><span style="color: #D8DEE9">attributes</span><span style="color: #ECEFF4">)</span><span style="color: #81A1C1">:</span><span style="color: #D8DEE9FF"> </span><span style="color: #8FBCBB">Site</span></span>
<span class="line"><span style="color: #D8DEE9FF">    </span><span style="color: #ECEFF4">{</span></span>
<span class="line"><span style="color: #ECEFF4">        </span><span style="color: #616E88">// ... other steps to create a site</span></span>
<span class="line"></span>
<span class="line"><span style="color: #D8DEE9FF">        </span><span style="color: #88C0D0">dispatch</span><span style="color: #ECEFF4">(</span><span style="color: #81A1C1">new</span><span style="color: #88C0D0"> </span><span style="color: #8FBCBB">AddFaviconToSiteJob</span><span style="color: #ECEFF4">(</span><span style="color: #81A1C1">$</span><span style="color: #D8DEE9">site</span><span style="color: #ECEFF4">))</span><span style="color: #81A1C1">;</span></span>
<span class="line"></span>
<span class="line"><span style="color: #D8DEE9FF">        </span><span style="color: #81A1C1">return</span><span style="color: #D8DEE9FF"> </span><span style="color: #81A1C1">$</span><span style="color: #D8DEE9">site</span><span style="color: #81A1C1">;</span></span>
<span class="line"><span style="color: #D8DEE9FF">    </span><span style="color: #ECEFF4">}</span></span>
<span class="line"><span style="color: #ECEFF4">}</span></span>
<span class="line"></span></code></pre>
<h2 id="displaying-the-favicon">Displaying the favicon</h2>
<p>Using laravel-medialibrary, it's easy to display the favicon. The <code>getFirstMediaUrl($collectionName)</code> will return an URL to the first media item in the collection.</p>
<p>In our Blade view that renders the site list, we can just use it:</p>
<pre class="shiki" style="background-color: #2e3440ff"><code><span class="line"><span style="color: #D8DEE9FF">    </span><span style="color: #81A1C1">&lt;</span><span style="color: #D8DEE9FF">img </span><span style="color: #81A1C1">class=</span><span style="color: #ECEFF4">&quot;</span><span style="color: #A3BE8C">inline mr-1 w-4 h-4</span><span style="color: #ECEFF4">&quot;</span><span style="color: #D8DEE9FF"> src</span><span style="color: #81A1C1">=</span><span style="color: #ECEFF4">&quot;</span><span style="color: #A3BE8C">{{ </span><span style="color: #81A1C1">$</span><span style="color: #D8DEE9">site</span><span style="color: #81A1C1">-&gt;</span><span style="color: #D8DEE9">getFirstMediaUrl</span><span style="color: #A3BE8C">(</span><span style="color: #81A1C1">$</span><span style="color: #D8DEE9">collectionName</span><span style="color: #A3BE8C">) }}</span><span style="color: #ECEFF4">&quot;</span><span style="color: #D8DEE9FF"> alt</span><span style="color: #81A1C1">=</span><span style="color: #ECEFF4">&quot;</span><span style="color: #A3BE8C">favicon</span><span style="color: #ECEFF4">&quot;</span><span style="color: #D8DEE9FF"> </span><span style="color: #81A1C1">/&gt;</span></span>
<span class="line"><span style="color: #81A1C1">@endif</span></span>
<span class="line"></span></code></pre>
<p>And with that, we now display favicons for any sites that are added to Oh Dear.</p>
<h2 id="importing-favicons-for-existing-sites">Importing favicons for existing sites</h2>
<p>Of course, we want to import favicons for the thousands of sites already monitored by Oh Dear. This is done by the following Artisan command, which is <a href="https://laravel.com/docs/master/scheduling#defining-schedules">scheduled</a> to run every month.</p>
<pre class="shiki" style="background-color: #2e3440ff"><code><span class="line"><span style="color: #81A1C1">namespace</span><span style="color: #D8DEE9FF"> App</span><span style="color: #ECEFF4">\</span><span style="color: #D8DEE9FF">Domain</span><span style="color: #ECEFF4">\</span><span style="color: #D8DEE9FF">Site</span><span style="color: #ECEFF4">\</span><span style="color: #D8DEE9FF">Commands</span><span style="color: #81A1C1">;</span></span>
<span class="line"></span>
<span class="line"><span style="color: #81A1C1">use</span><span style="color: #D8DEE9FF"> App</span><span style="color: #ECEFF4">\</span><span style="color: #D8DEE9FF">Domain</span><span style="color: #ECEFF4">\</span><span style="color: #D8DEE9FF">Site</span><span style="color: #ECEFF4">\</span><span style="color: #D8DEE9FF">Jobs</span><span style="color: #ECEFF4">\</span><span style="color: #8FBCBB">AddFaviconToSiteJob</span><span style="color: #81A1C1">;</span></span>
<span class="line"><span style="color: #81A1C1">use</span><span style="color: #D8DEE9FF"> App</span><span style="color: #ECEFF4">\</span><span style="color: #D8DEE9FF">Domain</span><span style="color: #ECEFF4">\</span><span style="color: #D8DEE9FF">Site</span><span style="color: #ECEFF4">\</span><span style="color: #D8DEE9FF">Models</span><span style="color: #ECEFF4">\</span><span style="color: #8FBCBB">Site</span><span style="color: #81A1C1">;</span></span>
<span class="line"><span style="color: #81A1C1">use</span><span style="color: #D8DEE9FF"> Illuminate</span><span style="color: #ECEFF4">\</span><span style="color: #D8DEE9FF">Console</span><span style="color: #ECEFF4">\</span><span style="color: #8FBCBB">Command</span><span style="color: #81A1C1">;</span></span>
<span class="line"></span>
<span class="line"><span style="color: #81A1C1">class</span><span style="color: #D8DEE9FF"> </span><span style="color: #8FBCBB">AddFaviconToSitesCommand</span><span style="color: #D8DEE9FF"> </span><span style="color: #81A1C1">extends</span><span style="color: #D8DEE9FF"> </span><span style="color: #8FBCBB; font-weight: bold">Command</span></span>
<span class="line"><span style="color: #ECEFF4">{</span></span>
<span class="line"><span style="color: #D8DEE9FF">    </span><span style="color: #81A1C1">protected</span><span style="color: #D8DEE9FF"> </span><span style="color: #81A1C1">$</span><span style="color: #D8DEE9">signature</span><span style="color: #D8DEE9FF"> </span><span style="color: #81A1C1">=</span><span style="color: #D8DEE9FF"> </span><span style="color: #ECEFF4">&#39;</span><span style="color: #A3BE8C">ohdear:sites:add-favicon-to-sites</span><span style="color: #ECEFF4">&#39;</span><span style="color: #81A1C1">;</span></span>
<span class="line"></span>
<span class="line"><span style="color: #D8DEE9FF">    </span><span style="color: #81A1C1">protected</span><span style="color: #D8DEE9FF"> </span><span style="color: #81A1C1">$</span><span style="color: #D8DEE9">description</span><span style="color: #D8DEE9FF"> </span><span style="color: #81A1C1">=</span><span style="color: #D8DEE9FF"> </span><span style="color: #ECEFF4">&#39;</span><span style="color: #A3BE8C">Fetch the favicon for all sites</span><span style="color: #ECEFF4">&#39;</span><span style="color: #81A1C1">;</span></span>
<span class="line"></span>
<span class="line"><span style="color: #D8DEE9FF">    </span><span style="color: #81A1C1">public</span><span style="color: #D8DEE9FF"> </span><span style="color: #81A1C1">function</span><span style="color: #D8DEE9FF"> </span><span style="color: #88C0D0">handle</span><span style="color: #ECEFF4">()</span></span>
<span class="line"><span style="color: #D8DEE9FF">    </span><span style="color: #ECEFF4">{</span></span>
<span class="line"><span style="color: #D8DEE9FF">        </span><span style="color: #81A1C1">$this-&gt;</span><span style="color: #88C0D0">info</span><span style="color: #ECEFF4">(</span><span style="color: #ECEFF4">&#39;</span><span style="color: #A3BE8C">Fetching favicons...</span><span style="color: #ECEFF4">&#39;</span><span style="color: #ECEFF4">)</span><span style="color: #81A1C1">;</span></span>
<span class="line"></span>
<span class="line"><span style="color: #D8DEE9FF">        </span><span style="color: #8FBCBB">Site</span><span style="color: #81A1C1">::</span><span style="color: #88C0D0">each</span><span style="color: #ECEFF4">(</span><span style="color: #81A1C1">function</span><span style="color: #D8DEE9FF"> </span><span style="color: #ECEFF4">(</span><span style="color: #8FBCBB">Site</span><span style="color: #D8DEE9FF"> </span><span style="color: #81A1C1">$</span><span style="color: #D8DEE9">site</span><span style="color: #ECEFF4">)</span><span style="color: #D8DEE9FF"> </span><span style="color: #ECEFF4">{</span></span>
<span class="line"><span style="color: #D8DEE9FF">            </span><span style="color: #81A1C1">if</span><span style="color: #D8DEE9FF"> </span><span style="color: #ECEFF4">(</span><span style="color: #81A1C1">!</span><span style="color: #D8DEE9FF"> </span><span style="color: #81A1C1">$</span><span style="color: #D8DEE9">site</span><span style="color: #81A1C1">-&gt;</span><span style="color: #D8DEE9">team</span><span style="color: #81A1C1">-&gt;</span><span style="color: #88C0D0">hasActiveSubscriptionOrIsOnGenericTrial</span><span style="color: #ECEFF4">())</span><span style="color: #D8DEE9FF"> </span><span style="color: #ECEFF4">{</span></span>
<span class="line"><span style="color: #D8DEE9FF">                </span><span style="color: #81A1C1">return;</span></span>
<span class="line"><span style="color: #D8DEE9FF">            </span><span style="color: #ECEFF4">}</span></span>
<span class="line"></span>
<span class="line"><span style="color: #D8DEE9FF">            </span><span style="color: #81A1C1">$this-&gt;</span><span style="color: #88C0D0">comment</span><span style="color: #ECEFF4">(</span><span style="color: #ECEFF4">&quot;</span><span style="color: #A3BE8C">Fetching favicon for `</span><span style="color: #81A1C1">{$</span><span style="color: #D8DEE9">site</span><span style="color: #81A1C1">-&gt;</span><span style="color: #D8DEE9">label</span><span style="color: #81A1C1">}</span><span style="color: #A3BE8C">` (</span><span style="color: #81A1C1">{$</span><span style="color: #D8DEE9">site</span><span style="color: #81A1C1">-&gt;</span><span style="color: #D8DEE9">id</span><span style="color: #81A1C1">}</span><span style="color: #A3BE8C">)</span><span style="color: #ECEFF4">&quot;</span><span style="color: #ECEFF4">)</span><span style="color: #81A1C1">;</span></span>
<span class="line"></span>
<span class="line"><span style="color: #D8DEE9FF">            </span><span style="color: #88C0D0">dispatch</span><span style="color: #ECEFF4">(</span><span style="color: #81A1C1">new</span><span style="color: #88C0D0"> </span><span style="color: #8FBCBB">AddFaviconToSiteJob</span><span style="color: #ECEFF4">(</span><span style="color: #81A1C1">$</span><span style="color: #D8DEE9">site</span><span style="color: #ECEFF4">))</span><span style="color: #81A1C1">;</span></span>
<span class="line"><span style="color: #D8DEE9FF">        </span><span style="color: #ECEFF4">})</span><span style="color: #81A1C1">;</span></span>
<span class="line"></span>
<span class="line"><span style="color: #D8DEE9FF">        </span><span style="color: #81A1C1">$this-&gt;</span><span style="color: #88C0D0">info</span><span style="color: #ECEFF4">(</span><span style="color: #ECEFF4">&#39;</span><span style="color: #A3BE8C">All done</span><span style="color: #ECEFF4">&#39;</span><span style="color: #ECEFF4">)</span><span style="color: #81A1C1">;</span></span>
<span class="line"><span style="color: #D8DEE9FF">    </span><span style="color: #ECEFF4">}</span></span>
<span class="line"><span style="color: #ECEFF4">}</span></span>
<span class="line"></span></code></pre>
<h2 id="in-closing">In closing</h2>
<p><a href="https://duckduckgo.com">Duck Duck Go</a> and <a href="https://spatie.be/docs/laravel-medialibrary">laravel-medialibrary</a> made it painless to import and display favicons.</p>
<p>If you want to see this all in action, <a href="https://ohdear.app/register">start your free ten-day trial</a> now.</p>
]]>
            </summary>
                                    <updated>2020-12-03T14:06:40+00:00</updated>
        </entry>
            <entry>
            <title><![CDATA[A fresh new dashboard look!]]></title>
            <link rel="alternate" href="https://ohdear.app/news-and-updates/a-fresh-new-dashboard-look" />
            <id>https://ohdear.app/48</id>
            <author>
                <name><![CDATA[Oh Dear]]></name>
            </author>
            <summary type="html">
                <![CDATA[<p>We just launched our brand new monitoring dashboard to all clients, giving a modern new look &amp; feel to Oh Dear! There are plenty of improvements under the hood, so let's dive right in.</p>
<h2 id="a-fresh-new-dashboard">A fresh new dashboard</h2>
<p>Here's what the new dashboard looks like.</p>
<p><img src="/img/dashboard-screenshot-for-homepage-2020.png" alt="Oh Dear dashboard in 2020" /></p>
<p>As usual, it auto-refreshes every 5 seconds (through the power of Laravel Livewire, which Freek wrote about <a href="https://freek.dev/1609-building-complex-forms-with-laravel-livewire-in-oh-dear">here</a> and <a href="https://freek.dev/1622-replacing-web-sockets-with-livewire">here</a>).</p>
<p>Pretty clean, right? 🙏</p>
<p>If we compare it to our previous dashboard, this one suddenly feels very ... old &amp; bulky.</p>
<p><img src="/img/dashboard-screenshot-for-homepage.png" alt="Old Oh Dear dashboard" /></p>
<p>We hope you'll get used to the new design as quickly as we did!</p>
<h2 id="more-information-at-your-fingertips">More information at your fingertips</h2>
<p>This modern new look gives you a lot of information directly on the dashboard. In many cases, there's no need to click through anymore to see the reason of the alert.</p>
<p>Take this downtime alert for instance.</p>
<p><img src="/uploads/blogs/dashboard-202011/ohdear-layout-update-2020-11-dashboard-error-uptime.png" alt="Example of downtime alert on dashboard" /></p>
<p>Or this SSL certificate warning.</p>
<p><img src="/uploads/blogs/dashboard-202011/ohdear-layout-update-2020-11-dashboard-error-certificate.png" alt="Example of certificate alert on dashboard" /></p>
<p>Or these content warnings, which consist of both <a href="/feature/broken-page-check">broken links &amp; mixed content checking</a>.</p>
<p><img src="/uploads/blogs/dashboard-202011/ohdear-layout-update-2020-11-dashboard-error-broken-links.png" alt="Example of broken link alert on dashboard" /></p>
<p>A summarized view of the error is available right there.</p>
<p>Of course, you can always click the entire cell and be taken to a more detailed view, with all the bells &amp; whistles you know.</p>
<h2 id="modern-touches-everywhere">Modern touches everywhere!</h2>
<p>Overall, the entire layout got a welcome refresher. A slightly darker background, tighter spacings around all elements and some more explicit hover states for our navigations.</p>
<p><img src="/uploads/blogs/dashboard-202011/ohdear-layout-update-2020-11-performance.png" alt="Example of performance page" /></p>
<p><img src="/uploads/blogs/dashboard-202011/ohdear-layout-update-2020-11-settings.png" alt="Example of settings page" /></p>
<p>We've introduced a new primary color, too. You'll notice a touch of dark blue for action buttons. This gives us a bit more flexibility with our UI/UX, to make these stand out more for important actions.</p>
<h2 id="what-do-you-think">What do you think?</h2>
<p>We hope you'll like these as much as we do!</p>
<p>If we hadn't convinced you yet, remember there's <a href="/blog/enjoy-our-black-friday-deals">a 30% Black Friday</a> discount available if you sign up with coupon code <code>BLACK-WEEK-2020</code>.</p>
<p>We've got a 10-day free trial, without any credit card obligation. Just give us a try with a username &amp; password <a href="/register">by registering</a> and you're all set!</p>
]]>
            </summary>
                                    <updated>2020-11-27T13:16:33+00:00</updated>
        </entry>
            <entry>
            <title><![CDATA[Enjoy our Black Friday Deals]]></title>
            <link rel="alternate" href="https://ohdear.app/news-and-updates/enjoy-our-black-friday-deals" />
            <id>https://ohdear.app/47</id>
            <author>
                <name><![CDATA[Oh Dear]]></name>
            </author>
            <summary type="html">
                <![CDATA[<p>Black Friday is almost here, and you'll probably see a lot of discounts coming your way. At Oh Dear, our deals already start today!</p>
<p>In the past, <a href="https://ohdear.app/blog/just-for-black-friday-were-doubling-our-prices">we doubled our prices</a>. This year we're going to make things cheaper. You'll probably like that better. 🙂</p>
<p>You can get a discount of 30% on the first three months you're subscribing to Oh Dear. Just use this coupon code when subscribing: <code>BLACK-WEEK-2020</code>. This coupon code will be valid until this Friday, end of day.</p>
<p>We got one more thing in store! In normal times, our cheapest plan is 10 EUR/m that allows you to monitor 5 sites. We think some people would still love to get on board of Oh Dear with a smaller plan.</p>
<p>That's why we temporarily added a 5 EUR / month (55 EUR / year) plan that allows you to monitor 2 sites. This plan will also only be available until this Friday, end of day. Once you're on the 5 EUR plan, you can remain there for life!</p>
<p>Now is a perfect time to start monitoring your sites. Oh Dear not only notifies you when your site is down, but also when your SSL will or has expired. We will also crawl your entire website and notify you when there are broken links. Earlier this year we also added <a href="https://ohdear.app/blog/scheduled-task-monitoring-now-available-to-all-our-users">scheduled task monitoring</a>.</p>
<p>We offer a no-strings-attached free trial of 10 days in which you can use all our features. <a href="/register">Sign up</a> now!</p>
]]>
            </summary>
                                    <updated>2020-11-28T06:25:46+00:00</updated>
        </entry>
            <entry>
            <title><![CDATA[Scheduled task monitoring now available to all our users]]></title>
            <link rel="alternate" href="https://ohdear.app/news-and-updates/scheduled-task-monitoring-now-available-to-all-our-users" />
            <id>https://ohdear.app/45</id>
            <author>
                <name><![CDATA[Oh Dear]]></name>
            </author>
            <summary type="html">
                <![CDATA[<p>After an intense testing period, we're excited to announce our scheduled task monitoring is now available to all our users!</p>
<p><img src="/img/features/cron_example_listing.png" alt="Scheduled task monitoring in Oh Dear" /></p>
<h2 id="why-monitor-scheduled-tasks">Why monitor scheduled tasks?</h2>
<p>Automation is at the heart of just about every company these days. We trust our automation to do the work for us. We trust that it will continue to run fine, from the day we wrote the code.</p>
<p>But <em>trust</em> isn't a strategy. It's <em>hope</em>. It's a <em>wish</em>.</p>
<p>With our newly launched scheduled task monitor, we can turn that <em>hope</em> into a <em>certainty</em>. 😎</p>
<p>You'll be able to monitor the frequency of every scheduled task you have and get actionable reports when they either A) don't run on time or B) don't report any status, indicating the task more than likely failed.</p>
<h2 id="free-for-all-oh-dear-users">Free for all Oh Dear users</h2>
<p>This feature is now live and available to all existing Oh Dear users, at no additional cost.</p>
<p>You'll find a new column on your dashboard called <em>Tasks</em>, with additional information available once you click through. Per site, you can add scheduled tasks and start monitoring straight away!</p>
<h2 id="how-does-scheduled-task-monitoring-work">How does scheduled task monitoring work?</h2>
<p>We use an industry-standard approach in the form of &quot;ping URLs&quot;.</p>
<p>The idea is quite simple: after every task gets executed, your application code can make a network request to a pre-defined URL we provide you. We monitor the requests on that URL.</p>
<p>If we don't receive a request (on time), we assume the scheduled task has failed, and we can notify you.</p>
<p>Making a network request doesn't have to be complex, for many languages it's a one-line addition to your scripts.</p>
<p>PHP:</p>
<pre class="shiki" style="background-color: #2e3440ff"><code><span class="line"><span style="color: #81A1C1">@</span><span style="color: #88C0D0">file_get_contents</span><span style="color: #ECEFF4">(</span><span style="color: #ECEFF4">&#39;</span><span style="color: #A3BE8C">https://ping.ohdear.app/e536e771-9ff6</span><span style="color: #ECEFF4">&#39;</span><span style="color: #ECEFF4">)</span><span style="color: #81A1C1">;</span></span>
<span class="line"></span></code></pre>
<p>Python:</p>
<pre class="shiki" style="background-color: #2e3440ff"><code><span class="line"><span style="color: #D8DEE9FF">requests</span><span style="color: #ECEFF4">.</span><span style="color: #88C0D0">get</span><span style="color: #ECEFF4">(</span><span style="color: #ECEFF4">&quot;</span><span style="color: #A3BE8C">https://ping.ohdear.app/e536e771-9ff6</span><span style="color: #ECEFF4">&quot;</span><span style="color: #ECEFF4">)</span></span>
<span class="line"></span></code></pre>
<p>Ruby:</p>
<pre class="shiki" style="background-color: #2e3440ff"><code><span class="line"><span style="color: #8FBCBB">Net</span><span style="color: #ECEFF4">::</span><span style="color: #8FBCBB">HTTP</span><span style="color: #ECEFF4">.</span><span style="color: #D8DEE9FF">get</span><span style="color: #ECEFF4">(</span><span style="color: #8FBCBB">URI</span><span style="color: #ECEFF4">.</span><span style="color: #D8DEE9FF">parse</span><span style="color: #ECEFF4">(</span><span style="color: #ECEFF4">&#39;</span><span style="color: #A3BE8C">https://ping.ohdear.app/e536e771-9ff6</span><span style="color: #ECEFF4">&#39;</span><span style="color: #ECEFF4">))</span></span>
<span class="line"></span></code></pre>
<p>Node:</p>

<p>We've got <a href="/docs/general/cron-job-monitoring">a lot of examples</a> available for just about any popular language.</p>
<h2 id="deep-integration-into-php">Deep integration into PHP</h2>
<p>Because we have deeply nested roots in the PHP community, there are more convenient integrations available for Laravel and Symfony users.</p>
<p>For <a href="https://ohdear.app/docs/general/cron-job-monitoring/php#cron-monitoring-in-laravel-php">Laravel</a>, you can integrate using <a href="https://github.com/spatie/laravel-schedule-monitor">an additional package that auto-syncs your tasks to Oh Dear</a>.</p>
<pre class="shiki" style="background-color: #2e3440ff"><code><span class="line"><span style="color: #D8DEE9FF">$ composer </span><span style="color: #81A1C1">require</span><span style="color: #D8DEE9FF"> spatie</span><span style="color: #81A1C1">/</span><span style="color: #D8DEE9FF">laravel</span><span style="color: #81A1C1">-</span><span style="color: #D8DEE9FF">schedule</span><span style="color: #81A1C1">-</span><span style="color: #D8DEE9FF">monitor</span></span>
<span class="line"><span style="color: #D8DEE9FF">$ composer </span><span style="color: #81A1C1">require</span><span style="color: #D8DEE9FF"> ohdearapp</span><span style="color: #81A1C1">/</span><span style="color: #D8DEE9FF">ohdear</span><span style="color: #81A1C1">-</span><span style="color: #D8DEE9FF">php</span><span style="color: #81A1C1">-</span><span style="color: #D8DEE9FF">sdk </span></span>
<span class="line"><span style="color: #D8DEE9FF">$ php artisan vendor</span><span style="color: #81A1C1">:</span><span style="color: #D8DEE9FF">publish </span><span style="color: #81A1C1">--</span><span style="color: #D8DEE9FF">provider</span><span style="color: #81A1C1">=</span><span style="color: #ECEFF4">&quot;</span><span style="color: #A3BE8C">Spatie\ScheduleMonitor\ScheduleMonitorServiceProvider</span><span style="color: #ECEFF4">&quot;</span><span style="color: #D8DEE9FF"> </span><span style="color: #81A1C1">--</span><span style="color: #D8DEE9FF">tag</span><span style="color: #81A1C1">=</span><span style="color: #ECEFF4">&quot;</span><span style="color: #A3BE8C">migrations</span><span style="color: #ECEFF4">&quot;</span></span>
<span class="line"><span style="color: #D8DEE9FF">$ php artisan vendor</span><span style="color: #81A1C1">:</span><span style="color: #D8DEE9FF">publish </span><span style="color: #81A1C1">--</span><span style="color: #D8DEE9FF">provider</span><span style="color: #81A1C1">=</span><span style="color: #ECEFF4">&quot;</span><span style="color: #A3BE8C">Spatie\ScheduleMonitor\ScheduleMonitorServiceProvider</span><span style="color: #ECEFF4">&quot;</span><span style="color: #D8DEE9FF"> </span><span style="color: #81A1C1">--</span><span style="color: #D8DEE9FF">tag</span><span style="color: #81A1C1">=</span><span style="color: #ECEFF4">&quot;</span><span style="color: #A3BE8C">config</span><span style="color: #ECEFF4">&quot;</span></span>
<span class="line"><span style="color: #D8DEE9FF">$ php artisan migrate</span></span>
<span class="line"></span></code></pre>
<p>As a final step, add your <a href="/docs/integrations/api/introduction">Oh Dear API key</a> to <code>config/schedule-monitor.php</code> and this package will automatically sync all schedules to Oh Dear and we'll take it from there.</p>
<p><img src="/uploads/blogs/scheduled-task-monitoring/sync-oh-dear.png" alt="Cron sync from Oh Dear" /></p>
<p>Freek made a more in-depth video of how this works under the hood, if you're interested:</p>
<iframe src="https://player.vimeo.com/video/460607656" width="640" height="480" frameborder="0" allow="autoplay; fullscreen" allowfullscreen></iframe>
<p>If you prefer not to use an extra package, you could add the <code>thenPing()</code> method to each of the task definitions in your <code>Console/Kernel.php</code> instead:</p>
<pre class="shiki" style="background-color: #2e3440ff"><code><span class="line"><span style="color: #81A1C1">class</span><span style="color: #D8DEE9FF"> </span><span style="color: #8FBCBB">Kernel</span><span style="color: #D8DEE9FF"> </span><span style="color: #81A1C1">extends</span><span style="color: #D8DEE9FF"> </span><span style="color: #8FBCBB; font-weight: bold">ConsoleKernel</span></span>
<span class="line"><span style="color: #ECEFF4">{</span></span>
<span class="line"><span style="color: #D8DEE9FF">    </span><span style="color: #81A1C1">protected</span><span style="color: #D8DEE9FF"> </span><span style="color: #81A1C1">function</span><span style="color: #D8DEE9FF"> </span><span style="color: #88C0D0">schedule</span><span style="color: #ECEFF4">(</span><span style="color: #8FBCBB">Schedule</span><span style="color: #D8DEE9FF"> </span><span style="color: #81A1C1">$</span><span style="color: #D8DEE9">schedule</span><span style="color: #ECEFF4">)</span></span>
<span class="line"><span style="color: #D8DEE9FF">    </span><span style="color: #ECEFF4">{</span></span>
<span class="line"><span style="color: #D8DEE9FF">        </span><span style="color: #81A1C1">$</span><span style="color: #D8DEE9">schedule</span><span style="color: #81A1C1">-&gt;</span><span style="color: #88C0D0">command</span><span style="color: #ECEFF4">(</span><span style="color: #ECEFF4">&#39;</span><span style="color: #A3BE8C">emails:send</span><span style="color: #ECEFF4">&#39;</span><span style="color: #ECEFF4">)</span></span>
<span class="line"><span style="color: #D8DEE9FF">            </span><span style="color: #81A1C1">-&gt;</span><span style="color: #88C0D0">daily</span><span style="color: #ECEFF4">()</span></span>
<span class="line"><span style="color: #D8DEE9FF">            </span><span style="color: #81A1C1">-&gt;</span><span style="color: #88C0D0">thenPing</span><span style="color: #ECEFF4">(</span><span style="color: #ECEFF4">&#39;</span><span style="color: #A3BE8C">https://ping.ohdear.app/e536e771-9ff6</span><span style="color: #ECEFF4">&#39;</span><span style="color: #ECEFF4">)</span><span style="color: #81A1C1">;</span></span>
<span class="line"><span style="color: #D8DEE9FF">    </span><span style="color: #ECEFF4">}</span></span>
<span class="line"><span style="color: #ECEFF4">}</span></span>
<span class="line"></span></code></pre>
<p>For Symfony users, there's <a href="https://ohdear.app/docs/general/cron-job-monitoring/php#cron-monitoring-in-symfony-php">a PingTask package</a> that allows you to define the ping URL per task you define:</p>
<pre class="shiki" style="background-color: #2e3440ff"><code><span class="line"><span style="color: #81A1C1">use</span><span style="color: #D8DEE9FF"> Zenstruck</span><span style="color: #ECEFF4">\</span><span style="color: #D8DEE9FF">ScheduleBundle</span><span style="color: #ECEFF4">\</span><span style="color: #D8DEE9FF">Schedule</span><span style="color: #ECEFF4">\</span><span style="color: #D8DEE9FF">Task</span><span style="color: #ECEFF4">\</span><span style="color: #8FBCBB">PingTask</span><span style="color: #81A1C1">;</span></span>
<span class="line"></span>
<span class="line"><span style="color: #81A1C1">$</span><span style="color: #D8DEE9">schedule</span><span style="color: #81A1C1">-&gt;</span><span style="color: #88C0D0">add</span><span style="color: #ECEFF4">(</span><span style="color: #81A1C1">new</span><span style="color: #D8DEE9FF"> </span><span style="color: #8FBCBB">PingTask</span><span style="color: #ECEFF4">(</span><span style="color: #ECEFF4">&#39;</span><span style="color: #A3BE8C">https://ping.ohdear.app/e536e771-9ff6</span><span style="color: #ECEFF4">&#39;</span><span style="color: #ECEFF4">))</span><span style="color: #81A1C1">;</span></span>
<span class="line"></span></code></pre>
<p>Whatever your use case may be, you'll find a convenient integration for it.</p>
<h2 id="notifications-where-you-need-them">Notifications where you need them</h2>
<p>As with all our checks, this monitoring is coupled with our powerful notification system!</p>
<p>You can choose where you <a href="/feature/notifications">receive your notifications</a> and what <em>type</em> of notifications you want. Only care about the failures? Just enable that.</p>
<p><img src="/img/features/cron_slack_notification.png" alt="Example Slack notification for a failed scheduled task" /></p>
<p>We've been using this ourselves for several months now and have included every improvement we wanted <em>ourselves</em> into this feature. Our goal is to put all the necessary information right at your fingertips.</p>
<h2 id="cron-jobs-amp-scheduled-task-monitoring">Cron jobs &amp; scheduled task monitoring</h2>
<p>We call the feature <em>&quot;scheduled task monitoring&quot;</em>, but it's more than just that. <em>Anything</em> can be a scheduled task.</p>
<p>From a cron job that calls a back-up script to a scheduled task on Windows, everything that <em>should</em> run on a fixed schedule can be monitored through this new feature.</p>
<p>For instance, you can monitor the successes of your back-up script that is triggered via cron:</p>
<pre class="shiki" style="background-color: #2e3440ff"><code><span class="line"><span style="color: #D8DEE9FF">24 4 </span><span style="color: #81A1C1">*</span><span style="color: #D8DEE9FF"> </span><span style="color: #81A1C1">*</span><span style="color: #D8DEE9FF"> </span><span style="color: #81A1C1">*</span><span style="color: #D8DEE9FF"> /root/tarsnap-backup.sh </span><span style="color: #81A1C1">&amp;&amp;</span><span style="color: #D8DEE9FF"> curl -fsS --retry 3 -o /dev/null https://ping.ohdear.app/e536e771-9ff6</span></span>
<span class="line"></span></code></pre>
<p>Because of the use of the <code>&amp;&amp;</code> operator, the <code>curl</code> example will <em>only</em> be executed if the first script exited with an exit code of <code>0</code>, to indicate it succeeded. If it reports anything else, the <code>curl</code> won't be called and we will know we missed a report for that task.</p>
<h2 id="monitoring-queues-and-jobs-health">Monitoring queues and jobs health</h2>
<p>Since the idea behind <em>scheduled task monitoring</em> is to check a URL for recurring hits, this can also be used to monitor the health of running jobs or queues.</p>
<p>Imagine the following flow:</p>
<ol>
<li>Add a new scheduled task in your code to put a new job on the queue every 5 minutes</li>
<li>This job has one purpose: to ping our endpoint</li>
</ol>
<p>This way, you've tested your application one step further: this ensures both the <em>schedule</em> runs and the <em>queues</em> are alive to pick up &amp; process jobs.</p>
<p>If we don't receive the hit to our endpoint on time, chances are something's wrong and we can alert you.</p>
<h2 id="want-to-give-it-a-try">Want to give it a try?</h2>
<p>Some things at Oh Dear don't change: we still have a free, 10-day trial, with no strings attached. Just an email and a password are needed, no credit card details.</p>
<p><a href="https://ohdear.app/register">Start a trial today and see how easy it is to integrate scheduled task monitoring!</a></p>
<p>If you decide to sign up, we're giving a 30% discount for the first 3 months for any new user. Use coupon code <code>MONITOR-ALL-THE-THINGS</code> during subscription to lock in your discount. This code is valid until October 1st, 2020!</p>
<p>We're immensely proud of this feature (<a href="https://freek.dev/1767-why-and-how-you-should-monitor-scheduled-tasks">so much goes on behind the scenes</a>) and can't wait to hear your feedback.</p>
<p>If we could ask a favour: share this post as far and wide as you can! 😁</p>
]]>
            </summary>
                                    <updated>2020-09-28T14:22:49+00:00</updated>
        </entry>
            <entry>
            <title><![CDATA[How to monitor websites behind HTTP basic authentication]]></title>
            <link rel="alternate" href="https://ohdear.app/news-and-updates/how-to-monitor-websites-behind-http-basic-authentication" />
            <id>https://ohdear.app/44</id>
            <author>
                <name><![CDATA[Oh Dear]]></name>
            </author>
            <summary type="html">
                <![CDATA[<p>Oh Dear allows you to monitor any kind of website, even those behind HTTP basic authentication. In this guide, we'll cover the steps on how to monitor a website behind an HTTP basic authentication prompt.</p>
<h2 id="what-is-http-basic-authentication">What is HTTP basic authentication?</h2>
<p>A quick recap: HTTP basic authentication, also known as HTTP basic auth, is a very simple way of authentication yourself to a website.</p>
<p>Any time you see a &quot;classic&quot; popup like this, it's most likely fueled by HTTP basic authentication:</p>
<p><img src="/uploads/blogs/http-basic-authentication-monitoring/http-basic-auth-prompt.png" alt="HTTP Basic Auth prompt" /></p>
<p>Once you've entered your username and password, you won't have to re-enter them in the same session. Your browser will remember them.</p>
<h2 id="monitoring-sites-with-http-basic-authentication">Monitoring sites with HTTP basic authentication</h2>
<p>The &quot;trick&quot; to monitoring sites behind a basic HTTP auth, is to look for the <code>Authorization</code> header and add that to the Oh Dear settings under <em>HTTP Headers</em>.</p>
<p>You see, we allow you <a href="/docs/general/site-settings#custom-http-headers">to set custom HTTP headers</a> for things like Cookies, language headers and also Authorization headers.</p>
<p>First, we need to find the correct <em>Authorization</em> header. This header is a <em>hash</em> of your username &amp; password combination, so it doesn't change. That's good, because now we can re-use this hash in Oh Dear!</p>
<p>First, log in to the site you want to monitor with the correct credentials. Next, right click somewhere on the page and pick <em>Inspect</em>.</p>
<p><img src="/uploads/blogs/http-basic-authentication-monitoring/http-basic-auth-right-click-inspect.png" alt="Right Click: inspect" /></p>
<p>Now follow these steps:</p>
<p><img src="/uploads/blogs/http-basic-authentication-monitoring/http-basic-auth-see-header.png" alt="HTTP Basic Auth header" /></p>
<ol>
<li>Go to the <em>Network</em> tab and reload your current page</li>
<li>Click on the first resource that loaded, which is most likely your homepage</li>
<li>Scroll down on the right hand site until you see the <em>Request Headers</em>
</li>
<li>Look for the <em>authorization</em> header</li>
</ol>
<p>The header is called <em>authorization</em> and the value is <em>Basic bWF0...</em>.</p>
<h2 id="add-this-header-to-oh-dears-site-settings">Add this header to Oh Dear's site settings</h2>
<p>Now that we have the <em>Authorization</em> header, you can add it to your Oh Dear settings for the site.</p>
<p>Head over to the site, hit <em>Settings</em> in the left menu and find the section for <em>Headers</em>.</p>
<p>Add the <em>Authorization</em> header with the value of <em>Basic bWF0...</em> you found earlier, in the inspector.</p>
<p><img src="/uploads/blogs/http-basic-authentication-monitoring/ohdear-add-custom-http-header.png" alt="Add custom header to Oh Dear" /></p>
<p>Oh Dear will now add this header to every uptime check and broken links check we perform, automatically logging in via the HTTP Basic Authentication.</p>
]]>
            </summary>
                                    <updated>2020-09-15T08:02:39+00:00</updated>
        </entry>
            <entry>
            <title><![CDATA[Certificate lifetime limited to 1y since September 1st, 2020]]></title>
            <link rel="alternate" href="https://ohdear.app/news-and-updates/certificate-lifetime-limited-to-1y-since-september-1st-2020" />
            <id>https://ohdear.app/43</id>
            <author>
                <name><![CDATA[Oh Dear]]></name>
            </author>
            <summary type="html">
                <![CDATA[<p>Earlier this year, Apple announced that it would limit the lifetime of trusted certificates to 398 days. Shortly after, both Firefox and Chrome followed in their footsteps.</p>
<h2 id="why-limit-the-certificate-lifetime">Why limit the certificate lifetime?</h2>
<p>The goal is to create a more secure web environment. By reducing the certificate lifetime to a maximum of 398 days, or roughly 1 year and a month, it forces administrators to <em>rotate certificates more frequently</em>.</p>
<p>By doing so, the private &amp; public keys get changed. Anyone that managed to compromise the private key will only see it be useful for, at most, a year.</p>
<h2 id="what-does-this-mean">What does this mean?</h2>
<p>Any new certificate that is issued <em>after September 1st, 2020</em> will at most be valid for a year <sup>(*)</sup>.</p>
<p>Some vendors still allow you to purchase multi-year certificates. How does that work then? Well, you'll get a discount for the multi-year purchase, and every year they'll send you a new certificate to replace the previous one.</p>
<p>At that point, you take counter-party risk as you're betting on the company still existing in 3 years to provide the certificates you already paid for.</p>
<p><sup>This only applies to publicly trusted certificates. If you've deployed your own internal CA, those certificate lifetimes may still exceed 398 days.</sup></p>
<h2 id="whats-going-on-behind-the-scenes">What's going on behind the scenes?</h2>
<p>The story is actually quite fascinating!</p>
<p>Last year, members at Google initiated a <a href="https://cabforum.org/2019/09/10/ballot-sc22-reduce-certificate-lifetimes-v2/">ballot to reduce the maximum certificate lifetime to 1yr</a>. The ballot is done via the <a href="https://cabforum.org/">CA/B Forum</a>, the industry standard way that groups SSL issuers, browsers, important stakeholders, etc.</p>
<p>The ballot failed. The <em>industry</em> failed to come to a consensus and thus, no new rules were created to limit certificate lifetime.</p>
<p>Now this is where it gets interesting. Votes are split between certificate <em>issuers</em> and <em>consumers</em>. The issuers, or the ones where you <em>buy</em> your certificates from, voted mostly <em>against</em> the proposal.</p>
<p>The <em>consumers</em> of the certificates, or the browsers, all voted <em>for</em> the proposal.</p>
<p>Quite an imbalance there, isn't it?</p>
<p>A few months later, <a href="https://support.apple.com/en-us/HT211025">Apple announced it would limit certificate lifetime in Safari</a>. One browser started to adhere to more strict certificate validation rules on its own.</p>
<p><a href="https://chromium.googlesource.com/chromium/src/+/master/net/docs/certificate_lifetimes.md">Google's Chrome</a> and <a href="https://blog.mozilla.org/security/2020/07/09/reducing-tls-certificate-lifespans-to-398-days/">Mozilla's Firefox</a> quickly followed with their own announcements.</p>
<p>Even though no consensus could be reached through the CA/B Forum, because the browser that hold 80%+ of the market share agreed to limit the certificate lifetime, the <em>issuers</em> of certificates have no choice but to follow along.</p>
<h2 id="what-do-we-feel-about-this">What do we feel about this?</h2>
<p>We applaud this move in general because it does a few things very well:</p>
<ol>
<li>It forces more rapid recycling of public certificates</li>
<li>It promotes automation, to reduce the burden</li>
<li>It will ultimately lead to bigger adoption of <a href="https://letsencrypt.org/">Let's Encrypt</a>. If you're going to automate your certificate renewal, why not use free ones at the same time?</li>
</ol>
<p>At the same time, it also shows the imbalance of a public forum like CA/B.</p>
<p>This move is generally positive, but if a major browser would unilaterally decide to implement a <em>negative</em> change to certificate management instead, is everyone else forced to adopt that too?</p>
<p>It's food for thought, for sure.</p>
<h2 id="increased-need-for-certificate-monitoring">Increased need for certificate monitoring</h2>
<p>Of course, with the max lifetime of certificates decreased, you'll be having to replace your certificates more often.</p>
<p>Oh Dear can give you peace of mind with <a href="https://ohdear.app/feature/certificate-monitoring">extended certificate monitoring</a>. We'll keep you informed on the expiration days.</p>
<p>Because we now need to check for both <em>expiration</em> and <em>validity</em> times, we added additional checks that will inform you if you have a certificate that exceeds the 398 days threshold.</p>
<p><img src="/uploads/blogs/certificate-max-1yr-validity/certificate-lifetime-validation.png" alt="Maximum lifetime validation" /></p>
<p>On top of that, we can let you know once your certificates <em>change</em>.</p>
<p>Imagine you're replacing a certificate, but are you 100% certain you've included all the same domains/SANs and it covers all the right hostnames? We've got you covered.</p>
<p>Don't let an expired certificate ruin your day. Monitor it with <a href="https://ohdear.app/feature/certificate-monitoring">Oh Dear</a>.</p>
]]>
            </summary>
                                    <updated>2020-09-07T08:00:43+00:00</updated>
        </entry>
            <entry>
            <title><![CDATA[Deep integration with WordPress and Oh Dear]]></title>
            <link rel="alternate" href="https://ohdear.app/news-and-updates/deep-integration-with-wordpress-and-oh-dear" />
            <id>https://ohdear.app/42</id>
            <author>
                <name><![CDATA[Oh Dear]]></name>
            </author>
            <summary type="html">
                <![CDATA[<p>There is now a WordPress plugin that gives you deeper insights into broken links found, the performance of your site and the uptime statistics!</p>
<h2 id="a-wordpress-plugin-for-oh-dear">A WordPress plugin for Oh Dear</h2>
<p>Our friends at <a href="https://kryptonitewp.com/">KryptoniteWP</a> have developed a free WordPress plugin that seamlessly integrates with your Oh Dear account through our API.</p>
<p>Once installed, you'll be able to see the uptime statistics of your site, the performance (as measured, externally, by Oh Dear) and a list of broken links that were found.</p>
<h2 id="uptime-statistics-in-wordpress">Uptime statistics in WordPress</h2>
<p>We can only hope everyone's statistics look as good as these:</p>
<p><img src="/img/docs/3rd-party-integrations/wordpress-plugin/ohdear-wordpress-1-uptime.png" alt="Install the Oh Dear plugin" /></p>
<p>In the plugin dashboard, you'll find the uptime details of the last 30 days neatly presented.</p>
<h2 id="performance-statistics-in-wordpress">Performance statistics in WordPress</h2>
<p>Below the uptime stats, you can find the performance numbers we measured for your site.</p>
<p><img src="/img/docs/3rd-party-integrations/wordpress-plugin/ohdear-wordpress-2-performance.png" alt="Install the Oh Dear plugin" /></p>
<p>If you <em>mouse-over</em> the chart, you will see even more details of the performance characteristics of your site.</p>
<h2 id="listing-broken-links-in-wordpress">Listing broken links in WordPress</h2>
<p>At the very bottom, you can find a list of all the broken pages Oh Dear found when we checked your website.</p>
<p><img src="/img/docs/3rd-party-integrations/wordpress-plugin/ohdear-wordpress-3-broken-links.png" alt="Install the Oh Dear plugin" /></p>
<p>There's a super convenient <em>edit</em> button available that takes you directly to the offending page, so you can fix any broken links straight away.</p>
<p>There's a benefit of having an external, 3rd-party service, like us check this: we see exactly what your visitors see.</p>
<p>No accidental <em>only-available-for-logged-in-users</em> pages, no hidden typos in URLs, ... We find &amp; alert you on time so you can fix them before your visitors.</p>
<h2 id="installing-the-wordpress-plugin">Installing the WordPress plugin</h2>
<p>Installation couldn't be easier!</p>
<p>Head over to your Plugin section in WordPress, search for <em>&quot;Oh Dear&quot;</em> and hit Install.</p>
<p><img src="/img/docs/3rd-party-integrations/wordpress-plugin/ohdear-wordpress-install.png" alt="Install the Oh Dear plugin" /></p>
<p>Once installed, head over to the settings and copy/paste your <a href="/user/api-tokens">API key</a>, so the plugin has authenticated access to your Oh Dear account.</p>
<p>Everything else happens automatically! The uptime &amp; performance data is fetched and cached locally, as well as the broken links reporting.</p>
<h2 id="insights-for-your-clients">Insights for your clients</h2>
<p>This plugin is ideal to provide your clients, who are probably looking at the WordPress dashboard to create content and manage their site, insights into the health of their entire website.</p>
<p>It is an isolated way of providing important data to your client, that doesn't require any extra work from you.</p>
<p>On the contrary even, by giving your client direct access to performance data and broken links reports, they can do the initial corrections themselves before having to escalate them to you.</p>
<h2 id="thank-you-kryptonitewp">Thank you KryptoniteWP!</h2>
<p>We want to extend our thanks to <a href="https://kryptonitewp.com/">KryptoniteWP</a> and <a href="https://twitter.com/flowdee">Florian</a> in particular that built this WordPress plugin.</p>
<p>It's amazing to see the community build <a href="/docs/integrations/api/introduction">on top of our API</a> and build such incredibly high-quality plugins!</p>
]]>
            </summary>
                                    <updated>2021-11-22T08:17:23+00:00</updated>
        </entry>
            <entry>
            <title><![CDATA[Adding action links to Oh Dear email notifications]]></title>
            <link rel="alternate" href="https://ohdear.app/news-and-updates/adding-action-links-to-oh-dear-email-notifications" />
            <id>https://ohdear.app/41</id>
            <author>
                <name><![CDATA[Oh Dear]]></name>
            </author>
            <summary type="html">
                <![CDATA[<p>Last week, we improved the email notifications sent by <a href="https://ohdear.app">Oh Dear</a> whenever something is down or broken.</p>
<p>They now contain links that allow you to <em>snooze</em> further emails, essentially &quot;silencing&quot; the alert for a defined period of time.</p>
<p><img src="/uploads/blogs/snooze/mail.png" alt="screenshot" /></p>
<p>When a snooze link is clicked, you'll be taken to a page where you can silence the alert with a single-click, <em>even when you're not logged in</em>.</p>
<p><img src="/uploads/blogs/snooze/mail-confirmation.png" alt="screenshot" /></p>
<p>This system uses <em>signed URLs</em> to provide the necessary security while adding the convenience of silencing alerts even when you're not actively logged into Oh Dear.</p>
<h2 id="why-weve-added-snooze-links">Why we've added snooze links</h2>
<p>Earlier this year, we added the ability to <a href="/blog/snoozing-alerts-and-advanced-slack-notifications">snooze notifications</a> to Oh Dear. Each different check in Oh Dear got a snooze setting screen. On that screen, users can choose how long we shouldn't send notifications for a check.</p>
<p><img src="/uploads/blogs/snooze/snooze-ui.png" alt="screenshot" /></p>
<p>We also introduced advanced Slack notifications. Whenever you get a notification, you can snooze further notification using the little menu underneath a notification. This way, you can snooze a check without even having to visit the Oh Dear website. Handy!</p>
<p><img src="/uploads/blogs/snooze/slack.png" alt="screenshot" /></p>
<p>(If you've previously configured <em>Slack Webhooks</em> you can upgrade your notification settings to use the new <a href="/docs/notifications/slack">Slack API integration</a> instead, this will provide the ability to snooze notifications.)</p>
<p>These advanced Slack got a lot of attention from us because we're using Slack notifications ourselves. But let's take a look at which notification channels are used the most at Oh Dear.</p>
<p>In the Oh Dear database, all notification preferences are stored in a table called <code>notification_destinations</code>. In the <code>channel</code> column, the name of the channel (<code>mail</code>, <code>slack</code>, <code>nexmo</code>), and so on is stored.</p>
<p>This query gives us the percentage for each different channel.</p>
<pre class="shiki" style="background-color: #2e3440ff"><code><span class="line"><span style="color: #81A1C1">SELECT</span></span>
<span class="line"><span style="color: #D8DEE9FF">    channel,</span></span>
<span class="line"><span style="color: #D8DEE9FF">    </span><span style="color: #88C0D0">ROUND</span><span style="color: #D8DEE9FF">(</span><span style="color: #88C0D0">COUNT</span><span style="color: #D8DEE9FF">(channel) </span><span style="color: #81A1C1">/</span><span style="color: #D8DEE9FF"> (</span></span>
<span class="line"><span style="color: #D8DEE9FF">            </span><span style="color: #81A1C1">SELECT</span></span>
<span class="line"><span style="color: #D8DEE9FF">                </span><span style="color: #88C0D0">count</span><span style="color: #D8DEE9FF">(</span><span style="color: #81A1C1">*</span><span style="color: #D8DEE9FF">)</span></span>
<span class="line"><span style="color: #D8DEE9FF">                </span><span style="color: #81A1C1">FROM</span><span style="color: #D8DEE9FF"> notification_destinations) </span><span style="color: #81A1C1">*</span><span style="color: #D8DEE9FF"> </span><span style="color: #B48EAD">100</span><span style="color: #D8DEE9FF">) </span><span style="color: #81A1C1">AS</span><span style="color: #D8DEE9FF"> </span><span style="color: #81A1C1">percentage</span></span>
<span class="line"><span style="color: #81A1C1">FROM</span></span>
<span class="line"><span style="color: #D8DEE9FF">    notification_destinations</span></span>
<span class="line"><span style="color: #81A1C1">GROUP BY</span></span>
<span class="line"><span style="color: #D8DEE9FF">    channel</span></span>
<span class="line"><span style="color: #81A1C1">ORDER BY</span></span>
<span class="line"><span style="color: #D8DEE9FF">    </span><span style="color: #81A1C1">percentage</span><span style="color: #D8DEE9FF"> </span><span style="color: #81A1C1">DESC</span></span>
<span class="line"></span></code></pre>
<p>Here are the results:</p>
<ul>
<li>
<code>mail</code>: 82%</li>
<li>
<code>slack</code>: 13%</li>
<li>
<code>nexmo</code>: 2%</li>
<li>
<code>pushover</code>: 1%</li>
<li>
<code>webhooks</code>: 1%</li>
<li>
<code>discord</code>: 1%</li>
</ul>
<p>Even though our team relies on Slack notifications, the vast majority of Oh Dear subscribers use email. It's easy to understand why: everybody already has an email address, and most people check their email regularly.</p>
<p>Because emails are being used so much for sending notifications, we decided to give them a little love by adding snooze links. ❤️</p>
]]>
            </summary>
                                    <updated>2020-07-13T11:36:49+00:00</updated>
        </entry>
            <entry>
            <title><![CDATA[Adding preventive revocation alerts to our certificate monitoring]]></title>
            <link rel="alternate" href="https://ohdear.app/news-and-updates/adding-preventive-revocation-alerts-to-our-certificate-monitoring" />
            <id>https://ohdear.app/40</id>
            <author>
                <name><![CDATA[Oh Dear]]></name>
            </author>
            <summary type="html">
                <![CDATA[<p>As part of our <a href="/feature/certificate-monitoring">SSL certificate monitoring</a>, we check <em>a lot</em> of things. The usuals, like if it covers the right domain name or if it hasn't expired are, of course, already included.</p>
<p>But SSL certificates can get quite complex. Sometimes, SSL certificates get <em>revoked</em> by the issuer. When that happens, browsers worldwide stop trusting them and will throw an invalid certificate warning.</p>
<h2 id="what-are-certificate-revocations">What are certificate revocations?</h2>
<p>These revocations usually happen on purpose by the owner, wanting to replace a certificate with a new one, to make sure the old one is no longer trusted.</p>
<p>But sometimes, things happen that cause certificates to be revoked <em>without the owner initiating it</em>.</p>
<p>A few months ago, it happened <a href="/blog/how-we-identified-clients-with-ssl-certificates-affected-by-lets-encrypt-mass-revocation">when Let's Encrypt had to revoke a lot of their certificates</a>.</p>
<p>Such events are rare, but appear to be happening more &amp; more. So, we want to be prepared and have made some changes to Oh Dear. 💪</p>
<h2 id="preventive-notifications-for-ssl-certificate-revocations">Preventive notifications for SSL certificate revocations</h2>
<p>In the case of <a href="/blog/how-we-identified-clients-with-ssl-certificates-affected-by-lets-encrypt-mass-revocation">Let's Encrypt's revocation</a>, they gave users a few days notice that <em>some</em> certificates were going to be revoked.</p>
<p>And just this week, <a href="https://www.mail-archive.com/dev-security-policy@lists.mozilla.org/msg13493.html">Ryan Sleevi announced a list of over 250 intermediate certificates</a> that violated the certificate rules, which should now be revoked.</p>
<p>While annoying for users worldwide, it <em>is</em> nice to know these revocations before they actually occur.</p>
<p>To help our users, we've added new functionality to Oh Dear that allows us to easily load these announced revocations in our database, and match any of the sites we monitor against them.</p>
<p><em>Here's what that might look like, as an example:</em></p>
<p><img src="/uploads/blogs/certificate-pending-revocation-checks/certificate-pending-revocation.png" alt="Example of certificate revocation warning" /></p>
<p>If we have a match, we can notify our users <em>before the revocation actually occurs</em>. Great, right? 🥳</p>
<p>This means you no longer have to wait for certificate problems to occur - causing problems for your visitors - but you get to fix them <em>before</em> they cause issues.</p>
]]>
            </summary>
                                    <updated>2021-11-22T08:16:53+00:00</updated>
        </entry>
            <entry>
            <title><![CDATA[Introducing new performance monitoring for your websites]]></title>
            <link rel="alternate" href="https://ohdear.app/news-and-updates/introducing-new-performance-monitoring-for-your-websites" />
            <id>https://ohdear.app/39</id>
            <author>
                <name><![CDATA[Oh Dear]]></name>
            </author>
            <summary type="html">
                <![CDATA[<p>We're excited to announce all Oh Dear users now have access to detailed performance metrics for all of their websites!</p>
<p>Let us take you through a quick tour of the new performance monitoring.</p>
<h2 id="an-updated-dashboard">An updated dashboard</h2>
<p>All our users will see a new dashboard upon login. We'll show you a performance graph and the latest response times next to the existing checks of uptime, broken links, mixed content &amp; certificate health.</p>
<p><img src="/img/dashboard-screenshot-for-homepage.png" alt="Screenshot of the Oh Dear dashboard" /></p>
<p>The dashboard updates in real-time, as soon as we have new performance metrics. You'll be able to see the data come in and the graph will auto-update itself!</p>
<h2 id="detailed-performance-metrics">Detailed performance metrics</h2>
<p>You can click through on the graph on the dashboard or the left-hand menu on the overview page of a site. In there, you'll be able to see detailed metrics of the performance of your website.</p>
<p><img src="/img/features/performance-graphs.png" alt="Detailed performance metrics in Oh Dear" /></p>
<p>If you hover over the chart, we'll pop-up the breakdown of each area of your performance.</p>
<p>We show you the following data:</p>
<ul>
<li>
<strong>DNS lookup</strong>: The time it takes to resolve the domain name to an IP address via DNS.</li>
<li>
<strong>TCP Connection Time</strong>: The time it takes to connect to the remote host (TCP three-way handshake).</li>
<li>
<strong>TLS Connection Time</strong>: The total time it took for the TLS handshake to complete (cipher negotiation &amp; encryption).</li>
<li>
<strong>Remote Server Processing</strong>: The time it took the server to process the request and start sending the first byte of the page. This is also known as the <strong>Time To First Byte</strong> or <strong>TTFB</strong>.</li>
<li>
<strong>Content Download</strong>: The time, in seconds, it took for the page to be downloaded from the remote server.</li>
</ul>
<p>Each of those metrics will allow you to pinpoint particular problems related to your website performance.</p>
<h2 id="get-notified-on-performance-issues">Get notified on performance issues</h2>
<p>The feature was designed with two clear goals in mind:</p>
<ul>
<li>You want to define a hard threshold in terms of performance goals</li>
<li>You want to know when your performance characteristics suddenly change</li>
</ul>
<p>You're now able to define a threshold for what you consider to be <em>slow</em>. Our default is 3500ms, or 3.5 seconds.</p>
<p>Once a site consistently crosses the 3.5 second mark, we'll notify you that things are getting a bit slow. We hope our users will crank that up so the threshold is a lot <em>lower</em> than 3.5 seconds. 😁</p>
<p>Our other alert relates to a <em>change</em> in performance: imagine you deploy your site, but it gets about 50% slower. Or faster? Classic monitoring will report the site as <em>up</em> and your visitors can still see it, but it has <em>drastically</em> changed the speed of the site.</p>
<p><img src="/uploads/blogs/performance-feature/performance-change-detected-1m.png" alt="Change in performance detected" /></p>
<p>Our default alert is a sudden change of 50% in performance: if we detect your site is slowing down or getting a lot faster, we'll make sure you know!</p>
<p>It may be harmless, it may even be good news, but we reckon you'd like to know whenever there's a big change like this.</p>
<h2 id="history-data-amp-trending">History data &amp; trending</h2>
<p>You're able to see the most granular data for the last 14 days. We'll aggregate the data in hourly averages for long-term storage and trending.</p>
<p>Per site, you can see a quick view for the last 7 days, and a view with all historic datapoints.</p>
<p><img src="/uploads/blogs/performance-feature/performance-change-detected-7d.png" alt="Long-term trends in performance data" /></p>
<p>In one of our next releases, we'll add the ability to export this data as a PNG or PDF so you can use it in your client reports.</p>
<h2 id="data-available-through-our-api-amp-sdk">Data available through our API &amp; SDK</h2>
<p>We've added the necessary endpoints to our API to allow you to retrieve the data at your convenience.</p>
<pre class="shiki" style="background-color: #2e3440ff"><code><span class="line"><span style="color: #D8DEE9FF">$ curl https://ohdear.app/api/sites/1/performance-records</span><span style="color: #81A1C1">?</span><span style="color: #D8DEE9FF">filter</span><span style="color: #ECEFF4">[</span><span style="color: #D8DEE9FF">start</span><span style="color: #ECEFF4">]</span><span style="color: #D8DEE9FF">=20200607125435</span><span style="color: #81A1C1">&amp;</span><span style="color: #D8DEE9FF">filter</span><span style="color: #ECEFF4">[</span><span style="color: #D8DEE9FF">end</span><span style="color: #ECEFF4">]</span><span style="color: #D8DEE9FF">=20200608125435</span><span style="color: #81A1C1">&amp;</span><span style="color: #D8DEE9FF">filter</span><span style="color: #ECEFF4">[</span><span style="color: #D8DEE9FF">timeframe</span><span style="color: #ECEFF4">]</span><span style="color: #D8DEE9FF">=1m \</span></span>
<span class="line"><span style="color: #D8DEE9FF">    -H </span><span style="color: #ECEFF4">&quot;</span><span style="color: #A3BE8C">Authorization: Bearer </span><span style="color: #81A1C1">$</span><span style="color: #D8DEE9">OHDEAR_TOKEN</span><span style="color: #ECEFF4">&quot;</span><span style="color: #D8DEE9FF"> \</span></span>
<span class="line"><span style="color: #D8DEE9FF">    -H </span><span style="color: #ECEFF4">&#39;</span><span style="color: #A3BE8C">Accept: application/json</span><span style="color: #ECEFF4">&#39;</span><span style="color: #D8DEE9FF"> \</span></span>
<span class="line"><span style="color: #D8DEE9FF">    -H </span><span style="color: #ECEFF4">&#39;</span><span style="color: #A3BE8C">Content-Type: application/json</span><span style="color: #ECEFF4">&#39;</span></span>
<span class="line"></span>
<span class="line"><span style="color: #ECEFF4">{</span></span>
<span class="line"><span style="color: #D8DEE9FF">  </span><span style="color: #ECEFF4">&quot;</span><span style="color: #A3BE8C">data</span><span style="color: #ECEFF4">&quot;</span><span style="color: #D8DEE9FF">: </span><span style="color: #ECEFF4">[</span></span>
<span class="line"><span style="color: #D8DEE9FF">    </span><span style="color: #ECEFF4">{</span></span>
<span class="line"><span style="color: #D8DEE9FF">      </span><span style="color: #ECEFF4">&quot;</span><span style="color: #A3BE8C">id</span><span style="color: #ECEFF4">&quot;</span><span style="color: #D8DEE9FF">: 121,</span></span>
<span class="line"><span style="color: #D8DEE9FF">      </span><span style="color: #ECEFF4">&quot;</span><span style="color: #A3BE8C">site_id</span><span style="color: #ECEFF4">&quot;</span><span style="color: #D8DEE9FF">: 1,</span></span>
<span class="line"><span style="color: #D8DEE9FF">      </span><span style="color: #ECEFF4">&quot;</span><span style="color: #A3BE8C">created_at</span><span style="color: #ECEFF4">&quot;</span><span style="color: #D8DEE9FF">: </span><span style="color: #ECEFF4">&quot;</span><span style="color: #A3BE8C">2020-06-04 11:18:15</span><span style="color: #ECEFF4">&quot;</span><span style="color: #D8DEE9FF">,</span></span>
<span class="line"><span style="color: #D8DEE9FF">      </span><span style="color: #ECEFF4">&quot;</span><span style="color: #A3BE8C">time_namelookup</span><span style="color: #ECEFF4">&quot;</span><span style="color: #D8DEE9FF">: 0.032941,</span></span>
<span class="line"><span style="color: #D8DEE9FF">      </span><span style="color: #ECEFF4">&quot;</span><span style="color: #A3BE8C">time_connect</span><span style="color: #ECEFF4">&quot;</span><span style="color: #D8DEE9FF">: 0.029106,</span></span>
<span class="line"><span style="color: #D8DEE9FF">      </span><span style="color: #ECEFF4">&quot;</span><span style="color: #A3BE8C">time_appconnect</span><span style="color: #ECEFF4">&quot;</span><span style="color: #D8DEE9FF">: 0.076993,</span></span>
<span class="line"><span style="color: #D8DEE9FF">      </span><span style="color: #ECEFF4">&quot;</span><span style="color: #A3BE8C">time_pretransfer</span><span style="color: #ECEFF4">&quot;</span><span style="color: #D8DEE9FF">: 0.00015999999999999348,</span></span>
<span class="line"><span style="color: #D8DEE9FF">      </span><span style="color: #ECEFF4">&quot;</span><span style="color: #A3BE8C">time_remoteserver</span><span style="color: #ECEFF4">&quot;</span><span style="color: #D8DEE9FF">: 0.03007500000000002,</span></span>
<span class="line"><span style="color: #D8DEE9FF">      </span><span style="color: #ECEFF4">&quot;</span><span style="color: #A3BE8C">time_redirect</span><span style="color: #ECEFF4">&quot;</span><span style="color: #D8DEE9FF">: 0,</span></span>
<span class="line"><span style="color: #D8DEE9FF">      </span><span style="color: #ECEFF4">&quot;</span><span style="color: #A3BE8C">time_download</span><span style="color: #ECEFF4">&quot;</span><span style="color: #D8DEE9FF">: 0.0007059999999999844,</span></span>
<span class="line"><span style="color: #D8DEE9FF">      </span><span style="color: #ECEFF4">&quot;</span><span style="color: #A3BE8C">time_total</span><span style="color: #ECEFF4">&quot;</span><span style="color: #D8DEE9FF">: 0.169981</span></span>
<span class="line"><span style="color: #D8DEE9FF">    </span><span style="color: #ECEFF4">}</span><span style="color: #D8DEE9FF">,</span></span>
<span class="line"><span style="color: #D8DEE9FF">    </span><span style="color: #ECEFF4">{</span></span>
<span class="line"><span style="color: #D8DEE9FF">      </span><span style="color: #ECEFF4">&quot;</span><span style="color: #A3BE8C">id</span><span style="color: #ECEFF4">&quot;</span><span style="color: #D8DEE9FF">: 122,</span></span>
<span class="line"><span style="color: #D8DEE9FF">      </span><span style="color: #ECEFF4">&quot;</span><span style="color: #A3BE8C">site_id</span><span style="color: #ECEFF4">&quot;</span><span style="color: #D8DEE9FF">: 1,</span></span>
<span class="line"><span style="color: #D8DEE9FF">      </span><span style="color: #ECEFF4">&quot;</span><span style="color: #A3BE8C">created_at</span><span style="color: #ECEFF4">&quot;</span><span style="color: #D8DEE9FF">: </span><span style="color: #ECEFF4">&quot;</span><span style="color: #A3BE8C">2020-06-04 11:19:15</span><span style="color: #ECEFF4">&quot;</span><span style="color: #D8DEE9FF">,</span></span>
<span class="line"><span style="color: #D8DEE9FF">      </span><span style="color: #ECEFF4">&quot;</span><span style="color: #A3BE8C">time_namelookup</span><span style="color: #ECEFF4">&quot;</span><span style="color: #D8DEE9FF">: 0.008363,</span></span>
<span class="line"><span style="color: #D8DEE9FF">      </span><span style="color: #ECEFF4">&quot;</span><span style="color: #A3BE8C">time_connect</span><span style="color: #ECEFF4">&quot;</span><span style="color: #D8DEE9FF">: 0.020259,</span></span>
<span class="line"><span style="color: #D8DEE9FF">      </span><span style="color: #ECEFF4">&quot;</span><span style="color: #A3BE8C">time_appconnect</span><span style="color: #ECEFF4">&quot;</span><span style="color: #D8DEE9FF">: 0.042906999999999994,</span></span>
<span class="line"><span style="color: #D8DEE9FF">      </span><span style="color: #ECEFF4">&quot;</span><span style="color: #A3BE8C">time_pretransfer</span><span style="color: #ECEFF4">&quot;</span><span style="color: #D8DEE9FF">: 0.00010600000000000886,</span></span>
<span class="line"><span style="color: #D8DEE9FF">      </span><span style="color: #ECEFF4">&quot;</span><span style="color: #A3BE8C">time_remoteserver</span><span style="color: #ECEFF4">&quot;</span><span style="color: #D8DEE9FF">: 0.020762000000000003,</span></span>
<span class="line"><span style="color: #D8DEE9FF">      </span><span style="color: #ECEFF4">&quot;</span><span style="color: #A3BE8C">time_redirect</span><span style="color: #ECEFF4">&quot;</span><span style="color: #D8DEE9FF">: 0,</span></span>
<span class="line"><span style="color: #D8DEE9FF">      </span><span style="color: #ECEFF4">&quot;</span><span style="color: #A3BE8C">time_download</span><span style="color: #ECEFF4">&quot;</span><span style="color: #D8DEE9FF">: 0.0005309999999999898,</span></span>
<span class="line"><span style="color: #D8DEE9FF">      </span><span style="color: #ECEFF4">&quot;</span><span style="color: #A3BE8C">time_total</span><span style="color: #ECEFF4">&quot;</span><span style="color: #D8DEE9FF">: 0.092928</span></span>
<span class="line"><span style="color: #D8DEE9FF">    </span><span style="color: #ECEFF4">}</span><span style="color: #D8DEE9FF">,</span></span>
<span class="line"><span style="color: #D8DEE9FF">    </span><span style="color: #ECEFF4">{</span></span>
<span class="line"><span style="color: #D8DEE9FF">      ...</span></span>
<span class="line"><span style="color: #D8DEE9FF">    </span><span style="color: #ECEFF4">}</span></span>
<span class="line"><span style="color: #D8DEE9FF">  </span><span style="color: #ECEFF4">]</span><span style="color: #D8DEE9FF">,</span></span>
<span class="line"><span style="color: #ECEFF4">}</span></span>
<span class="line"></span></code></pre>
<p>For more information, <a href="/docs/integrations/api/performance-records">please have a read of the performance metric API docs</a>.</p>
<p>If you use our <a href="/docs/integrations/php-sdk/introduction">PHP-SDK</a>, a convenient PHP package that acts as a wrapper for our API, you can also query for performance records as of version <code>2.0.0</code>.</p>
<pre class="shiki" style="background-color: #2e3440ff"><code><span class="line"><span style="color: #81A1C1">&lt;?</span><span style="color: #D8DEE9FF">php</span></span>
<span class="line"><span style="color: #81A1C1">$</span><span style="color: #D8DEE9">sdk</span><span style="color: #81A1C1">-&gt;</span><span style="color: #88C0D0">performanceRecords</span><span style="color: #ECEFF4">(</span><span style="color: #B48EAD">1</span><span style="color: #ECEFF4">,</span><span style="color: #D8DEE9FF"> </span><span style="color: #ECEFF4">&#39;</span><span style="color: #A3BE8C">2020-06-07</span><span style="color: #ECEFF4">&#39;</span><span style="color: #ECEFF4">,</span><span style="color: #D8DEE9FF"> </span><span style="color: #ECEFF4">&#39;</span><span style="color: #A3BE8C">2020-06-08</span><span style="color: #ECEFF4">&#39;</span><span style="color: #ECEFF4">)</span><span style="color: #81A1C1">;</span></span>
<span class="line"></span>
<span class="line"><span style="color: #81A1C1">$</span><span style="color: #D8DEE9">sdk</span><span style="color: #81A1C1">-&gt;</span><span style="color: #88C0D0">performanceRecords</span><span style="color: #ECEFF4">(</span><span style="color: #B48EAD">1</span><span style="color: #ECEFF4">,</span><span style="color: #D8DEE9FF"> </span><span style="color: #ECEFF4">&#39;</span><span style="color: #A3BE8C">2020-06-07 09:00:00</span><span style="color: #ECEFF4">&#39;</span><span style="color: #ECEFF4">,</span><span style="color: #D8DEE9FF"> </span><span style="color: #ECEFF4">&#39;</span><span style="color: #A3BE8C">2020-06-08 17:00:00</span><span style="color: #ECEFF4">&#39;</span><span style="color: #ECEFF4">)</span><span style="color: #81A1C1">;</span></span>
<span class="line"></span></code></pre>
<p>It accepts a site ID, the <code>start</code> and <code>end</code> date, and will return an array of all the detailed performance metrics we have available.</p>
<p>For more details, have a look at <a href="/docs/integrations/php-sdk/performance-records">the detailed documentation on the new <code>performanceRecords()</code> method</a>.</p>
<h2 id="want-more-information">Want more information?</h2>
<p>Looking for some more reading on the new performance monitoring? Well, we've got you covered!</p>
<ul>
<li>More high-level details are available <a href="/feature/performance">on the performance feature page</a>
</li>
<li>Our <a href="/docs/general/performance">documentation has been updated</a> to cover the performance checks</li>
<li>We have <a href="/docs/integrations/api/performance-records">API integrations available</a>
</li>
<li>To help consume the data, we have <a href="/docs/integrations/php-sdk/performance-records">updated our PHP-SDK</a>
</li>
</ul>
<h2 id="want-to-give-it-a-try">Want to give it a try?</h2>
<p>Want to know how fast your own website is?</p>
<p>Sign up to <a href="/register">create an account</a> and you'll see the detailed metrics appear!</p>
]]>
            </summary>
                                    <updated>2020-06-09T11:44:40+00:00</updated>
        </entry>
            <entry>
            <title><![CDATA[Resolving the AddTrust External CA Root certificate expiration]]></title>
            <link rel="alternate" href="https://ohdear.app/news-and-updates/resolving-the-addtrust-external-ca-root-certificate-expiration" />
            <id>https://ohdear.app/38</id>
            <author>
                <name><![CDATA[Oh Dear]]></name>
            </author>
            <summary type="html">
                <![CDATA[<p>Some of our users have received reports about their <strong>AddTrust External CA Root</strong> or <strong>USERTrust RSA Certification Authority</strong> certificate. The problem occurs because <em>the remote server</em> sends a root certificate in the chain that will expire in less than 14 days.</p>
<p>Here are the steps to verify this and a few tips on how to resolve it.</p>
<h2 id="what-are-the-addtrust-external-ca-root-expiration-notifications">What are the AddTrust External CA Root expiration notifications?</h2>
<p>Oh Dear checks all the certificates your server sends back to us whenever we connect to it.</p>
<p>Sometimes we just get 1 certificate back, sometimes we receive an entire chain of certificates (this is usually the correct thing to do, minus the root certificate).</p>
<p>Sometimes, we receive certificates where - in the middle of the chain - an expired certificate is present. We alert on these, as clients might block connections when one certificate in the chain is expired.</p>
<p>Sometimes, and it's rare, a server sends a root certificate along that is close to expiry, but actually isn't <em>needed</em>.</p>
<p>For some of our users, they've received these reports for the <strong>AddTrust External CA Root</strong> and <strong>USERTrust RSA Certification Authority</strong> root certificates.</p>
<h2 id="verify-that-the-ssl-certificates-are-indeed-about-to-expire">Verify that the SSL certificates are indeed about to expire</h2>
<p>It's a bit technical, so if this doesn't make a whole lot of sense, we suggest you reach out to your hosting provider or your SSL Certificate provider - they'll be able to help out!</p>
<p>Forward them this post, and they'll be able to fix things for you.</p>
<p>In this example, we'll connect to a random Tumblr blog and request the certificates. Tumblr appears to be one of the larger providers worldwide that's sending a soon-to-expire root certificate along in their chain.</p>
<p><em>Update: they since removed the old expiring root from their chain.</em></p>
<pre class="shiki" style="background-color: #2e3440ff"><code><span class="line"><span style="color: #D8DEE9FF">$ openssl s_client -showcerts -connect world-of-cats.tumblr.com:443</span></span>
<span class="line"></span>
<span class="line"><span style="color: #D8DEE9FF">CONNECTED</span><span style="color: #ECEFF4">(</span><span style="color: #D8DEE9FF">00000006</span><span style="color: #ECEFF4">)</span></span>
<span class="line"><span style="color: #D8DEE9FF">depth=3 C = SE, O = AddTrust AB, OU = AddTrust External TTP Network, CN = AddTrust External CA Root</span></span>
<span class="line"><span style="color: #D8DEE9FF">verify return:1</span></span>
<span class="line"><span style="color: #D8DEE9FF">depth=2 C = US, ST = New Jersey, L = Jersey City, O = The USERTRUST Network, CN = USERTrust RSA Certification Authority</span></span>
<span class="line"><span style="color: #D8DEE9FF">verify return:1</span></span>
<span class="line"><span style="color: #D8DEE9FF">depth=1 C = GB, ST = Greater Manchester, L = Salford, O = Sectigo Limited, CN = Sectigo RSA Domain Validation Secure Server CA</span></span>
<span class="line"><span style="color: #D8DEE9FF">verify return:1</span></span>
<span class="line"><span style="color: #D8DEE9FF">depth=0 CN = </span><span style="color: #81A1C1">*</span><span style="color: #D8DEE9FF">.tumblr.com</span></span>
<span class="line"><span style="color: #D8DEE9FF">verify return:1</span></span>
<span class="line"><span style="color: #D8DEE9FF">---</span></span>
<span class="line"><span style="color: #D8DEE9FF">Certificate chain</span></span>
<span class="line"><span style="color: #D8DEE9FF"> 0 s:/CN=</span><span style="color: #81A1C1">*</span><span style="color: #D8DEE9FF">.tumblr.com</span></span>
<span class="line"><span style="color: #D8DEE9FF">   i:/C=GB/ST=Greater Manchester/L=Salford/O=Sectigo Limited/CN=Sectigo RSA Domain Validation Secure Server CA</span></span>
<span class="line"><span style="color: #D8DEE9FF">-----BEGIN CERTIFICATE-----</span></span>
<span class="line"><span style="color: #D8DEE9FF">MIIGpzCCBY+gAwIBAgIRAOsw1/2DvyzYHRF0zq8c9xQwDQYJKoZIhvcNAQELBQAw</span></span>
<span class="line"><span style="color: #D8DEE9FF">gY8xCzAJBgNVBAYTAkdCMRswGQYDVQQIExJHcmVhdGVyIE1hbmNoZXN0ZXIxEDAO</span></span>
<span class="line"><span style="color: #D8DEE9FF">BgNVBAcTB1NhbGZvcmQxGDAWBgNVBAoTD1NlY3RpZ28gTGltaXRlZDE3MDUGA1UE</span></span>
<span class="line"><span style="color: #D8DEE9FF">AxMuU2VjdGlnbyBSU0EgRG9tYWluIFZhbGlkYXRpb24gU2VjdXJlIFNlcnZlciBD</span></span>
<span class="line"><span style="color: #D8DEE9FF">QTAeFw0yMDAzMjYwMDAwMDBaFw0yMjA2MjgwMDAwMDBaMBcxFTATBgNVBAMMDCou</span></span>
<span class="line"><span style="color: #D8DEE9FF">dHVtYmxyLmNvbTCCASIwDQYJKoZIhvcNAQEBBQADggEPADCCAQoCggEBAPe+MXhf</span></span>
<span class="line"><span style="color: #D8DEE9FF">4lZYnrsY5Ch1L0MqHOc44hIHkmawVVyTA8CynfbbFJWW+3Uoy0tHTcRgXyaV9xU3</span></span>
<span class="line"><span style="color: #D8DEE9FF">oFyaIyYsLEUzfQLLmCuUjs8zSYvDH0jioCAz2HnkBaSuRAeOL2Iuaa9RoUVPrm8H</span></span>
<span class="line"><span style="color: #D8DEE9FF">TwMwNQEjTJXM9SdSDzK8fS78jglTpzy+1CvWXjo9ij4+hiz2UjRkntA1oKXtOgnm</span></span>
<span class="line"><span style="color: #D8DEE9FF">7W63CwD+fs9cW4VJaehjIAXf8AM/vd/WTrsDmr2ne17D05Lg7UgIJJaAo7JkF7bt</span></span>
<span class="line"><span style="color: #D8DEE9FF">v3Be/BEYQTo/Eo0Ao9mqbt0DotNRn3lyh1y6MMhU7Hbr/qQzq1+cyEr+d0yd/ugp</span></span>
<span class="line"><span style="color: #D8DEE9FF">P4c3HKfxD21+6PUCAwEAAaOCA3MwggNvMB8GA1UdIwQYMBaAFI2MXsRUrYrhd+mb</span></span>
<span class="line"><span style="color: #D8DEE9FF">+ZsF4bgBjWHhMB0GA1UdDgQWBBR7eUPnbT0TNZdZJ9sYGcIV+LV+zzAOBgNVHQ8B</span></span>
<span class="line"><span style="color: #D8DEE9FF">Af8EBAMCBaAwDAYDVR0TAQH/BAIwADAdBgNVHSUEFjAUBggrBgEFBQcDAQYIKwYB</span></span>
<span class="line"><span style="color: #D8DEE9FF">BQUHAwIwSQYDVR0gBEIwQDA0BgsrBgEEAbIxAQICBzAlMCMGCCsGAQUFBwIBFhdo</span></span>
<span class="line"><span style="color: #D8DEE9FF">dHRwczovL3NlY3RpZ28uY29tL0NQUzAIBgZngQwBAgEwgYQGCCsGAQUFBwEBBHgw</span></span>
<span class="line"><span style="color: #D8DEE9FF">djBPBggrBgEFBQcwAoZDaHR0cDovL2NydC5zZWN0aWdvLmNvbS9TZWN0aWdvUlNB</span></span>
<span class="line"><span style="color: #D8DEE9FF">RG9tYWluVmFsaWRhdGlvblNlY3VyZVNlcnZlckNBLmNydDAjBggrBgEFBQcwAYYX</span></span>
<span class="line"><span style="color: #D8DEE9FF">aHR0cDovL29jc3Auc2VjdGlnby5jb20wIwYDVR0RBBwwGoIMKi50dW1ibHIuY29t</span></span>
<span class="line"><span style="color: #D8DEE9FF">ggp0dW1ibHIuY29tMIIB9wYKKwYBBAHWeQIEAgSCAecEggHjAeEAdgBGpVXrdfqR</span></span>
<span class="line"><span style="color: #D8DEE9FF">IDC1oolp9PN9ESxBdL79SbiFq/L8cP5tRwAAAXEYg7bxAAAEAwBHMEUCIC/2w8Js</span></span>
<span class="line"><span style="color: #D8DEE9FF">j5l7v6HXiXF3xmZtlnP24wVQyCbuZog5CR4LAiEA94tol2Wv9CfY5+oZOZbguyby</span></span>
<span class="line"><span style="color: #D8DEE9FF">+2GjsTF/Kt6VtkYfu7EAdgDfpV6raIJPH2yt7rhfTj5a6s2iEqRqXo47EsAgRFwq</span></span>
<span class="line"><span style="color: #D8DEE9FF">cwAAAXEYg7a6AAAEAwBHMEUCIEz+QPJzXAcJ+DO/vY35zaJyFO79tb0YGqxIdMK8</span></span>
<span class="line"><span style="color: #D8DEE9FF">QmUxAiEAuMC/Pb9ASdjVA+1V9XRze3+FOuzYgDIukcloJkFTBQIAdwBByMqx3yJG</span></span>
<span class="line"><span style="color: #D8DEE9FF">ShDGoToJQodeTjGLGwPr60vHaPCQYpYG9gAAAXEYg7beAAAEAwBIMEYCIQCRQNow</span></span>
<span class="line"><span style="color: #D8DEE9FF">KwOkT83uWKunFDLxYKvelZx3iDVN4XnT7QSyQAIhAPqkCy4vgInpPdm6vlIVU5w5</span></span>
<span class="line"><span style="color: #D8DEE9FF">HhBlRa5yypT2soaqe3MHAHYAb1N2rDHwMRnYmQCkURX/dxUcEdkCwQApBo2yCJo3</span></span>
<span class="line"><span style="color: #D8DEE9FF">2RMAAAFxGIO2jAAABAMARzBFAiEA02T++BnEL2AifEhiThLu+o9o1rL2gHVRu4qv</span></span>
<span class="line"><span style="color: #D8DEE9FF">gtaVNTkCIEuIiz0vVU4rWmvm2qOqlMer4UzeUq0FDmn6L2ib4uMEMA0GCSqGSIb3</span></span>
<span class="line"><span style="color: #D8DEE9FF">DQEBCwUAA4IBAQC1S8CwUg1o7Nek9AteJHycWe54Yk/kSRN8VFax8AqbWWFF9528</span></span>
<span class="line"><span style="color: #D8DEE9FF">20VpJ/XFFacju1mj7cdEPGLHVJ80Ia3D+1YT7c2OaFa/SI3BVs05BRKmjvxHR7ZM</span></span>
<span class="line"><span style="color: #D8DEE9FF">W7RNZK+8qmMzh2mEjj1LPWezioxec5KR90LjSGIaG3KnWHpQhGSwC3AFzkmrF6Pj</span></span>
<span class="line"><span style="color: #D8DEE9FF">S8z3gfSbuWDicMwEWmiW6Gjy1Xe6jg/DJn8NKwLw5ju+17oyKR7BxQ3nfFltAWSL</span></span>
<span class="line"><span style="color: #D8DEE9FF">qHzYRzzARUalZIQNvYEYNvqcA3rsBnpRLG5N4OCsV/VE/cDDQX4XrOGVdvj4fQlf</span></span>
<span class="line"><span style="color: #D8DEE9FF">QWOOZkkAxvC6iU63He3vFdE1HrmuTqQYTLoS</span></span>
<span class="line"><span style="color: #D8DEE9FF">-----END CERTIFICATE-----</span></span>
<span class="line"><span style="color: #D8DEE9FF"> 1 s:/C=GB/ST=Greater Manchester/L=Salford/O=Sectigo Limited/CN=Sectigo RSA Domain Validation Secure Server CA</span></span>
<span class="line"><span style="color: #D8DEE9FF">   i:/C=US/ST=New Jersey/L=Jersey City/O=The USERTRUST Network/CN=USERTrust RSA Certification Authority</span></span>
<span class="line"><span style="color: #D8DEE9FF">-----BEGIN CERTIFICATE-----</span></span>
<span class="line"><span style="color: #D8DEE9FF">MIIGEzCCA/ugAwIBAgIQfVtRJrR2uhHbdBYLvFMNpzANBgkqhkiG9w0BAQwFADCB</span></span>
<span class="line"><span style="color: #D8DEE9FF">iDELMAkGA1UEBhMCVVMxEzARBgNVBAgTCk5ldyBKZXJzZXkxFDASBgNVBAcTC0pl</span></span>
<span class="line"><span style="color: #D8DEE9FF">cnNleSBDaXR5MR4wHAYDVQQKExVUaGUgVVNFUlRSVVNUIE5ldHdvcmsxLjAsBgNV</span></span>
<span class="line"><span style="color: #D8DEE9FF">BAMTJVVTRVJUcnVzdCBSU0EgQ2VydGlmaWNhdGlvbiBBdXRob3JpdHkwHhcNMTgx</span></span>
<span class="line"><span style="color: #D8DEE9FF">MTAyMDAwMDAwWhcNMzAxMjMxMjM1OTU5WjCBjzELMAkGA1UEBhMCR0IxGzAZBgNV</span></span>
<span class="line"><span style="color: #D8DEE9FF">BAgTEkdyZWF0ZXIgTWFuY2hlc3RlcjEQMA4GA1UEBxMHU2FsZm9yZDEYMBYGA1UE</span></span>
<span class="line"><span style="color: #D8DEE9FF">ChMPU2VjdGlnbyBMaW1pdGVkMTcwNQYDVQQDEy5TZWN0aWdvIFJTQSBEb21haW4g</span></span>
<span class="line"><span style="color: #D8DEE9FF">VmFsaWRhdGlvbiBTZWN1cmUgU2VydmVyIENBMIIBIjANBgkqhkiG9w0BAQEFAAOC</span></span>
<span class="line"><span style="color: #D8DEE9FF">AQ8AMIIBCgKCAQEA1nMz1tc8INAA0hdFuNY+B6I/x0HuMjDJsGz99J/LEpgPLT+N</span></span>
<span class="line"><span style="color: #D8DEE9FF">TQEMgg8Xf2Iu6bhIefsWg06t1zIlk7cHv7lQP6lMw0Aq6Tn/2YHKHxYyQdqAJrkj</span></span>
<span class="line"><span style="color: #D8DEE9FF">eocgHuP/IJo8lURvh3UGkEC0MpMWCRAIIz7S3YcPb11RFGoKacVPAXJpz9OTTG0E</span></span>
<span class="line"><span style="color: #D8DEE9FF">oKMbgn6xmrntxZ7FN3ifmgg0+1YuWMQJDgZkW7w33PGfKGioVrCSo1yfu4iYCBsk</span></span>
<span class="line"><span style="color: #D8DEE9FF">Haswha6vsC6eep3BwEIc4gLw6uBK0u+QDrTBQBbwb4VCSmT3pDCg/r8uoydajotY</span></span>
<span class="line"><span style="color: #D8DEE9FF">uK3DGReEY+1vVv2Dy2A0xHS+5p3b4eTlygxfFQIDAQABo4IBbjCCAWowHwYDVR0j</span></span>
<span class="line"><span style="color: #D8DEE9FF">BBgwFoAUU3m/WqorSs9UgOHYm8Cd8rIDZsswHQYDVR0OBBYEFI2MXsRUrYrhd+mb</span></span>
<span class="line"><span style="color: #D8DEE9FF">+ZsF4bgBjWHhMA4GA1UdDwEB/wQEAwIBhjASBgNVHRMBAf8ECDAGAQH/AgEAMB0G</span></span>
<span class="line"><span style="color: #D8DEE9FF">A1UdJQQWMBQGCCsGAQUFBwMBBggrBgEFBQcDAjAbBgNVHSAEFDASMAYGBFUdIAAw</span></span>
<span class="line"><span style="color: #D8DEE9FF">CAYGZ4EMAQIBMFAGA1UdHwRJMEcwRaBDoEGGP2h0dHA6Ly9jcmwudXNlcnRydXN0</span></span>
<span class="line"><span style="color: #D8DEE9FF">LmNvbS9VU0VSVHJ1c3RSU0FDZXJ0aWZpY2F0aW9uQXV0aG9yaXR5LmNybDB2Bggr</span></span>
<span class="line"><span style="color: #D8DEE9FF">BgEFBQcBAQRqMGgwPwYIKwYBBQUHMAKGM2h0dHA6Ly9jcnQudXNlcnRydXN0LmNv</span></span>
<span class="line"><span style="color: #D8DEE9FF">bS9VU0VSVHJ1c3RSU0FBZGRUcnVzdENBLmNydDAlBggrBgEFBQcwAYYZaHR0cDov</span></span>
<span class="line"><span style="color: #D8DEE9FF">L29jc3AudXNlcnRydXN0LmNvbTANBgkqhkiG9w0BAQwFAAOCAgEAMr9hvQ5Iw0/H</span></span>
<span class="line"><span style="color: #D8DEE9FF">ukdN+Jx4GQHcEx2Ab/zDcLRSmjEzmldS+zGea6TvVKqJjUAXaPgREHzSyrHxVYbH</span></span>
<span class="line"><span style="color: #D8DEE9FF">7rM2kYb2OVG/Rr8PoLq0935JxCo2F57kaDl6r5ROVm+yezu/Coa9zcV3HAO4OLGi</span></span>
<span class="line"><span style="color: #D8DEE9FF">H19+24rcRki2aArPsrW04jTkZ6k4Zgle0rj8nSg6F0AnwnJOKf0hPHzPE/uWLMUx</span></span>
<span class="line"><span style="color: #D8DEE9FF">RP0T7dWbqWlod3zu4f+k+TY4CFM5ooQ0nBnzvg6s1SQ36yOoeNDT5++SR2RiOSLv</span></span>
<span class="line"><span style="color: #D8DEE9FF">xvcRviKFxmZEJCaOEDKNyJOuB56DPi/Z+fVGjmO+wea03KbNIaiGCpXZLoUmGv38</span></span>
<span class="line"><span style="color: #D8DEE9FF">sbZXQm2V0TP2ORQGgkE49Y9Y3IBbpNV9lXj9p5v//cWoaasm56ekBYdbqbe4oyAL</span></span>
<span class="line"><span style="color: #D8DEE9FF">l6lFhd2zi+WJN44pDfwGF/Y4QA5C5BIG+3vzxhFoYt/jmPQT2BVPi7Fp2RBgvGQq</span></span>
<span class="line"><span style="color: #D8DEE9FF">6jG35LWjOhSbJuMLe/0CjraZwTiXWTb2qHSihrZe68Zk6s+go/lunrotEbaGmAhY</span></span>
<span class="line"><span style="color: #D8DEE9FF">LcmsJWTyXnW0OMGuf1pGg+pRyrbxmRE1a6Vqe8YAsOf4vmSyrcjC8azjUeqkk+B5</span></span>
<span class="line"><span style="color: #D8DEE9FF">yOGBQMkKW+ESPMFgKuOXwIlCypTPRpgSabuY0MLTDXJLR27lk8QyKGOHQ+SwMj4K</span></span>
<span class="line"><span style="color: #D8DEE9FF">00u/I5sUKUErmgQfky3xxzlIPK1aEn8=</span></span>
<span class="line"><span style="color: #D8DEE9FF">-----END CERTIFICATE-----</span></span>
<span class="line"><span style="color: #D8DEE9FF"> 2 s:/C=US/ST=New Jersey/L=Jersey City/O=The USERTRUST Network/CN=USERTrust RSA Certification Authority</span></span>
<span class="line"><span style="color: #D8DEE9FF">   i:/C=SE/O=AddTrust AB/OU=AddTrust External TTP Network/CN=AddTrust External CA Root</span></span>
<span class="line"><span style="color: #D8DEE9FF">-----BEGIN CERTIFICATE-----</span></span>
<span class="line"><span style="color: #D8DEE9FF">MIIFdzCCBF+gAwIBAgIQE+oocFv07O0MNmMJgGFDNjANBgkqhkiG9w0BAQwFADBv</span></span>
<span class="line"><span style="color: #D8DEE9FF">MQswCQYDVQQGEwJTRTEUMBIGA1UEChMLQWRkVHJ1c3QgQUIxJjAkBgNVBAsTHUFk</span></span>
<span class="line"><span style="color: #D8DEE9FF">ZFRydXN0IEV4dGVybmFsIFRUUCBOZXR3b3JrMSIwIAYDVQQDExlBZGRUcnVzdCBF</span></span>
<span class="line"><span style="color: #D8DEE9FF">eHRlcm5hbCBDQSBSb290MB4XDTAwMDUzMDEwNDgzOFoXDTIwMDUzMDEwNDgzOFow</span></span>
<span class="line"><span style="color: #D8DEE9FF">gYgxCzAJBgNVBAYTAlVTMRMwEQYDVQQIEwpOZXcgSmVyc2V5MRQwEgYDVQQHEwtK</span></span>
<span class="line"><span style="color: #D8DEE9FF">ZXJzZXkgQ2l0eTEeMBwGA1UEChMVVGhlIFVTRVJUUlVTVCBOZXR3b3JrMS4wLAYD</span></span>
<span class="line"><span style="color: #D8DEE9FF">VQQDEyVVU0VSVHJ1c3QgUlNBIENlcnRpZmljYXRpb24gQXV0aG9yaXR5MIICIjAN</span></span>
<span class="line"><span style="color: #D8DEE9FF">BgkqhkiG9w0BAQEFAAOCAg8AMIICCgKCAgEAgBJlFzYOw9sIs9CsVw127c0n00yt</span></span>
<span class="line"><span style="color: #D8DEE9FF">UINh4qogTQktZAnczomfzD2p7PbPwdzx07HWezcoEStH2jnGvDoZtF+mvX2do2NC</span></span>
<span class="line"><span style="color: #D8DEE9FF">tnbyqTsrkfjib9DsFiCQCT7i6HTJGLSR1GJk23+jBvGIGGqQIjy8/hPwhxR79uQf</span></span>
<span class="line"><span style="color: #D8DEE9FF">jtTkUcYRZ0YIUcuGFFQ/vDP+fmyc/xadGL1RjjWmp2bIcmfbIWax1Jt4A8BQOujM</span></span>
<span class="line"><span style="color: #D8DEE9FF">8Ny8nkz+rwWWNR9XWrf/zvk9tyy29lTdyOcSOk2uTIq3XJq0tyA9yn8iNK5+O2hm</span></span>
<span class="line"><span style="color: #D8DEE9FF">AUTnAU5GU5szYPeUvlM3kHND8zLDU+/bqv50TmnHa4xgk97Exwzf4TKuzJM7UXiV</span></span>
<span class="line"><span style="color: #D8DEE9FF">Z4vuPVb+DNBpDxsP8yUmazNt925H+nND5X4OpWaxKXwyhGNVicQNwZNUMBkTrNN9</span></span>
<span class="line"><span style="color: #D8DEE9FF">N6frXTpsNVzbQdcS2qlJC9/YgIoJk2KOtWbPJYjNhLixP6Q5D9kCnusSTJV882sF</span></span>
<span class="line"><span style="color: #D8DEE9FF">qV4Wg8y4Z+LoE53MW4LTTLPtW//e5XOsIzstAL81VXQJSdhJWBp/kjbmUZIO8yZ9</span></span>
<span class="line"><span style="color: #D8DEE9FF">HE0XvMnsQybQv0FfQKlERPSZ51eHnlAfV1SoPv10Yy+xUGUJ5lhCLkMaTLTwJUdZ</span></span>
<span class="line"><span style="color: #D8DEE9FF">+gQek9QmRkpQgbLevni3/GcV4clXhB4PY9bpYrrWX1Uu6lzGKAgEJTm4Diup8kyX</span></span>
<span class="line"><span style="color: #D8DEE9FF">HAc/DVL17e8vgg8CAwEAAaOB9DCB8TAfBgNVHSMEGDAWgBStvZh6NLQm9/rEJlTv</span></span>
<span class="line"><span style="color: #D8DEE9FF">A73gJMtUGjAdBgNVHQ4EFgQUU3m/WqorSs9UgOHYm8Cd8rIDZsswDgYDVR0PAQH/</span></span>
<span class="line"><span style="color: #D8DEE9FF">BAQDAgGGMA8GA1UdEwEB/wQFMAMBAf8wEQYDVR0gBAowCDAGBgRVHSAAMEQGA1Ud</span></span>
<span class="line"><span style="color: #D8DEE9FF">HwQ9MDswOaA3oDWGM2h0dHA6Ly9jcmwudXNlcnRydXN0LmNvbS9BZGRUcnVzdEV4</span></span>
<span class="line"><span style="color: #D8DEE9FF">dGVybmFsQ0FSb290LmNybDA1BggrBgEFBQcBAQQpMCcwJQYIKwYBBQUHMAGGGWh0</span></span>
<span class="line"><span style="color: #D8DEE9FF">dHA6Ly9vY3NwLnVzZXJ0cnVzdC5jb20wDQYJKoZIhvcNAQEMBQADggEBAJNl9jeD</span></span>
<span class="line"><span style="color: #D8DEE9FF">lQ9ew4IcH9Z35zyKwKoJ8OkLJvHgwmp1ocd5yblSYMgpEg7wrQPWCcR23+WmgZWn</span></span>
<span class="line"><span style="color: #D8DEE9FF">RtqCV6mVksW2jwMibDN3wXsyF24HzloUQToFJBv2FAY7qCUkDrvMKnXduXBBP3zQ</span></span>
<span class="line"><span style="color: #D8DEE9FF">YzYhBx9G/2CkkeFnvN4ffhkUyWNnkepnB2u0j4vAbkN9w6GAbLIevFOFfdyQoaS8</span></span>
<span class="line"><span style="color: #D8DEE9FF">Le9Gclc1Bb+7RrtubTeZtv8jkpHGbkD4jylW6l/VXxRTrPBPYer3IsynVgviuDQf</span></span>
<span class="line"><span style="color: #D8DEE9FF">Jtl7GQVoP7o81DgGotPmjw7jtHFtQELFhLRAlSv0ZaBIefYdgWOWnU914Ph85I6p</span></span>
<span class="line"><span style="color: #D8DEE9FF">0fKtirOMxyHNwu8=</span></span>
<span class="line"><span style="color: #D8DEE9FF">-----END CERTIFICATE-----</span></span>
<span class="line"></span></code></pre>
<p>That's a lot of text right there!</p>
<p>The very last certificate is the <strong>AddTrust External CA Root</strong> certificate. This is the one that's causing a bit of problems at the moment. If we decode that blob of text, we can see why.</p>
<p>To decode a certificate, copy/paste the certificate between the <code>-----BEGIN CERTIFICATE-----</code> and <code>-----END CERTIFICATE-----</code> (including those lines) and save it to a text file. It should look a little something like this:</p>
<pre class="shiki" style="background-color: #2e3440ff"><code><span class="line"><span style="color: #D8DEE9FF">-----BEGIN CERTIFICATE-----</span></span>
<span class="line"><span style="color: #D8DEE9FF">MIIFdzCCBF+gAwIBAgIQE+oocFv07O0MNmMJgGFDNjANBgkqhkiG9w0BAQwFADBv</span></span>
<span class="line"><span style="color: #D8DEE9FF">MQswCQYDVQQGEwJTRTEUMBIGA1UEChMLQWRkVHJ1c3QgQUIxJjAkBgNVBAsTHUFk</span></span>
<span class="line"><span style="color: #ECEFF4">[</span><span style="color: #D8DEE9FF">...</span><span style="color: #ECEFF4">]</span></span>
<span class="line"><span style="color: #D8DEE9FF">0fKtirOMxyHNwu8=</span></span>
<span class="line"><span style="color: #D8DEE9FF">-----END CERTIFICATE-----</span></span>
<span class="line"></span></code></pre>
<p>We named our text file <code>certificate.crt</code>.</p>
<pre class="shiki" style="background-color: #2e3440ff"><code><span class="line"><span style="color: #D8DEE9FF">$ openssl x509 -in certificate.crt -text</span></span>
<span class="line"></span>
<span class="line"><span style="color: #D8DEE9FF">Certificate:</span></span>
<span class="line"><span style="color: #D8DEE9FF">    Data:</span></span>
<span class="line"><span style="color: #D8DEE9FF">        Version: 3 </span><span style="color: #ECEFF4">(</span><span style="color: #D8DEE9FF">0x2</span><span style="color: #ECEFF4">)</span></span>
<span class="line"><span style="color: #D8DEE9FF">        Serial Number:</span></span>
<span class="line"><span style="color: #D8DEE9FF">            13:ea:28:70:5b:f4:ec:ed:0c:36:63:09:80:61:43:36</span></span>
<span class="line"><span style="color: #D8DEE9FF">    Signature Algorithm: sha384WithRSAEncryption</span></span>
<span class="line"><span style="color: #D8DEE9FF">        Issuer: C=SE, O=AddTrust AB, OU=AddTrust External TTP Network, CN=AddTrust External CA Root</span></span>
<span class="line"><span style="color: #D8DEE9FF">        Validity</span></span>
<span class="line"><span style="color: #D8DEE9FF">            Not Before: May 30 10:48:38 2000 GMT</span></span>
<span class="line"><span style="color: #D8DEE9FF">            Not After </span><span style="color: #88C0D0">:</span><span style="color: #D8DEE9FF"> May 30 10:48:38 2020 GMT</span></span>
<span class="line"><span style="color: #D8DEE9FF">        Subject: C=US, ST=New Jersey, L=Jersey City, O=The USERTRUST Network, CN=USERTrust RSA Certification Authority</span></span>
<span class="line"><span style="color: #D8DEE9FF">        Subject Public Key Info:</span></span>
<span class="line"><span style="color: #D8DEE9FF">            Public Key Algorithm: rsaEncryption</span></span>
<span class="line"><span style="color: #D8DEE9FF">                Public-Key: </span><span style="color: #ECEFF4">(</span><span style="color: #D8DEE9FF">4096 bit</span><span style="color: #ECEFF4">)</span></span>
<span class="line"></span>
<span class="line"><span style="color: #ECEFF4">[</span><span style="color: #D8DEE9FF">...</span><span style="color: #ECEFF4">]</span></span>
<span class="line"></span></code></pre>
<p>That particular certificate expires on <strong>May 30 10:48:38 2020 GMT</strong>. In other words, in just about 14 days.</p>
<h2 id="validating-the-ssl-certificate-path">Validating the SSL Certificate Path</h2>
<p>There are several paths possible to validate the certificate of <strong>.tumblr.com</strong>. One of them doesn't even require the <em>AddTrust External CA Root</em> certificate:</p>
<pre class="shiki" style="background-color: #2e3440ff"><code><span class="line"><span style="color: #D8DEE9FF">1	Sent by server	</span><span style="color: #81A1C1">*</span><span style="color: #D8DEE9FF">.tumblr.com</span></span>
<span class="line"><span style="color: #D8DEE9FF">Fingerprint SHA256: 3b46c48112e902c99d6f6ece3dd4877b190936e51289c90c874e219cf0494cd2</span></span>
<span class="line"><span style="color: #D8DEE9FF">Pin SHA256: uSU/pyBXHivUNGcwZD+1TTSBYu6Q4n3GlvZTctoDmdQ=</span></span>
<span class="line"><span style="color: #D8DEE9FF">RSA 2048 bits </span><span style="color: #ECEFF4">(</span><span style="color: #D8DEE9FF">e 65537</span><span style="color: #ECEFF4">)</span><span style="color: #D8DEE9FF"> / SHA256withRSA</span></span>
<span class="line"></span>
<span class="line"><span style="color: #D8DEE9FF">2	Sent by server	Sectigo RSA Domain Validation Secure Server CA</span></span>
<span class="line"><span style="color: #D8DEE9FF">Fingerprint SHA256: 7fa4ff68ec04a99d7528d5085f94907f4d1dd1c5381bacdc832ed5c960214676</span></span>
<span class="line"><span style="color: #D8DEE9FF">Pin SHA256: 4a6cPehI7OG6cuDZka5NDZ7FR8a60d3auda+sKfg4Ng=</span></span>
<span class="line"><span style="color: #D8DEE9FF">RSA 2048 bits </span><span style="color: #ECEFF4">(</span><span style="color: #D8DEE9FF">e 65537</span><span style="color: #ECEFF4">)</span><span style="color: #D8DEE9FF"> / SHA384withRSA</span></span>
<span class="line"></span>
<span class="line"><span style="color: #D8DEE9FF">3	In trust store	USERTrust RSA Certification Authority   Self-signed</span></span>
<span class="line"><span style="color: #D8DEE9FF">Fingerprint SHA256: e793c9b02fd8aa13e21c31228accb08119643b749c898964b1746d46c3d4cbd2</span></span>
<span class="line"><span style="color: #D8DEE9FF">Pin SHA256: x4QzPSC810K5/cMjb05Qm4k3Bw5zBn4lTdO/nEW/Td4=</span></span>
<span class="line"><span style="color: #D8DEE9FF">RSA 4096 bits </span><span style="color: #ECEFF4">(</span><span style="color: #D8DEE9FF">e 65537</span><span style="color: #ECEFF4">)</span><span style="color: #D8DEE9FF"> / SHA384withRSA</span></span>
<span class="line"></span></code></pre>
<p>Since that soon-to-expire root certificate that is being sent along isn't actually needed, it should be safe to remove it from your intermediate certificate list.</p>
<p>Or, perhaps even better, replace it with an up-to-date one that <em>is</em> valid for your certificate chain.</p>
<h2 id="replace-or-remove-the-old-root-certificate-in-your-chain">Replace or remove the old root-certificate in your chain</h2>
<p>It's best to doublecheck this with your SSL Provider, to verify the best course of action here.</p>
<p>If you are in control of your own webserver/proxy/SSL setups, you should be able to find the following certificate somewhere in your intermediate certificate list, and remove it.</p>
<pre class="shiki" style="background-color: #2e3440ff"><code><span class="line"><span style="color: #D8DEE9FF">-----BEGIN CERTIFICATE-----</span></span>
<span class="line"><span style="color: #D8DEE9FF">MIIFdzCCBF+gAwIBAgIQE+oocFv07O0MNmMJgGFDNjANBgkqhkiG9w0BAQwFADBv</span></span>
<span class="line"><span style="color: #D8DEE9FF">MQswCQYDVQQGEwJTRTEUMBIGA1UEChMLQWRkVHJ1c3QgQUIxJjAkBgNVBAsTHUFk</span></span>
<span class="line"><span style="color: #D8DEE9FF">ZFRydXN0IEV4dGVybmFsIFRUUCBOZXR3b3JrMSIwIAYDVQQDExlBZGRUcnVzdCBF</span></span>
<span class="line"><span style="color: #D8DEE9FF">eHRlcm5hbCBDQSBSb290MB4XDTAwMDUzMDEwNDgzOFoXDTIwMDUzMDEwNDgzOFow</span></span>
<span class="line"><span style="color: #D8DEE9FF">gYgxCzAJBgNVBAYTAlVTMRMwEQYDVQQIEwpOZXcgSmVyc2V5MRQwEgYDVQQHEwtK</span></span>
<span class="line"><span style="color: #D8DEE9FF">ZXJzZXkgQ2l0eTEeMBwGA1UEChMVVGhlIFVTRVJUUlVTVCBOZXR3b3JrMS4wLAYD</span></span>
<span class="line"><span style="color: #D8DEE9FF">VQQDEyVVU0VSVHJ1c3QgUlNBIENlcnRpZmljYXRpb24gQXV0aG9yaXR5MIICIjAN</span></span>
<span class="line"><span style="color: #D8DEE9FF">BgkqhkiG9w0BAQEFAAOCAg8AMIICCgKCAgEAgBJlFzYOw9sIs9CsVw127c0n00yt</span></span>
<span class="line"><span style="color: #D8DEE9FF">UINh4qogTQktZAnczomfzD2p7PbPwdzx07HWezcoEStH2jnGvDoZtF+mvX2do2NC</span></span>
<span class="line"><span style="color: #D8DEE9FF">tnbyqTsrkfjib9DsFiCQCT7i6HTJGLSR1GJk23+jBvGIGGqQIjy8/hPwhxR79uQf</span></span>
<span class="line"><span style="color: #D8DEE9FF">jtTkUcYRZ0YIUcuGFFQ/vDP+fmyc/xadGL1RjjWmp2bIcmfbIWax1Jt4A8BQOujM</span></span>
<span class="line"><span style="color: #D8DEE9FF">8Ny8nkz+rwWWNR9XWrf/zvk9tyy29lTdyOcSOk2uTIq3XJq0tyA9yn8iNK5+O2hm</span></span>
<span class="line"><span style="color: #D8DEE9FF">AUTnAU5GU5szYPeUvlM3kHND8zLDU+/bqv50TmnHa4xgk97Exwzf4TKuzJM7UXiV</span></span>
<span class="line"><span style="color: #D8DEE9FF">Z4vuPVb+DNBpDxsP8yUmazNt925H+nND5X4OpWaxKXwyhGNVicQNwZNUMBkTrNN9</span></span>
<span class="line"><span style="color: #D8DEE9FF">N6frXTpsNVzbQdcS2qlJC9/YgIoJk2KOtWbPJYjNhLixP6Q5D9kCnusSTJV882sF</span></span>
<span class="line"><span style="color: #D8DEE9FF">qV4Wg8y4Z+LoE53MW4LTTLPtW//e5XOsIzstAL81VXQJSdhJWBp/kjbmUZIO8yZ9</span></span>
<span class="line"><span style="color: #D8DEE9FF">HE0XvMnsQybQv0FfQKlERPSZ51eHnlAfV1SoPv10Yy+xUGUJ5lhCLkMaTLTwJUdZ</span></span>
<span class="line"><span style="color: #D8DEE9FF">+gQek9QmRkpQgbLevni3/GcV4clXhB4PY9bpYrrWX1Uu6lzGKAgEJTm4Diup8kyX</span></span>
<span class="line"><span style="color: #D8DEE9FF">HAc/DVL17e8vgg8CAwEAAaOB9DCB8TAfBgNVHSMEGDAWgBStvZh6NLQm9/rEJlTv</span></span>
<span class="line"><span style="color: #D8DEE9FF">A73gJMtUGjAdBgNVHQ4EFgQUU3m/WqorSs9UgOHYm8Cd8rIDZsswDgYDVR0PAQH/</span></span>
<span class="line"><span style="color: #D8DEE9FF">BAQDAgGGMA8GA1UdEwEB/wQFMAMBAf8wEQYDVR0gBAowCDAGBgRVHSAAMEQGA1Ud</span></span>
<span class="line"><span style="color: #D8DEE9FF">HwQ9MDswOaA3oDWGM2h0dHA6Ly9jcmwudXNlcnRydXN0LmNvbS9BZGRUcnVzdEV4</span></span>
<span class="line"><span style="color: #D8DEE9FF">dGVybmFsQ0FSb290LmNybDA1BggrBgEFBQcBAQQpMCcwJQYIKwYBBQUHMAGGGWh0</span></span>
<span class="line"><span style="color: #D8DEE9FF">dHA6Ly9vY3NwLnVzZXJ0cnVzdC5jb20wDQYJKoZIhvcNAQEMBQADggEBAJNl9jeD</span></span>
<span class="line"><span style="color: #D8DEE9FF">lQ9ew4IcH9Z35zyKwKoJ8OkLJvHgwmp1ocd5yblSYMgpEg7wrQPWCcR23+WmgZWn</span></span>
<span class="line"><span style="color: #D8DEE9FF">RtqCV6mVksW2jwMibDN3wXsyF24HzloUQToFJBv2FAY7qCUkDrvMKnXduXBBP3zQ</span></span>
<span class="line"><span style="color: #D8DEE9FF">YzYhBx9G/2CkkeFnvN4ffhkUyWNnkepnB2u0j4vAbkN9w6GAbLIevFOFfdyQoaS8</span></span>
<span class="line"><span style="color: #D8DEE9FF">Le9Gclc1Bb+7RrtubTeZtv8jkpHGbkD4jylW6l/VXxRTrPBPYer3IsynVgviuDQf</span></span>
<span class="line"><span style="color: #D8DEE9FF">Jtl7GQVoP7o81DgGotPmjw7jtHFtQELFhLRAlSv0ZaBIefYdgWOWnU914Ph85I6p</span></span>
<span class="line"><span style="color: #D8DEE9FF">0fKtirOMxyHNwu8=</span></span>
<span class="line"><span style="color: #D8DEE9FF">-----END CERTIFICATE-----</span></span>
<span class="line"></span></code></pre>
<p>This file is usually referenced in your webserver configs, it might look like this:</p>
<p>In Nginx:</p>
<pre class="shiki" style="background-color: #2e3440ff"><code><span class="line"><span style="color: #D8DEE9FF">	</span><span style="color: #ECEFF4">[</span><span style="color: #D8DEE9FF">...</span><span style="color: #ECEFF4">]</span></span>
<span class="line"><span style="color: #D8DEE9FF">	 ssl_certificate             /path/to/fullchain.pem</span><span style="color: #81A1C1">;</span></span>
<span class="line"></span></code></pre>
<p>In Apache:</p>
<pre class="shiki" style="background-color: #2e3440ff"><code><span class="line"><span style="color: #D8DEE9FF">	</span><span style="color: #ECEFF4">[</span><span style="color: #D8DEE9FF">...</span><span style="color: #ECEFF4">]</span></span>
<span class="line"><span style="color: #D8DEE9FF">	SSLCertificateChainFile      /path/to/fullchain.pem</span><span style="color: #81A1C1">;</span></span>
<span class="line"></span></code></pre>
<p>Open that file, take a back-up, and remove the certificate referenced above here.</p>
<p>Restart your webserver to load the new certificate configurations, and doublecheck if everything still works properly.</p>
<h2 id="why-does-oh-dear-report-on-these-certificates">Why does Oh Dear report on these certificates?</h2>
<p>We verify every certificate that gets sent by the server. In this case, the final root certificate that was being sent isn't <em>technically</em> needed to validate the certificate chain, as there's a local root certificate present (on your own device) that perfectly does that already.</p>
<p>It's unclear how every device in the wild would react if a server sends along an expired, but ultimately unneeded, root certificate.</p>
<p>How would an old Android phone react? Or an embedded device, running old firmware? We can't know, so we prefer to err on the side of caution and alert you that the server is sending along expiring certificates.</p>
<p>Hopefully this post can help you identify the problem and roll out a solution!</p>
<h2 id="update-we-will-modify-our-alerting-settings">Update: we will modify our alerting settings</h2>
<p>After internal debates, we've decided to make the behaviour of these alerts configurable.</p>
<p>To be clear: the server should not send an expired root certificate back to the client. It's impossible to predict how old devices might respond, and it'll surely break some embedded devices or devices with older SSL validation logic.</p>
<p>However, modern  browsers treat this as a non-issue, since they can find a different path to validate the certificate and tie it to a valid root certificate.</p>
<p>In one of our next releases, you will be able to select if we should validate <em>all</em> certificates a server sends, or just the <em>domain</em> certificate. The default will be to validate <em>all</em> certificates, as we've always done.</p>
<p>In some scenario's, it's difficult or near impossible to change the certificate chain (ie: shared hosting setups that offer little to no control of the certificates). For those scenario's, you might want to disable the validation of <em>all</em> certificates (even though it might cause issues for some clients).</p>
]]>
            </summary>
                                    <updated>2020-05-31T07:56:36+00:00</updated>
        </entry>
            <entry>
            <title><![CDATA[How Oh Dear identified a certificate problem at a large CDN provider]]></title>
            <link rel="alternate" href="https://ohdear.app/news-and-updates/how-oh-dear-identified-a-certificate-problem-at-a-large-cdn-provider" />
            <id>https://ohdear.app/37</id>
            <author>
                <name><![CDATA[Oh Dear]]></name>
            </author>
            <summary type="html">
                <![CDATA[<p>As part of our service, we perform <a href="/feature/certificate-monitoring">SSL certificate monitoring</a>. We do this slightly different than other providers, which is why were able to detect a problem with the SSL certificates of a large, commercial, CDN provider.</p>
<p>In this post, we'll do a technical deep-dive into how we found this problem!</p>
<h2 id="why-we-found-it-in-the-first-place">Why we found it in the first place</h2>
<p>While we're a traditional website monitoring service in some aspects, we do a couple of things differently from our competition (and I'm not just talking about our crawler that <a href="/feature/broken-page-check">looks for broken links &amp; mixed content</a>).</p>
<p>Our SSL monitoring is fairly <em>intense</em>. We fetch and validate the <strikethrough>SSL</strikethrough> <strikethrough>TLS</strikethrough> x.509 certificates <strong>every 5 minutes</strong>, for each site, to report on changes and problems.</p>
<p>With over 250 checks a day for the SSL certificate alone, it means we have a lot of opportunities to catch errors related to your site certificates.</p>
<p>This allows us to quickly identify situations where a certificate has changed (use case: did you renew <em>all</em> the SANs on the certificate?) or one that has incorrectly been replaced.</p>
<h2 id="what-happened-here">What happened here?</h2>
<p>In this case, we received reports from multiple of our clients that our certificate change reporting <em>&quot;seemed wrong&quot;</em>. We were sending alerts to clients that their certificates had changed, but they could never quite verify this.</p>
<p>When we connect to a host to do our in-depth certificate analysis, we fetch as much information as we can. It's similar to how OpenSSL's client would do it:</p>
<pre class="shiki" style="background-color: #2e3440ff"><code><span class="line"><span style="color: #D8DEE9FF">$ openssl s_client \</span></span>
<span class="line"><span style="color: #D8DEE9FF">	-connect clientsite.tld:443 \</span></span>
<span class="line"><span style="color: #D8DEE9FF">	-servername clientsite.tld \</span></span>
<span class="line"><span style="color: #D8DEE9FF">	</span><span style="color: #81A1C1">2&gt;</span><span style="color: #D8DEE9FF">/dev/null \</span></span>
<span class="line"><span style="color: #D8DEE9FF">	</span><span style="color: #81A1C1">|</span><span style="color: #D8DEE9FF"> grep </span><span style="color: #ECEFF4">&#39;</span><span style="color: #A3BE8C">CN</span><span style="color: #ECEFF4">&#39;</span></span>
<span class="line"></span>
<span class="line"><span style="color: #D8DEE9FF"> 0 s:/CN=clientsite.tld</span></span>
<span class="line"><span style="color: #D8DEE9FF">   i:/C=US/O=Let</span><span style="color: #ECEFF4">&#39;</span><span style="color: #A3BE8C">s Encrypt/CN=Let</span><span style="color: #ECEFF4">&#39;</span><span style="color: #D8DEE9FF">s Encrypt Authority X3</span></span>
<span class="line"><span style="color: #D8DEE9FF"> 1 s:/C=US/O=Let</span><span style="color: #ECEFF4">&#39;</span><span style="color: #A3BE8C">s Encrypt/CN=Let</span><span style="color: #ECEFF4">&#39;</span><span style="color: #D8DEE9FF">s Encrypt Authority X3</span></span>
<span class="line"><span style="color: #D8DEE9FF">   i:/O=Digital Signature Trust Co./CN=DST Root CA X3</span></span>
<span class="line"><span style="color: #D8DEE9FF">subject=/CN=clientsite.tld</span></span>
<span class="line"><span style="color: #D8DEE9FF">issuer=/C=US/O=Let</span><span style="color: #ECEFF4">&#39;</span><span style="color: #A3BE8C">s Encrypt/CN=Let</span><span style="color: #ECEFF4">&#39;</span><span style="color: #D8DEE9FF">s Encrypt Authority X3</span></span>
<span class="line"></span></code></pre>
<p>This is what you'd expect: a connection to the host <code>clientsite.tld</code>, where we make clear that we want to retrieve the certificate information using SNI - Server Name Indication.</p>
<p>The above example is a functioning one, it correctly returned us the certificate of the site, and we could verify everything was intact.</p>
<p>However, every once in a while, this happened:</p>
<pre class="shiki" style="background-color: #2e3440ff"><code><span class="line"><span style="color: #D8DEE9FF">$ openssl s_client \</span></span>
<span class="line"><span style="color: #D8DEE9FF">	-connect clientsite.tld:443 \</span></span>
<span class="line"><span style="color: #D8DEE9FF">	-servername clientsite.tld \</span></span>
<span class="line"><span style="color: #D8DEE9FF">	</span><span style="color: #81A1C1">2&gt;</span><span style="color: #D8DEE9FF">/dev/null \</span></span>
<span class="line"><span style="color: #D8DEE9FF">	</span><span style="color: #81A1C1">|</span><span style="color: #D8DEE9FF"> grep </span><span style="color: #ECEFF4">&#39;</span><span style="color: #A3BE8C">CN</span><span style="color: #ECEFF4">&#39;</span></span>
<span class="line"></span>
<span class="line"><span style="color: #D8DEE9FF"> 0 s:/OU=Domain Control Validated/CN=</span><span style="color: #81A1C1">*</span><span style="color: #D8DEE9FF">.cdnprovider.com</span></span>
<span class="line"><span style="color: #D8DEE9FF">   i:/C=US/ST=State/L=Location/O=GoDaddy.com, Inc./OU=http://certs.godaddy.com/repository//CN=Go Daddy Secure Certificate Authority - G2</span></span>
<span class="line"><span style="color: #D8DEE9FF"> 1 s:/OU=Domain Control Validated/CN=</span><span style="color: #81A1C1">*</span><span style="color: #D8DEE9FF">.cdnprovider.com</span></span>
<span class="line"><span style="color: #D8DEE9FF">   i:/C=US/ST=State/L=Location/O=GoDaddy.com, Inc./OU=http://certs.godaddy.com/repository//CN=Go Daddy Secure Certificate Authority - G2</span></span>
<span class="line"><span style="color: #D8DEE9FF"> 2 s:/C=US/ST=State/L=Location/O=GoDaddy.com, Inc./OU=http://certs.godaddy.com/repository//CN=Go Daddy Secure Certificate Authority - G2</span></span>
<span class="line"><span style="color: #D8DEE9FF">   i:/C=US/ST=State/L=Location/O=GoDaddy.com, Inc./CN=Go Daddy Root Certificate Authority - G2</span></span>
<span class="line"><span style="color: #D8DEE9FF"> 3 s:/C=US/ST=State/L=Location/O=GoDaddy.com, Inc./CN=Go Daddy Root Certificate Authority - G2</span></span>
<span class="line"><span style="color: #D8DEE9FF">   i:/C=US/ST=State/L=Location/O=GoDaddy.com, Inc./CN=Go Daddy Root Certificate Authority - G2</span></span>
<span class="line"><span style="color: #D8DEE9FF">ct6W1bEcW10r8Nvp0lZrYmdIn//gn4ltYpiWtRCRROEa81WO5lNDL5NO5gJ1I6CN</span></span>
<span class="line"><span style="color: #D8DEE9FF">subject=/OU=Domain Control Validated/CN=</span><span style="color: #81A1C1">*</span><span style="color: #D8DEE9FF">.cdnprovider.com</span></span>
<span class="line"></span></code></pre>
<p>We requested the certificate for domain <code>clientsite.tld</code> but got back a certificate for <code>*.cdnprovider.com</code>.</p>
<p>Clearly this shouldn't happen!</p>
<p>As a result, our alerts got sent to the client, because their site was being served by an incorrect certificate.</p>
<h2 id="changes-made-at-oh-dear-to-help-verify-this">Changes made at Oh Dear to help verify this</h2>
<p>When we received the first reports, it wasn't easy to troubleshoot this. You see, we connect to the hostname <code>clientsite.tld</code>, but that might be served by several IP addresses using DNS Round Robin.</p>
<pre class="shiki" style="background-color: #2e3440ff"><code><span class="line"><span style="color: #D8DEE9FF">$  dig +short +noshort clientsite.tld</span></span>
<span class="line"><span style="color: #D8DEE9FF">clientsite.tld.		66	IN	A	1.2.3.4</span></span>
<span class="line"><span style="color: #D8DEE9FF">clientsite.tld.		66	IN	A	5.6.7.8</span></span>
<span class="line"></span></code></pre>
<p>In fact, that's how most CDNs operate: you point your domain to a CNAME, and they present multiple anycasted IPs, each capable of serving your site.</p>
<p>Our problem was that we didn't present the IP that we used for this certificate check back to you, the user. So how could you know which IP served the wrong certificate?</p>
<p>As part of our debugging, we made this available to all users in the detailed view of their certificate report:</p>
<p><img src="/uploads/blogs/cdn-provider-ip-used-in-check/cdn-provider-ip-retrieved-check.png" alt="Certificate retrieved from what IP?" /></p>
<p>To do this, we <a href="https://github.com/spatie/ssl-certificate/commit/3b1798a9ed8b7b598731594d285be5792b6eb00a">contributed to the upstream SSL package</a> to expose the remote address IP, since this wasn't available out of the box.</p>
<pre class="shiki" style="background-color: #2e3440ff"><code><span class="line"><span style="color: #616E88">/* ... */</span></span>
<span class="line"><span style="color: #81A1C1">$</span><span style="color: #D8DEE9">response</span><span style="color: #ECEFF4">[</span><span style="color: #ECEFF4">&#39;</span><span style="color: #A3BE8C">remoteAddress</span><span style="color: #ECEFF4">&#39;</span><span style="color: #ECEFF4">]</span><span style="color: #D8DEE9FF"> </span><span style="color: #81A1C1">=</span><span style="color: #D8DEE9FF"> </span><span style="color: #88C0D0">stream_socket_get_name</span><span style="color: #ECEFF4">(</span><span style="color: #81A1C1">$</span><span style="color: #D8DEE9">client</span><span style="color: #ECEFF4">,</span><span style="color: #88C0D0"> </span><span style="color: #81A1C1">true</span><span style="color: #ECEFF4">)</span><span style="color: #81A1C1">;</span></span>
<span class="line"></span></code></pre>
<p>But, this wasn't enough to easily pinpoint the issue.</p>
<h2 id="working-together-with-the-cdn">Working together with the CDN</h2>
<p>You see, many of the IPs of a CDN are &quot;anycast&quot; IPs: you connect to an IP address, but there might be multiple servers worldwide responding to that very same IP.</p>
<p>The short version is: the one closest to you (in BGP-terms) will provide you the answer. But for the CDN provider, there's no way to uniquely identify which of their thousands of servers actually responded.</p>
<p>We worked together with them to provide all technical details of our checks and sufficient example/test cases to, at first, convince them of this problem. Then, our examples helped them to troubleshoot and resolve the problem on their end.</p>
<blockquote>
<p>I wanted to let you know that we found two edge servers that were mis-behaving and causing the issue you were seeing. We did a full sweep of the thousands of servers we manage and confirmed no others were in this bad state.</p>
<p>-- Director of Customer Support</p>
</blockquote>
<p>We're thrilled to see the widespread implications of our <em>paranoid</em> certificate monitoring, and that, as a result, we helped thousands of sites worldwide. Even those not using Oh Dear!</p>
]]>
            </summary>
                                    <updated>2020-05-13T05:52:44+00:00</updated>
        </entry>
            <entry>
            <title><![CDATA[Snoozing alerts and advanced Slack notifications]]></title>
            <link rel="alternate" href="https://ohdear.app/news-and-updates/snoozing-alerts-and-advanced-slack-notifications" />
            <id>https://ohdear.app/36</id>
            <author>
                <name><![CDATA[Oh Dear]]></name>
            </author>
            <summary type="html">
                <![CDATA[<p>We've introduced two very cool new features to Oh Dear: the ability to temporarily silence alerts and advanced Slack notifications.</p>
<h2 id="snoozing-alerts">Snoozing alerts</h2>
<p>You can now temporarily silence alerts being sent by Oh Dear. These <em>snoozes</em> can be activated per check we perform.</p>
<p>Say you receive a notification your site is down, but you know the fix will take a while to finish? You can snooze for 5 minutes, an hour, 4 hours or a day.</p>
<p><img src="/uploads/blogs/advanced-slack-notifications/snooze-via-ohdear-dashboard.png" alt="Snooze notification via the dashboard" /></p>
<p>This way, you won't be distracted and your teammates won't be disturbed by something you're actively working on!</p>
<p><em>Want to learn more? Have a look at <a href="/docs/notifications/snoozing">our documentation on how snoozing works</a>.</em></p>
<h2 id="advanced-slack-notifications">Advanced Slack notifications</h2>
<p>We've rolled out a new way of linking your Slack Workspace to Oh Dear. Our first implementation used <em>Slack Webhooks</em>, but this new method makes advanced use of the Slack API. This allows two-way communication between your Slack Workspace &amp; Oh Dear.</p>
<p>Here's an example of a test notification being sent:</p>
<video autoplay loop controls width="100%">
<source src="/uploads/blogs/advanced-slack-notifications/test-notification-inspire-me.mp4" type="video/mp4">
</video>
<p><em>(This might, in fact, be one of the only implementations of Laravel's <code>php artisan inspire</code> in the wild!)</em></p>
<h2 id="snoozing-amp-rechecking-alerts-via-slack">Snoozing &amp; rechecking alerts via Slack</h2>
<p>Now that we have communications established, we can use these Slack notifications to <em>Snooze</em> incoming notifications and request them be re-checked whenever we want.</p>
<video autoplay loop controls width="100%">
<source src="/uploads/blogs/advanced-slack-notifications/snooze-notification.mp4" type="video/mp4">
</video>
<p>Let's break down what is happening here:</p>
<ol>
<li>You can immediately request a new check to confirm the issue (or have it re-check the moment you fixed the problem)</li>
<li>You can immediately snooze the notification right from Slack, no need to go to the Oh Dear dashboard</li>
</ol>
<p>We can live-update the Slack notification and append any new data to it. You'll see who snoozed it and who requested the recheck.</p>
<p>If a recovery comes in, it'll be appended to the original messages too.</p>
<video autoplay loop controls width="100%">
<source src="/uploads/blogs/advanced-slack-notifications/recovery-message.mp4" type="video/mp4">
</video>
<h2 id="clear-overview-of-your-channels">Clear overview of your channels</h2>
<p>As an added benefit: you can now choose which channel to send the alerts to directly from Oh Dear, this will make it more clear which notifications get sent to which channel.</p>
<p><img src="/uploads/blogs/advanced-slack-notifications/slack-notifications-pick-channel.png" alt="Choose Slack channel in Oh Dear" /></p>
<p>Previously, you might have a list of a couple of webhooks, but it isn't obvious which hook is associated with which channel.</p>
<p>Now, you'll see this directly from your Oh Dear notification settings.</p>
<h2 id="activate-these-new-slack-implementations-in-your-account">Activate these new Slack implementations in your account</h2>
<p>To activate these new Slack notifications, head over to your <a href="/team-settings/notifications/slack-api">Slack notification settings</a> and link your Slack Workspace to Oh Dear.</p>
<p>For some more reading, have a look at our <a href="/docs/notifications/slack">documentation on the Slack API integration</a>.</p>
<p>We hope you'll enjoy these new powerful notifications!</p>
]]>
            </summary>
                                    <updated>2020-04-16T14:40:19+00:00</updated>
        </entry>
            <entry>
            <title><![CDATA[Seeing detailed logs for webhook events]]></title>
            <link rel="alternate" href="https://ohdear.app/news-and-updates/seeing-detailed-logs-for-webhook-events" />
            <id>https://ohdear.app/34</id>
            <author>
                <name><![CDATA[Oh Dear]]></name>
            </author>
            <summary type="html">
                <![CDATA[<p>We've added the ability to see detailed webhook logs to Oh Dear, showing both the <em>sent request</em> and the <em>received response</em> for all notifications we have sent.</p>
<h2 id="debugging-webhooks-can-be-a-pain">Debugging webhooks can be a pain</h2>
<p>We've been there and it isn't fun. You either add logging logic in your own webhook to capture the payload or you change the endpoint to something like PostBin to get a web-ui view of all events that got triggered.</p>
<p>We can do better, can't we?</p>
<p>We've now shipped a cool update that allows you to see the detailed logs of each webhook that got fired for an alert.</p>
<h2 id="detailed-webhook-logs-in-oh-dear">Detailed Webhook logs in Oh Dear</h2>
<p>In your webhook notification settings, you can see an extra tab called &quot;<em>Logs</em>&quot;. It does what its name implies - it shows all the logs we have for that webhook.</p>
<p><img src="/uploads/blogs/webhook-logs/webhook-logs-in-detail.png" alt="Webhook logs in Oh Dear" /></p>
<p>Per fired event, you can see the detailed request we sent - with all the payload information, HTTP headers etc. - and the response we got back from your endpoint.</p>
<p>To help troubleshooting, there's also a <strong>Resend</strong> button that takes the existing request and just fires it again to your endpoint. Perfect for rapid development!</p>
<p>This view alone should give you all the data and confidence to implement webhooks in your own application without resorting to crazy hacks like logging/dumping the payload and manually having to trigger the webhook again.</p>
<p>If you want to play around with our webhooks, <a href="/docs/integrations/webhooks/introduction">have a look at our documentation</a>. There are plenty of details on what the payload means, how to configure the webhooks, how to <a href="/docs/integrations/webhooks/getting-started#authentication">validate the request came from us</a>, etc. If you write your webhook integrations in PHP, we also have <a href="/docs/integrations/webhooks/laravel-package">a Laravel package</a> available for easy consumption.</p>
]]>
            </summary>
                                    <updated>2020-04-10T12:07:50+00:00</updated>
        </entry>
            <entry>
            <title><![CDATA[You can now disable team-level notification settings per site]]></title>
            <link rel="alternate" href="https://ohdear.app/news-and-updates/you-can-now-disable-team-level-notification-settings-per-site" />
            <id>https://ohdear.app/33</id>
            <author>
                <name><![CDATA[Oh Dear]]></name>
            </author>
            <summary type="html">
                <![CDATA[<p>We've added the ability to disable the team-level notification settings on a per-site basis. This allows for even more flexibility in the way you set up and configure your alerts!</p>
<h2 id="recap-team-level-notifications">Recap: team-level notifications</h2>
<p>Most of our users configure their notification preferences on the team-level. This gives them one place to add Slack webhooks, Nexmo API details, e-mail addresses, ...</p>
<p>Every site that gets added automatically inherits these settings and will use them for alerts of downtime, expiring certificates, broken pages, ...</p>
<h2 id="adding-notifications-per-site">Adding notifications per site</h2>
<p>Some users add custom notification destinations <em>per site</em>. We notice this is especially useful for web agencies that want to keep their customer informed of downtime or broken pages.</p>
<p>They can add the Slack webhook of their client or their e-mail address, and that client is automatically kept up-to-date of everything that happens.</p>
<h2 id="whats-new-disabling-team-level-notifications-per-site">What's new: disabling team-level notifications per site</h2>
<p>Our latest release added a nifty new feature on top of that: the ability to ignore the team-level notifications per website.</p>
<p><img src="/uploads/blogs/overwrite-team-notification-settings/overwrite-team-notification-settings.png" alt="Ignore team-level notifications per site" /></p>
<p>This can be used for <em>that one site</em> that is just a little bit different than all the others.</p>
<p>Perhaps it's a dev-site, perhaps it's a personal site added to the company monitoring account, ...</p>
<p>Whatever it is, you can now choose to disable the team-level notifications entirely - per channel - and only use the notification details configured for that website.</p>
<p>We're curious to find out how you'll be using these new notification options!</p>
]]>
            </summary>
                                    <updated>2020-04-07T10:56:38+00:00</updated>
        </entry>
            <entry>
            <title><![CDATA[Adding postcard notifications to our alerts]]></title>
            <link rel="alternate" href="https://ohdear.app/news-and-updates/adding-postcard-notifications-to-our-alerts" />
            <id>https://ohdear.app/35</id>
            <author>
                <name><![CDATA[Oh Dear]]></name>
            </author>
            <summary type="html">
                <![CDATA[<p>Imagine: you live in a forest. You're cut off from technology. You don't trust mobile phones. The mailman comes ones a week to check up on you. He's the only person you talk to. His name is Mike and he's super into knitting. You get along fine.</p>
<p>In this situation, how would you know if your website was still working if you didn't have internet to receive notifications?</p>
<p>Why do you even have a website when you live in the middle of a forest? Because <em>everyone</em> has a website, that's why.</p>
<p>Well today we have good news. We'll be able to notify you through Mike, the mailman.</p>
<h2 id="introducing-postcard-notifications-for-site-alerts">Introducing postcard notifications for site alerts</h2>
<p>You're now able to configure postcard notifications in your Oh Dear account.</p>
<p><img src="/uploads/blogs/postcard-notifications/ohdear-postcard-notifications.png" alt="Postcard Notifications" /></p>
<p>All we need is the address to send them to and your patience. A lot of patience. Did we mention it takes a few days for these alerts to arrive? Fingers crossed Mike doesn't get sick and miss a week of deliveries.</p>
<h2 id="oh-oh">Oh Oh!</h2>
<p>The downtime alerts <a href="/blog/a-fresh-new-look-for-oh-dear">are slightly different than our normal postcards</a>. We wouldn't want to confuse our users. We really think about these kind of details, y'know.</p>
<p>If something's wrong, you'll know straight away.</p>
<p><img src="/uploads/blogs/postcard-notifications/ohdear-postcard-ohoh.png" alt="Postcard Notifications - oh oh!" /></p>
<p>And if the problem is resolved, what more do you need than a simple &quot;OK&quot;?</p>
<p><img src="/uploads/blogs/postcard-notifications/ohdear-postcard-ok.png" alt="Postcard Notifications - ok" /></p>
<h2 id="our-users-always-come-first">Our users always come first</h2>
<p>We realize we've been prioritizing the <em>digital natives</em> too much lately. All our notifications were digital. How could we miss this?!</p>
<p>To all our users that live in a forest, devoid of technology, WiFi signals and 4G connectivity: we apologize.</p>
<p>As always, we hope you can sleep better knowing we'll <em>finally</em> be able to reach you if your online presence has gone offline!</p>
]]>
            </summary>
                                    <updated>2020-04-01T08:48:16+00:00</updated>
        </entry>
            <entry>
            <title><![CDATA[Configure custom SSL certificate expiration thresholds]]></title>
            <link rel="alternate" href="https://ohdear.app/news-and-updates/configure-custom-ssl-certificate-expiration-thresholds" />
            <id>https://ohdear.app/32</id>
            <author>
                <name><![CDATA[Oh Dear]]></name>
            </author>
            <summary type="html">
                <![CDATA[<p>When we first launched Oh Dear, we had a fixed certificate expiration timer: 14 days. As soon as the expiration date came within 14 days, we'd start sending a daily reminder to <em>hurry up</em> and renew those certificates.</p>
<p>Our first exception was made when Let's Encrypt gained more in popularity. We started notifying Let's Encrypt certificates <em>7 days</em> before expiration date. The reason there was most auto-renewal systems will kick in 14 days before expiration date, our default threshold was <em>just</em> at that edge and caused us to send renewal reminders right around the time most scripts would renew automatically.</p>
<p>This 7/14 split worked pretty well for a long time and served most of our customers. But we understand not all renewals are as simple as that.</p>
<p>Because internal rules or validations might take longer, we're adding a custom setting per site that allows you to inrease or shorten the threshold for when you want to start receiving renewal reminders for your <strike>SSL</strike> TLS certificates.</p>
<p><img src="/uploads/blogs/custom-certificate-expiration-dates/setting-custom-certificate-expiration-days.png" alt="Custom threshold for ssl certificate renewals" /></p>
<p>You can now choose any number of days you'd like, whatever suits your need.</p>
<p>For Extended Validation certificates or Organization Validated certificates, we recommend a safety net of 30 days.</p>
]]>
            </summary>
                                    <updated>2020-03-31T11:19:04+00:00</updated>
        </entry>
            <entry>
            <title><![CDATA[Improvements to our notification system for sending alerts]]></title>
            <link rel="alternate" href="https://ohdear.app/news-and-updates/improvements-to-our-notification-system-for-sending-alerts" />
            <id>https://ohdear.app/31</id>
            <author>
                <name><![CDATA[Oh Dear]]></name>
            </author>
            <summary type="html">
                <![CDATA[<p>We added a series of improvements to our notifications settings, making it easier for you to control where your alerts are sent.</p>
<h2 id="a-new-look-for-our-notifications-settings">A new look for our notifications settings</h2>
<p>Here's what the new notification screen now looks like.</p>
<p><img src="/uploads/blogs/new-notification-screens/new-notifications-screen.png" alt="New notification screen" /></p>
<p>If you've been using Oh Dear for a while, you'll notice we completely re-structured all notification destinations on the left.</p>
<p>You'll find the correct one a lot faster now.</p>
<p>Behind the scenes, everything was re-written from VueJS to LiveWire. Freek <a href="https://freek.dev/1609-building-complex-forms-with-laravel-livewire-in-oh-dear">wrote a very detailed tech blog-post about this</a>, with lots of behind the scenes code.</p>
<p>This new method allows us to keep all notifications more clean &amp; structured.</p>
<h2 id="quickly-sending-a-test-notification">Quickly sending a test notification</h2>
<p>You can now easily test each notification by sending a test alert, from the tab at the top.</p>
<p><img src="/uploads/blogs/new-notification-screens/test-notification.png" alt="New notification screen" /></p>
<p>You can send a test notification to every destination you have configured.</p>
<p>Not sure if you have the correct webhook for Slack? Or the right API keys for Nexmo? Just test it!</p>
<p>Here's what it will look like if you're testing our your Slack notifications.</p>
<p><img src="/uploads/blogs/new-notification-screens/slack-test-notification.png" alt="New notification screen" /></p>
<p>We think these improvements will help everyone that's configuring their notifications &amp; we hope you enjoy them!</p>
]]>
            </summary>
                                    <updated>2020-03-26T12:19:17+00:00</updated>
        </entry>
            <entry>
            <title><![CDATA[How we identified clients with SSL certificates affected by Let's Encrypt mass-revocation]]></title>
            <link rel="alternate" href="https://ohdear.app/news-and-updates/how-we-identified-clients-with-ssl-certificates-affected-by-lets-encrypt-mass-revocation" />
            <id>https://ohdear.app/30</id>
            <author>
                <name><![CDATA[Oh Dear]]></name>
            </author>
            <summary type="html">
                <![CDATA[<p>Yesterday, <a href="/blog/notifying-users-of-revoked-lets-encrypt-certificates">we sent out notifications to all our clients</a> that are affected by the <a href="https://community.letsencrypt.org/t/revoking-certain-certificates-on-march-4/114864">Let's Encrypt mass revocation of SSL certificates</a>. In this post, we'll share the details how we found those certificates.</p>
<p>Now, the <em>morning after</em>, we're well rested and in good shape to do a proper write-up on the matter.</p>
<h2 id="getting-a-list-of-all-domains-to-check">Getting a list of all domains to check</h2>
<p>As part of our <a href="/feature/uptime-monitoring">uptime monitoring</a>, users can add a site to Oh Dear with specific URL parameters. So in order to get a list of domains we needed to verify, it wasn't as simple as:</p>
<pre class="shiki" style="background-color: #2e3440ff"><code><span class="line"><span style="color: #81A1C1">SELECT</span><span style="color: #D8DEE9FF"> domain </span><span style="color: #81A1C1">FROM</span><span style="color: #D8DEE9FF"> sites;</span></span>
<span class="line"></span></code></pre>
<p>Instead, we used Laravel's lazy collections to quickly filter all teams with active subscriptions and extract the relevant domain name.</p>
<pre class="shiki" style="background-color: #2e3440ff"><code><span class="line"><span style="color: #8FBCBB">Team</span><span style="color: #81A1C1">::</span><span style="color: #88C0D0">cursor</span><span style="color: #ECEFF4">()</span></span>
<span class="line"><span style="color: #D8DEE9FF">    </span><span style="color: #81A1C1">-&gt;</span><span style="color: #88C0D0">filter</span><span style="color: #ECEFF4">(</span><span style="color: #81A1C1">fn</span><span style="color: #D8DEE9FF"> </span><span style="color: #ECEFF4">(</span><span style="color: #8FBCBB">Team</span><span style="color: #D8DEE9FF"> </span><span style="color: #81A1C1">$</span><span style="color: #D8DEE9">team</span><span style="color: #ECEFF4">)</span><span style="color: #D8DEE9FF"> </span><span style="color: #ECEFF4">=&gt;</span><span style="color: #D8DEE9FF"> </span><span style="color: #81A1C1">$</span><span style="color: #D8DEE9">team</span><span style="color: #81A1C1">-&gt;</span><span style="color: #88C0D0">hasActiveSubscriptionOrIsOnGenericTrial</span><span style="color: #ECEFF4">())</span></span>
<span class="line"><span style="color: #D8DEE9FF">    </span><span style="color: #81A1C1">-&gt;</span><span style="color: #88C0D0">flatMap</span><span style="color: #ECEFF4">(</span><span style="color: #81A1C1">fn</span><span style="color: #D8DEE9FF"> </span><span style="color: #ECEFF4">(</span><span style="color: #8FBCBB">Team</span><span style="color: #D8DEE9FF"> </span><span style="color: #81A1C1">$</span><span style="color: #D8DEE9">team</span><span style="color: #ECEFF4">)</span><span style="color: #D8DEE9FF"> </span><span style="color: #ECEFF4">=&gt;</span><span style="color: #D8DEE9FF"> </span><span style="color: #81A1C1">$</span><span style="color: #D8DEE9">team</span><span style="color: #81A1C1">-&gt;</span><span style="color: #D8DEE9">sites</span><span style="color: #ECEFF4">)</span></span>
<span class="line"><span style="color: #D8DEE9FF">    </span><span style="color: #81A1C1">-&gt;</span><span style="color: #88C0D0">map</span><span style="color: #ECEFF4">(</span><span style="color: #81A1C1">fn</span><span style="color: #D8DEE9FF"> </span><span style="color: #ECEFF4">(</span><span style="color: #8FBCBB">Site</span><span style="color: #D8DEE9FF"> </span><span style="color: #81A1C1">$</span><span style="color: #D8DEE9">site</span><span style="color: #ECEFF4">)</span><span style="color: #D8DEE9FF"> </span><span style="color: #ECEFF4">=&gt;</span><span style="color: #D8DEE9FF"> </span><span style="color: #81A1C1">$</span><span style="color: #D8DEE9">site</span><span style="color: #81A1C1">-&gt;</span><span style="color: #88C0D0">domain</span><span style="color: #ECEFF4">())</span></span>
<span class="line"><span style="color: #D8DEE9FF">    </span><span style="color: #81A1C1">-&gt;</span><span style="color: #88C0D0">each</span><span style="color: #ECEFF4">(</span><span style="color: #81A1C1">fn</span><span style="color: #D8DEE9FF"> </span><span style="color: #ECEFF4">(</span><span style="color: #81A1C1">string</span><span style="color: #D8DEE9FF"> </span><span style="color: #81A1C1">$</span><span style="color: #D8DEE9">output</span><span style="color: #ECEFF4">)</span><span style="color: #D8DEE9FF"> </span><span style="color: #ECEFF4">=&gt;</span><span style="color: #D8DEE9FF"> </span><span style="color: #81A1C1">echo</span><span style="color: #D8DEE9FF"> </span><span style="color: #81A1C1">$</span><span style="color: #D8DEE9">output</span><span style="color: #D8DEE9FF"> </span><span style="color: #81A1C1">.</span><span style="color: #D8DEE9FF"> </span><span style="color: #81A1C1">PHP_EOL</span><span style="color: #ECEFF4">)</span><span style="color: #81A1C1">;</span></span>
<span class="line"></span></code></pre>
<p>This produced a new-line separated list of domains that we need to check.</p>
<p>Let's save those in <code>domains.txt</code>, since we're moving to some CLI tricks now.</p>
<h2 id="retrieving-the-serial-for-each-certificate">Retrieving the serial for each certificate</h2>
<p>Now we find the active <em>Serial Number</em> for each of those certificates. It involves connecting to each site over SSL/TLS, getting the certificate and saving the <em>Serial Number</em>.</p>
<p>The original idea came from <a href="https://news.ycombinator.com/item?id=22475943">a Hacker News comment</a>, we modified it to get some better error handling and control of the output.</p>
<pre class="shiki" style="background-color: #2e3440ff"><code><span class="line"><span style="color: #616E88"># Create a directory to hold all serial numbers</span></span>
<span class="line"><span style="color: #D8DEE9FF">mkdir -p serials</span></span>
<span class="line"></span>
<span class="line"><span style="color: #616E88"># Loop all domains, connect and fetch the serial</span></span>
<span class="line"><span style="color: #81A1C1">for</span><span style="color: #D8DEE9FF"> </span><span style="color: #D8DEE9">i</span><span style="color: #D8DEE9FF"> </span><span style="color: #81A1C1">in</span><span style="color: #D8DEE9FF"> </span><span style="color: #ECEFF4">$(</span><span style="color: #A3BE8C">cat domains.txt</span><span style="color: #ECEFF4">)</span><span style="color: #81A1C1">;</span><span style="color: #D8DEE9FF"> </span><span style="color: #81A1C1">do</span></span>
<span class="line"><span style="color: #D8DEE9FF">  </span><span style="color: #88C0D0">echo</span><span style="color: #D8DEE9FF"> </span><span style="color: #ECEFF4">&quot;</span><span style="color: #A3BE8C">Connecting to </span><span style="color: #81A1C1">$</span><span style="color: #D8DEE9">i</span><span style="color: #A3BE8C"> ... </span><span style="color: #ECEFF4">&quot;</span></span>
<span class="line"></span>
<span class="line"><span style="color: #D8DEE9FF">  </span><span style="color: #ECEFF4">(</span></span>
<span class="line"><span style="color: #D8DEE9FF">    openssl s_client -connect </span><span style="color: #81A1C1">$</span><span style="color: #D8DEE9">i</span><span style="color: #D8DEE9FF">:443 -servername </span><span style="color: #81A1C1">$</span><span style="color: #D8DEE9">i</span><span style="color: #D8DEE9FF"> -showcerts </span><span style="color: #81A1C1">&lt;</span><span style="color: #D8DEE9FF"> /dev/null </span><span style="color: #81A1C1">2&gt;</span><span style="color: #D8DEE9FF"> /dev/null </span><span style="color: #81A1C1">|</span></span>
<span class="line"><span style="color: #D8DEE9FF">    openssl x509 -text -noout </span><span style="color: #81A1C1">|</span></span>
<span class="line"><span style="color: #D8DEE9FF">    grep -A 1 </span><span style="color: #ECEFF4">&quot;</span><span style="color: #A3BE8C">Serial Number</span><span style="color: #ECEFF4">&quot;</span><span style="color: #D8DEE9FF"> </span><span style="color: #81A1C1">|</span></span>
<span class="line"><span style="color: #D8DEE9FF">    tr -d </span><span style="color: #88C0D0">:</span><span style="color: #D8DEE9FF"> </span><span style="color: #81A1C1">|</span></span>
<span class="line"><span style="color: #D8DEE9FF">    tail -n 1</span></span>
<span class="line"><span style="color: #D8DEE9FF">  </span><span style="color: #ECEFF4">)</span><span style="color: #D8DEE9FF"> </span><span style="color: #81A1C1">|</span><span style="color: #D8DEE9FF"> tee serials/</span><span style="color: #81A1C1">$</span><span style="color: #D8DEE9">i</span><span style="color: #81A1C1">;</span></span>
<span class="line"></span>
<span class="line"><span style="color: #81A1C1">done</span></span>
<span class="line"></span></code></pre>
<p>The <code>openssl s_client</code> connects to the domain (using Server Name Indication (SNI) with the <code>-servername</code> option) and lists all certificates.</p>
<p>Now, in <code>serials/*</code>, we have a directory full of domain names and their corresponding certificate serial.</p>
<h2 id="combining-all-serials">Combining all serials</h2>
<p>We'll make a single list with all the serials we need to check. This way, we can optimize our <code>grep</code> commands for later.</p>
<pre class="shiki" style="background-color: #2e3440ff"><code><span class="line"><span style="color: #D8DEE9FF">$ cat serials/</span><span style="color: #81A1C1">*</span><span style="color: #D8DEE9FF"> </span><span style="color: #81A1C1">|</span><span style="color: #D8DEE9FF"> tr -d </span><span style="color: #ECEFF4">&quot;</span><span style="color: #A3BE8C"> </span><span style="color: #ECEFF4">&quot;</span><span style="color: #D8DEE9FF"> </span><span style="color: #81A1C1">|</span><span style="color: #D8DEE9FF"> sort </span><span style="color: #81A1C1">|</span><span style="color: #D8DEE9FF"> uniq </span><span style="color: #81A1C1">&gt;</span><span style="color: #D8DEE9FF"> serial-numbers.txt</span></span>
<span class="line"></span></code></pre>
<p>The file <code>serial-numbers.txt</code> is now a gigantic list of serial numbers.</p>
<h2 id="finding-the-serials-in-the-12gb-text-file">Finding the serials in the 1.2GB text file</h2>
<p>Let's Encrypt has <a href="https://letsencrypt.org/caaproblem/">released a text-file with all affected certificates</a>. This file includes the Serial Number (which we now have) together with all domains/SANs on the certificate.</p>
<p>Our first attempt was to simply <code>grep</code> our way through the file for each serial found. But <code>grep</code> is single-threaded, so we could only utilize a single CPU core for searching through a pretty big file.</p>
<p>This was taking too long, so we quickly adapted our method and started to search through the log in parallel.</p>
<p>Lucky for us, we started preparing a new set of servers <a href="/feature/broken-page-check">for our crawlers</a> that check for broken links last week. Those servers were still idling as they aren't in production yet. This was the perfect time to use that spare capacity.</p>
<p>First, we split the big file of serials (called <code>serial-numbers.txt</code>) in many equal pieces.</p>
<pre class="shiki" style="background-color: #2e3440ff"><code><span class="line"><span style="color: #D8DEE9FF">$ split -l 1000 serial-numbers.txt</span></span>
<span class="line"></span></code></pre>
<p>This gives us a list of many files, all with 1000 serial numbers in it. The file naming is predictable:</p>
<pre class="shiki" style="background-color: #2e3440ff"><code><span class="line"><span style="color: #D8DEE9FF">$ ls </span><span style="color: #81A1C1">-</span><span style="color: #D8DEE9FF">l x</span><span style="color: #81A1C1">*</span></span>
<span class="line"><span style="color: #81A1C1">-</span><span style="color: #D8DEE9FF">rw</span><span style="color: #81A1C1">-</span><span style="color: #D8DEE9FF">rw</span><span style="color: #81A1C1">-</span><span style="color: #D8DEE9FF">r</span><span style="color: #81A1C1">--</span><span style="color: #D8DEE9FF"> </span><span style="color: #B48EAD">1</span><span style="color: #D8DEE9FF"> immutable immutable </span><span style="color: #B48EAD">2672</span><span style="color: #D8DEE9FF"> Mar  </span><span style="color: #B48EAD">3</span><span style="color: #D8DEE9FF"> </span><span style="color: #B48EAD">20</span><span style="color: #81A1C1">:</span><span style="color: #B48EAD">27</span><span style="color: #D8DEE9FF"> xaa</span></span>
<span class="line"><span style="color: #81A1C1">-</span><span style="color: #D8DEE9FF">rw</span><span style="color: #81A1C1">-</span><span style="color: #D8DEE9FF">rw</span><span style="color: #81A1C1">-</span><span style="color: #D8DEE9FF">r</span><span style="color: #81A1C1">--</span><span style="color: #D8DEE9FF"> </span><span style="color: #B48EAD">1</span><span style="color: #D8DEE9FF"> immutable immutable </span><span style="color: #B48EAD">2948</span><span style="color: #D8DEE9FF"> Mar  </span><span style="color: #B48EAD">3</span><span style="color: #D8DEE9FF"> </span><span style="color: #B48EAD">20</span><span style="color: #81A1C1">:</span><span style="color: #B48EAD">27</span><span style="color: #D8DEE9FF"> xab</span></span>
<span class="line"><span style="color: #81A1C1">-</span><span style="color: #D8DEE9FF">rw</span><span style="color: #81A1C1">-</span><span style="color: #D8DEE9FF">rw</span><span style="color: #81A1C1">-</span><span style="color: #D8DEE9FF">r</span><span style="color: #81A1C1">--</span><span style="color: #D8DEE9FF"> </span><span style="color: #B48EAD">1</span><span style="color: #D8DEE9FF"> immutable immutable </span><span style="color: #B48EAD">2948</span><span style="color: #D8DEE9FF"> Mar  </span><span style="color: #B48EAD">3</span><span style="color: #D8DEE9FF"> </span><span style="color: #B48EAD">20</span><span style="color: #81A1C1">:</span><span style="color: #B48EAD">27</span><span style="color: #D8DEE9FF"> xac</span></span>
<span class="line"><span style="color: #81A1C1">-</span><span style="color: #D8DEE9FF">rw</span><span style="color: #81A1C1">-</span><span style="color: #D8DEE9FF">rw</span><span style="color: #81A1C1">-</span><span style="color: #D8DEE9FF">r</span><span style="color: #81A1C1">--</span><span style="color: #D8DEE9FF"> </span><span style="color: #B48EAD">1</span><span style="color: #D8DEE9FF"> immutable immutable </span><span style="color: #B48EAD">2960</span><span style="color: #D8DEE9FF"> Mar  </span><span style="color: #B48EAD">3</span><span style="color: #D8DEE9FF"> </span><span style="color: #B48EAD">20</span><span style="color: #81A1C1">:</span><span style="color: #B48EAD">27</span><span style="color: #D8DEE9FF"> xad</span></span>
<span class="line"></span></code></pre>
<p>In order to utilize all our cores, we used each file as the pattern input to <code>grep</code> and sent the job to the background for processing.</p>
<pre class="shiki" style="background-color: #2e3440ff"><code><span class="line"><span style="color: #81A1C1">for</span><span style="color: #D8DEE9FF"> </span><span style="color: #D8DEE9">file</span><span style="color: #D8DEE9FF"> </span><span style="color: #81A1C1">in</span><span style="color: #D8DEE9FF"> </span><span style="color: #ECEFF4">$(</span><span style="color: #A3BE8C">ls x</span><span style="color: #81A1C1">*</span><span style="color: #ECEFF4">)</span><span style="color: #81A1C1">;</span><span style="color: #D8DEE9FF"> </span><span style="color: #81A1C1">do</span></span>
<span class="line"><span style="color: #D8DEE9FF">	</span><span style="color: #EBCB8B">\g</span><span style="color: #D8DEE9FF">rep -P </span><span style="color: #ECEFF4">&quot;$(</span><span style="color: #A3BE8C">cat </span><span style="color: #81A1C1">$</span><span style="color: #D8DEE9">file</span><span style="color: #A3BE8C"> </span><span style="color: #81A1C1">|</span><span style="color: #A3BE8C"> tr </span><span style="color: #ECEFF4">&quot;</span><span style="color: #A3BE8C">\n</span><span style="color: #ECEFF4">&quot;</span><span style="color: #A3BE8C"> </span><span style="color: #ECEFF4">&quot;</span><span style="color: #A3BE8C">|</span><span style="color: #ECEFF4">&quot;</span><span style="color: #A3BE8C"> </span><span style="color: #81A1C1">|</span><span style="color: #A3BE8C"> sed -e </span><span style="color: #ECEFF4">&#39;</span><span style="color: #A3BE8C">s/|/\|/g</span><span style="color: #ECEFF4">&#39;</span><span style="color: #A3BE8C"> </span><span style="color: #81A1C1">|</span><span style="color: #A3BE8C"> sed -e </span><span style="color: #ECEFF4">&#39;</span><span style="color: #A3BE8C">s/|$//</span><span style="color: #ECEFF4">&#39;</span><span style="color: #A3BE8C"> </span><span style="color: #ECEFF4">)&quot;</span><span style="color: #D8DEE9FF"> ../ssl-cert/caa-rechecking-incident-affected-serials.txt </span><span style="color: #81A1C1">&gt;&gt;</span><span style="color: #D8DEE9FF"> results.txt </span><span style="color: #81A1C1">&amp;</span></span>
<span class="line"><span style="color: #81A1C1">done</span></span>
<span class="line"></span></code></pre>
<p>That rather ugly-looking <code>tr</code> &amp; <code>sed</code> pipeline in there transforms the input file from a new-line separated list of serials, to a <code>|</code>-separated list. This is used in <code>grep</code> to indicate the &quot;or&quot; statement, any line may match.</p>
<p>In the long form, it turns our input of this:</p>
<pre class="shiki" style="background-color: #2e3440ff"><code><span class="line"><span style="color: #D8DEE9FF">$ cat xaa</span></span>
<span class="line"><span style="color: #D8DEE9FF">01009ba...</span></span>
<span class="line"><span style="color: #D8DEE9FF">0111839...</span></span>
<span class="line"><span style="color: #D8DEE9FF">011539e...</span></span>
<span class="line"><span style="color: #D8DEE9FF">0135d43...</span></span>
<span class="line"></span></code></pre>
<p>... into this:</p>
<pre class="shiki" style="background-color: #2e3440ff"><code><span class="line"><span style="color: #B48EAD">01009</span><span style="color: #D8DEE9FF">ba</span><span style="color: #81A1C1">...|</span><span style="color: #B48EAD">0111839</span><span style="color: #ECEFF4">.</span><span style="color: #81A1C1">..</span><span style="color: #81A1C1">|</span><span style="color: #B48EAD">011539</span><span style="color: #D8DEE9FF">e</span><span style="color: #81A1C1">...|</span><span style="color: #B48EAD">0135</span><span style="color: #D8DEE9FF">d43</span><span style="color: #81A1C1">...</span></span>
<span class="line"></span></code></pre>
<p>Because we sent each <code>grep</code> command to the background in our <code>for</code>-loop, using the <code>&amp;</code> at the end of the command, we now have many <code>grep</code>'s running in parallel.</p>
<p>What followed was, to me as a sysadmin, a thing of beauty. ?</p>
<p><img src="/uploads/blogs/letsencrypt-revocation-check/server-usage.png" alt="Server Utilization of the Lets Encrypt checks" /></p>
<p>The crunching continued for a while, and we now had a list of affected serials stored in <code>results.txt</code>.</p>
<p>At this point, things were getting a bit late, so we resorted to even <em>weirder Bashness</em> to match these serials back to the domain names.</p>
<h2 id="matching-the-serials-back-to-domains">Matching the serials back to domains</h2>
<p>We loop each affected serial and match it back to the domain:</p>
<pre class="shiki" style="background-color: #2e3440ff"><code><span class="line"><span style="color: #81A1C1">for</span><span style="color: #D8DEE9FF"> </span><span style="color: #D8DEE9">line</span><span style="color: #D8DEE9FF"> </span><span style="color: #81A1C1">in</span><span style="color: #D8DEE9FF"> </span><span style="color: #ECEFF4">$(</span><span style="color: #A3BE8C">cat results.txt </span><span style="color: #ECEFF4">)</span><span style="color: #81A1C1">;</span><span style="color: #D8DEE9FF"> </span><span style="color: #81A1C1">do</span></span>
<span class="line"><span style="color: #D8DEE9FF">	</span><span style="color: #EBCB8B">\g</span><span style="color: #D8DEE9FF">rep </span><span style="color: #81A1C1">$</span><span style="color: #D8DEE9">line</span><span style="color: #D8DEE9FF"> serials/</span><span style="color: #81A1C1">*;</span></span>
<span class="line"><span style="color: #81A1C1">done</span><span style="color: #D8DEE9FF"> </span><span style="color: #81A1C1">|</span></span>
<span class="line"><span style="color: #D8DEE9FF">	awk </span><span style="color: #ECEFF4">&#39;</span><span style="color: #A3BE8C">{print $1}</span><span style="color: #ECEFF4">&#39;</span><span style="color: #D8DEE9FF"> </span><span style="color: #81A1C1">|</span></span>
<span class="line"><span style="color: #D8DEE9FF">	sed </span><span style="color: #ECEFF4">&#39;</span><span style="color: #A3BE8C">s/\// /</span><span style="color: #ECEFF4">&#39;</span><span style="color: #D8DEE9FF"> </span><span style="color: #81A1C1">|</span></span>
<span class="line"><span style="color: #D8DEE9FF">	awk </span><span style="color: #ECEFF4">&#39;</span><span style="color: #A3BE8C">{print $2}</span><span style="color: #ECEFF4">&#39;</span><span style="color: #D8DEE9FF"> </span><span style="color: #81A1C1">|</span></span>
<span class="line"><span style="color: #D8DEE9FF">	sed </span><span style="color: #ECEFF4">&#39;</span><span style="color: #A3BE8C">s/:/ /</span><span style="color: #ECEFF4">&#39;</span><span style="color: #D8DEE9FF"> </span><span style="color: #81A1C1">|</span></span>
<span class="line"><span style="color: #D8DEE9FF">	awk </span><span style="color: #ECEFF4">&#39;</span><span style="color: #A3BE8C">{print $1}</span><span style="color: #ECEFF4">&#39;</span></span>
<span class="line"></span></code></pre>
<p>Looking at it now, awake, it could've been much cleaner. But, it got the job done! We now have a list of domain names of clients we need to notify.</p>
<h2 id="sending-the-mails-to-clients">Sending the mails to clients</h2>
<p>To inform our clients, we resorted back to PHP. This allows us to send the notification e-mails in our own style/branding.</p>
<pre class="shiki" style="background-color: #2e3440ff"><code><span class="line"><span style="color: #8FBCBB">Mail</span><span style="color: #81A1C1">::</span><span style="color: #88C0D0">to</span><span style="color: #ECEFF4">(</span><span style="color: #81A1C1">$</span><span style="color: #D8DEE9">users</span><span style="color: #ECEFF4">)</span><span style="color: #81A1C1">-&gt;</span><span style="color: #88C0D0">send</span><span style="color: #ECEFF4">(</span><span style="color: #81A1C1">new</span><span style="color: #D8DEE9FF"> </span><span style="color: #8FBCBB">LetsencryptRevokedMail</span><span style="color: #ECEFF4">(</span><span style="color: #81A1C1">$</span><span style="color: #D8DEE9">domain</span><span style="color: #ECEFF4">))</span><span style="color: #81A1C1">;</span></span>
<span class="line"></span></code></pre>
<p>It uses the power of <a href="https://laravel.com/docs/master/mail">Laravel Mailables</a> to make this really easy.</p>
<h2 id="a-rush-job-because-time-was-against-us">A rush job because time was against us</h2>
<p>We didn't do as a clean a job as we'd normally do. There were no tests, no clean integrations, and most of it was <em>hacked</em> together on very short-notice.</p>
<p>But, there wasn't much choice. The list of affected certificates was released yesterday, and within 48 hours the revocation was to take place. It was up to us to notify our users <em>asap</em>. After all, those affected still needed to renew their certificates!</p>
<p>We're happy to see the list of affected domains beforehand though. The normal procedure is that the revoced certificates end up in Certificate Revocation Lists (CRL), but at that point the revocation <em>has already happened</em>.</p>
<p>This allowed us to be proactive and inform clients ahead of time!</p>
]]>
            </summary>
                                    <updated>2020-03-04T07:41:06+00:00</updated>
        </entry>
            <entry>
            <title><![CDATA[Notifying users of revoked Let's Encrypt certificates]]></title>
            <link rel="alternate" href="https://ohdear.app/news-and-updates/notifying-users-of-revoked-lets-encrypt-certificates" />
            <id>https://ohdear.app/29</id>
            <author>
                <name><![CDATA[Oh Dear]]></name>
            </author>
            <summary type="html">
                <![CDATA[<p>The team at Let's Encrypt, the free certificate authority, <a href="https://community.letsencrypt.org/t/revoking-certain-certificates-on-march-4/114864">has identified an issue that might have lead to unauthorized certificate issuance</a>.</p>
<p>Because it's hard to determine <em>which</em> sites have been abused, they have no other choice but to revoke all certificates that <em>may</em> have been maliciously issued.</p>
<p>The result is a massive 3,048,289 certificates that will be revoked within the next 24 hours.</p>
<p>We've just finished alerting all our users that are affected by this. <strong>In total, 2.3% of the domains that are monitored by Oh Dear were scheduled for revocation tomorrow.</strong></p>
<p>Each owner has been notified so they can, hopefully, renew their certificates in advance.</p>
<p>Normally we would use Certificate Revocation Lists for this. Unfortunately, once a certificate has been added to a Certificate Revocation List, it's already too late and browsers will already block that certificate from being trusted.</p>
<p>In this case, we had the opportunity to be proactive. The team at Let's Encrypt has <a href="https://letsencrypt.org/caaproblem/">released a list of all certificate serial numbers</a> that are due to be revoced. We parsed this list, found all our clients with the same serial number and notified them all.</p>
<p>We're happy to have been of assistance to our clients, even on such short notice. We hope everyone is able to renew their certificates in time to prevent any downtime.</p>
<p>If you have a website that's running on HTTPS, this incident has shown why you need a proper monitoring solution. Don't hesitate and <a href="https://ohdear.app/">try out Oh Dear</a>.</p>
]]>
            </summary>
                                    <updated>2020-05-05T08:56:13+00:00</updated>
        </entry>
            <entry>
            <title><![CDATA[A fresh new look for Oh Dear]]></title>
            <link rel="alternate" href="https://ohdear.app/news-and-updates/a-fresh-new-look-for-oh-dear" />
            <id>https://ohdear.app/27</id>
            <author>
                <name><![CDATA[Oh Dear]]></name>
            </author>
            <summary type="html">
                <![CDATA[<p>We're super proud to show the new <em>us</em> - we have a brand new logo, an entirely new style and a new website. In this post, we'll show you all the changes!</p>
<h2 id="a-rename-of-oh-dear">A rename of Oh Dear</h2>
<p>As part of our change, we're making a tiny change to our name: we are no longer &quot;Oh Dear!&quot; but are now &quot;Oh Dear&quot;. No more exclamation point at the end.</p>
<p>The reason is perhaps even more boring than the name change itself: it's super hard to write good content when it looks like, every time you mention Oh Dear!, the sentence stopped midway. See? Super confusing. Let's stop doing that.</p>
<h2 id="a-brand-new-logo">A brand new logo</h2>
<p>Our previous logo, while original, had sort of lost its appeal to us. We'll miss our British monocle-wearing friend, but couldn' be happier with our newly updated logo.</p>
<p>For old times' sake, here he is one more time. <em>Enjoy your time off, buddy.</em></p>
<p><img src="/uploads/blogs/redesign-202002/ohdear-logo-2018.png" alt="Old Oh Dear logo from 2018" /></p>
<p>For our new logo, we partnered with <a href="https://rikgrafiek.be/">Rik Grafiek, a creative from Ghent, Belgium</a>.</p>
<p>Our new look is clean, professional and modern - with lots going on behind the scenes.</p>
<p><img src="/uploads/blogs/redesign-202002/ohdear-logo-2020.png" alt="New Oh Dear logo (2020)" /></p>
<p>If you have to explain a logo, it isn't a good one. We hope you'll notice the following accents in our new style:</p>
<ul>
<li>It looks like a cardiac flatline - that's when we spring to live and start sending alerts ?</li>
<li>The &quot;o&quot; in Oh Dear is a magnifying glass, because we look for <a href="/feature/broken-page-check">broken links</a> and other flaws in your sites ?</li>
</ul>
<p>With a new <em>logo</em> also comes a new <em>avatar</em> for use in social media &amp; <a href="/feature/notifications">our notifications</a>.</p>
<p><img src="/uploads/blogs/redesign-202002/ohdear-avatar.png" alt="New Oh Dear avatar (2020)" /></p>
<p>You'll find a subtle reference to the wink of our old monocle-wearing friend. ?</p>
<h2 id="refreshing-our-postcards-as-well">Refreshing our postcards as well</h2>
<p>Every new client of Oh Dear automatically gets a postcard sent to their address, as a special <em>thank you</em> for trusting us with the important task of monitoring your websites.</p>
<p>Our new look &amp; feel also allowed us to rethink our postcards. Left you'll find our old postcard, to the right our new one.</p>
<p><img src="/uploads/blogs/redesign-202002/postcards-2020.png" alt="Oh Dear postcards in 2020" /></p>
<p>The new cards have an adapted version of our logo as the front cover.</p>
<p>These are true collectors' items. The only way to get one, is to <a href="http://ohdear.app/register">sign up and become an Oh Dear user</a>. ?</p>
<h2 id="the-new-look-amp-feel-of-the-website">The new look &amp; feel of the website</h2>
<p><a href="/">The homepage</a> got a very slick new feel to it.</p>
<p><img src="/uploads/blogs/redesign-202002/ohdear-homepage-2020-part-1.png" alt="Homepage of Oh Dear - part 1" /></p>
<p><img src="/uploads/blogs/redesign-202002/ohdear-homepage-2020-part-2.png" alt="Homepage of Oh Dear - part 2" /></p>
<p>Our website has changed a lot over the 3 years we've been in business. From left to right, these were the designs in 2017, 2018 and now in 2020.</p>
<p><img src="/uploads/blogs/redesign-202002/ohdear-homepage-collage.png" alt="Collage of homepage designs of Oh Dear" /></p>
<p>For a live version of our new design, <a href="/">have a look at our homepage</a>.</p>
<p>We've been adding more and more whitespace with every iteration. It's given us a tighter design and an overall increase in professionalisme to the website.</p>
<p>At least, <em>we</em> feel we've added professionalism - we can always agree to disagree. ?</p>
<h2 id="updated-documentation-layout">Updated documentation layout</h2>
<p>Our <a href="/docs/">documentation section</a> is easily the biggest content-part of our website.</p>
<p><a href="/docs/general/checks">Every check</a> we perform is documented, we have <a href="/docs/integrations/api/sites">code examples</a> for interacting with our API, there are <a href="/docs/integrations/webhooks/laravel-package">PHP packages</a> for working with our webhooks, ... All this to say, our docs are pretty big.</p>
<p>From now on, they'll be visually different from our main website too. They deserve a little something, don't they?</p>
<p><img src="/uploads/blogs/redesign-202002/ohdear-docs-2020.png" alt="The documentation layout of Oh Dear" /></p>
<h2 id="new-stickers-are-coming">New stickers are coming!</h2>
<p>We'll be handing these out at conferences like candy, if you want one - make sure to talk to <a href="https://twitter.com/freekmurze">Freek</a> or <a href="https://twitter.com/mattiasgeniar">Mattias</a>!</p>
<p><img src="/uploads/blogs/redesign-202002/ohdear-stickers-2020.png" alt="Collage of homepage designs of Oh Dear" /></p>
<p>Now that we have a professional brand &amp; style guide, we also have name tags and some other ideas for <em>branded gear</em> to hand out.</p>
<h2 id="to-celebrate-were-giving-away-a-year-worth-of-monitoring-services">To celebrate, we're giving away a year worth of monitoring services!</h2>
<p>Because we're thrilled about this update, we want to share our enthousiasm with the rest of the world!</p>
<p>We're giving away a year worth of monitoring for free to one lucky winner in the contest. To enter the Oh Dear giveaway, <a href="/blog/win-a-chance-to-get-a-free-year-of-oh-dear-monitoring">complete the form right there</a>. ?</p>
<h2 id="what-do-you-think">What do you think?</h2>
<p>We'd love to hear feedback!</p>
<p>Do you like the new design? If not, what bothers you? Do you still see places where we refer to our old logo instead of the new one? Do let us know!</p>
]]>
            </summary>
                                    <updated>2020-02-25T11:21:36+00:00</updated>
        </entry>
            <entry>
            <title><![CDATA[Win a chance to get a free year of Oh Dear monitoring]]></title>
            <link rel="alternate" href="https://ohdear.app/news-and-updates/win-a-chance-to-get-a-free-year-of-oh-dear-monitoring" />
            <id>https://ohdear.app/28</id>
            <author>
                <name><![CDATA[Oh Dear]]></name>
            </author>
            <summary type="html">
                <![CDATA[<p>We just <a href="/blog/a-fresh-new-look-for-oh-dear">launched our complete redesign</a> with an updated logo, and to celebrate we're giving away a full year of monitoring services!</p>
<p>To enter the contest, all you need to do is complete the form below - we'll pick the lucky winner in two weeks.</p>
<p><a href="#" id="n55L0NZ4"></a>
&lt;script src=&quot;https://embed.contestkit.com/iframe/n55L0NZ4&quot; data-ck-n55L0NZ4
data-ck-element-id=&quot;n55L0NZ4&quot;&gt;</script></p>
<p>We'd love it if you could share it with your friends &amp; coworkers.</p>
<p>Cheers! ?</p>
]]>
            </summary>
                                    <updated>2020-02-25T11:19:05+00:00</updated>
        </entry>
            <entry>
            <title><![CDATA[Adding maintenance windows to Oh Dear]]></title>
            <link rel="alternate" href="https://ohdear.app/news-and-updates/adding-maintenance-windows-to-oh-dear" />
            <id>https://ohdear.app/26</id>
            <author>
                <name><![CDATA[Oh Dear]]></name>
            </author>
            <summary type="html">
                <![CDATA[<p>We've just released a new feature: maintenance windows!</p>
<p>You can now place your site in maintenance which will mute all notifications during that period.</p>
<h2 id="setting-maintenance-windows">Setting maintenance windows</h2>
<p>You can add a maintenance period per website. You set the start and end date, and during that timeframe the notifications will be muted.</p>
<p>We'll still perform our checks, so you can see in your website history when the site <em>was</em> unavailable, but all notifications will be stopped so no one will be disturbed.</p>
<p><img src="/uploads/blogs/maintenance-periods/maintenance-period.png" alt="Maintenance Periods" /></p>
<p>In <a href="/sites">your dashboard</a> you can click through on any site and find the <em>Maintenance periods</em> menu item on the left.</p>
<h2 id="setting-on-demand-maintenance-windows">Setting on-demand maintenance windows</h2>
<p>One implementation we've always frowned upon (a bit) was the idea of recurring maintenance windows. A fixed time where all alerts would be muted.</p>
<p>Sure, in some cases <em>actual</em> maintenance would happen. But how often would a recurring maintenance window be configured where <em>nothing</em> happens?</p>
<p>And if there <em>was</em> real downtime during that time, would anyone know?</p>
<p>For that reason we took a different approach. On the maintenance overview, we give the actual API commands you could use to implement this in your deploy or maintenance script. It's super easy.</p>
<pre class="shiki" style="background-color: #2e3440ff"><code><span class="line"><span style="color: #D8DEE9FF">$ OHDEAR_TOKEN=</span><span style="color: #ECEFF4">&quot;</span><span style="color: #A3BE8C">your API token</span><span style="color: #ECEFF4">&quot;</span></span>
<span class="line"></span>
<span class="line"><span style="color: #D8DEE9FF">$ curl -X POST https://ohdear.app/api/sites/1/start-maintenance \</span></span>
<span class="line"><span style="color: #D8DEE9FF">    -H </span><span style="color: #ECEFF4">&quot;</span><span style="color: #A3BE8C">Authorization: Bearer </span><span style="color: #81A1C1">$</span><span style="color: #D8DEE9">OHDEAR_TOKEN</span><span style="color: #ECEFF4">&quot;</span><span style="color: #D8DEE9FF"> \</span></span>
<span class="line"><span style="color: #D8DEE9FF">    -H </span><span style="color: #ECEFF4">&#39;</span><span style="color: #A3BE8C">Accept: application/json</span><span style="color: #ECEFF4">&#39;</span><span style="color: #D8DEE9FF"> \</span></span>
<span class="line"><span style="color: #D8DEE9FF">    -H </span><span style="color: #ECEFF4">&#39;</span><span style="color: #A3BE8C">Content-Type: application/json</span><span style="color: #ECEFF4">&#39;</span></span>
<span class="line"><span style="color: #D8DEE9FF">	</span></span>
<span class="line"><span style="color: #D8DEE9FF">$ curl -X POST https://ohdear.app/api/sites/1/stop-maintenance \</span></span>
<span class="line"><span style="color: #D8DEE9FF">    -H </span><span style="color: #ECEFF4">&quot;</span><span style="color: #A3BE8C">Authorization: Bearer </span><span style="color: #81A1C1">$</span><span style="color: #D8DEE9">OHDEAR_TOKEN</span><span style="color: #ECEFF4">&quot;</span><span style="color: #D8DEE9FF"> \</span></span>
<span class="line"><span style="color: #D8DEE9FF">    -H </span><span style="color: #ECEFF4">&#39;</span><span style="color: #A3BE8C">Accept: application/json</span><span style="color: #ECEFF4">&#39;</span><span style="color: #D8DEE9FF"> \</span></span>
<span class="line"><span style="color: #D8DEE9FF">    -H </span><span style="color: #ECEFF4">&#39;</span><span style="color: #A3BE8C">Content-Type: application/json</span><span style="color: #ECEFF4">&#39;</span></span>
<span class="line"></span></code></pre>
<p>The first API call starts a maintenance window for that site (which defaults to 60 minutes, <a href="/docs/api/maintenance-windows#creating-a-new-maintenance-period-on-demand">but you can customize that</a>), the second API call stops the maintenance window.</p>
<p>If you add this as the first &amp; last steps in your deploy scripts, you've just configured on-demand maintenance windows. No matter when you deploy or how long it might take, the maintenance window will be timed <em>just right</em>.</p>
<h2 id="more-api-commands">More API commands</h2>
<p>Of course the API also allows for pre-defined maintenance windows (as does our dashboard). You can still configure a start- and end date manually for alerts to be muted.</p>
<p>You can find all <a href="/docs/api/maintenance-windows">API calls related to maintenance windows</a> right in our documentation, as well as updated information on using <a href="/docs/php-sdk/sites#managing-maintenance-periods">the PHP SDK to start/stop a maintenance window</a> for a site.</p>
]]>
            </summary>
                                    <updated>2020-01-09T13:31:52+00:00</updated>
        </entry>
            <entry>
            <title><![CDATA[Chrome's next steps for security: mixed content checking more important than ever]]></title>
            <link rel="alternate" href="https://ohdear.app/news-and-updates/chromes-next-steps-for-security-mixed-content-checking-more-important-than-ever" />
            <id>https://ohdear.app/25</id>
            <author>
                <name><![CDATA[Oh Dear]]></name>
            </author>
            <summary type="html">
                <![CDATA[<p>The team at Chrome has <a href="https://security.googleblog.com/2019/10/no-more-mixed-messages-about-https_3.html">announced their plans for handling mixed content last week</a> on their blog.</p>
<p>We'll highlight the most important details and what the potential impact is.</p>
<h2 id="a-security-first-approach-what-is-mixed-content">A security-first approach: what is mixed content?</h2>
<p>As a general reminder: &quot;mixed content&quot; exists when you have a website loaded via <code>HTTPS</code>, that loads insecure resources over plain <code>HTTP</code>. These can be images, CSS or even JavaScript &amp; iFrames.</p>
<p>Certain types of mixed content are already blocked. They won't load in a secure context (= <code>HTTPS</code> site) and your users might find a half-broken or fully broken website. In the console, you'll see notices like these.</p>
<blockquote>
<p>Mixed Content: The page at 'https://domain.tld' was loaded over HTTPS, but requested an insecure resource 'http://domain.tld/iframe'. This request has been blocked; the content must be served over HTTPS.</p>
</blockquote>
<p>The goal is to protect the user: websites served via <code>HTTPS</code> have an encrypted connection between the user and the server. A man-in-the-middle attack is a lot harder to perform when a site is loaded via HTTPS than via HTTP.</p>
<p>Images, CSS or JavaScript loaded via HTTP could then still be intercepted and modified, potentially compromising your users.</p>
<h2 id="chromes-plan-to-auto-upgrade-mixed-content">Chrome's plan to auto-upgrade mixed content</h2>
<p>It would have been pretty good for our business use case if Chrome decided to all-out block mixed content. :-)</p>
<p>But, luckily for the smooth operation of the web, <a href="https://security.googleblog.com/2019/10/no-more-mixed-messages-about-https_3.html">they're going about it much smarter</a>.</p>
<p>The timeline is as follows:</p>
<blockquote>
<p>In Chrome 80, mixed audio and video resources will be autoupgraded to https://, and Chrome will block them by default if they fail to load over https://. Chrome 80 will be released to early release channels in January 2020.</p>
</blockquote>
<blockquote>
<p>Also in Chrome 80, mixed images will still be allowed to load, but they will cause Chrome to show a “Not Secure” chip in the omnibox. We anticipate that this is a clearer security UI for users and that it will motivate websites to migrate their images to HTTPS.</p>
</blockquote>
<p>Marking websites as non-secure has been a gradual process since early last year, when <a href="https://www.blog.google/products/chrome/milestone-chrome-security-marking-http-not-secure/">all HTTP sites were shown a similar message</a>.</p>
<p>Early next year, Chrome 81 will force upgrade all non-secure elements on a secure page to HTTPS.</p>
<blockquote>
<p>In Chrome 81, mixed images will be autoupgraded to https://, and Chrome will block them by default if they fail to load over https://. Chrome 81 will be released to early release channels in February 2020.</p>
</blockquote>
<p>In other words: if your images, css or JavaScript aren't able to be served by HTTPS, they'll be blocked by default.</p>
<h2 id="start-scanning-for-mixed-content-today">Start scanning for mixed content today</h2>
<p>This is probably a good time to mention that Oh Dear! has <a href="/feature/mixed-content-checking">mixed content checking</a> available for all our users (on top of our <a href="/feature/broken-links-checking">broken links checking</a>).</p>
<p>If you don't want to be caught by surprise early next year, make sure you monitor for mixed content and preventively upgrade all your links &amp; resources to HTTPS.</p>
<p>This would be especially important if your assets are served on a subdomain or different server that isn't capable of serving HTTPS just yet. Once Chrome auto-upgrades those to HTTPS, they'll stop working for your users altogether.</p>
]]>
            </summary>
                                    <updated>2020-06-22T06:51:09+00:00</updated>
        </entry>
            <entry>
            <title><![CDATA[How we used Caddy and Laravel's subdomain routing to serve our status pages]]></title>
            <link rel="alternate" href="https://ohdear.app/news-and-updates/how-we-used-caddy-and-laravels-subdomain-routing-to-serve-our-status-pages" />
            <id>https://ohdear.app/23</id>
            <author>
                <name><![CDATA[Oh Dear]]></name>
            </author>
            <summary type="html">
                <![CDATA[<p>We recently launched our <a href="/feature/status-pages">new Status Page feature</a>. Under the hood, it's using the <a href="https://caddyserver.com/">Caddy proxy server</a> and <a href="https://laravel.com/docs/5.8/routing#route-group-sub-domain-routing">Laravel's subdomain routing</a> to serve the right status page on the right domain.</p>
<p>With this technology stack, we can automatically generate, configure &amp; renew the SSL certificates for custom domains of our clients.</p>
<p>In this post we'll deep dive in to our current setup.</p>
<h2 id="caddy-to-serve-and-manage-all-ssltls-certificates">Caddy to serve and manage all SSL/TLS certificates</h2>
<p>Caddy is a powerful server that excels at configuring SSL/TLS certificates on-the-fly, when a user first connects to their domain. You configure Caddy through a single <code>Caddyfile</code> configuration file.</p>
<p>Our latest <code>Caddyfile</code> config can always be found in our repo <a href="https://github.com/ohdearapp/status.ohdear.app-Caddyfile">ohdearapp/status.ohdear.app-Caddyfile</a>. We'll describe the interesting bits in this post.</p>
<p>First, we want to make sure every domain automatically runs on HTTPS instead of the unsecure HTTP.</p>
<pre class="shiki" style="background-color: #2e3440ff"><code><span class="line"><span style="color: #D8DEE9FF">http:// {</span></span>
<span class="line"><span style="color: #D8DEE9FF">  	</span><span style="color: #81A1C1">redir</span><span style="color: #D8DEE9FF"> https://{host}{uri}</span></span>
<span class="line"><span style="color: #D8DEE9FF">}</span></span>
<span class="line"></span></code></pre>
<p>This makes sure any connection attempt on <code>http://</code> gets translated to <code>https://</code>. Caddy does this automatically too, but we want to be explicit and prevent our PHP code from first rewriting the domain before an HTTPS upgrade occurs.</p>
<p>Next up is the config that allows Caddy to handle the automatic certificate issuance.</p>
<pre class="shiki" style="background-color: #2e3440ff"><code><span class="line"><span style="color: #D8DEE9FF">https:</span><span style="color: #616E88">// {</span></span>
<span class="line"></span>
<span class="line"><span style="color: #D8DEE9FF">	tls </span><span style="color: #ECEFF4">{</span></span>
<span class="line"><span style="color: #D8DEE9FF">		ask https</span><span style="color: #81A1C1">:</span><span style="color: #616E88">//ohdear.app/caddy/allowed-domain</span></span>
<span class="line"><span style="color: #D8DEE9FF">	</span><span style="color: #ECEFF4">}</span></span>
<span class="line"><span style="color: #D8DEE9FF">	</span></span>
<span class="line"><span style="color: #D8DEE9FF">	</span><span style="color: #ECEFF4">[</span><span style="color: #81A1C1">...</span><span style="color: #ECEFF4">]</span></span>
<span class="line"><span style="color: #D8DEE9FF">}</span></span>
<span class="line"></span></code></pre>
<p>We catch every <code>https://</code> URL that makes it to this server. The <code>tls</code> directive is then used to instruct Caddy to issue Let's Encrypt certificates automatically, in case it doesn't yet have a certificate.</p>
<p>Because we don't want to try to issue a certificate for every domain that connects to us <em>(that might trigger our Let's Encrypt rate limits)</em>, we use Caddy's <code>ask</code> feature to callback to Oh Dear! and ask if that domain is <em>allowed</em> to be issued a certificate.</p>
<p>Caddy does this by firing a <code>GET</code> request to our URL. If that returns an <code>HTTP/200</code>, it's allowed to continue. The URLs look like this.</p>
<pre class="shiki" style="background-color: #2e3440ff"><code><span class="line"><span style="color: #D8DEE9FF">https:</span><span style="color: #616E88">//ohdear.app/caddy/allowed-domain?domain=status.ohdear.app</span></span>
<span class="line"><span style="color: #D8DEE9FF">https:</span><span style="color: #616E88">//ohdear.app/caddy/allowed-domain?domain=status.dnsspy.io</span></span>
<span class="line"><span style="color: #81A1C1">...</span><span style="color: #D8DEE9FF"> </span></span>
<span class="line"></span></code></pre>
<p>Because we don't really want to expose all our status page URLs to someone brute forcing that URL, HTTP calls are only allowed from the Caddy servers' IP, using a custom <a href="https://laravel.com/docs/5.8/middleware">HTTP Middleware</a> in Laravel.</p>
<p>Once the domain is allowed, we will proxy the result back to our main application, but modify the <code>Host</code> header ever so slightly.</p>
<pre class="shiki" style="background-color: #2e3440ff"><code><span class="line"><span style="color: #D8DEE9FF">https:// {</span></span>
<span class="line"><span style="color: #D8DEE9FF">	[...]</span></span>
<span class="line"><span style="color: #D8DEE9FF">	</span></span>
<span class="line"><span style="color: #D8DEE9FF">	</span><span style="color: #81A1C1">proxy</span><span style="color: #D8DEE9FF"> / http://ohdear.app {</span></span>
<span class="line"><span style="color: #D8DEE9FF">		</span><span style="color: #616E88"># We use Laravel&#39;s subdomain routing to match</span></span>
<span class="line"><span style="color: #D8DEE9FF">		</span><span style="color: #616E88"># this domain to the right status page</span></span>
<span class="line"><span style="color: #D8DEE9FF">		</span><span style="color: #81A1C1">header_upstream</span><span style="color: #D8DEE9FF"> Host {host}.status.ohdearapp.com</span></span>
<span class="line"><span style="color: #D8DEE9FF">		</span></span>
<span class="line"><span style="color: #D8DEE9FF">		</span><span style="color: #616E88"># Confirm the request came from our Caddy proxy</span></span>
<span class="line"><span style="color: #D8DEE9FF">		</span><span style="color: #81A1C1">header_upstream</span><span style="color: #D8DEE9FF"> StatusPageHost {host}</span></span>
<span class="line"></span>
<span class="line"><span style="color: #D8DEE9FF">		</span><span style="color: #616E88"># Add headers any proxy would expect</span></span>
<span class="line"><span style="color: #D8DEE9FF">		</span><span style="color: #81A1C1">header_upstream</span><span style="color: #D8DEE9FF"> X-Real-IP {remote}</span></span>
<span class="line"><span style="color: #D8DEE9FF">		</span><span style="color: #81A1C1">header_upstream</span><span style="color: #D8DEE9FF"> X-Forwarded-For {remote}</span></span>
<span class="line"><span style="color: #D8DEE9FF">		</span><span style="color: #81A1C1">header_upstream</span><span style="color: #D8DEE9FF"> X-Forwarded-Port {server_port}</span></span>
<span class="line"><span style="color: #D8DEE9FF">		</span><span style="color: #81A1C1">header_upstream</span><span style="color: #D8DEE9FF"> X-Forwarded-Proto {scheme}</span></span>
<span class="line"></span>
<span class="line"><span style="color: #D8DEE9FF">		</span><span style="color: #616E88"># We should never take more than 5s to load</span></span>
<span class="line"><span style="color: #D8DEE9FF">	</span><span style="color: #81A1C1">	timeout </span><span style="color: #D8DEE9FF">5s</span></span>
<span class="line"><span style="color: #D8DEE9FF">	}</span></span>
<span class="line"><span style="color: #D8DEE9FF">	</span></span>
<span class="line"><span style="color: #D8DEE9FF">	[...]</span></span>
<span class="line"><span style="color: #D8DEE9FF">}</span></span>
<span class="line"></span></code></pre>
<p>By modifying the <code>Host</code> header that gets sent back to us, we can inject the domain name as a subdomain: <code>header_upstream Host {host}.status.ohdearapp.com</code>.</p>
<p>Our application therefore gets a request to <code>status.dnsspy.io.status.ohdearapp.com</code>.</p>
<p>At that point, it's up to Laravel to handle the request.</p>
<h2 id="subdomain-routing-in-laravel">Subdomain routing in Laravel</h2>
<p>To make this work, we use <a href="https://laravel.com/docs/5.8/routing#route-group-sub-domain-routing">Laravel's subdomain routing</a>.</p>
<p>Our <code>RouteServiceProvider.php</code> contains something similar to this.</p>
<pre class="shiki" style="background-color: #2e3440ff"><code><span class="line"><span style="color: #81A1C1">$</span><span style="color: #D8DEE9">router</span><span style="color: #81A1C1">-&gt;</span><span style="color: #88C0D0">domain</span><span style="color: #ECEFF4">(</span><span style="color: #ECEFF4">&#39;</span><span style="color: #A3BE8C">{domain}.</span><span style="color: #ECEFF4">&#39;</span><span style="color: #81A1C1">.</span><span style="color: #D8DEE9FF"> </span><span style="color: #88C0D0">config</span><span style="color: #ECEFF4">(</span><span style="color: #ECEFF4">&#39;</span><span style="color: #A3BE8C">app.url</span><span style="color: #ECEFF4">&#39;</span><span style="color: #ECEFF4">))</span><span style="color: #81A1C1">-&gt;</span><span style="color: #88C0D0">group</span><span style="color: #ECEFF4">(</span><span style="color: #81A1C1">function</span><span style="color: #D8DEE9FF"> </span><span style="color: #ECEFF4">()</span><span style="color: #D8DEE9FF"> </span><span style="color: #ECEFF4">{</span></span>
<span class="line"><span style="color: #D8DEE9FF">    </span><span style="color: #81A1C1">require</span><span style="color: #D8DEE9FF"> </span><span style="color: #88C0D0">base_path</span><span style="color: #ECEFF4">(</span><span style="color: #ECEFF4">&#39;</span><span style="color: #A3BE8C">routes/status-pages.php</span><span style="color: #ECEFF4">&#39;</span><span style="color: #ECEFF4">)</span><span style="color: #81A1C1">;</span></span>
<span class="line"><span style="color: #ECEFF4">})</span><span style="color: #81A1C1">;</span></span>
<span class="line"></span></code></pre>
<p>The rest of our application (the public site, documentation, the dashboard etc.) get limited to only be served on the <code>ohdear.app</code> domain.</p>
<pre class="shiki" style="background-color: #2e3440ff"><code><span class="line"><span style="color: #81A1C1">$</span><span style="color: #D8DEE9">router</span><span style="color: #81A1C1">-&gt;</span><span style="color: #88C0D0">group</span><span style="color: #ECEFF4">([</span></span>
<span class="line"><span style="color: #D8DEE9FF">    </span><span style="color: #ECEFF4">&#39;</span><span style="color: #A3BE8C">middleware</span><span style="color: #ECEFF4">&#39;</span><span style="color: #D8DEE9FF"> </span><span style="color: #81A1C1">=&gt;</span><span style="color: #D8DEE9FF"> </span><span style="color: #ECEFF4">[</span><span style="color: #ECEFF4">&#39;</span><span style="color: #A3BE8C">web</span><span style="color: #ECEFF4">&#39;</span><span style="color: #ECEFF4">,</span><span style="color: #D8DEE9FF"> </span><span style="color: #ECEFF4">&#39;</span><span style="color: #A3BE8C">hasTeam</span><span style="color: #ECEFF4">&#39;</span><span style="color: #ECEFF4">],</span></span>
<span class="line"><span style="color: #D8DEE9FF">    </span><span style="color: #ECEFF4">&#39;</span><span style="color: #A3BE8C">domain</span><span style="color: #ECEFF4">&#39;</span><span style="color: #D8DEE9FF"> </span><span style="color: #81A1C1">=&gt;</span><span style="color: #D8DEE9FF"> </span><span style="color: #88C0D0">config</span><span style="color: #ECEFF4">(</span><span style="color: #ECEFF4">&#39;</span><span style="color: #A3BE8C">app.url</span><span style="color: #ECEFF4">&#39;</span><span style="color: #ECEFF4">)</span><span style="color: #D8DEE9FF"> </span><span style="color: #ECEFF4">,</span></span>
<span class="line"><span style="color: #ECEFF4">],</span><span style="color: #D8DEE9FF"> </span><span style="color: #81A1C1">function</span><span style="color: #D8DEE9FF"> </span><span style="color: #ECEFF4">()</span><span style="color: #D8DEE9FF"> </span><span style="color: #ECEFF4">{</span></span>
<span class="line"><span style="color: #D8DEE9FF">    </span><span style="color: #81A1C1">require</span><span style="color: #D8DEE9FF"> </span><span style="color: #88C0D0">base_path</span><span style="color: #ECEFF4">(</span><span style="color: #ECEFF4">&#39;</span><span style="color: #A3BE8C">routes/front.php</span><span style="color: #ECEFF4">&#39;</span><span style="color: #ECEFF4">)</span><span style="color: #81A1C1">;</span></span>
<span class="line"><span style="color: #ECEFF4">})</span><span style="color: #81A1C1">;</span></span>
<span class="line"></span></code></pre>
<p>Because domain names can contain periods or dashes, we modified the <code>RouteServiceProvider.php</code> to let Laravel receive the full domain name as a variable.</p>
<pre class="shiki" style="background-color: #2e3440ff"><code><span class="line"><span style="color: #81A1C1">class</span><span style="color: #D8DEE9FF"> </span><span style="color: #8FBCBB">RouteServiceProvider</span><span style="color: #D8DEE9FF"> </span><span style="color: #81A1C1">extends</span><span style="color: #D8DEE9FF"> </span><span style="color: #8FBCBB; font-weight: bold">ServiceProvider</span></span>
<span class="line"><span style="color: #ECEFF4">{</span></span>
<span class="line"><span style="color: #D8DEE9FF">    </span><span style="color: #81A1C1">public</span><span style="color: #D8DEE9FF"> </span><span style="color: #81A1C1">function</span><span style="color: #D8DEE9FF"> </span><span style="color: #88C0D0">map</span><span style="color: #ECEFF4">(</span><span style="color: #8FBCBB">Router</span><span style="color: #D8DEE9FF"> </span><span style="color: #81A1C1">$</span><span style="color: #D8DEE9">router</span><span style="color: #ECEFF4">)</span></span>
<span class="line"><span style="color: #D8DEE9FF">    </span><span style="color: #ECEFF4">{</span></span>
<span class="line"><span style="color: #D8DEE9FF">        </span><span style="color: #8FBCBB">Route</span><span style="color: #81A1C1">::</span><span style="color: #88C0D0">pattern</span><span style="color: #ECEFF4">(</span><span style="color: #ECEFF4">&#39;</span><span style="color: #A3BE8C">domain</span><span style="color: #ECEFF4">&#39;</span><span style="color: #ECEFF4">,</span><span style="color: #D8DEE9FF"> </span><span style="color: #ECEFF4">&#39;</span><span style="color: #A3BE8C">[a-z0-9.-]+</span><span style="color: #ECEFF4">&#39;</span><span style="color: #ECEFF4">)</span><span style="color: #81A1C1">;</span></span>
<span class="line"><span style="color: #D8DEE9FF">    </span><span style="color: #ECEFF4">}</span></span>
<span class="line"><span style="color: #ECEFF4">}</span></span>
<span class="line"></span></code></pre>
<p>By default, it will only match <code>[a-z0-9]+</code>.</p>
<p>Our <code>CustomSubdomainShowStatusPageController</code> will then get the full domain name and use it to retrieve the details of the correct status page, and render it to our users.</p>
<h2 id="a-slightly-modified-webserver-configuration">A slightly modified webserver configuration</h2>
<p>Because we're now receiving a set of unknown subdomains, we modified our Apache vhost to act as a catch-all vhost. In other words: any domain that points to this server, will hit our Oh Dear! application.</p>
<p>We do this by creating a new vhost and adding a <code>ServerAlias</code> of <code>*</code> in Apache.</p>
<pre class="shiki" style="background-color: #2e3440ff"><code><span class="line"><span style="color: #81A1C1">&lt;</span><span style="color: #D8DEE9FF">VirtualHost </span><span style="color: #A3BE8C">*:80</span><span style="color: #81A1C1">&gt;</span></span>
<span class="line"><span style="color: #D8DEE9FF">  </span><span style="color: #81A1C1">ServerName</span><span style="color: #D8DEE9FF">              status.ohdearapp.com</span></span>
<span class="line"><span style="color: #D8DEE9FF">  </span><span style="color: #81A1C1">ServerAlias</span><span style="color: #D8DEE9FF">             </span><span style="color: #A3BE8C">*</span></span>
<span class="line"><span style="color: #D8DEE9FF">  </span></span>
<span class="line"><span style="color: #D8DEE9FF">  </span><span style="color: #ECEFF4">[</span><span style="color: #A3BE8C">...</span><span style="color: #ECEFF4">]</span></span>
<span class="line"><span style="color: #D8DEE9FF">  </span></span>
<span class="line"><span style="color: #D8DEE9FF">  </span><span style="color: #81A1C1">RewriteCond</span><span style="color: #D8DEE9FF"> </span><span style="color: #EBCB8B">%{HTTP:StatusPageHost}</span><span style="color: #D8DEE9FF">  </span><span style="color: #A3BE8C">^$</span></span>
<span class="line"><span style="color: #D8DEE9FF">  </span><span style="color: #81A1C1">RewriteRule</span><span style="color: #D8DEE9FF"> </span><span style="color: #EBCB8B">^</span><span style="color: #D8DEE9FF"> </span><span style="color: #A3BE8C">https://ohdear.app%{REQUEST_URI}</span><span style="color: #D8DEE9FF"> [L,R=</span><span style="color: #B48EAD">301</span><span style="color: #D8DEE9FF">]</span></span>
<span class="line"><span style="color: #81A1C1">&lt;/</span><span style="color: #D8DEE9FF">VirtualHost</span><span style="color: #81A1C1">&gt;</span></span>
<span class="line"></span></code></pre>
<p>The <code>RewriteRule</code> at the bottom makes it so that any domain that hits this vhost, but didn't have the custom <code>StatusPageHost</code> header, will be redirected to our homepage.</p>
<p><em>(Note we're running Apache on port :80 with our own Nginx proxy serving TLS traffic on port :443.)</em></p>
<h2 id="forcing-a-single-domain-for-oh-dear-for-seo-purposes">Forcing a single domain for Oh Dear! for SEO purposes</h2>
<p>If you read the line <em>&quot;any domain that points to this server, will hit our Oh Dear! application</em>&quot; and you cringed a little, you might have thought about the SEO implications of doing such a thing. Well, we sure did.</p>
<p>Because of our modified routes-configuration, where we scope the status pages and our main application to a specific domain, we'll never accidentally show pages of our <em>main</em> app on the <em>status</em> pages.</p>
<p>In our main apache config, we have a hard-defined list of domains we want to serve.</p>
<pre class="shiki" style="background-color: #2e3440ff"><code><span class="line"><span style="color: #81A1C1">&lt;</span><span style="color: #D8DEE9FF">VirtualHost </span><span style="color: #A3BE8C">*:80</span><span style="color: #81A1C1">&gt;</span></span>
<span class="line"><span style="color: #D8DEE9FF">  </span><span style="color: #81A1C1">ServerName</span><span style="color: #D8DEE9FF">  ohdearapp.com</span></span>
<span class="line"><span style="color: #D8DEE9FF">  </span><span style="color: #81A1C1">ServerAlias</span><span style="color: #D8DEE9FF"> </span><span style="color: #A3BE8C">www.ohdearapp.com</span><span style="color: #D8DEE9FF"> </span><span style="color: #A3BE8C">ohdear-app.com</span><span style="color: #D8DEE9FF"> www.ohdear-app.com ohdear.app www.ohdear.app</span></span>
<span class="line"><span style="color: #D8DEE9FF">  </span></span>
<span class="line"><span style="color: #D8DEE9FF">  </span><span style="color: #ECEFF4">[</span><span style="color: #A3BE8C">...</span><span style="color: #ECEFF4">]</span></span>
<span class="line"><span style="color: #D8DEE9FF">  </span></span>
<span class="line"><span style="color: #D8DEE9FF">  </span><span style="color: #81A1C1">Options</span><span style="color: #D8DEE9FF"> +FollowSymlinks</span></span>
<span class="line"><span style="color: #D8DEE9FF">  </span><span style="color: #81A1C1">RewriteEngine</span><span style="color: #D8DEE9FF"> on</span></span>
<span class="line"><span style="color: #D8DEE9FF">  </span><span style="color: #81A1C1">RewriteCond</span><span style="color: #D8DEE9FF"> </span><span style="color: #EBCB8B">%{THE_REQUEST}</span><span style="color: #D8DEE9FF"> </span><span style="color: #A3BE8C">!\s/api/?</span><span style="color: #D8DEE9FF"> [NC]</span></span>
<span class="line"><span style="color: #D8DEE9FF">  </span><span style="color: #81A1C1">RewriteCond</span><span style="color: #D8DEE9FF"> </span><span style="color: #EBCB8B">%{HTTP_HOST}</span><span style="color: #D8DEE9FF">   </span><span style="color: #A3BE8C">!^ohdear\.app</span><span style="color: #D8DEE9FF"> [NC]</span></span>
<span class="line"><span style="color: #D8DEE9FF">  </span><span style="color: #81A1C1">RewriteRule</span><span style="color: #D8DEE9FF"> </span><span style="color: #EBCB8B">^</span><span style="color: #D8DEE9FF">              </span><span style="color: #A3BE8C">https://ohdear.app%{REQUEST_URI}</span><span style="color: #D8DEE9FF"> [L,R=</span><span style="color: #B48EAD">301</span><span style="color: #D8DEE9FF">]</span></span>
<span class="line"><span style="color: #81A1C1">&lt;/</span><span style="color: #D8DEE9FF">VirtualHost</span><span style="color: #81A1C1">&gt;</span></span>
<span class="line"></span></code></pre>
<p>Everything that gets processed by that vhost will trigger the rewrite rule at the bottom. In short: if you're accessing that vhost and your domain name isn't <code>ohdear.app</code> (but one of our aliases), we'll rewrite you to our main site.</p>
<p>Additionally, if you hit the <code>HTTP</code> version of our status pages on their subdomain (ie: <code>status.dnsspy.io.status.ohdearapp.com</code>), we consider that a failed request (it should have come from the Caddy proxy on <code>status.dnsspy.io</code>) and we'll redirect you to our main site.</p>
<p>We can test this with <code>curl</code>.</p>
<pre class="shiki" style="background-color: #2e3440ff"><code><span class="line"><span style="color: #D8DEE9FF">$ curl </span><span style="color: #81A1C1">-</span><span style="color: #D8DEE9FF">I </span><span style="color: #ECEFF4">&quot;</span><span style="color: #A3BE8C">http://94.176.99.159</span><span style="color: #ECEFF4">&quot;</span><span style="color: #D8DEE9FF"> \</span></span>
<span class="line"><span style="color: #D8DEE9FF">    </span><span style="color: #81A1C1">-</span><span style="color: #D8DEE9FF">H </span><span style="color: #ECEFF4">&quot;</span><span style="color: #A3BE8C">Host: status.dnsspy.io.status.ohdearapp.com</span><span style="color: #ECEFF4">&quot;</span></span>
<span class="line"><span style="color: #D8DEE9FF">HTTP</span><span style="color: #81A1C1">/</span><span style="color: #B48EAD">1</span><span style="color: #ECEFF4">.</span><span style="color: #B48EAD">1</span><span style="color: #D8DEE9FF"> </span><span style="color: #B48EAD">301</span><span style="color: #D8DEE9FF"> Moved Permanently</span></span>
<span class="line"><span style="color: #D8DEE9FF">Location: https</span><span style="color: #81A1C1">:</span><span style="color: #616E88">//ohdear.app/</span></span>
<span class="line"></span>
<span class="line"><span style="color: #D8DEE9FF">$ curl </span><span style="color: #81A1C1">-</span><span style="color: #D8DEE9FF">I https</span><span style="color: #81A1C1">:</span><span style="color: #616E88">//status.dnsspy.io</span></span>
<span class="line"><span style="color: #D8DEE9FF">HTTP</span><span style="color: #81A1C1">/</span><span style="color: #B48EAD">2</span><span style="color: #D8DEE9FF"> </span><span style="color: #B48EAD">200</span></span>
<span class="line"></span>
<span class="line"><span style="color: #D8DEE9FF">$ curl </span><span style="color: #81A1C1">-</span><span style="color: #D8DEE9FF">I https</span><span style="color: #81A1C1">:</span><span style="color: #616E88">//ohdearapp.com</span></span>
<span class="line"><span style="color: #D8DEE9FF">HTTP</span><span style="color: #81A1C1">/</span><span style="color: #B48EAD">1</span><span style="color: #ECEFF4">.</span><span style="color: #B48EAD">1</span><span style="color: #D8DEE9FF"> </span><span style="color: #B48EAD">301</span><span style="color: #D8DEE9FF"> Moved Permanently</span></span>
<span class="line"><span style="color: #D8DEE9FF">Location: https</span><span style="color: #81A1C1">:</span><span style="color: #616E88">//ohdear.app/</span></span>
<span class="line"></span></code></pre>
<p>Good, SEO secured &amp; status pages served!</p>
<h2 id="want-to-give-our-status-pages-a-try">Want to give our Status Pages a try?</h2>
<p>We'd love it if you created your own status page and showed it to the world!</p>
<p>Go ahead and <a href="/register">create your account</a> to monitor your first site and publish your first status page.</p>
]]>
            </summary>
                                    <updated>2020-04-13T15:40:26+00:00</updated>
        </entry>
            <entry>
            <title><![CDATA[Introducing status pages for all our users!]]></title>
            <link rel="alternate" href="https://ohdear.app/news-and-updates/introducing-status-pages-for-all-our-users" />
            <id>https://ohdear.app/24</id>
            <author>
                <name><![CDATA[Oh Dear]]></name>
            </author>
            <summary type="html">
                <![CDATA[<p>We're proud to introduce a new major feature to all our Oh Dear users: Status Pages!</p>
<h2 id="our-new-status-pages-feature">Our new Status Pages feature</h2>
<p>All our users will now find a <em>Status Pages</em> feature in <a href="/sites">their dashboard</a>, in the top level navigation. It allows you to create one or more status pages to keep your users informed in case of downtime or emergency.</p>
<p>We're not limiting the amount of status pages you can create. You're free to create 1 or 100, it's all up to you.</p>
<h2 id="what-it-looks-like">What it looks like</h2>
<p>We're proud to say these status pages are all powered by our new feature!</p>
<ul>
<li>
<a href="https://status.ohdear.app/">status.ohdear.app</a>: our own status page</li>
<li>
<a href="https://status.flareapp.io/">status.flareapp.io</a>: the status page of <a href="https://flareapp.io/">Flare</a>
</li>
<li>
<a href="https://status.laravel.io/">status.laravel.io</a>: the status of <a href="https://status.laravel.io/">the Laravel Community Portal</a>
</li>
</ul>
<p>We made sure the design was minimal but allowed for enough customization to give it your own look &amp; feel.</p>
<p><img src="/uploads/blogs/status-page-announcement/status-page-demo.png" alt="Oh Dear status page" /></p>
<p>Most of what you see on that page can be tuned &amp; tweaked in your settings.</p>
<h2 id="the-main-features-of-our-status-pages">The main features of our status pages</h2>
<p>We've added a lot of <a href="/feature/status-pages">interesting features to the status pages</a>, here are some of the highlights:</p>
<ul>
<li>Auto-update the status page based on our <a href="/feature/uptime-monitoring">uptime monitoring</a>
</li>
<li>Ability to tweak the colors, logo &amp; favicon</li>
<li>Run the status pages on your own (sub)domain with SSL enabled</li>
<li>Everything is localized to the timezone of your choosing</li>
<li>You choose which sites get added to your status page</li>
</ul>
<p>This allows you to create a status page for each of your clients (if you're a web agency) or a dashboard overview for your office that shows the availability of your site, your application, your API, ...</p>
<h2 id="clear-amp-focussed-communication">Clear &amp; focussed communication</h2>
<p>In the best case scenario, your users never have to see your status page.</p>
<p>But in times of crisis, you want it to be there to provide clear communication to your clients.</p>
<p><img src="/img/features/status_page_message.png" alt="Oh Dear status updates" /></p>
<p>Each status page gets its own RSS feed, that allows you to subscribe to them in any way you like.</p>
<p>You can add <a href="https://slack.com/intl/en-be/help/articles/218688467-Add-RSS-feeds-to-Slack">the RSS feed to your Slack</a>, use <a href="https://ifttt.com/">IFTTT</a> to automatically post them to your Twitter, ...</p>
<h2 id="customize-to-your-hearts-content">Customize to your heart's content</h2>
<p>You're free to upload your own logo and favicon, choose the wording on the &quot;<em>All good</em>&quot; placeholder, pick the colors you'd like, ...</p>
<p><img src="/img/features/status_page_display_settings.png" alt="Oh Dear status page customization" /></p>
<p>Because of our minimal design, it doesn't take much to make it look like it's part of your own brand.</p>
<h2 id="run-each-status-page-on-your-own-domain">Run each status page on your own domain</h2>
<p>You can configure which domain your status page should be served at. We'll automatically configure and deploy an SSL certificate, too.</p>
<p>Setting up your own (sub)domain is as easy as changing a single DNS record. We've got more details in our <a href="/docs/status-pages/custom-domain">documentation on custom domains</a> if you're interested.</p>
<h2 id="our-updated-api-amp-sdk-are-available">Our updated API &amp; SDK are available</h2>
<p>Together with the new status pages, we've shipped an update to our API that allows you to control your status pages remotely, too.</p>
<p>We've updated our documentation to show how to use our API:</p>
<ul>
<li>
<a href="/docs/api/status-pages">API: Status Pages</a>
</li>
<li>
<a href="/docs/api/status-page-updates">API: Status Page Updates &amp; Messages</a>
</li>
<li>
<a href="/docs/php-sdk/status-pages">PHP SDK: Status Pages</a>
</li>
</ul>
<p>Our <a href="/docs/php-sdk/introduction">PHP SDK</a> is a convenient wrapper on top of our API that allows you to easily talk to our API using simple PHP classes &amp; methods.</p>
<p>By implementing our API, you can hook up our status pages to any remote monitoring service or your internal incident response tool.</p>
<h2 id="want-to-create-your-own-status-page">Want to create your own status page?</h2>
<p>Getting started is super easy!</p>
<ol>
<li>If you don't have an account yet, create one at <a href="https://ohdear.app/register">ohdear.app/register</a>. There's a free trial, no strings attached.</li>
<li>Once logged in, head over to the <em>Status Pages</em> tab at the top</li>
<li>Create your first status page!</li>
</ol>
<p>The feature's available to all accounts, both trial users and subscribing customers.</p>
<p>We'd love to know what you think! Let us know in the comments below or on Twitter at <a href="https://twitter.com/ohdearapp">@OhDearApp</a>.</p>
]]>
            </summary>
                                    <updated>2020-08-05T11:47:15+00:00</updated>
        </entry>
            <entry>
            <title><![CDATA[Improving our broken links checker & mixed content reporting]]></title>
            <link rel="alternate" href="https://ohdear.app/news-and-updates/improving-our-broken-links-checker-mixed-content-reporting" />
            <id>https://ohdear.app/22</id>
            <author>
                <name><![CDATA[Oh Dear]]></name>
            </author>
            <summary type="html">
                <![CDATA[<p>We're excited to announce that we've shipped some nice improvements to our broken links &amp; mixed content checks. These checks both make use of <a href="https://github.com/spatie/crawler">the crawler</a> that powers those features.</p>
<h2 id="increasing-the-amount-of-pages-we-crawl">Increasing the amount of pages we crawl</h2>
<p>When we first launched Oh Dear!, we decided to limit the crawls to the first 1.000 unique pages we find. This was mostly a protection for infinite loops, since those are really hard to detect.</p>
<p>Imagine having a broken website with infinite pagination, where you can keep clicking on to the next page, but still see the same content (there are several WordPress plugins out there exhibiting this behaviour). The body of the page still changes (the page-number will increment), so we can't just compare the <code>html-body</code> to previous pages either.</p>
<p>Makes you wonder how Google fixes this, doesn't it? :-)</p>
<p>Now, more than a year later, <strong>we feel confident to increase the 1.000 page limit to 5.000 per website.</strong></p>
<h2 id="faster-crawling">Faster crawling</h2>
<p>Thanks to <a href="https://github.com/spatie/crawler/pull/250">major improvements in the crawler</a>, we can now also change 2 other important options.</p>
<ul>
<li>Our per-page crawl delay was decreased from 500ms to 250ms</li>
<li>We now crawl 2 pages concurrently per website instead of per 1</li>
</ul>
<p>Both of these original settings were also a protection mechanism for the website: we don't want to overwhelm your server(s) by crawling too agressively.</p>
<p><em>Our goal is to be a monitoring service, not a DDoS service.</em></p>
<p><strong>Our crawler will now be a bit faster, handle more requests concurrently and crawl more pages than before.</strong></p>
]]>
            </summary>
                                    <updated>2020-06-22T06:50:49+00:00</updated>
        </entry>
            <entry>
            <title><![CDATA[Trigger an on demand uptime & broken links check after a deploy]]></title>
            <link rel="alternate" href="https://ohdear.app/news-and-updates/trigger-an-on-demand-uptime-broken-links-check-after-a-deploy" />
            <id>https://ohdear.app/21</id>
            <author>
                <name><![CDATA[Oh Dear]]></name>
            </author>
            <summary type="html">
                <![CDATA[<p>You can use our <a href="/docs/api/introduction">API</a> to trigger an <em>on demand</em> run of both the uptime check and the broken links checker. If you add this to, say, your deploy script, you can have near-instant validation that your deploy succeeded and didn't break any links &amp; pages.</p>
<h2 id="find-your-check-ids">Find your check IDs</h2>
<p>Our API allows you to trigger an on demand run <a href="/docs/api/checks">for every check we do</a>. But, it's an API - so it requires a set of IDs. First, let's find the different checks your site has. In order to use this API command, you need 2 things:</p>
<ol>
<li>An API key, which you can <a href="/user/api-tokens">generate in your user settings</a>.</li>
<li>The site ID, which you can find in the &quot;Settings&quot; menu for <a href="/sites">every site</a>, all the way at the bottom (in this example, we'll take site ID 7024)</li>
</ol>
<p>Let's find the different checks that are enabled.</p>
<pre class="shiki" style="background-color: #2e3440ff"><code><span class="line"><span style="color: #D8DEE9FF">$ curl  https://ohdear.app/api/sites/7024 \</span></span>
<span class="line"><span style="color: #D8DEE9FF">    -H </span><span style="color: #ECEFF4">&#39;</span><span style="color: #A3BE8C">Authorization: Bearer [your-api-token-here] </span><span style="color: #ECEFF4">&#39;</span><span style="color: #D8DEE9FF"> \</span></span>
<span class="line"><span style="color: #D8DEE9FF">    -H </span><span style="color: #ECEFF4">&#39;</span><span style="color: #A3BE8C">Accept: application/json</span><span style="color: #ECEFF4">&#39;</span><span style="color: #D8DEE9FF"> \</span></span>
<span class="line"><span style="color: #D8DEE9FF">    -H </span><span style="color: #ECEFF4">&#39;</span><span style="color: #A3BE8C">Content-Type: application/json</span><span style="color: #ECEFF4">&#39;</span><span style="color: #D8DEE9FF"> </span><span style="color: #81A1C1">|</span><span style="color: #D8DEE9FF"> jq</span></span>
<span class="line"></span>
<span class="line"><span style="color: #ECEFF4">{</span></span>
<span class="line"><span style="color: #D8DEE9FF">  </span><span style="color: #ECEFF4">&quot;</span><span style="color: #A3BE8C">id</span><span style="color: #ECEFF4">&quot;</span><span style="color: #D8DEE9FF">: 7024,</span></span>
<span class="line"><span style="color: #D8DEE9FF">  </span><span style="color: #ECEFF4">&quot;</span><span style="color: #A3BE8C">url</span><span style="color: #ECEFF4">&quot;</span><span style="color: #D8DEE9FF">: </span><span style="color: #ECEFF4">&quot;</span><span style="color: #A3BE8C">https://ohdear.app</span><span style="color: #ECEFF4">&quot;</span><span style="color: #D8DEE9FF">,</span></span>
<span class="line"><span style="color: #D8DEE9FF">  </span><span style="color: #ECEFF4">[</span><span style="color: #D8DEE9FF">...</span><span style="color: #ECEFF4">]</span></span>
<span class="line"><span style="color: #D8DEE9FF">  </span><span style="color: #ECEFF4">&quot;</span><span style="color: #A3BE8C">checks</span><span style="color: #ECEFF4">&quot;</span><span style="color: #D8DEE9FF">: </span><span style="color: #ECEFF4">[</span></span>
<span class="line"><span style="color: #D8DEE9FF">    </span><span style="color: #ECEFF4">{</span></span>
<span class="line"><span style="color: #D8DEE9FF">      </span><span style="color: #ECEFF4">&quot;</span><span style="color: #A3BE8C">id</span><span style="color: #ECEFF4">&quot;</span><span style="color: #D8DEE9FF">: 32077,</span></span>
<span class="line"><span style="color: #D8DEE9FF">      </span><span style="color: #ECEFF4">&quot;</span><span style="color: #A3BE8C">type</span><span style="color: #ECEFF4">&quot;</span><span style="color: #D8DEE9FF">: </span><span style="color: #ECEFF4">&quot;</span><span style="color: #A3BE8C">uptime</span><span style="color: #ECEFF4">&quot;</span><span style="color: #D8DEE9FF">,</span></span>
<span class="line"><span style="color: #D8DEE9FF">    </span><span style="color: #ECEFF4">}</span><span style="color: #D8DEE9FF">,</span></span>
<span class="line"><span style="color: #D8DEE9FF">    </span><span style="color: #ECEFF4">{</span></span>
<span class="line"><span style="color: #D8DEE9FF">      </span><span style="color: #ECEFF4">&quot;</span><span style="color: #A3BE8C">id</span><span style="color: #ECEFF4">&quot;</span><span style="color: #D8DEE9FF">: 32078,</span></span>
<span class="line"><span style="color: #D8DEE9FF">      </span><span style="color: #ECEFF4">&quot;</span><span style="color: #A3BE8C">type</span><span style="color: #ECEFF4">&quot;</span><span style="color: #D8DEE9FF">: </span><span style="color: #ECEFF4">&quot;</span><span style="color: #A3BE8C">broken_links</span><span style="color: #ECEFF4">&quot;</span><span style="color: #D8DEE9FF">,</span></span>
<span class="line"><span style="color: #D8DEE9FF">    </span><span style="color: #ECEFF4">}</span><span style="color: #D8DEE9FF">,</span></span>
<span class="line"><span style="color: #D8DEE9FF">    </span><span style="color: #ECEFF4">{</span></span>
<span class="line"><span style="color: #D8DEE9FF">      </span><span style="color: #ECEFF4">&quot;</span><span style="color: #A3BE8C">id</span><span style="color: #ECEFF4">&quot;</span><span style="color: #D8DEE9FF">: 32079,</span></span>
<span class="line"><span style="color: #D8DEE9FF">      </span><span style="color: #ECEFF4">&quot;</span><span style="color: #A3BE8C">type</span><span style="color: #ECEFF4">&quot;</span><span style="color: #D8DEE9FF">: </span><span style="color: #ECEFF4">&quot;</span><span style="color: #A3BE8C">mixed_content</span><span style="color: #ECEFF4">&quot;</span><span style="color: #D8DEE9FF">,</span></span>
<span class="line"><span style="color: #D8DEE9FF">    </span><span style="color: #ECEFF4">}</span><span style="color: #D8DEE9FF">,</span></span>
<span class="line"><span style="color: #D8DEE9FF">    </span><span style="color: #ECEFF4">{</span></span>
<span class="line"><span style="color: #D8DEE9FF">      </span><span style="color: #ECEFF4">&quot;</span><span style="color: #A3BE8C">id</span><span style="color: #ECEFF4">&quot;</span><span style="color: #D8DEE9FF">: 32080,</span></span>
<span class="line"><span style="color: #D8DEE9FF">      </span><span style="color: #ECEFF4">&quot;</span><span style="color: #A3BE8C">type</span><span style="color: #ECEFF4">&quot;</span><span style="color: #D8DEE9FF">: </span><span style="color: #ECEFF4">&quot;</span><span style="color: #A3BE8C">certificate_health</span><span style="color: #ECEFF4">&quot;</span><span style="color: #D8DEE9FF">,</span></span>
<span class="line"><span style="color: #D8DEE9FF">    </span><span style="color: #ECEFF4">}</span><span style="color: #D8DEE9FF">,</span></span>
<span class="line"><span style="color: #D8DEE9FF">    </span><span style="color: #ECEFF4">{</span></span>
<span class="line"><span style="color: #D8DEE9FF">      </span><span style="color: #ECEFF4">&quot;</span><span style="color: #A3BE8C">id</span><span style="color: #ECEFF4">&quot;</span><span style="color: #D8DEE9FF">: 32081,</span></span>
<span class="line"><span style="color: #D8DEE9FF">      </span><span style="color: #ECEFF4">&quot;</span><span style="color: #A3BE8C">type</span><span style="color: #ECEFF4">&quot;</span><span style="color: #D8DEE9FF">: </span><span style="color: #ECEFF4">&quot;</span><span style="color: #A3BE8C">certificate_transparency</span><span style="color: #ECEFF4">&quot;</span><span style="color: #D8DEE9FF">,</span></span>
<span class="line"><span style="color: #D8DEE9FF">    </span><span style="color: #ECEFF4">}</span></span>
<span class="line"><span style="color: #D8DEE9FF">  </span><span style="color: #ECEFF4">]</span><span style="color: #D8DEE9FF">,</span></span>
<span class="line"><span style="color: #ECEFF4">}</span></span>
<span class="line"></span>
<span class="line"></span></code></pre>
<p>Some output was truncated, but you get the idea. There's a bunch of checks, each with their own ID.</p>
<p>Take the check you'd like to run on demand (<code>32077</code> for the uptime check, <code>32078</code> for the broken links check etc.).</p>
<h2 id="trigger-an-on-demand-run-with-curl">Trigger an on demand run with curl</h2>
<p>Most deploy scripts allow you to execute some raw commands. In this example, we'll use <code>curl</code> together with your <a href="/docs/api/authentication">your API key</a> to instruct Oh Dear! to perform a full site check, searching for broken links.</p>
<pre class="shiki" style="background-color: #2e3440ff"><code><span class="line"><span style="color: #D8DEE9FF">$ curl -X POST https://ohdear.app/api/checks/32077/request-run \</span></span>
<span class="line"><span style="color: #D8DEE9FF">    -H </span><span style="color: #ECEFF4">&#39;</span><span style="color: #A3BE8C">Authorization: Bearer [your-api-token-here]</span><span style="color: #ECEFF4">&#39;</span><span style="color: #D8DEE9FF"> \</span></span>
<span class="line"><span style="color: #D8DEE9FF">    -H </span><span style="color: #ECEFF4">&#39;</span><span style="color: #A3BE8C">Accept: application/json</span><span style="color: #ECEFF4">&#39;</span><span style="color: #D8DEE9FF"> \</span></span>
<span class="line"><span style="color: #D8DEE9FF">    -H </span><span style="color: #ECEFF4">&#39;</span><span style="color: #A3BE8C">Content-Type: application/json</span><span style="color: #ECEFF4">&#39;</span><span style="color: #D8DEE9FF"> </span><span style="color: #81A1C1">|</span><span style="color: #D8DEE9FF"> jq</span></span>
<span class="line"><span style="color: #ECEFF4">{</span></span>
<span class="line"><span style="color: #D8DEE9FF">  </span><span style="color: #ECEFF4">&quot;</span><span style="color: #A3BE8C">id</span><span style="color: #ECEFF4">&quot;</span><span style="color: #D8DEE9FF">: 32077,</span></span>
<span class="line"><span style="color: #D8DEE9FF">  </span><span style="color: #ECEFF4">&quot;</span><span style="color: #A3BE8C">type</span><span style="color: #ECEFF4">&quot;</span><span style="color: #D8DEE9FF">: </span><span style="color: #ECEFF4">&quot;</span><span style="color: #A3BE8C">uptime</span><span style="color: #ECEFF4">&quot;</span><span style="color: #D8DEE9FF">,</span></span>
<span class="line"><span style="color: #D8DEE9FF">  </span><span style="color: #ECEFF4">&quot;</span><span style="color: #A3BE8C">label</span><span style="color: #ECEFF4">&quot;</span><span style="color: #D8DEE9FF">: </span><span style="color: #ECEFF4">&quot;</span><span style="color: #A3BE8C">Uptime</span><span style="color: #ECEFF4">&quot;</span><span style="color: #D8DEE9FF">,</span></span>
<span class="line"><span style="color: #D8DEE9FF">  </span><span style="color: #ECEFF4">&quot;</span><span style="color: #A3BE8C">enabled</span><span style="color: #ECEFF4">&quot;</span><span style="color: #D8DEE9FF">: true,</span></span>
<span class="line"><span style="color: #D8DEE9FF">  </span><span style="color: #ECEFF4">&quot;</span><span style="color: #A3BE8C">latest_run_ended_at</span><span style="color: #ECEFF4">&quot;</span><span style="color: #D8DEE9FF">: </span><span style="color: #ECEFF4">&quot;</span><span style="color: #A3BE8C">2019-07-10 12:35:40</span><span style="color: #ECEFF4">&quot;</span><span style="color: #D8DEE9FF">,</span></span>
<span class="line"><span style="color: #D8DEE9FF">  </span><span style="color: #ECEFF4">&quot;</span><span style="color: #A3BE8C">latest_run_result</span><span style="color: #ECEFF4">&quot;</span><span style="color: #D8DEE9FF">: </span><span style="color: #ECEFF4">&quot;</span><span style="color: #A3BE8C">pending</span><span style="color: #ECEFF4">&quot;</span></span>
<span class="line"><span style="color: #ECEFF4">}</span></span>
<span class="line"></span></code></pre>
<p>This uses the <code>/request-run</code> endpoint of <a href="/docs/api/checks">our API</a>, which you can trigger for every kind of check we have. In this case, we requested a run for the check with ID <code>32077</code>.</p>
<h2 id="tying-it-all-together">Tying it all together</h2>
<p>To combine it all in one easy flow, you can call the following <code>curl</code> commands to instruct Oh Dear! to do a full site check.</p>
<pre class="shiki" style="background-color: #2e3440ff"><code><span class="line"><span style="color: #616E88">#!/bin/bash</span></span>
<span class="line"><span style="color: #D8DEE9FF">API_TOKEN=</span><span style="color: #ECEFF4">[</span><span style="color: #D8DEE9FF">your-api-token-here</span><span style="color: #ECEFF4">]</span></span>
<span class="line"></span>
<span class="line"><span style="color: #D8DEE9FF">UPTIME_ID=32077</span></span>
<span class="line"><span style="color: #D8DEE9FF">BROKENLINKS_ID=32078</span></span>
<span class="line"></span>
<span class="line"><span style="color: #616E88"># Trigger an uptime check</span></span>
<span class="line"><span style="color: #D8DEE9FF">curl -X POST </span><span style="color: #ECEFF4">&quot;</span><span style="color: #A3BE8C">https://ohdear.app/api/checks/</span><span style="color: #81A1C1">$</span><span style="color: #D8DEE9">UPTIME_ID</span><span style="color: #A3BE8C">/request-run</span><span style="color: #ECEFF4">&quot;</span><span style="color: #D8DEE9FF"> \</span></span>
<span class="line"><span style="color: #D8DEE9FF">    -H </span><span style="color: #ECEFF4">&quot;</span><span style="color: #A3BE8C">Authorization: Bearer </span><span style="color: #81A1C1">$</span><span style="color: #D8DEE9">API_TOKEN</span><span style="color: #ECEFF4">&quot;</span><span style="color: #D8DEE9FF"> \</span></span>
<span class="line"><span style="color: #D8DEE9FF">    -H </span><span style="color: #ECEFF4">&quot;</span><span style="color: #A3BE8C">Accept: application/json</span><span style="color: #ECEFF4">&quot;</span><span style="color: #D8DEE9FF"> \</span></span>
<span class="line"><span style="color: #D8DEE9FF">    -H </span><span style="color: #ECEFF4">&quot;</span><span style="color: #A3BE8C">Content-Type: application/json</span><span style="color: #ECEFF4">&quot;</span></span>
<span class="line"></span>
<span class="line"><span style="color: #616E88"># Trigger the broken links check</span></span>
<span class="line"><span style="color: #D8DEE9FF">curl -X POST </span><span style="color: #ECEFF4">&quot;</span><span style="color: #A3BE8C">https://ohdear.app/api/checks/</span><span style="color: #81A1C1">$</span><span style="color: #D8DEE9">BROKENLINKS_ID</span><span style="color: #A3BE8C">/request-run</span><span style="color: #ECEFF4">&quot;</span><span style="color: #D8DEE9FF"> \</span></span>
<span class="line"><span style="color: #D8DEE9FF">    -H </span><span style="color: #ECEFF4">&quot;</span><span style="color: #A3BE8C">Authorization: Bearer </span><span style="color: #81A1C1">$</span><span style="color: #D8DEE9">API_TOKEN</span><span style="color: #ECEFF4">&quot;</span><span style="color: #D8DEE9FF"> \</span></span>
<span class="line"><span style="color: #D8DEE9FF">    -H </span><span style="color: #ECEFF4">&quot;</span><span style="color: #A3BE8C">Accept: application/json</span><span style="color: #ECEFF4">&quot;</span><span style="color: #D8DEE9FF"> \</span></span>
<span class="line"><span style="color: #D8DEE9FF">    -H </span><span style="color: #ECEFF4">&quot;</span><span style="color: #A3BE8C">Content-Type: application/json</span><span style="color: #ECEFF4">&quot;</span></span>
<span class="line"></span>
<span class="line"></span></code></pre>
<p>Pretty neat, hu?</p>
]]>
            </summary>
                                    <updated>2021-11-22T19:19:57+00:00</updated>
        </entry>
            <entry>
            <title><![CDATA[Crawling internal vs. external URLs is now a setting]]></title>
            <link rel="alternate" href="https://ohdear.app/news-and-updates/crawling-internal-vs-external-urls-is-now-a-setting" />
            <id>https://ohdear.app/20</id>
            <author>
                <name><![CDATA[Oh Dear]]></name>
            </author>
            <summary type="html">
                <![CDATA[<p>We've added a setting that allows you to choose if we should crawl all internal URLs or the external URLs too.</p>
<h2 id="per-site-settings-for-external-urls">Per-site settings for external URLs</h2>
<p>You can now overwrite, per website, if we should probe the <em>outgoing</em> links of your site too.</p>
<p>This is a powerful setting if you want to make sure your visitors are being refered to a working page or website. If your main focus is to aggregate content and refer them to the next website, you'll want to give your users the best experience by linking to working sites.</p>
<p>We do realize this setting isn't for everyone. After all, you have no control over the external sites. They might be down, under maintenance or changing their URL structures.</p>
<h2 id="new-default-internal-crawling-only">New default: internal crawling only</h2>
<p>Because of the sometimes tricky behaviour of <em>other</em> websites, we've changed the default behaviour to only crawl your sites' internal links, not the external ones.</p>
<p>If you add a new site to your dashboard, we'll stick to the URLs related to the same domain. If you added a site to Oh Dear! before today, you'll notice we're crawling the external links too.</p>
<p>This should give our users a better onboarding experience with less false positives.</p>
<p>Of course, anyone's free to change the setting to <em>also</em> crawl the external URLs!</p>
]]>
            </summary>
                                    <updated>2020-06-22T06:50:36+00:00</updated>
        </entry>
            <entry>
            <title><![CDATA[Extending uptime monitoring with POST, PUT & PATCH methods]]></title>
            <link rel="alternate" href="https://ohdear.app/news-and-updates/extending-uptime-monitoring-with-post-put-patch-methods" />
            <id>https://ohdear.app/19</id>
            <author>
                <name><![CDATA[Oh Dear]]></name>
            </author>
            <summary type="html">
                <![CDATA[<p>Next to our standard uptime monitoring through <code>GET</code> requests, we've added support for <code>POST</code>, <code>PUT</code> &amp; <code>PATCH</code> methods too.</p>
<h2 id="more-uptime-monitoring-capabilities">More uptime monitoring capabilities</h2>
<p>We've had the option to monitor websites via a <code>GET</code> request since the very launch. It allows us to probe and test 99% of the sites out there for their uptime and report the owner if it's down.</p>
<p>But it doesn't quite fit every use case, and extending the available methods opens up many new doors &amp; possibilities.</p>
<h2 id="adding-posts-put-amp-patch">Adding POSTS, PUT &amp; PATCH</h2>
<p>In your site settings, you can now choose which method we should use to probe your website. If you're choosing something other than a <code>GET</code> request, you can specify the <em>payload</em> too.</p>
<p><img src="/uploads/blogs/post-put-patch-methods/site_options.png" alt="Site settings - choose the method" /></p>
<p>This allows for some interesting extra checks;</p>
<ul>
<li>You can validate the search results on a page using <code>POST</code>, with the optional &quot;<em>Verify text</em>&quot;, you can make sure the page returns the items you expect</li>
<li>You can simulate a website login</li>
<li>You can simulate any form submission and the resulting page</li>
<li>You can probe advanced API endpoints that modify data with <code>PUT</code> or <code>PATCH</code>
</li>
</ul>
<p>And that's not everything.</p>
<h2 id="in-the-age-of-serverless-keep-your-functions-warm">In the age of serverless, keep your functions warm</h2>
<p>In one of our earlier blogposts, we mentioned how you can use our crawler to <a href="/blog/using-oh-dear-to-keep-your-varnish-cache-warm">keep your site caches warm</a>.</p>
<p>While this is super useful, it didn't catch every use case: your site is more than a series of pages, strung together.</p>
<p>Your site consists of a login form, a search field, a contact form, ... but our crawler only sees the forms, not the output <em>after</em> a form submission.</p>
<p>These new uptime methods allow you to keep your code &quot;warm&quot;, if you're using serverless solutions. This prevents (sometimes significant) delays in <em>boot</em> times for functions that aren't being hit too often.</p>
<p>By adding monitoring probes to those endpoints, you gain 2 important benefits;</p>
<ul>
<li>If it's down, you'll know about it</li>
<li>Your functions are always <em>warm</em> and ready to serve production traffic, without a delay</li>
</ul>
<p>These new methods also open the door to more advanced <em>scenarios</em>, where you can simulate most of the functionality of any website, giving you complete uptime coverage of your site - not just your homepage.</p>
]]>
            </summary>
                                    <updated>2020-06-22T06:50:27+00:00</updated>
        </entry>
            <entry>
            <title><![CDATA[We're a featured .app domain on Google's Registry]]></title>
            <link rel="alternate" href="https://ohdear.app/news-and-updates/were-a-featured-app-domain-on-googles-registry" />
            <id>https://ohdear.app/18</id>
            <author>
                <name><![CDATA[Oh Dear]]></name>
            </author>
            <summary type="html">
                <![CDATA[<p>We're proud to have been listed on <a href="https://www.registry.google/announcements/appsaroundtheworld/#!/">Google's 1 year anniversary post</a> about the launch of the .APP top level domain.</p>
<h2 id="a-year-of-app">A year of .APP</h2>
<p>A year ago, on May 8th 2018, Google launched a new top level domain (TLD) called <em>.app</em>.</p>
<p>At that time, Oh Dear! had just launched on the <em>ohdearapp.com</em> domain. It was a no-brainer for us to migrate our domain from <em>ohdearapp.com</em> to <em>ohdear.app</em>. The launch of the .APP TLD was perfectly timed for us!</p>
<p>Within the first couple of weeks, we registered the domain and moved all our services over to the <em>ohdear.app</em> domain.</p>
<h2 id="improved-security-with-hsts">Improved security with HSTS</h2>
<p>HSTS stands for <em>HTTP Strict Transport Security</em>. It's a mechanisme that allows a website to signal that it should only be reached via HTTPS - the encrypted HTTP - instead of the plain text HyperText Transfer Protocol.</p>
<p>When we were at our <em>.com</em> domain, we added the following header to our website and all its pages.</p>
<pre class="shiki" style="background-color: #2e3440ff"><code><span class="line"><span style="color: #D8DEE9FF">$ curl </span><span style="color: #81A1C1">-</span><span style="color: #D8DEE9FF">I https</span><span style="color: #81A1C1">:</span><span style="color: #616E88">//ohdearapp.com</span></span>
<span class="line"><span style="color: #81A1C1">...</span></span>
<span class="line"><span style="color: #D8DEE9FF">Strict</span><span style="color: #81A1C1">-</span><span style="color: #D8DEE9FF">Transport</span><span style="color: #81A1C1">-</span><span style="color: #D8DEE9FF">Security</span><span style="color: #81A1C1">:</span><span style="color: #D8DEE9FF"> max</span><span style="color: #81A1C1">-</span><span style="color: #D8DEE9FF">age</span><span style="color: #81A1C1">=</span><span style="color: #B48EAD">31536000</span></span>
<span class="line"></span></code></pre>
<p>Whenever a browser would visit our site, it would remember for 31536000 seconds (365 days) that it can only reach our domain via HTTPS.</p>
<p>This prevents man-in-the-middle attacks where a connection would be downgraded from HTTPS to HTTP to snoop on the data being transferred over the wire.</p>
<p>With the <em>.app</em> domain, we no long need this.</p>
<h2 id="tld-wide-implementation-of-hsts">TLD-wide implementation of HSTS</h2>
<p>More acronyms! ;-)</p>
<p>One of the nice features of having a <em>.APP</em> domain, is that it <em>automatically requires HTTPS</em>. There is no workaround.</p>
<p>Why? Because browsers have a thing called <em>preloaded HSTS lists</em>. Instead of waiting to visit a site for the first time, to read the HSTS header, browsers have lists of domains that want to have that configuration <em>preloaded</em>. Usually, those lists include specific domains.</p>
<p>However, for <em>.APP</em> (and a few others, like <em>.DEV</em>), there's a TLD-wide preload. That means browsers that trust this list (which is Chrome + Firefox and many others) will <em>automatically upgrade an HTTP connection to HTTPS for every domain ending in <em>.APP</em></em>.</p>
<p>We no longer need this header (although we might as well have just left if there, there's no harm in that) and it makes the entire <em>.APP</em> top level domain safer as it enforces HTTPS.</p>
<p>Since one of our focusses is the <a href="/docs/general/certificate-health">extensive monitoring of HTTPS certificates</a>, we applaud any action that encourages the use of HTTPS over HTTP.</p>
]]>
            </summary>
                                    <updated>2020-06-22T06:50:20+00:00</updated>
        </entry>
            <entry>
            <title><![CDATA[Using Oh Dear! to keep your Varnish cache warm]]></title>
            <link rel="alternate" href="https://ohdear.app/news-and-updates/using-oh-dear-to-keep-your-varnish-cache-warm" />
            <id>https://ohdear.app/17</id>
            <author>
                <name><![CDATA[Oh Dear]]></name>
            </author>
            <summary type="html">
                <![CDATA[<p>Slow websites are annoying, right? We sure think so.</p>
<p>One common solution is to introduce a caching proxy like <a href="https://varnish-cache.org/">Varnish</a> to help cache pages and reduce your server load.</p>
<p>The good news is, if you have Oh Dear!, you can let those 2 work together.</p>
<h2 id="varnish-oh-dear-crawling">Varnish + Oh Dear! crawling = ❤️</h2>
<p>The idea is as follows: if you've enabled our <a href="/docs/general/broken-links">broken links</a> or <a href="/docs/general/mixed-content">mixed content</a> checks for any of your sites, we'll crawl your sites to find any broken pages.</p>
<p>On top of that, we have the ability to set <a href="/docs/general/site-settings#custom-http-headers">custom HTTP headers per website</a> that get added to both the uptime checks and our crawler.</p>
<p>Combining our crawler and the custom HTTP headers allows you to <em>authorize</em> our crawler in your Varnish configs to let it update the cache.</p>
<h2 id="configuring-varnish-to-refresh-your-cache-when-oh-dear-crawls-your-site">Configuring Varnish to refresh your cache when Oh Dear! crawls your site</h2>
<p>There are several default Varnish configs available you can use as the boilerplate for your Varnish service. One of them is maintained by one of the co-founders of Oh Dear! and can be found here: <a href="https://github.com/mattiasgeniar/varnish-6.0-configuration-templates">Varnish 6 configuration template</a>.</p>
<p>If you take this as your basis, it's relatively easy to allow Oh Dear! to update your cached pages.</p>
<p>First, add this line to your <code>vcl_recv</code> routine.</p>
<pre class="shiki" style="background-color: #2e3440ff"><code><span class="line"><span style="color: #D8DEE9FF">vcl_recv </span><span style="color: #ECEFF4">{</span></span>
<span class="line"><span style="color: #D8DEE9FF">  </span><span style="color: #81A1C1">if</span><span style="color: #D8DEE9FF"> </span><span style="color: #ECEFF4">(</span><span style="color: #D8DEE9FF">req</span><span style="color: #81A1C1">.</span><span style="color: #D8DEE9FF">http</span><span style="color: #81A1C1">.</span><span style="color: #D8DEE9FF">OhDear</span><span style="color: #81A1C1">-</span><span style="color: #D8DEE9FF">Authorized</span><span style="color: #81A1C1">-</span><span style="color: #D8DEE9FF">Request </span><span style="color: #81A1C1">==</span><span style="color: #D8DEE9FF"> </span><span style="color: #ECEFF4">&quot;</span><span style="color: #A3BE8C">ASecretStringOrPassphrase</span><span style="color: #ECEFF4">&quot;</span><span style="color: #ECEFF4">)</span><span style="color: #D8DEE9FF"> </span><span style="color: #ECEFF4">{</span></span>
<span class="line"><span style="color: #D8DEE9FF">    set req</span><span style="color: #81A1C1">.</span><span style="color: #D8DEE9FF">hash_always_miss </span><span style="color: #81A1C1">=</span><span style="color: #D8DEE9FF"> </span><span style="color: #81A1C1">true;</span></span>
<span class="line"><span style="color: #D8DEE9FF">  </span><span style="color: #ECEFF4">}</span></span>
<span class="line"><span style="color: #D8DEE9FF">  </span></span>
<span class="line"><span style="color: #D8DEE9FF">  </span><span style="color: #81A1C1">...</span></span>
<span class="line"><span style="color: #ECEFF4">}</span></span>
<span class="line"></span></code></pre>
<p>Now, every time Varnish receives a request with the header <code>OhDear-Authorized-Request</code> that has the value <code>ASecretStringOrPassphrase</code>, it will refresh the current page from its backend (aka: you won't be served a cached response, but it will go to your backend server).</p>
<p>In Oh Dear!, you can add this <a href="/docs/general/site-settings#custom-http-headers">custom header</a> to each of your sites.</p>
<p><img src="/uploads/blogs/ohdear-varnish-integration/ohdear_custom_http_header.png" alt="Custom HTTP header" /></p>
<p>From now, that extra header will be present every time we crawl your page.</p>
<p>This also allows extra possibilities in your Varnish code, like authorizing our crawler to access otherwise limited pages.</p>
<h2 id="checking-the-uptime-behind-your-cache">Checking the uptime behind your cache</h2>
<p>Using similar logic, we can also allow the uptime checks to bypass the cache altogether to check the availability of your site.</p>
<p>It wouldn't be the first time a site <em>appears</em> online, because the monitoring probes were answered by a cached response. Your users that bypass the cache (they might be logged in) are still seeing your error pages.</p>
<p>To let Oh Dear! bypass the cache every time without touching the TTL (Time-To-Live) or currently cached pages, you can use logic similar to this.</p>
<pre class="shiki" style="background-color: #2e3440ff"><code><span class="line"><span style="color: #D8DEE9FF">vcl_recv </span><span style="color: #ECEFF4">{</span></span>
<span class="line"><span style="color: #D8DEE9FF">  </span><span style="color: #81A1C1">if</span><span style="color: #D8DEE9FF"> </span><span style="color: #ECEFF4">(</span><span style="color: #D8DEE9FF">req</span><span style="color: #81A1C1">.</span><span style="color: #D8DEE9FF">http</span><span style="color: #81A1C1">.</span><span style="color: #D8DEE9FF">OhDear</span><span style="color: #81A1C1">-</span><span style="color: #D8DEE9FF">Authorized</span><span style="color: #81A1C1">-</span><span style="color: #D8DEE9FF">Request </span><span style="color: #81A1C1">==</span><span style="color: #D8DEE9FF"> </span><span style="color: #ECEFF4">&quot;</span><span style="color: #A3BE8C">ASecretStringOrPassphrase</span><span style="color: #ECEFF4">&quot;</span><span style="color: #ECEFF4">)</span><span style="color: #D8DEE9FF"> </span><span style="color: #ECEFF4">{</span></span>
<span class="line"><span style="color: #D8DEE9FF">    </span><span style="color: #81A1C1">return</span><span style="color: #D8DEE9FF"> </span><span style="color: #ECEFF4">(</span><span style="color: #D8DEE9FF">pass</span><span style="color: #ECEFF4">)</span><span style="color: #81A1C1">;</span></span>
<span class="line"><span style="color: #D8DEE9FF">  </span><span style="color: #ECEFF4">}</span></span>
<span class="line"><span style="color: #ECEFF4">}</span></span>
<span class="line"></span></code></pre>
<p>We're certain there are other use cases out there that we haven't even thought of. If you're doing something similar, we would love to hear from you in the comments below!</p>
]]>
            </summary>
                                    <updated>2020-06-22T06:49:46+00:00</updated>
        </entry>
            <entry>
            <title><![CDATA[Adding a Friendly Name to your sites]]></title>
            <link rel="alternate" href="https://ohdear.app/news-and-updates/adding-a-friendly-name-to-your-sites" />
            <id>https://ohdear.app/16</id>
            <author>
                <name><![CDATA[Oh Dear]]></name>
            </author>
            <summary type="html">
                <![CDATA[<p>We've added the ability to show a &quot;friendly name&quot; for your sites, instead of the domain and the URL associated with it.</p>
<p>For each website, you can configure the <em>display name</em> that we should use to present the website.</p>
<p><img src="/uploads/blogs/friendly-name/friendly-name-settings.png" alt="Friendly Name - Settings" /></p>
<p>This will be the name used throughout Oh Dear! in place likes our Slack or Email alerts, the dashboard, the breadcrumb, ...</p>
<p><img src="/uploads/blogs/friendly-name/friendly-name-show.png" alt="Friendly Name - Settings" /></p>
<p>This is especially convenient when you want to check the uptime for multiple pages on a single domain or when you have very long URLs that you can easily abbreviate to an internal project name.</p>
<p>It'll also be a core piece of one of our next features we'll be building: status pages. But more on that later. #teaser ;-)</p>
]]>
            </summary>
                                    <updated>2019-03-29T13:56:23+00:00</updated>
        </entry>
            <entry>
            <title><![CDATA[Introducing our public tools section: try Oh Dear! without an account]]></title>
            <link rel="alternate" href="https://ohdear.app/news-and-updates/introducing-our-public-tools-section-try-oh-dear-without-an-account" />
            <id>https://ohdear.app/15</id>
            <author>
                <name><![CDATA[Oh Dear]]></name>
            </author>
            <summary type="html">
                <![CDATA[<p>We launched a cool new feature that everyone can enjoy: public versions of all the checks available within Oh Dear!</p>
<p>Now you can <a href="/tools">try Oh Dear! without even creating an account</a>.</p>
<h2 id="the-philosophy-behind-our-public-checks">The philosophy behind our public checks</h2>
<p><em>Why give something away for free if others are paying for it?</em></p>
<p>We love creating tools and features that are useful for everyone, not just our paying customers. We figured there's value in offering <em>one-off</em> checks on our site without devalueing our offer to our paying customers.</p>
<p>It's a perfect way to try us out without the extra <em>hassle</em> of creating an account, even if it <a href="/register">only takes 5 seconds to start a trial</a>.</p>
<p><img src="/uploads/blogs/public-checks/public-check-cover.png" alt="Public Checks - Introduction" /></p>
<p>The public checks have their limitations:</p>
<ul>
<li>They are <em>one-off</em> checks, they don't run every minute</li>
<li>There are no notification options to alert you, other than the browser window</li>
<li>There's no <a href="/docs/api/introduction">API to automate checks</a>
</li>
</ul>
<p>But, let's focus on the good news!</p>
<h2 id="availability-tool">Availability tool</h2>
<p>Want to know if a particular site is available worldwide? You can now test using our availability checker which will test from 5 different locations spread across all continents.</p>
<p><img src="/uploads/blogs/public-checks/public-check-uptime.png" alt="Public Checks - Uptime" /></p>
<p>Try out the availability checker at <a href="/tools/certificate">ohdear.app/tools/reachable</a>.</p>
<h2 id="down-for-everyone-or-just-me">Down for everyone or just me?</h2>
<p>Many of us know and perhaps use the site <a href="https://downforeveryoneorjustme.com/">downforeveryoneorjustme.com</a> to check if a site is online worldwide. Well, we can now be an alternative for that.</p>
<p>To help users quickly identify problems, there's now <a href="https://chrome.google.com/webstore/detail/oh-dear/ebicpogndlpgfmlecipndcgjnamdnejh">a Chrome extension</a> you can use to check the availability of the site you're currently on.</p>
<p>Alternatively, you can create a new bookmark with the following URL and you it as a <em>bookmarklet</em>. Oldskool, right? :-)</p>
<pre class="shiki" style="background-color: #2e3440ff"><code><span class="line"><span style="color: #D8DEE9FF">javascript:</span><span style="color: #ECEFF4">{</span><span style="color: #D8DEE9FF">window</span><span style="color: #81A1C1">.</span><span style="color: #D8DEE9FF">location</span><span style="color: #81A1C1">=</span><span style="color: #ECEFF4">&#39;</span><span style="color: #A3BE8C">https://ohdear.app/tools/reachable?prefill=</span><span style="color: #ECEFF4">&#39;</span><span style="color: #81A1C1">+</span><span style="color: #88C0D0">encodeURIComponent</span><span style="color: #ECEFF4">(</span><span style="color: #88C0D0">window</span><span style="color: #81A1C1">.</span><span style="color: #88C0D0">location</span><span style="color: #81A1C1">.</span><span style="color: #88C0D0">href</span><span style="color: #ECEFF4">)}</span></span>
<span class="line"></span></code></pre>
<p>This snippet, when used, can allow you to quickly test any website. If you're on a site that doesn't load for you, hit that bookmarklet or the Oh Dear! browser extension and let Oh Dear! doublecheck the uptime from different locations.</p>
<p>We'll do a deeper dive into the Chrome extension at a later point, to show all the details.</p>
<h2 id="certificate-health-checks">Certificate health checks</h2>
<p>Our <a href="/tools/certificate">certificate checks</a> allow you to check the important details of your websites' certificates. We'll check the expiration date, the intermediate &amp; root certificates and some of the encryption algoritms used.</p>
<p><img src="/uploads/blogs/public-checks/public-check-certificate.png" alt="Public Checks - Certificates" /></p>
<p>We actually check a few extra things that don't quite fit the screenshot, go ahead and <a href="/tools/certificate">scan your own domain</a> to see the results.</p>
<p>What we can't show, and what our subscribers do enjoy, is:</p>
<ul>
<li>Notifications when certificates change (renewals or unexpected changes)</li>
<li>Notifications when SANs get added or removed from a certificate</li>
<li>Notifications when a root certificate gets revoked and could render your certificates useless</li>
<li>Notifications when we detect new certificates for your domains in <a href="/docs/general/certificate-transparency">certificate transparency logs</a>
</li>
</ul>
<p>As you can see, there are still plenty of reasons to <a href="/register">give us a try</a>. :-)</p>
<p>Try out the certificate checker at <a href="/tools/certificate">ohdear.app/tools/certificate</a>.</p>
<h2 id="coming-soon-broken-links-amp-mixed-content-checks">Coming soon: broken links &amp; mixed content checks</h2>
<p>A crucial piece of our offering is still missing from these public checks: our broken links &amp; mixed content reporting.</p>
<p>These work fundamentally different than the certificate &amp; uptime check. Our crawler can take anywhere between a few minutes up to an hour to complete a run and report the issues with a website.</p>
<p>As a user, you don't want to keep your browser open and wait for that.</p>
<p>We'll create a solution where you can leave your e-mail address and we'll email the report to you as soon as our crawls are done. This takes a bit more work to complete (and we want to get it right - just like the rest of our app).</p>
<p>As soon as that's finished, we'll make sure to blog about it!</p>
<h2 id="sharing-the-results">Sharing the results</h2>
<p>Every check will generate a unique URL that can be shared among colleagues, friends or on social media.</p>
<p>If there's downtime or an issue with a certificate, this will allow you to provide all the necessary info to those responsible to take action.</p>
]]>
            </summary>
                                    <updated>2019-03-12T10:25:44+00:00</updated>
        </entry>
            <entry>
            <title><![CDATA[You can now specify to who we should send your invoice]]></title>
            <link rel="alternate" href="https://ohdear.app/news-and-updates/you-can-now-specify-to-who-we-should-send-your-invoice" />
            <id>https://ohdear.app/14</id>
            <author>
                <name><![CDATA[Oh Dear]]></name>
            </author>
            <summary type="html">
                <![CDATA[<p>We've added a small but useful feature to Oh Dear! last month, which allows you to customize the recipient of your invoices.</p>
<p><img src="/uploads/blogs/billing-email/ohdear_billing_address.png" alt="Billing Options" /></p>
<p>It's not a big feature, but small &amp; incremental improvements make Oh Dear! better one step at a time.</p>
<p>You can customize the recipient per team on <a href="/billing">your team profile page</a>. If you have multiple teams (each with its own subscription), each teams' invoices can be sent to a different e-mail address.</p>
]]>
            </summary>
                                    <updated>2021-08-11T06:43:06+00:00</updated>
        </entry>
            <entry>
            <title><![CDATA[Why full service agency Marbles choose Oh Dear! for its uptime monitoring]]></title>
            <link rel="alternate" href="https://ohdear.app/news-and-updates/why-full-service-agency-marbles-choose-oh-dear-for-its-uptime-monitoring" />
            <id>https://ohdear.app/13</id>
            <author>
                <name><![CDATA[Oh Dear]]></name>
            </author>
            <summary type="html">
                <![CDATA[<p>We reached out to one of our earliest customers, <a href="https://www.marbles.be/">Marbles</a>, to ask why they decided to move from Pingdom and use our service instead. If you're in doubt whether or not to give us a try, maybe they can convince you.</p>
<h1 id="our-interview-with-marbles">Our interview with Marbles</h1>
<h2 id="hi-rias-who-are-you-and-what-does-your-business-do">Hi Rias, who are you and what does your business do?</h2>
<p>We are <a href="https://www.marbles.be/">Marbles</a>, an Antwerp based full service agency that does everything from creating identities to marketing &amp; communications, business development and coaching. Of course creating websites and web applications is part of our services and to make sure they're the best they can be we use <em>Oh Dear!</em> for the monitoring.</p>
<h2 id="cool-why-did-you-chose-oh-dear-as-your-monitoring-solution">Cool! Why did you chose Oh Dear! as your monitoring solution?</h2>
<p>It includes all the checks we need for a very fair price.</p>
<h2 id="who-did-you-have-before">Who did you have before?</h2>
<p>We used Pingdom, but only for the basic uptime checks.</p>
<h2 id="what-made-you-switch">What made you switch?</h2>
<p>The detection of mixed content &amp; broken links and the https certificate expiration checks on top of the uptime monitoring.</p>
<h2 id="how-does-oh-dear-help-you-provide-better-service-for-your-clients">How does Oh Dear! help you provide better service for your clients?</h2>
<p>By alerting us of issues before anyone could possibly notice it manually. This allows us to fix issues before our clients are even aware of it, or if they are we can tell them we're already working on a fix.</p>
<h2 id="whats-your-favorite-feature-of-oh-dear">What's your favorite feature of Oh Dear?</h2>
<p>All the extra checks on top of basic uptime monitoring with Slack notifications and webhooks to receive reports.</p>
<h2 id="is-there-a-killer-feature-were-missing-that-could-help-you">Is there a killer feature we're missing that could help you?</h2>
<p>Setting up notification &quot;groups&quot;. We have clients who have an SLA with us, they need very quick solutions and we use the SMS notifications for them, for other clients we only set up the Slack Notifications.</p>
<p>It's bothersome to set up the SMS notifications individually for each site that needs them, and if another person needs to receive these, or the phone numbers need to get changed, we need to do this for each site manually.</p>
<p><em>In response: this is indeed a very good idea still missing, we're taking this up in our development to see if we can introduce an elegant solution to this problem. Thanks for letting us know!</em></p>
<h1 id="what-makes-oh-dear-special-to-you">What makes Oh Dear! special to you?</h1>
<p>We'll be reaching out to more of our customers over the next months to find out why they chose us over the (many) competitors out there. We'd love to know what pursuaded them and what items we still need to address to serve our customers even better.</p>
<p>If you want to share your thoughts, feel free to reach out to us on Twitter at <a href="https://twitter.com/ohdearapp">@OhDearApp</a>.</p>
]]>
            </summary>
                                    <updated>2019-01-31T12:24:32+00:00</updated>
        </entry>
            <entry>
            <title><![CDATA[Oh Dear! integration in Tideways]]></title>
            <link rel="alternate" href="https://ohdear.app/news-and-updates/oh-dear-integration-in-tideways" />
            <id>https://ohdear.app/12</id>
            <author>
                <name><![CDATA[Oh Dear]]></name>
            </author>
            <summary type="html">
                <![CDATA[<p>We've partnered with <a href="https://tideways.com/">Tideways</a> to highlight application downtime within its PHP Profiler. This will allow you to easily correlate downtime events with your application exceptions being thrown.</p>
<h2 id="about-tideways">About Tideways</h2>
<p>Tideways is an advanced PHP profiler that has quickly become a must-have for a PHP developer interested in gaining insights into their application performance, exception handling and error detection.</p>
<p>The powerful profiler allows you to get detailed knowledge of your application bottlenecks with easy access to the full stacktraces and the application drilldown to <em>where</em> the bottleneck occured.</p>
<p>If you haven't tried it yet, you should give it a try - it's immensely powerful.</p>
<h2 id="correlating-downtime-events-with-application-performance">Correlating downtime events with application performance</h2>
<p>Oh Dear! has the ability to trigger up- and downtime alerts to a <a href="/docs/webhooks/introduction">webhook</a> that you specify. The payload varies per <em>event</em> we fire and gives you the ability to integrate Oh Dear! into pretty much any tool or service.</p>
<p>Tideways finished their Oh Dear! integration by allowing our users to send downtime events to their webhook endpoint. This lets Tideways know when downtime was detected and it can then be visualised right in your Tideways monitoring screen.</p>
<p><img src="https://ohdear.app/uploads/blogs/tideways-integration/ohdear-in-tideways.png" alt="Tideways Integration of Oh Dear" /></p>
<p>The ability to immediately see cause &amp; effect can be a powerful addition to your monitoring stack.</p>
<h2 id="configuring-the-tideways-webhook">Configuring the Tideways webhook</h2>
<p>Integrating <a href="/">Oh Dear!</a> into your <a href="https://tideways.com/">Tideways</a> account is super simple as explained <a href="https://support.tideways.com/article/101-ohdear">by their documentation</a>. In short: you'll find a custom webhook endpoint in your application settings that you can add to the notification options of your application.</p>
<p><img src="https://ohdear.app/uploads/blogs/tideways-integration/ohdear-tideways-webhook.png" alt="Oh Dear webook settings" /></p>
<p>Once this webhook has been configured to receive both the up- and down events, Tideways can show these in their dashboard.</p>
<p>We strongly believe in the power of combining event information in a single display. This can help users more easily correlate events and find the root causes of downtime alerts.</p>
<p>Thank you <a href="https://tideways.com/">Tideways</a> for integrating Oh Dear! into your services!</p>
<p>Want to give it a try? Both Tideways and Oh Dear! have free trial options. :-)</p>
]]>
            </summary>
                                    <updated>2019-02-06T08:14:40+00:00</updated>
        </entry>
            <entry>
            <title><![CDATA[Adding uptime capacity for our mates down under]]></title>
            <link rel="alternate" href="https://ohdear.app/news-and-updates/adding-uptime-capacity-for-our-mates-down-under" />
            <id>https://ohdear.app/11</id>
            <author>
                <name><![CDATA[Oh Dear]]></name>
            </author>
            <summary type="html">
                <![CDATA[<p>Last week we finished adding more uptime monitoring capacity for our users that are working out of Australia, to provide faster uptime monitoring.</p>
<h1 id="faster-uptime-monitoring-latency-matters">Faster uptime monitoring, latency matters</h1>
<p>If the network packets need to travel half the world, it adds up to a noticeable amount of latency when monitoring remote websites.</p>
<p>For instance, we are based out of Europe. If we were to connect to a server somewhere in Australia, we'd quickly lose 300ms for every packet we send over the network just to make it to the other side.</p>
<pre class="shiki" style="background-color: #2e3440ff"><code><span class="line"><span style="color: #D8DEE9FF">$ ping uptime</span><span style="color: #81A1C1">-</span><span style="color: #D8DEE9FF">checker</span><span style="color: #81A1C1">-</span><span style="color: #D8DEE9FF">sydney</span><span style="color: #81A1C1">.</span><span style="color: #D8DEE9FF">ohdearapp</span><span style="color: #81A1C1">.</span><span style="color: #D8DEE9FF">com</span></span>
<span class="line"><span style="color: #D8DEE9FF">PING uptime</span><span style="color: #81A1C1">-</span><span style="color: #D8DEE9FF">checker</span><span style="color: #81A1C1">-</span><span style="color: #D8DEE9FF">sydney</span><span style="color: #81A1C1">.</span><span style="color: #D8DEE9FF">ohdearapp</span><span style="color: #81A1C1">.</span><span style="color: #88C0D0">com </span><span style="color: #ECEFF4">(</span><span style="color: #B48EAD">45</span><span style="color: #ECEFF4">.</span><span style="color: #B48EAD">32</span><span style="color: #ECEFF4">.</span><span style="color: #B48EAD">189</span><span style="color: #ECEFF4">.</span><span style="color: #B48EAD">194</span><span style="color: #ECEFF4">)</span><span style="color: #81A1C1">:</span><span style="color: #D8DEE9FF"> </span><span style="color: #B48EAD">56</span><span style="color: #D8DEE9FF"> data bytes</span></span>
<span class="line"><span style="color: #B48EAD">64</span><span style="color: #D8DEE9FF"> bytes from </span><span style="color: #B48EAD">45</span><span style="color: #ECEFF4">.</span><span style="color: #B48EAD">32</span><span style="color: #ECEFF4">.</span><span style="color: #B48EAD">189</span><span style="color: #ECEFF4">.</span><span style="color: #B48EAD">194</span><span style="color: #81A1C1">:</span><span style="color: #D8DEE9FF"> icmp_seq</span><span style="color: #81A1C1">=</span><span style="color: #B48EAD">0</span><span style="color: #D8DEE9FF"> ttl</span><span style="color: #81A1C1">=</span><span style="color: #B48EAD">42</span><span style="color: #D8DEE9FF"> time</span><span style="color: #81A1C1">=</span><span style="color: #B48EAD">304</span><span style="color: #ECEFF4">.</span><span style="color: #B48EAD">764</span><span style="color: #D8DEE9FF"> ms</span></span>
<span class="line"><span style="color: #B48EAD">64</span><span style="color: #D8DEE9FF"> bytes from </span><span style="color: #B48EAD">45</span><span style="color: #ECEFF4">.</span><span style="color: #B48EAD">32</span><span style="color: #ECEFF4">.</span><span style="color: #B48EAD">189</span><span style="color: #ECEFF4">.</span><span style="color: #B48EAD">194</span><span style="color: #81A1C1">:</span><span style="color: #D8DEE9FF"> icmp_seq</span><span style="color: #81A1C1">=</span><span style="color: #B48EAD">1</span><span style="color: #D8DEE9FF"> ttl</span><span style="color: #81A1C1">=</span><span style="color: #B48EAD">42</span><span style="color: #D8DEE9FF"> time</span><span style="color: #81A1C1">=</span><span style="color: #B48EAD">304</span><span style="color: #ECEFF4">.</span><span style="color: #B48EAD">861</span><span style="color: #D8DEE9FF"> ms</span></span>
<span class="line"><span style="color: #B48EAD">64</span><span style="color: #D8DEE9FF"> bytes from </span><span style="color: #B48EAD">45</span><span style="color: #ECEFF4">.</span><span style="color: #B48EAD">32</span><span style="color: #ECEFF4">.</span><span style="color: #B48EAD">189</span><span style="color: #ECEFF4">.</span><span style="color: #B48EAD">194</span><span style="color: #81A1C1">:</span><span style="color: #D8DEE9FF"> icmp_seq</span><span style="color: #81A1C1">=</span><span style="color: #B48EAD">2</span><span style="color: #D8DEE9FF"> ttl</span><span style="color: #81A1C1">=</span><span style="color: #B48EAD">42</span><span style="color: #D8DEE9FF"> time</span><span style="color: #81A1C1">=</span><span style="color: #B48EAD">304</span><span style="color: #ECEFF4">.</span><span style="color: #B48EAD">750</span><span style="color: #D8DEE9FF"> ms</span></span>
<span class="line"></span></code></pre>
<p>This same delay is present when we perform uptime checks. The entire path between EU &amp; Australia also contains over a dozen <em>hops</em>. Each <em>hop</em> has the potential to break the connection, be overloaded, suffer downtime, ...</p>
<p>For us to monitor websites worldwide, we need to be close to the source.</p>
<h1 id="location-detection">Location detection</h1>
<p>When you sign up, we determine your default uptime monitoring location based on the IP address you sign up with. It's a simple check to set a default, where we take Paris as the fallback location for all our EU clients.</p>
<pre class="shiki" style="background-color: #2e3440ff"><code><span class="line"><span style="color: #81A1C1">protected</span><span style="color: #D8DEE9FF"> </span><span style="color: #81A1C1">function</span><span style="color: #D8DEE9FF"> </span><span style="color: #88C0D0">determineDefaultUptimeChecker</span><span style="color: #ECEFF4">()</span><span style="color: #81A1C1">:</span><span style="color: #D8DEE9FF"> </span><span style="color: #81A1C1">string</span></span>
<span class="line"><span style="color: #ECEFF4">{</span></span>
<span class="line"><span style="color: #D8DEE9FF">    </span><span style="color: #81A1C1">$</span><span style="color: #D8DEE9">detectedTimezone</span><span style="color: #D8DEE9FF"> </span><span style="color: #81A1C1">=</span><span style="color: #D8DEE9FF"> </span><span style="color: #8FBCBB">IpApi</span><span style="color: #81A1C1">::</span><span style="color: #88C0D0">getPropertiesForCurrentRequest</span><span style="color: #ECEFF4">()[</span><span style="color: #ECEFF4">&#39;</span><span style="color: #A3BE8C">timezone</span><span style="color: #ECEFF4">&#39;</span><span style="color: #ECEFF4">]</span><span style="color: #81A1C1">;</span></span>
<span class="line"></span>
<span class="line"><span style="color: #D8DEE9FF">    </span><span style="color: #81A1C1">if</span><span style="color: #D8DEE9FF"> </span><span style="color: #ECEFF4">(</span><span style="color: #88C0D0">starts_with</span><span style="color: #ECEFF4">(</span><span style="color: #81A1C1">$</span><span style="color: #D8DEE9">detectedTimezone</span><span style="color: #ECEFF4">,</span><span style="color: #88C0D0"> </span><span style="color: #ECEFF4">&#39;</span><span style="color: #A3BE8C">America</span><span style="color: #ECEFF4">&#39;</span><span style="color: #ECEFF4">))</span><span style="color: #D8DEE9FF"> </span><span style="color: #ECEFF4">{</span></span>
<span class="line"><span style="color: #D8DEE9FF">        </span><span style="color: #81A1C1">return</span><span style="color: #D8DEE9FF"> </span><span style="color: #88C0D0">array_random</span><span style="color: #ECEFF4">([</span><span style="color: #ECEFF4">&#39;</span><span style="color: #A3BE8C">toronto</span><span style="color: #ECEFF4">&#39;</span><span style="color: #ECEFF4">,</span><span style="color: #88C0D0"> </span><span style="color: #ECEFF4">&#39;</span><span style="color: #A3BE8C">dallas</span><span style="color: #ECEFF4">&#39;</span><span style="color: #ECEFF4">])</span><span style="color: #81A1C1">;</span></span>
<span class="line"><span style="color: #D8DEE9FF">    </span><span style="color: #ECEFF4">}</span></span>
<span class="line"></span>
<span class="line"><span style="color: #D8DEE9FF">    </span><span style="color: #81A1C1">if</span><span style="color: #D8DEE9FF"> </span><span style="color: #ECEFF4">(</span><span style="color: #88C0D0">starts_with</span><span style="color: #ECEFF4">(</span><span style="color: #81A1C1">$</span><span style="color: #D8DEE9">detectedTimezone</span><span style="color: #ECEFF4">,</span><span style="color: #88C0D0"> </span><span style="color: #ECEFF4">&#39;</span><span style="color: #A3BE8C">Asia</span><span style="color: #ECEFF4">&#39;</span><span style="color: #ECEFF4">))</span><span style="color: #D8DEE9FF"> </span><span style="color: #ECEFF4">{</span></span>
<span class="line"><span style="color: #D8DEE9FF">        </span><span style="color: #81A1C1">return</span><span style="color: #D8DEE9FF"> </span><span style="color: #ECEFF4">&#39;</span><span style="color: #A3BE8C">bangalore</span><span style="color: #ECEFF4">&#39;</span><span style="color: #81A1C1">;</span></span>
<span class="line"><span style="color: #D8DEE9FF">    </span><span style="color: #ECEFF4">}</span></span>
<span class="line"></span>
<span class="line"><span style="color: #D8DEE9FF">    </span><span style="color: #81A1C1">if</span><span style="color: #D8DEE9FF"> </span><span style="color: #ECEFF4">(</span><span style="color: #88C0D0">starts_with</span><span style="color: #ECEFF4">(</span><span style="color: #81A1C1">$</span><span style="color: #D8DEE9">detectedTimezone</span><span style="color: #ECEFF4">,</span><span style="color: #88C0D0"> </span><span style="color: #ECEFF4">&#39;</span><span style="color: #A3BE8C">Australia</span><span style="color: #ECEFF4">&#39;</span><span style="color: #ECEFF4">))</span><span style="color: #D8DEE9FF"> </span><span style="color: #ECEFF4">{</span></span>
<span class="line"><span style="color: #D8DEE9FF">        </span><span style="color: #81A1C1">return</span><span style="color: #D8DEE9FF"> </span><span style="color: #ECEFF4">&#39;</span><span style="color: #A3BE8C">sydney</span><span style="color: #ECEFF4">&#39;</span><span style="color: #81A1C1">;</span></span>
<span class="line"><span style="color: #D8DEE9FF">    </span><span style="color: #ECEFF4">}</span></span>
<span class="line"></span>
<span class="line"><span style="color: #D8DEE9FF">    </span><span style="color: #81A1C1">return</span><span style="color: #D8DEE9FF"> </span><span style="color: #ECEFF4">&#39;</span><span style="color: #A3BE8C">paris</span><span style="color: #ECEFF4">&#39;</span><span style="color: #81A1C1">;</span></span>
<span class="line"><span style="color: #ECEFF4">}</span></span>
<span class="line"></span></code></pre>
<p>Once your default location has been determined, we'll use that for any new site you add.</p>
<p>Of course, you can modify the location per website, right in your dashboard. If you have customers worldwide, chances are your websites are located worldwide, too.</p>
<h1 id="validation-of-downtime-via-secondary-location">Validation of downtime via secondary location</h1>
<p>We'll use the closest available location where we have servers to do our <em>primary</em> probes. For our Australian users, that will now be a server based in Sydney.</p>
<p>Once we detect downtime, we'll use a secondary location to confirm that there is indeed a problem. To confirm this, we'll use a server located in another country which is <em>also</em> served by another cloud provider.</p>
<p>Our Sydney server is run on Vultr, so we'll use one our Digital Ocean servers to confirm the downtime. This way, we eliminate false positive alerts that are caused by connectivity issues at a single cloud provider.</p>
]]>
            </summary>
                                    <updated>2018-12-18T09:59:29+00:00</updated>
        </entry>
            <entry>
            <title><![CDATA[Our Gitlab CI pipeline for Laravel applications]]></title>
            <link rel="alternate" href="https://ohdear.app/news-and-updates/our-gitlab-ci-pipeline-for-laravel-applications" />
            <id>https://ohdear.app/10</id>
            <author>
                <name><![CDATA[Oh Dear]]></name>
            </author>
            <summary type="html">
                <![CDATA[<p>We've been fairly public about the amount of testing we have for Oh Dear!. Freek has been <a href="https://twitter.com/freekmurze/status/963119438504611842">showing</a> <a href="https://twitter.com/freekmurze/status/927996380932689920">bits</a> and <a href="https://twitter.com/freekmurze/status/969680415618252800">pieces</a> on his Twitter to show the extent of that effort.</p>
<p>Having a huge test suite is nice, but integrating it into your development workflow is even better.</p>
<p>That's why we're releasing our Gitlab CI pipeline that is optimized for Laravel applications. It contains all the elements you'd expect: building (<code>composer</code>, <code>yarn</code> &amp; <code>webpack</code>), database seeding, PHPUnit &amp; copy/paste (mess) detectors &amp; some basic security auditing of our 3rd party dependencies.</p>
<p>If you want to see it in action, skip to the <a href="#how-to-use-our-gitlab-ci">&quot;how to use&quot;</a> section.</p>
<h2 id="our-laravel-ci-pipeline">Our Laravel CI pipeline</h2>
<p>Here's what our current setup looks like.</p>
<p><img src="https://ohdear.app/uploads/blogs/gitlab-ci-for-laravel/ohdear_pipelines_all_green.png" alt="Laravel CI pipeline in Gitlab" /></p>
<p>We'll break things down in this blogpost to explain <em>why</em> we've made some of the decisions we've made and how to set up a system like this.</p>
<h2 id="setting-up-gitlab-ci">Setting up Gitlab CI</h2>
<p>We use the free version of <a href="https://gitlab.com/">Gitlab</a> to host our Git repositories and launch the jobs that run all our testing. However, since we run the free version (and as a startup, we're cautious about our running costs), we are limited to what kind of CI we can run on Gitlab.</p>
<p>As such, we've installed and run our own <a href="https://docs.gitlab.com/runner/">Gitlab Runner</a>, that uses Docker containers to run our testing. The Gitlab.com servers essentially instruct <em>our</em> servers to run the entire pipeline and we report back the status to Gitlab for reporting.</p>
<p>Setting up the local <a href="https://docs.gitlab.com/runner/install/docker.html">Gitlab Runner with Docker</a> is pretty straight-forward and their documentation handles this perfectly. Some minor things we changed on our end to speed things up are related to the concurrency of the jobs.</p>
<pre class="shiki" style="background-color: #2e3440ff"><code><span class="line"><span style="color: #D8DEE9FF">$ cat /etc/gitlab-runner/config-main.toml</span></span>
<span class="line"><span style="color: #D8DEE9FF">concurrent = 2</span></span>
<span class="line"><span style="color: #D8DEE9FF">check_interval = 0</span></span>
<span class="line"></span>
<span class="line"><span style="color: #ECEFF4">[[</span><span style="color: #D8DEE9FF">runners</span><span style="color: #ECEFF4">]]</span></span>
<span class="line"><span style="color: #D8DEE9FF">  name = </span><span style="color: #ECEFF4">&quot;</span><span style="color: #A3BE8C">ohdear/ohdear</span><span style="color: #ECEFF4">&quot;</span></span>
<span class="line"><span style="color: #D8DEE9FF">  url = </span><span style="color: #ECEFF4">&quot;</span><span style="color: #A3BE8C">https://gitlab.com</span><span style="color: #ECEFF4">&quot;</span></span>
<span class="line"><span style="color: #D8DEE9FF">  token = </span><span style="color: #ECEFF4">&quot;</span><span style="color: #A3BE8C">(this is secret, don&#39;t share this)</span><span style="color: #ECEFF4">&quot;</span></span>
<span class="line"><span style="color: #D8DEE9FF">  executor = </span><span style="color: #ECEFF4">&quot;</span><span style="color: #A3BE8C">docker</span><span style="color: #ECEFF4">&quot;</span></span>
<span class="line"><span style="color: #D8DEE9FF">  </span><span style="color: #ECEFF4">[</span><span style="color: #D8DEE9FF">runners.docker</span><span style="color: #ECEFF4">]</span></span>
<span class="line"><span style="color: #D8DEE9FF">    tls_verify = </span><span style="color: #88C0D0">false</span></span>
<span class="line"><span style="color: #D8DEE9FF">    image = </span><span style="color: #ECEFF4">&quot;</span><span style="color: #A3BE8C">php:7.2</span><span style="color: #ECEFF4">&quot;</span></span>
<span class="line"><span style="color: #D8DEE9FF">    privileged = </span><span style="color: #88C0D0">false</span></span>
<span class="line"><span style="color: #D8DEE9FF">    disable_cache = </span><span style="color: #88C0D0">false</span></span>
<span class="line"><span style="color: #D8DEE9FF">    volumes = </span><span style="color: #ECEFF4">[</span><span style="color: #ECEFF4">&quot;</span><span style="color: #A3BE8C">/cache</span><span style="color: #ECEFF4">&quot;</span><span style="color: #ECEFF4">]</span></span>
<span class="line"><span style="color: #D8DEE9FF">    shm_size = 0</span></span>
<span class="line"><span style="color: #D8DEE9FF">  </span><span style="color: #ECEFF4">[</span><span style="color: #D8DEE9FF">runners.cache</span><span style="color: #ECEFF4">]</span></span>
<span class="line"></span></code></pre>
<p>By default we run our tests on PHP 7.2 and allow for 2 jobs at the same time.</p>
<h2 id="cpu-load-amp-docker-containers">CPU load &amp; Docker containers</h2>
<p>We run the testsuite on one of our own systems. When the tests start, Docker starts several containers. One of them is a MySQL container where the database seeding will happen.</p>
<pre class="shiki" style="background-color: #2e3440ff"><code><span class="line"><span style="color: #D8DEE9FF">$ docker ps</span></span>
<span class="line"><span style="color: #D8DEE9FF">COMMAND                  CREATED             NAMES</span></span>
<span class="line"><span style="color: #ECEFF4">&quot;</span><span style="color: #A3BE8C">docker-php-entryp...</span><span style="color: #ECEFF4">&quot;</span><span style="color: #D8DEE9FF">   2 minutes ago       runner-...-build-4</span></span>
<span class="line"><span style="color: #ECEFF4">&quot;</span><span style="color: #A3BE8C">docker-entrypoint...</span><span style="color: #ECEFF4">&quot;</span><span style="color: #D8DEE9FF">   2 minutes ago       runner-...-mysql-0</span></span>
<span class="line"></span></code></pre>
<p>When multiple tests run in parallel, CPU load tends to spike.</p>
<p><img src="https://ohdear.app/uploads/blogs/gitlab-ci-for-laravel/ohdear_pipeline_cpu_load.png" alt="Laravel CI pipeline in Gitlab" /></p>
<p>Remember that multiple containers will run at the same time, potentially pushing your server to 100% CPU usage. For this reason we decided to run these on one of our test machines, even though production servers have a healthy abundance of free CPU and memory.</p>
<p>But, in order for us to handle spike usage, we need to keep those resources free &amp; available.</p>
<h2 id="defining-the-stages">Defining the stages</h2>
<p>We created 4 different stages in which our tests run. These will happen stage-by-stage with a job concurrency of 2. During any stage, at most 2 jobs will be running at the same time.</p>
<pre class="shiki" style="background-color: #2e3440ff"><code><span class="line"><span style="color: #D8DEE9FF">$ cat /etc/gitlab-runner/config-main.toml</span></span>
<span class="line"><span style="color: #D8DEE9FF">concurrent = 2</span></span>
<span class="line"><span style="color: #D8DEE9FF">...</span></span>
<span class="line"></span></code></pre>
<p>If your tests require more jobs at the same time, you can increase that <code>concurrent</code> setting.</p>
<p>The previous stage must succeed before the next one can begin. Here's the abbreviated version of our <a href="https://github.com/ohdearapp/gitlab-ci-pipeline-for-laravel/blob/master/.gitlab-ci.yml">.gitlab-ci.yml</a>.</p>
<pre class="shiki" style="background-color: #2e3440ff"><code><span class="line"><span style="color: #8FBCBB">stages</span><span style="color: #ECEFF4">:</span></span>
<span class="line"><span style="color: #D8DEE9FF">  </span><span style="color: #ECEFF4">-</span><span style="color: #D8DEE9FF"> </span><span style="color: #A3BE8C">preparation</span></span>
<span class="line"><span style="color: #D8DEE9FF">  </span><span style="color: #ECEFF4">-</span><span style="color: #D8DEE9FF"> </span><span style="color: #A3BE8C">building</span></span>
<span class="line"><span style="color: #D8DEE9FF">  </span><span style="color: #ECEFF4">-</span><span style="color: #D8DEE9FF"> </span><span style="color: #A3BE8C">testing</span></span>
<span class="line"><span style="color: #D8DEE9FF">  </span><span style="color: #ECEFF4">-</span><span style="color: #D8DEE9FF"> </span><span style="color: #A3BE8C">security</span></span>
<span class="line"></span>
<span class="line"><span style="color: #8FBCBB">composer</span><span style="color: #ECEFF4">:</span></span>
<span class="line"><span style="color: #D8DEE9FF">  </span><span style="color: #8FBCBB">stage</span><span style="color: #ECEFF4">:</span><span style="color: #D8DEE9FF"> </span><span style="color: #A3BE8C">preparation</span></span>
<span class="line"></span>
<span class="line"><span style="color: #8FBCBB">yarn</span><span style="color: #ECEFF4">:</span></span>
<span class="line"><span style="color: #D8DEE9FF">  </span><span style="color: #8FBCBB">stage</span><span style="color: #ECEFF4">:</span><span style="color: #D8DEE9FF"> </span><span style="color: #A3BE8C">preparation</span></span>
<span class="line"></span>
<span class="line"><span style="color: #8FBCBB">build-assets</span><span style="color: #ECEFF4">:</span></span>
<span class="line"><span style="color: #D8DEE9FF">  </span><span style="color: #8FBCBB">stage</span><span style="color: #ECEFF4">:</span><span style="color: #D8DEE9FF"> </span><span style="color: #A3BE8C">building</span></span>
<span class="line"></span>
<span class="line"><span style="color: #8FBCBB">db-seeding</span><span style="color: #ECEFF4">:</span></span>
<span class="line"><span style="color: #D8DEE9FF">  </span><span style="color: #8FBCBB">stage</span><span style="color: #ECEFF4">:</span><span style="color: #D8DEE9FF"> </span><span style="color: #A3BE8C">building</span></span>
<span class="line"></span>
<span class="line"><span style="color: #8FBCBB">phpunit</span><span style="color: #ECEFF4">:</span></span>
<span class="line"><span style="color: #D8DEE9FF">  </span><span style="color: #8FBCBB">stage</span><span style="color: #ECEFF4">:</span><span style="color: #D8DEE9FF"> </span><span style="color: #A3BE8C">testing</span></span>
<span class="line"></span>
<span class="line"><span style="color: #8FBCBB">codestyle</span><span style="color: #ECEFF4">:</span></span>
<span class="line"><span style="color: #D8DEE9FF">  </span><span style="color: #8FBCBB">stage</span><span style="color: #ECEFF4">:</span><span style="color: #D8DEE9FF"> </span><span style="color: #A3BE8C">testing</span></span>
<span class="line"></span>
<span class="line"><span style="color: #8FBCBB">phpcpd</span><span style="color: #ECEFF4">:</span></span>
<span class="line"><span style="color: #D8DEE9FF">  </span><span style="color: #8FBCBB">stage</span><span style="color: #ECEFF4">:</span><span style="color: #D8DEE9FF"> </span><span style="color: #A3BE8C">testing</span></span>
<span class="line"></span>
<span class="line"><span style="color: #8FBCBB">sensiolabs</span><span style="color: #ECEFF4">:</span></span>
<span class="line"><span style="color: #D8DEE9FF">  </span><span style="color: #8FBCBB">stage</span><span style="color: #ECEFF4">:</span><span style="color: #D8DEE9FF"> </span><span style="color: #A3BE8C">security</span></span>
<span class="line"></span>
<span class="line"></span></code></pre>
<p>If you have a stage that consists of 3 jobs (like our <code>testing</code> stage), remember that the 3rd job might take longer to complete with a concurrency of <em>only</em> 2 jobs. Those first 2 will run in parallel, the 3rd one will have to wait for a free job <em>slot</em>.</p>
<h2 id="asset-building-before-testing">Asset building before testing?</h2>
<p>One of the steps we do different than most, is building the assets <em>before</em> we run our unit tests.</p>
<p>The reason is because of a test like this:</p>
<pre class="shiki" style="background-color: #2e3440ff"><code><span class="line"><span style="color: #81A1C1">public</span><span style="color: #D8DEE9FF"> </span><span style="color: #81A1C1">static</span><span style="color: #D8DEE9FF"> </span><span style="color: #81A1C1">function</span><span style="color: #D8DEE9FF"> </span><span style="color: #88C0D0">boot</span><span style="color: #ECEFF4">()</span></span>
<span class="line"><span style="color: #ECEFF4">{</span></span>
<span class="line"><span style="color: #D8DEE9FF">  </span><span style="color: #616E88">/* ... */</span></span>
<span class="line"></span>
<span class="line"><span style="color: #D8DEE9FF">  </span><span style="color: #81A1C1">$</span><span style="color: #D8DEE9">startServerCommand</span><span style="color: #D8DEE9FF"> </span><span style="color: #81A1C1">=</span><span style="color: #D8DEE9FF"> </span><span style="color: #ECEFF4">&#39;</span></span>
<span class="line"><span style="color: #A3BE8C">      php -S localhost:9000/ -t \</span></span>
<span class="line"><span style="color: #A3BE8C">      ./tests/Server/public &gt; /dev/null 2&gt;&amp;1 &amp; echo $!</span></span>
<span class="line"><span style="color: #A3BE8C">  </span><span style="color: #ECEFF4">&#39;</span><span style="color: #81A1C1">;</span></span>
<span class="line"></span>
<span class="line"><span style="color: #D8DEE9FF">  </span><span style="color: #81A1C1">$</span><span style="color: #D8DEE9">pid</span><span style="color: #D8DEE9FF"> </span><span style="color: #81A1C1">=</span><span style="color: #D8DEE9FF"> </span><span style="color: #88C0D0">exec</span><span style="color: #ECEFF4">(</span><span style="color: #81A1C1">$</span><span style="color: #D8DEE9">startServerCommand</span><span style="color: #ECEFF4">)</span><span style="color: #81A1C1">;</span></span>
<span class="line"></span></code></pre>
<p>During our unit tests, we spawn a webserver to test several of our key features;</p>
<ul>
<li>Uptime &amp; downtime detection</li>
<li>We crawl that test server to detect mixed content &amp; broken links</li>
<li>We test several of our custom HTTP header features</li>
</ul>
<p>This test webserver spawns <a href="/">our public website</a>, which in turn relies on compiled JavaScript &amp; CSS (<a href="https://laravel.com/docs/5.7/mix">Laravel Mix</a>). That gets compiled with <code>webpack</code>, which is why we run that asset-building stage before our unit tests.</p>
<p>Without it, our tests would simply fail as we can't render our homepage.</p>
<p>Crawling our own site - and various custom endpoints to simulate downtime or slow responses - has the additional benefit that we validate (most of) our website is functioning correctly before we deploy.</p>
<h2 id="setting-dependencies">Setting dependencies</h2>
<p>Some of our stages depend on the output of the previous stage in order to work. A good example is our <code>testing</code> stage. When we run <code>phpunit</code>, it will fetch oru homepage which in turn relies on the CSS &amp; JavaScript that got generated in the previous stage.</p>
<p>Gitlab CI allows you to set your dependencies per stage.</p>
<pre class="shiki" style="background-color: #2e3440ff"><code><span class="line"><span style="color: #D8DEE9FF">phpunit:</span></span>
<span class="line"><span style="color: #D8DEE9FF">  </span><span style="color: #ECEFF4">[</span><span style="color: #D8DEE9FF">...</span><span style="color: #ECEFF4">]</span></span>
<span class="line"><span style="color: #D8DEE9FF">  dependencies:</span></span>
<span class="line"><span style="color: #D8DEE9FF">    - build-assets</span></span>
<span class="line"><span style="color: #D8DEE9FF">    - composer</span></span>
<span class="line"><span style="color: #D8DEE9FF">    - db-seeding</span></span>
<span class="line"></span></code></pre>
<p>Setting the dependency makes sure the <code>artifacts</code> get downloaded from that particular job into this one, essentially copying the output of one job to another.</p>
<p>In this example, before we can run our unit testing we'll need:</p>
<ul>
<li>Our compiled assets (and the <code>public/mix-manifest.json</code> needed by Laravel)</li>
<li>The <code>vendor</code> directory of the <code>composer install</code>
</li>
<li>A functioning database that contains our seeded data</li>
</ul>
<p>Once that's done, it can run this job.</p>
<h2 id="caches-vs-artifacts">Caches vs. Artifacts</h2>
<p>Gitlab CI heavily relies on 2 concepts that we initially misconfigured: caches &amp; artifacts.</p>
<p>A cache is, as the word implies, a local <em>cache</em> of the data. It's available only locally on the server and is not guaranteed to be present.</p>
<p>An artifact is - in our own words - what you want to store in a job to pass on to the next one. <em>Initially</em>, artifacts were what you wanted to <em>survive</em> out of a job. Like generated logs or error files, PHP Unit coverage results etc.</p>
<p>But this feature can be used broader than just exporting test results: you can use it to pass the output of one job onto the next one.</p>
<p>We first thought to use <em>caches</em> for this purpose, as these get stored locally and are available faster. However, the cache isn't guaranteed to be there and about 30% of our pipelines would randomly fail because it was missing a composer <code>vendor</code> directory, compiled assets, ... even though those jobs completed just fine.</p>
<pre class="shiki" style="background-color: #2e3440ff"><code><span class="line"><span style="color: #8FBCBB">composer</span><span style="color: #ECEFF4">:</span></span>
<span class="line"><span style="color: #D8DEE9FF">  </span><span style="color: #8FBCBB">stage</span><span style="color: #ECEFF4">:</span><span style="color: #D8DEE9FF"> </span><span style="color: #A3BE8C">preparation</span></span>
<span class="line"><span style="color: #D8DEE9FF">  </span><span style="color: #8FBCBB">script</span><span style="color: #ECEFF4">:</span></span>
<span class="line"><span style="color: #D8DEE9FF">    </span><span style="color: #ECEFF4">-</span><span style="color: #D8DEE9FF"> </span><span style="color: #A3BE8C">composer install --prefer-dist --no-ansi --no-interaction --no-progress --no-scripts</span></span>
<span class="line"><span style="color: #D8DEE9FF">  </span><span style="color: #8FBCBB">artifacts</span><span style="color: #ECEFF4">:</span></span>
<span class="line"><span style="color: #D8DEE9FF">    </span><span style="color: #8FBCBB">paths</span><span style="color: #ECEFF4">:</span></span>
<span class="line"><span style="color: #D8DEE9FF">      </span><span style="color: #ECEFF4">-</span><span style="color: #D8DEE9FF"> </span><span style="color: #A3BE8C">vendor/</span></span>
<span class="line"><span style="color: #D8DEE9FF">      </span><span style="color: #ECEFF4">-</span><span style="color: #D8DEE9FF"> </span><span style="color: #A3BE8C">.env</span></span>
<span class="line"><span style="color: #D8DEE9FF">    </span><span style="color: #8FBCBB">expire_in</span><span style="color: #ECEFF4">:</span><span style="color: #D8DEE9FF"> </span><span style="color: #A3BE8C">1 days</span></span>
<span class="line"><span style="color: #D8DEE9FF">    </span><span style="color: #8FBCBB">when</span><span style="color: #ECEFF4">:</span><span style="color: #D8DEE9FF"> </span><span style="color: #A3BE8C">always</span></span>
<span class="line"><span style="color: #D8DEE9FF">  </span><span style="color: #8FBCBB">cache</span><span style="color: #ECEFF4">:</span></span>
<span class="line"><span style="color: #D8DEE9FF">    </span><span style="color: #8FBCBB">paths</span><span style="color: #ECEFF4">:</span></span>
<span class="line"><span style="color: #D8DEE9FF">      </span><span style="color: #ECEFF4">-</span><span style="color: #D8DEE9FF"> </span><span style="color: #A3BE8C">vendor/</span></span>
<span class="line"></span></code></pre>
<p>In the example above we define 2 critical pieces:</p>
<ul>
<li>
<code>artifacts</code>: what we want to upload back to Gitlab in order for our next job(s) to make use of</li>
<li>
<code>cache</code>: what we want to store locally to speed up the next run of this job</li>
</ul>
<p>So we ended up with Artifacts for everything we want to inherit for our next job and local caches to speed up composer installs, whenever possible.</p>
<p>This feels like code duplication in the YAML file, but it's a necessary step.</p>
<h2 id="some-gotchas-in-your-envexample">Some gotcha's in your .env.example</h2>
<p>We spawn a separate Docker container for our MySQL database. It uses a set of pre-defined environment variables to create a user with password and a database.</p>
<p>It's defined at the very top of our <a href="https://github.com/ohdearapp/gitlab-ci-pipeline-for-laravel/blob/master/.gitlab-ci.yml">.gitlab-ci.yml</a>.</p>
<pre class="shiki" style="background-color: #2e3440ff"><code><span class="line"><span style="color: #8FBCBB">variables</span><span style="color: #ECEFF4">:</span></span>
<span class="line"><span style="color: #D8DEE9FF">  </span><span style="color: #8FBCBB">MYSQL_ROOT_PASSWORD</span><span style="color: #ECEFF4">:</span><span style="color: #D8DEE9FF"> </span><span style="color: #A3BE8C">root</span></span>
<span class="line"><span style="color: #D8DEE9FF">  </span><span style="color: #8FBCBB">MYSQL_USER</span><span style="color: #ECEFF4">:</span><span style="color: #D8DEE9FF"> </span><span style="color: #A3BE8C">ohdear_ci</span></span>
<span class="line"><span style="color: #D8DEE9FF">  </span><span style="color: #8FBCBB">MYSQL_PASSWORD</span><span style="color: #ECEFF4">:</span><span style="color: #D8DEE9FF"> </span><span style="color: #A3BE8C">ohdear_secret</span></span>
<span class="line"><span style="color: #D8DEE9FF">  </span><span style="color: #8FBCBB">MYSQL_DATABASE</span><span style="color: #ECEFF4">:</span><span style="color: #D8DEE9FF"> </span><span style="color: #A3BE8C">ohdear_ci</span></span>
<span class="line"><span style="color: #D8DEE9FF">  </span><span style="color: #8FBCBB">DB_HOST</span><span style="color: #ECEFF4">:</span><span style="color: #D8DEE9FF"> </span><span style="color: #A3BE8C">mysql</span></span>
<span class="line"></span></code></pre>
<p>Our Laravel application needs to be aware of these credentials too, in order to connect to this database. We solved this by setting these credentials in our <code>.env.example</code> file.</p>
<pre class="shiki" style="background-color: #2e3440ff"><code><span class="line"><span style="color: #A3BE8C">DB_CONNECTION=mysql</span></span>
<span class="line"><span style="color: #A3BE8C">DB_HOST=mysql</span></span>
<span class="line"><span style="color: #A3BE8C">DB_PORT=3306</span></span>
<span class="line"><span style="color: #A3BE8C">DB_DATABASE=ohdear_ci</span></span>
<span class="line"><span style="color: #A3BE8C">DB_USERNAME=ohdear_ci</span></span>
<span class="line"><span style="color: #A3BE8C">DB_PASSWORD=ohdear_secret</span></span>
<span class="line"></span></code></pre>
<p>In our <code>composer</code> job, we also prepare the Laravel config for use.</p>
<pre class="shiki" style="background-color: #2e3440ff"><code><span class="line"><span style="color: #8FBCBB">composer</span><span style="color: #ECEFF4">:</span></span>
<span class="line"><span style="color: #D8DEE9FF">  </span><span style="color: #ECEFF4">[</span><span style="color: #B48EAD">...</span><span style="color: #ECEFF4">]</span></span>
<span class="line"><span style="color: #D8DEE9FF">  </span><span style="color: #8FBCBB">script</span><span style="color: #ECEFF4">:</span></span>
<span class="line"><span style="color: #D8DEE9FF">    </span><span style="color: #ECEFF4">-</span><span style="color: #D8DEE9FF"> </span><span style="color: #A3BE8C">composer install [...]</span></span>
<span class="line"><span style="color: #D8DEE9FF">    </span><span style="color: #ECEFF4">-</span><span style="color: #D8DEE9FF"> </span><span style="color: #A3BE8C">cp .env.example .env</span></span>
<span class="line"><span style="color: #D8DEE9FF">    </span><span style="color: #ECEFF4">-</span><span style="color: #D8DEE9FF"> </span><span style="color: #A3BE8C">php artisan key:generate</span></span>
<span class="line"></span></code></pre>
<p>By coping the <code>.env.example</code> file, we provided the MySQL credentials for our testing environment.</p>
<h2 id="missing-deployment-step">Missing deployment step</h2>
<p>An obvious step missing here is - perhaps - the most important one: deploying the application.</p>
<p>We haven't implemented this in Gitlab CI yet. Our deployment is automated of course, but right now it's not tied to the status of our CI pipeline. We <em>can</em> deploy, even if the tests fail.</p>
<p>We're still a small team and we make the decision to deploy thoughfully, but controlled. As many Laravel users would use <a href="https://envoyer.io/">Envoyer</a> for their deployment, further automation could be done to integrate that too.</p>
<p>We'll highlight our deployment strategy (and the reasoning to not couple this in with Gitlab CI) in a later blogpost, there are a lot of nuances that deserve highlighting for that.</p>
<h2 id="grab-our-gitlab-ci-pipeline">Grab our Gitlab CI pipeline</h2>
<p>You'll find the config on our Github: <a href="https://github.com/ohdearapp/gitlab-ci-pipeline-for-laravel">ohdearapp/gitlab-ci-pipeline-for-laravel</a>.</p>
<p>If you find issues or have improvements, feel free to contribute them!</p>
<p>The basis for this pipeline has been heavily inspired by <a href="http://lorisleiva.com/laravel-deployment-using-gitlab-pipelines/">Loris Leiva's blogpost on Laravel pipelines</a> and adapted to our needs &amp; desires.</p>
<h2 id="how-to-use-our-gitlab-ci">How to use our Gitlab CI?</h2>
<p>The abbreviated version is;</p>
<ol>
<li>Get a Gitlab account &amp; commit your code to a Gitlab repository</li>
<li>Copy/paste our <a href="https://github.com/ohdearapp/gitlab-ci-pipeline-for-laravel/blob/master/.gitlab-ci.yml">.gitlab-ci.yml</a> into your project</li>
<li>Push to your repository</li>
</ol>
<p>Now watch as Gitlab detects your config and will try to run your job. At this point, you might want to consider either subscribing to Gitlab CI or running your own Gitlab runners to execute the tests.</p>
<p>If you spot any improvements, gotcha's or have general remarks, we'd love to hear your thoughts in the comments below!</p>
]]>
            </summary>
                                    <updated>2021-07-05T12:01:56+00:00</updated>
        </entry>
            <entry>
            <title><![CDATA[Transitioning from laravel-echo-server to laravel-websockets]]></title>
            <link rel="alternate" href="https://ohdear.app/news-and-updates/transitioning-from-laravel-echo-server-to-laravel-websockets" />
            <id>https://ohdear.app/8</id>
            <author>
                <name><![CDATA[Oh Dear]]></name>
            </author>
            <summary type="html">
                <![CDATA[<p>We have just finished our transition from a websocket server based on <a href="https://github.com/tlaverdure/laravel-echo-server">laravel-echo-server</a> to one that is fully driven by PHP: <a href="https://github.com/beyondcode/laravel-websockets">laravel-websockets</a>. In this post, we'll highlight why and how we made that move.</p>
<h2 id="simplifying-our-stack">Simplifying our stack</h2>
<p>As we're built on <a href="https://laravel.com/">Laravel</a>, we already run a fair bit of nodejs during our build phase. Our frontend JavaScript &amp; CSS already get compiled via <a href="https://laravel.com/docs/5.7/mix">webpack</a>. So in a way, our stack already includes <code>node</code> to make this all happen.</p>
<p>Part of our smooth user experience (if we say so ourselves ;-)) comes from the use of websockets, that allows us to give instant feedback to our users in their dashboard &amp; our <a href="/">homepage</a>. To make that work, we've always used <a href="https://github.com/tlaverdure/laravel-echo-server">laravel-echo-server</a>, a <code>node</code> implementation of a websocket server.</p>
<p>To make that websocket server work, you can use 2 methods: use a Redis queue or publish messages directly through HTTP. We used a Redis queue, which means the following events took place for us:</p>
<ol>
<li>Laravel publishes a message to a Redis channel</li>
<li>The echo-server listens to new events being stored there</li>
<li>The echo-server relays those to its subscribers/clients</li>
</ol>
<p>This has worked very well for us, without any issues.</p>
<p>But we found ourselves in the unique spot to test an even simpler approach: run a websocket server fully in PHP without the need for node.</p>
<h2 id="moving-to-php">Moving to PHP</h2>
<p>Our initial reaction was &quot;<em>but surely PHP can't handle the load a Node process could, right?</em>&quot;.</p>
<p>Well, to get started we <a href="https://ma.ttias.be/benchmarking-websocket-server-performance-with-artillery">benchmarked the laravel-websockets package using Artillery</a>. What we found was that the websocket implementation in PHP could handle our load with great ease and keep under 50MB memory consumption.</p>
<p>Performance, during our testing, appeared on-par with the node implementation.</p>
<p>Since we weren't losing anything, we dediced to remove our node dependency for our production machines and run the entire websocket stack in PHP.</p>
<h2 id="adding-tls-and-supervisor">Adding TLS and supervisor</h2>
<p>Our setup is already using Nginx as a TLS proxy as well as Supervisor to keep all our workers running, so we already had the building blocks in place to add some configuration for our new websocket server.</p>
<p>We <a href="https://ma.ttias.be/deploying-laravel-websockets-with-nginx-reverse-proxy-and-supervisord">configured both Nginx and Supervisor</a> to handle the TLS part and the job-running pretty quickly.</p>
<h2 id="transitioning-from-laravel-echo-server-to-laravel-websockets">Transitioning from laravel-echo-server to laravel-websockets</h2>
<p>Code-wise, the change was a piece of cake. Unless we're forgetting something, it consisted of:</p>
<ul>
<li>Remove all references to <code>/js/socket.io.js</code> in our frontend (we'll no longer be needing <a href="https://socket.io/docs/client-api/">socket.io</a> for our websockets)</li>
<li>Install <a href="https://github.com/beyondcode/laravel-websockets">laravel-websockets</a> and follow its install instructions</li>
<li>Change our frontend-code from using socket.io to pusher</li>
</ul>
<pre class="shiki added deleted" style="background-color: #2e3440ff"><code><span class="line"><span style="color: #D8DEE9FF">     </span><span style="color: #D8DEE9">window</span><span style="color: #ECEFF4">.</span><span style="color: #D8DEE9">Echo</span><span style="color: #D8DEE9FF"> </span><span style="color: #81A1C1">=</span><span style="color: #D8DEE9FF"> </span><span style="color: #81A1C1">new</span><span style="color: #D8DEE9FF"> </span><span style="color: #88C0D0">Echo</span><span style="color: #D8DEE9FF">(</span><span style="color: #ECEFF4">{</span></span>
<span class="line del"><span style="color: #D8DEE9FF">       </span><span style="color: #88C0D0">broadcaster</span><span style="color: #ECEFF4">:</span><span style="color: #D8DEE9FF"> </span><span style="color: #ECEFF4">&#39;</span><span style="color: #A3BE8C">socket.io</span><span style="color: #ECEFF4">&#39;</span><span style="color: #ECEFF4">,</span></span>
<span class="line add"><span style="color: #D8DEE9FF">       </span><span style="color: #88C0D0">broadcaster</span><span style="color: #ECEFF4">:</span><span style="color: #D8DEE9FF"> </span><span style="color: #ECEFF4">&#39;</span><span style="color: #A3BE8C">pusher</span><span style="color: #ECEFF4">&#39;</span><span style="color: #ECEFF4">,</span></span>
<span class="line"><span style="color: #D8DEE9FF">         </span><span style="color: #88C0D0">key</span><span style="color: #ECEFF4">:</span><span style="color: #D8DEE9FF"> </span><span style="color: #D8DEE9">window</span><span style="color: #ECEFF4">.</span><span style="color: #D8DEE9">pusherKey</span><span style="color: #ECEFF4">,</span></span>
<span class="line del"><span style="color: #D8DEE9FF">       </span><span style="color: #88C0D0">host</span><span style="color: #ECEFF4">:</span><span style="color: #D8DEE9FF"> </span><span style="color: #D8DEE9">window</span><span style="color: #ECEFF4">.</span><span style="color: #D8DEE9">pusherHost</span><span style="color: #ECEFF4">,</span></span>
<span class="line add"><span style="color: #D8DEE9FF">       </span><span style="color: #88C0D0">wsHost</span><span style="color: #ECEFF4">:</span><span style="color: #D8DEE9FF"> </span><span style="color: #D8DEE9">window</span><span style="color: #ECEFF4">.</span><span style="color: #D8DEE9">pusherHost</span><span style="color: #ECEFF4">,</span></span>
<span class="line add"><span style="color: #D8DEE9FF">       </span><span style="color: #88C0D0">wsPort</span><span style="color: #ECEFF4">:</span><span style="color: #D8DEE9FF"> </span><span style="color: #D8DEE9">window</span><span style="color: #ECEFF4">.</span><span style="color: #D8DEE9">pusherPort</span><span style="color: #ECEFF4">,</span></span>
<span class="line add"><span style="color: #D8DEE9FF">       </span><span style="color: #88C0D0">disableStats</span><span style="color: #ECEFF4">:</span><span style="color: #D8DEE9FF"> </span><span style="color: #81A1C1">true</span><span style="color: #ECEFF4">,</span></span>
<span class="line"><span style="color: #D8DEE9FF">     </span><span style="color: #ECEFF4">}</span><span style="color: #D8DEE9FF">)</span><span style="color: #81A1C1">;</span></span>
<span class="line"></span></code></pre>
<ul>
<li>Change our broadcast driver from Redis to using Pusher in <code>.env</code>
</li>
</ul>

<p>That was enough for us to move to <a href="https://github.com/beyondcode/laravel-websockets">laravel-websockets</a>.</p>
<h2 id="what-did-we-gain">What did we gain?</h2>
<p>One of its biggest gains is in our development process: we now just need to run <code>php artisan websocket:serve</code> to get a local websocket server going and not have to deal with the (rather confusing) configuration of laravel-echo-server.</p>
<p>Additionally, we simplified our server setup and now fully rely on PHP without Node for running websockets. Managing less software is always a win, especially from a security angle (keeping track of the node ecosystem and the dependencies of the echo-server).</p>
<p>For us, it was a no-brainer to make the switch.</p>
]]>
            </summary>
                                    <updated>2018-12-04T21:21:33+00:00</updated>
        </entry>
            <entry>
            <title><![CDATA[Redesigning parts of our homepage]]></title>
            <link rel="alternate" href="https://ohdear.app/news-and-updates/redesigning-parts-of-our-homepage" />
            <id>https://ohdear.app/9</id>
            <author>
                <name><![CDATA[Oh Dear]]></name>
            </author>
            <summary type="html">
                <![CDATA[<p>We've launched a fresh now look for the Oh Dear! homepage and a lot of tweaks to the overall look &amp; feel of the public facing pages of our site. Allow us to show those changes in more detail!</p>
<h2 id="a-fresh-clean-homepage">A fresh, clean homepage</h2>
<p>This is visually the most noticeable change we've pushed. When we first launched, our design looked like this.</p>
<p><img src="/uploads/blogs/redesign-201811/ohdear_v1_homepage.png" alt="Homepage version 1" /></p>
<p>We liked that design quite a bit. It stood out. You don't see many startups foolish enough to make their entire homepage screaming red. It was also <em>sort-of</em> a reference to the red error screens you'd see when a site certificated had expired in the browser.</p>
<p>But, the number one piece of feedback we received was: &quot;aargh my eyes!&quot;.</p>
<p>And, well, we couldn't blame them. :-)</p>
<p>So here's a freshly designed homepage, easier on the eyes with updated text to showcase what we do and what our strenghts are.</p>
<p><img src="/uploads/blogs/redesign-201811/ohdear_v2_homepage.png" alt="Homepage version 2" /></p>
<p>There's still some screaming red involved, but it doesn't cover the entire homepage anymore. Besides highlighting what we're good at (doing <em>more</em> in terms of website monitoring than most of our competitors) we also have a live counter of the amount of checks we've run so far, refreshed live through the use of websockets.</p>
<p><img src="/uploads/blogs/redesign-201811/homepage-counter.gif" alt="Homepage version 2" /></p>
<p>Everything inside Oh Dear! is powered by websockets, now a part of the public facing website is too!</p>
<h2 id="updated-blogpost-design">Updated blogpost design</h2>
<p>This is a bit <em>meta</em> as you're already reading this on our blog, but this design got some nice tweaks too. Here's what it looked like before.</p>
<p>It was functional, but not <em>pretty</em>.</p>
<p><img src="/uploads/blogs/redesign-201811/ohdear_v1_blogpost.png" alt="Blogpost version 1" /></p>
<p>Here's <a href="/blog/automatic-monitoring-of-laravel-forge-managed-sites">that same blogpost</a> with a new coat of paint.</p>
<p><img src="/uploads/blogs/redesign-201811/ohdear_v2_blogpost.png" alt="Blogpost version 2" /></p>
<p>The images get highlighted more (extending the width of the text), clearer headings and some updated typography.</p>
<h2 id="highlighting-our-user-testimonials-amp-quotes">Highlighting our user testimonials &amp; quotes</h2>
<p>One thing we're very proud of is the feedback we receive from our users. Some big names in our industry have publicly endorsed us and we definitely want to showcase those.</p>
<p>At first, our quotes on the homepage looked like this.</p>
<p><img src="/uploads/blogs/redesign-201811/ohdear_v1_quotes.png" alt="Quotes version 1" /></p>
<p>Since we were actually starting to accumulate <em>so many positive quotes</em>, we needed a new design to feature more. This is the current layout we have.</p>
<p><img src="/uploads/blogs/redesign-201811/ohdear_v2_quotes.png" alt="Quotes version 2" /></p>
<p>More content horizontally and an updated <em>zig-zag</em> layout to break the symmetry on the page.</p>
<h2 id="tweaks-to-the-pricing-amp-documentation">Tweaks to the pricing &amp; documentation</h2>
<p>We applied the same design principles to our <a href="/pricing">pricing</a> and <a href="/docs">documentation</a> too. We've improved readability by adding contrast between titles &amp; text and by increasing the font-size and line height slightly.</p>
<p>Behind the scenes, we've been extending our <a href="/docs">documentation</a> quite a lot too, which meant our left-hand menu was growing to be a bit <em>too</em> big. That now auto-folds to highlight the current category.</p>
<p>Many of those pages just look a lot better too, like our <a href="/docs/api/uptime">API documentation on uptime reporting</a> or how to <a href="/docs/api/sites">use our API and manage your sites</a>.</p>
<p>At the same time we added a section to highlight all <a href="/docs/3rd-party-integrations/introduction">3rd party integrations</a> that make use of our API. There's already a Terraform provider, a Telegram chatbot and a CLI client available to talk to Oh Dear! - how cool is that?</p>
<p>If you find areas of our site or application that needs improvements, we'd love to hear about them!</p>
]]>
            </summary>
                                    <updated>2020-02-25T08:25:45+00:00</updated>
        </entry>
            <entry>
            <title><![CDATA[Just for Black Friday, we're doubling our prices]]></title>
            <link rel="alternate" href="https://ohdear.app/news-and-updates/just-for-black-friday-were-doubling-our-prices" />
            <id>https://ohdear.app/7</id>
            <author>
                <name><![CDATA[Oh Dear]]></name>
            </author>
            <summary type="html">
                <![CDATA[<p>Black Friday.</p>
<p>Everyone's throwing out coupon codes with crazy discounts, right? Why on earth would we be doubling our price for just that day?</p>
<h2 id="price-value">$price === $value</h2>
<p>For many online services, Black Friday is a huge source of income. Webshops reportedly double or even triple their revenue that day. Many make up for a bad month <em>in just that single day</em>.</p>
<p>On your most important sales day of the year, you want your site to be online. Therefore, on that day, our service is twice as valuable.</p>
<p>You see, when we first built Oh Dear!, it was to fix what we considered to be wrong with the current monitoring solutions out there. Many of them just did one check (mostly the homepage). Many didn't report certificate errors. Nearly no one was crazy enough to crawl an entire site and report <em>all</em> broken pages.</p>
<p>Yet, in order to be a succesfull online business, you need all of that.</p>
<h2 id="wait-youre-serious">Wait, you're serious?</h2>
<p>Of course we are. ;-)</p>
<p>You can't afford downtime when you're in peak sales. You want to be certain about your uptime and place your trust in a respected monitoring provider. So that's what we'll do on Black Friday: take care of monitoring your sites, 24/7.</p>
<p>Now, if you want to be <em>absolutely</em> certain you're online, you could go ahead and subscribe to Oh Dear! in advance. If you use coupon code <code>BLACKFRIDAY18</code> <em>before</em> Black Friday, you'll get 30% off your first month.</p>
<p>The code expires on Thursday, November 22nd at midnight.</p>
<p><em>Oh by the way, we're only doubling our prices on Black Friday, not permanently. We're not actually crazy, you know. :-)</em></p>
]]>
            </summary>
                                    <updated>2018-11-20T07:52:57+00:00</updated>
        </entry>
            <entry>
            <title><![CDATA[Introducing the Oh Dear! plugin for Laravel Nova]]></title>
            <link rel="alternate" href="https://ohdear.app/news-and-updates/introducing-the-oh-dear-plugin-for-laravel-nova" />
            <id>https://ohdear.app/6</id>
            <author>
                <name><![CDATA[Oh Dear]]></name>
            </author>
            <summary type="html">
                <![CDATA[<p>Today we released our new open source package called <a href="https://github.com/ohdearapp/nova-ohdear-tool">nova-ohdear-tool</a>. It's meant to be installed into a Laravel Nova app. <a href="https://nova.laravel.com">Laravel Nova</a> is a package that allows you to easily create admin panels for Laravel applications.</p>
<p>You'll find the installation instructions in <a href="http://ohdear.app/docs/nova-tool/getting-started">the documentation section of Oh Dear!</a>.</p>
<h2 id="whats-the-nova-tool-like">What's the Nova tool like?</h2>
<p>Here's what it looks like installed in <a href="https://murze.be">the murze.be blog</a>:
<img src="https://ohdear.app/uploads/blogs/laravel-nova/overview.png" alt="Overview of the tool" /></p>
<p>The tool allows you to:</p>
<ul>
<li>view the latest results for all the checks we perform</li>
<li>quickly request a new run of a check</li>
<li>enable or disable a check</li>
<li>take a look at the uptime / downtime stats for the past years and months</li>
<li>view a list of broken links on the site</li>
<li>view a list of mixed content on the site</li>
<li>see certificate details</li>
</ul>
<p><img src="https://ohdear.app/uploads/blogs/laravel-nova/uptime-report.png" alt="Uptime report" /></p>
<p><img src="https://ohdear.app/uploads/blogs/laravel-nova/certificate-details.png" alt="Certificate details" /></p>
<p><img src="https://ohdear.app/uploads/blogs/laravel-nova/broken-link-report.png" alt="Broken links report" /></p>
<h2 id="whats-in-it-for-you">What's in it for you?</h2>
<p>The benefit to you - or your users - is to be able to get a birds-eye view of the health of your entire site.</p>
<p>You can easily see which of your pages are broken and - since you're already in your admin panel - can quickly fix it the problem or the broken link. Once that's done, just request a new crawl straight from your application and watch the results come in.</p>
<p>The Oh Dear! tool allows you to fully manage the monitoring of your website without ever leaving your site. Pretty cool, right?</p>
<h2 id="under-the-hood">Under the hood</h2>
<p>Let's take a quick peek under the hood. Our package is a so called Nova Tool. A <a href="https://nova.laravel.com/docs/1.0/customization/tools.html">Nova Tool</a> is an official way to add functionality to Laravel Nova.</p>
<p>Nova is a single page application. The backend is powered by Laravel, the front end by Vue. No surprises there! A Nova tool is nothing more than a package that contains:</p>
<ul>
<li>a PHP API to fetch data from a source and pass it to the client side</li>
<li>a collection of Vue components to display the data the server provides via the API.</li>
</ul>
<p>On the server side the API consist of a few <a href="https://github.com/ohdearapp/nova-ohdear-tool/blob/f3c903a25de5e532c62cf464dfae1386b94c6e43/routes/api.php">routes</a> and <a href="https://github.com/ohdearapp/nova-ohdear-tool/tree/f3c903a25de5e532c62cf464dfae1386b94c6e43/src/Http/Controllers">controllers</a>. To communicate with Oh Dear! these controllers use <a href="http://ohdear.app/docs/php-sdk/introduction">our own PHP SDK</a>.</p>
<p>Over at the client side <a href="https://github.com/ohdearapp/nova-ohdear-tool/blob/c09da66e6a11dff88b590c6ea429081a1bf65103/resources/js/api.js">the api.js file</a> contains all Axios calls to consume the api provided by the server.</p>
<p>Per screen you see in the tool there's a matching Vue component. You'll find these components in <a href="https://github.com/ohdearapp/nova-ohdear-tool/tree/c09da66e6a11dff88b590c6ea429081a1bf65103/resources/js/components">the components directory</a>. To switch between screens the Nova tool uses <a href="https://router.vuejs.org/">Vue Router</a>. All the routes it uses are registered in <a href="https://github.com/ohdearapp/nova-ohdear-tool/blob/c09da66e6a11dff88b590c6ea429081a1bf65103/resources/js/tool.js">the tool.js file</a>.</p>
<h2 id="getting-started">Getting started</h2>
<p>If you want to use our Nova tool, make sure you have an active Oh Dear account. You can create one <a href="https://ohdear.app/register">here</a> (it's free for the first 10 days).</p>
<p>Next, create a Laravel app with Nova installed into it. To know more of Nova itself, check out <a href="https://nova.laravel.com/docs/1.0/installation.html">the official Nova documention</a>. Once that is done, follow our documentation to know <a href="http://ohdear.app/docs/nova-tool/introduction">how to install our Nova tool into your Nova app</a>.</p>
]]>
            </summary>
                                    <updated>2018-11-19T12:44:03+00:00</updated>
        </entry>
            <entry>
            <title><![CDATA[Automatic monitoring of Laravel Forge managed sites]]></title>
            <link rel="alternate" href="https://ohdear.app/news-and-updates/automatic-monitoring-of-laravel-forge-managed-sites" />
            <id>https://ohdear.app/5</id>
            <author>
                <name><![CDATA[Oh Dear]]></name>
            </author>
            <summary type="html">
                <![CDATA[<p>We've launched a cool feature for our users on the Laravel Forge platform: automatic monitoring of any of your sites and servers managed through Laravel Forge!</p>
<h2 id="how-the-automatic-monitoring-works">How the automatic monitoring works</h2>
<p>Forge recently introduced a feature called <code>tags</code>, which allows you to add custom tags to any <em>server</em> or <em>site</em> in Forge.</p>
<p>We use those tags to determine which sites we should automatically add to your Oh Dear! Account. Every site or server tagged with <code>oh-dear</code> will be added. This allows you to still pick which sites should - or should <em>not</em> - get monitored.</p>
<p><img src="https://ohdear.app/uploads/blogs/laravel-forge-import/laravel_forge_tags.png" alt="Oh Dear tags" /></p>
<p>There are 2 ways you can use these tags right now:</p>
<ul>
<li>Add a tag to a server</li>
<li>Add a tag to a site</li>
</ul>
<p>If you add a tag to a server, <strong>we will automatically monitor every site that gets added to it</strong>. This is convenient for users that have multiple sites on a single server.</p>
<p>Alternatively, if you want more fine grained control over the monitoring, you can add the tags to an individual site too, instead of on the server. We'll only import <em>those</em> sites that have the tag.</p>
<h2 id="add-your-forge-api-token-to-oh-dear">Add your Forge API token to Oh Dear!</h2>
<p>To get started, you can add a Laravel Forge API token in your <a href="/team-settings/forge">Oh Dear! dashboard</a>.</p>
<p>In the same settings page, you can decide which checks we should automatically enable for newly found sites. This applies to the sites that will be imported straight away, as well as the ones we will add later on as you add more sites to Forge.</p>
<p><img src="https://ohdear.app/uploads/blogs/laravel-forge-import/laravel_forge_settings.png" alt="Forge Import" /></p>
<p>When we import a website, we will assume it'll be <code>https</code> enabled. Hey, it's 2018 after all. If it's an <code>http</code>-only site, you can add an explicit extra tag called <code>oh-dear-http</code> to force the use of HTTP instead.</p>
<p>You can find more information on how this works on our <a href="/docs/general/forge-import">Forge import documentation</a>.</p>
<h2 id="get-notified-when-we-automatically-add-a-site-from-forge">Get notified when we automatically add a site from Forge</h2>
<p>If your team is growing, it'll become important to know which sites got added to Oh Dear! and which didn't. To facilitate this, we add a new event to our notifications system that you can configure.</p>
<p><img src="https://ohdear.app/uploads/blogs/laravel-forge-import/ohdear_notification_site_add.png" alt="Site added to Oh Dear" /></p>
<p>There's now a &quot;<em>Site added to account</em>&quot; event. This can be sent to any of our <a href="/docs/notifications/introduction">notifications channels (Slack, Email, Discord, ...)</a>. It will fire whenever a website gets added to your account, either from the Laravel Forge import, through <a href="/docs/api/introduction">our API</a> or the <a href="/sites">Oh Dear! dashboard</a>.</p>
<p><img src="https://ohdear.app/uploads/blogs/laravel-forge-import/laravel_forge_site_added.png" alt="Site added to Oh Dear notification" /></p>
<p>This way, your team will automatically be aware that a new site has been added to your account which <em>might</em> trigger alerts.</p>
<p>Through our <a href="/docs/webhooks/introduction">webhooks</a>, you can also pass on this information to any other service you may be running.</p>
<h2 id="save-some-bucks-on-forge-and-oh-dear">Save some bucks on Forge and Oh Dear!</h2>
<p>The creator of Forge, <a href="https://twitter.com/taylorotwell">Taylor Otwell</a>, was kind enough to provide us with a sign-up link for Forge that will give you a discount of 25% on the first bill you'll get from Forge. You can find the sign-up link on our <a href="/team-settings/forge">Forge Import settings screen</a>. Hurry up, because that link is only valid until 16 november 2018.</p>
<p>If you don't have an Oh Dear account yet to view that Forge coupon code, <a href="https://ohdear.app/register">register here</a>. The first 10 days are free, no questions (or creditcards) asked. If you decide to subscribe to Oh Dear! you can use this coupon code to get 25% discount on the first bill you'll get from us: <code>OH-DEAR-LOVES-FORGE</code> This coupon code is also only valid until 16 november 2018.</p>
<h2 id="oh-dear-laravel-forge">Oh Dear! ❤️ Laravel Forge</h2>
<p>Most of our servers are provisioned through Laravel Forge, as well as the sites that run on them. It is an amazingly powerful tool that benefits the entire Laravel community.</p>
<p>We are greatful for both the API and Tags support that recently got added to Forge, allowing the development of this feature.</p>
<p>The best kind of monitoring is the one you don't have to think about, this is another step in that direction.</p>
]]>
            </summary>
                                    <updated>2018-11-17T00:00:40+00:00</updated>
        </entry>
    </feed>
