Questions
Question 1
Which design pattern has as its primary responsibility to decouple presentation and service tiers, and a central director?
A. Value Object
B. Composite View
C. Business Delegate
D. Model-View-Controller
Question 2
Which design pattern has as its primary responsibility to exchange data between tiers?
A. Value Object
B. Composite View
C. Business Delegate
D. Model-View-Controller
Question 3
Which design pattern has as its primary responsibility to abstract data sources and provide transparent access to the data in these sources?
A. Value Object
B. Data Access Object
C. Business Delegate
D. Model-View-Controller
E. None of the above
Question 4
Which design pattern has as its primary responsibility to isolate the presentation and the business tiers from each other by adding a director between the two, making it is easier to manage changes on either side?
A. Session Facade
B. Data Access Object
C. Business Delegate
D. Model-View-Controller
E. Aggregate Entity
Question 5
Which one of the following is most likely used for cache?
A. Value Object
B. Data Access Object
C. Business Delegate
D. Cache Object
E. Aggregate Entity
Question 6
Which design pattern acts as a switchboard, dispatching incoming requests to the correct resource?
A. Value Object
B. Data Access Object
C. Business Delegate
D. Front Controller
Question 7
Which design pattern is most likely to care about RDBMS, OODBMS, and flat files?
A. Value Object
B. Data Access Object
C. Business Delegate
D. Cache Object
E. Aggregate Entity
Question 8
Which design pattern does the following force most affect?
Persistent storage APIs vary between vendors, which causes a lack of uniform APIs to address the requirements for accessing storages.
A. Value Object
B. Data Access Object
C. Business Delegate
D. Cache Object
E. Aggregate Entity
Question 9
Which design pattern has as its primary role to provide control and protection for the business service?
A. Value Object
B. Data Access Object
C. Business Delegate
D. Cache Object
E. Aggregate Entity
Question 10
Which design pattern is most likely to be used as a proxy?
A. Business Delegate
B. Data Access Object
C. Model-View-Controller
D. Value Object
Question 11
Which design pattern reduces the number of remote network method calls required to obtain the attribute values from the entity beans?
A. Business Delegate
B. Data Access Object
C. Model-View-Controller
D. Value Object
Question 12
Which design pattern that usually is a good candidate to work with entity beans becomes less useful when a cache is used to persist data?
A. Business Delegate
B. Data Access Object
C. Model-View-Controller
D. Value Object
Answers
Question 1
D. The Model-View-Controller pattern has as its primary responsibility to decouple presentation and data/business logic tiers, by using a director or switchboard between them.
Question 2
A. The Value Object pattern has as its primary responsibility to exchange data between tiers. Although the Business Delegate and Model-View-Controller also do this, it isn't their primary responsibility.
Question 3
B. The Data Access Object pattern has as its primary responsibility to abstract data sources and provide transparent access to the data in these sources. The Business Delegate and Model-View-Controller may do so, but the Data Access Object always does this.
Question 4
D. The Model-View-Controller pattern has as its primary responsibility to minimize the impact of changing the client or business tier. Remember that this is a very high-level pattern, so it often uses other patterns.
Question 5
A. The Value Object pattern is most likely used for cache. Notice that its whole purpose is to collect data from somewhere far and bring it close in a neat package. The Data Access Object and Business Delegate often actually use a Value Object underneath. The Cache Object is fiction and the Aggregate Entity is not one of the four that you might see on the exam.
Question 6
D. The front controller pattern acts as a switch board, dispatching incoming requests to the correct resource.
Question 7
B. The Data Access Object design pattern is one that deals with RDBMS, OODBMS, excel, flat files, and more. This is pattern you use to isolate the access API from the actual data repository implementation. Value Object and Business Delegate don't do this. The other two patterns mentioned are distracters.
Question 8
B. The Data Access Object design pattern is affected most by varying persistent storage APIs due to different vendors and non-uniform APIs to address the requirements to access storages. Whenever you see the word persistent, think Data Access Object design pattern.
Question 9
C. The Business Delegate design pattern has as its primary role to provide control and protection for the business service. Although you can't just ignore the rest of the Question, normally when a Question focuses on the business service, think Business Delegate design pattern.
Question 10
A. The Business Delegate design pattern is most likely to be used as a proxy. Its whole purpose is being the mediator between a business service and the rest of the world, especially, but not limited to, clients. This is what proxies do, too.
Question 11
D. The Value Object design pattern reduces the number of remote network method calls required to obtain the attribute values from the entity beans. Although the four patterns in the answers do this, it's the main reason for using a Value Object.
Question 12
B. The Data Access Object design pattern is usually a good candidate to work with data that is remote or and costly to query often, but becomes a bad choice with container-managed persistence. This is tricky because the container often, but not always, will persist data as a primary function.
Previous Chapter: Quick Recap - Chapters 51 to 58
Next Chapter: Chapter 59 - Exam Preparation Tips

Topics Covered in the Blog - Synopsis

Showing posts with label scwcd certification. Show all posts
Showing posts with label scwcd certification. Show all posts
Friday, April 29, 2011
Self Test: Chapters 47 to 50
Questions:
Question 1:
Which two statements apply to the following code snippet? (Choose two.)
< servlet >
< servlet-name >
testServlet
< /servlet-name >
< servlet-class >
myPackage.MyTestServlet
< /servlet-class >
< /servlet >
A. It is a mapping between a servlet name and the fully-qualified name of the servlet class.
B. It is a map between a URL and a servlet.
C. This code belongs in the WebApp deployment descriptor.
D. It tells the container where to install the servlet.
Question 2:
Which two of the following statements most closely relate to HTTPS Client Authentication?
A. It uses a Status-Code element (three-digit integer).
B. It uses predefined form fields.
C. It is the most secure form of authentication.
D. It uses SSL.
Question 3:
Which directory is the location for myApp.jar?
A. /WEB-INF/
B. /WEB-INF/classes/
C. /WEB-INF/lib/D. /
Question 4:
In which two elements can you define initialization parameters?
A. servlet
B. context-param
C. welcome-file
D. login-config
Question 5:
Which three of the following are elements of the Web Application Descriptor?
A. servlet
B. context-param
C. listener
D. error
Question 6:
What is the configuration that the deployment descriptor uses to handle each exception?
A. error-page
B. exception
C. error
D. exception-page
Question 7:
What is the deployment descriptor file named?
A. server.conf
B. server.xml
C. web.xml
D. web.conf
Question 8:
Which directory is the location for Web application class files?
A. /WEB-INF/
B. /WEB-INF/classes/
C. /WEB-INF/classpath/
D. /META-INF/classes
Question 9:
What does the security-role element do?
A. It configures the authentication method that should be used by the form login mechanism.
B. It defines the status codes for security breaches.
C. It contains a mapping between an error code or exception type to the path of a resource in the Web application.
D. It describes and names the security role.
Question 10:
Which directory is the location for the deployment descriptor?
A. /WEB-INF/
B. /WEB-INF/classes/
C. /WEB-INF/lib/D. /
Question 11:
Which of the following best defines authentication?
A. The means used to prove that information has not been modified by a third party while in transit.
B. This is access control where interactions with resources are limited to collections of users or programs for the purpose of enforcing integrity, confidentiality, or availability constraints.
C. You have permission to use a given page.
D. The means by which communicating entities prove to one another that they are acting on behalf of specific identities.
Question 12:
What is the best definition for auditing?
A. This is access control where it defines who can interact with what resources.
B. Maintaining a record of Web application activity.
C. This is a check of the Web application when it is used for commercial transactions.
D. This prevents Web site attacks.
Answers:
Question 1:
A and C. The servlet element establishes a mapping between a servlet name and the fully-qualified name of the servlet class. You would place this code in the WebApp deployment descriptor.
Question 2:
C and D. This is end user authentication using HTTPS (HTTP over SSL). This mechanism uses public key encryption that requires the user to possess a Public Key Certificate (PKC). This is the highest level security of the four here.
Question 3:
C. The jar files go in the /WEB-INF/lib/ directory.
Question 4:
A and B. The initialization parameters are defined in both the context-param and the servlet elements of the Web deployment descriptor.
Question 5:
A, B, and C. All of these are elements except there is no error element. It should have been error-page.
Question 6:
A. The error-page element, which defines what resource the container should use for a given exception.
< web-app >
< error-page >
< error-code >404< / error-code >
< location > /404.html < /location >
< /error-page >
< /web-app >
Question 7:
C. web.xml is the deployment descriptor file.
Question 8:
B. You place your servlets and utility classes in /WEB-INF/classes/.
Question 9:
D. The security-role element contains the definition of a security role. The definition consists of an optional description of the security role, and the security role name.
Question 10:
A. web.xml is the deployment descriptor file in /WEB-INF/web.xml.
Question 11:
D. Authentication is the means by which communicating entities prove to one another that they are acting on behalf of specific identities. In other words, it is the attempt to prove that you are really you.
Question 12:
B. Maintain a record of Web application activity. For example, you can log resource accesses including times and requester IP and ID. This usually involves a log somewhere.
Previous Chapter: Quick Recap - Chapters 47 to 50
Next Chapter: Chapter 51 - Introduction to Design Patterns
Question 1:
Which two statements apply to the following code snippet? (Choose two.)
< servlet >
< servlet-name >
testServlet
< /servlet-name >
< servlet-class >
myPackage.MyTestServlet
< /servlet-class >
< /servlet >
A. It is a mapping between a servlet name and the fully-qualified name of the servlet class.
B. It is a map between a URL and a servlet.
C. This code belongs in the WebApp deployment descriptor.
D. It tells the container where to install the servlet.
Question 2:
Which two of the following statements most closely relate to HTTPS Client Authentication?
A. It uses a Status-Code element (three-digit integer).
B. It uses predefined form fields.
C. It is the most secure form of authentication.
D. It uses SSL.
Question 3:
Which directory is the location for myApp.jar?
A. /WEB-INF/
B. /WEB-INF/classes/
C. /WEB-INF/lib/D. /
Question 4:
In which two elements can you define initialization parameters?
A. servlet
B. context-param
C. welcome-file
D. login-config
Question 5:
Which three of the following are elements of the Web Application Descriptor?
A. servlet
B. context-param
C. listener
D. error
Question 6:
What is the configuration that the deployment descriptor uses to handle each exception?
A. error-page
B. exception
C. error
D. exception-page
Question 7:
What is the deployment descriptor file named?
A. server.conf
B. server.xml
C. web.xml
D. web.conf
Question 8:
Which directory is the location for Web application class files?
A. /WEB-INF/
B. /WEB-INF/classes/
C. /WEB-INF/classpath/
D. /META-INF/classes
Question 9:
What does the security-role element do?
A. It configures the authentication method that should be used by the form login mechanism.
B. It defines the status codes for security breaches.
C. It contains a mapping between an error code or exception type to the path of a resource in the Web application.
D. It describes and names the security role.
Question 10:
Which directory is the location for the deployment descriptor?
A. /WEB-INF/
B. /WEB-INF/classes/
C. /WEB-INF/lib/D. /
Question 11:
Which of the following best defines authentication?
A. The means used to prove that information has not been modified by a third party while in transit.
B. This is access control where interactions with resources are limited to collections of users or programs for the purpose of enforcing integrity, confidentiality, or availability constraints.
C. You have permission to use a given page.
D. The means by which communicating entities prove to one another that they are acting on behalf of specific identities.
Question 12:
What is the best definition for auditing?
A. This is access control where it defines who can interact with what resources.
B. Maintaining a record of Web application activity.
C. This is a check of the Web application when it is used for commercial transactions.
D. This prevents Web site attacks.
Answers:
Question 1:
A and C. The servlet element establishes a mapping between a servlet name and the fully-qualified name of the servlet class. You would place this code in the WebApp deployment descriptor.
Question 2:
C and D. This is end user authentication using HTTPS (HTTP over SSL). This mechanism uses public key encryption that requires the user to possess a Public Key Certificate (PKC). This is the highest level security of the four here.
Question 3:
C. The jar files go in the /WEB-INF/lib/ directory.
Question 4:
A and B. The initialization parameters are defined in both the context-param and the servlet elements of the Web deployment descriptor.
Question 5:
A, B, and C. All of these are elements except there is no error element. It should have been error-page.
Question 6:
A. The error-page element, which defines what resource the container should use for a given exception.
< web-app >
< error-page >
< error-code >404< / error-code >
< location > /404.html < /location >
< /error-page >
< /web-app >
Question 7:
C. web.xml is the deployment descriptor file.
Question 8:
B. You place your servlets and utility classes in /WEB-INF/classes/.
Question 9:
D. The security-role element contains the definition of a security role. The definition consists of an optional description of the security role, and the security role name.
Question 10:
A. web.xml is the deployment descriptor file in /WEB-INF/web.xml.
Question 11:
D. Authentication is the means by which communicating entities prove to one another that they are acting on behalf of specific identities. In other words, it is the attempt to prove that you are really you.
Question 12:
B. Maintain a record of Web application activity. For example, you can log resource accesses including times and requester IP and ID. This usually involves a log somewhere.
Previous Chapter: Quick Recap - Chapters 47 to 50
Next Chapter: Chapter 51 - Introduction to Design Patterns
Quick Recap: Chapters 47 to 50
Let us quickly review what we learnt about the Web Application Deployment and the Deployment Descriptor web.xml in the previous few chapters.
Web Application Folder Structure:
1. The WEB-INF is the root directory of any Web Application
2. This directory contains two folders /classes – to hold all the class files and /lib to hold all the JAR files
3. The web.xml file also resides in WEB-INF Folder
Elements of a Deployment Descriptor:
The deployment descriptor has 77 elements but the most important ones are:
1. C = < context-param >
2. L = < listener >
3. S = < servlet >
4. S = < servlet-mapping >
5. S = < session-config >
6. W = < welcome-file-list >
7. E = < error-page >
8. T = < taglib >
9. S = < security-constraint >
10. L = < login-config >
11. S = < security-role >
Exception Handling:
You can specify the exception handling declaratively in the deployment descriptor. You do this with the error-page element and the exception-type subelement like so:
< web-app >
< error-page >
< exception-type > javax.servlet.ServletException < / exception-type >
< location > /servlet/ErrorDisplay < / location >
< / error-page >
< / web-app >
Application Security:
• Application Security is an important aspect of any web application. Our application should be prepared to handle atleast a minimum level of attack.
• Authentication is the process by which the system verifies if a user is who he really says he is
• Authorization is the process by which we place access control restrictions on the various resources of the system
• Authentication can be of 4 types:
o HTTP Basic Authentication
o HTTP Digest Authentication
o HTTPS Client Authentication &
o Form Based Authentication
Key Terms we learnt in these chapters are:
• Web application
• Web archive file
• WebApp deployment descriptor
• Authentication, authorization
• Security constraint
Previous Chapter: Chapter 50 - Web Application Security
Next Chapter: Self Test - Chapters 47 to 50
Thursday, April 14, 2011
Quick Recap: Chapters 38 to 43
Let us quick recap what we learnt about JavaBeans in the previous few chapters.
Introduction to JavaBeans:
• JavaBeans used in JSPs are totally different from Enterprise Java Beans or EJBs
• JavaBeans are regular Java classes that have a public no-arg constructor and getter/setter methods for all the variables declared in the class
Using JavaBeans:
• JavaBeans can be used inside JSPs using the jsp:useBean tag
• The attributes that can be set in the jsp:useBean are: id, scope, class, beanName and type
• You can modify the attributes of a Bean using the setProperty and getProperty actions
JavaBean Scope:
• JavaBeans can have 4 scopes: page, request, session and application
• Page is the least visible and is available only in the current JSP
• Beans declared with scope as Request are visible to all JSPs and Servlets that share the current Request
• Beans declared with Session scope are visible to all JSPs and Servlets that are accessed by a single user session
• Beans declared with Application scope are visible to all JSPs and Servlets that share the current Servlet Context – across user sessions
Key Terms Learnt in this Chapter:
• JavaBean
• Bean properties
• XML
• Bean scope and attributes
• get/set method pairs
Previous Chapter: Chapter 43 - Accessing JavaBeans in JSP
Next Chapter: Self Test - Chapters 38 to 43
Tuesday, April 12, 2011
Chapter 37: JSP Scriptlets
In the previous chapters, we have covered various aspects of the JSP Technology and to be honest there is still a lot more to be covered about the JSP Technology. However, for now, we are going to take a look at JSP Scriptlets. This is going to be a small chapter, which we can wrap up quickly…
So, lets get started!!!
JSP Scriptlets
The JSP Scriptlets are those tiny bits of Java code that you can embed in your JSP page to add extra functionality to your JSP page. Though there are a lot of things you can accomplish using them, the most important use of these fellows are:
* Implementing Conditions
* To Iterate through a set of values
Implementing conditions is so trivial that, we don't need to explain it. Any programmer who has written some basic java code knows how to use an if-else block and all you need to do is to place them within the scriptlet tags and then write your conditions the way you want it.
Iterating through values too is easy but still lets look at an example because it is not as straightforward as implementing conditions.
1 < html >
2 < body >
3 < % 4 java.util.Random randomInt = new java.util.Random(); 5 int limit = 10; 6 % >
7 < ol type='i' >
8 < % for (int count=0; count
9 < li > < % = randomInt.nextInt() % > < / li >
10 < % } % >
11 < / ol >
12 < / body >
13 < / html >
In the above example, the iteration construct begins on line 8 and ends on line 10. However, if the developer left out line 10, then the iteration statement would not be correctly structured.
The scripting language is mostly Java.
You might be wondering, why did I put a separate chapter for such a trivial topic. I did that intentionally because, you can expect one or two questions that would test your knowledge of these scriptlets. So I thought it’d be better to give it a separate chapter so that you’ll remember it better !!!
Previous Chapter: Chapter 36 - JSP Implicit Objects
Next Chapter: Quick Recap - Chapters 31 to 37
So, lets get started!!!
JSP Scriptlets
The JSP Scriptlets are those tiny bits of Java code that you can embed in your JSP page to add extra functionality to your JSP page. Though there are a lot of things you can accomplish using them, the most important use of these fellows are:
* Implementing Conditions
* To Iterate through a set of values
Implementing conditions is so trivial that, we don't need to explain it. Any programmer who has written some basic java code knows how to use an if-else block and all you need to do is to place them within the scriptlet tags and then write your conditions the way you want it.
Iterating through values too is easy but still lets look at an example because it is not as straightforward as implementing conditions.
1 < html >
2 < body >
3 < % 4 java.util.Random randomInt = new java.util.Random(); 5 int limit = 10; 6 % >
7 < ol type='i' >
8 < % for (int count=0; count
9 < li > < % = randomInt.nextInt() % > < / li >
10 < % } % >
11 < / ol >
12 < / body >
13 < / html >
In the above example, the iteration construct begins on line 8 and ends on line 10. However, if the developer left out line 10, then the iteration statement would not be correctly structured.
The scripting language is mostly Java.
You might be wondering, why did I put a separate chapter for such a trivial topic. I did that intentionally because, you can expect one or two questions that would test your knowledge of these scriptlets. So I thought it’d be better to give it a separate chapter so that you’ll remember it better !!!
Exam Trivia:
The code inside the scriptlet tags are inserted into the service method of the Servlet that gets created from the JSP and all your logic inside the scriptlets get translated to proper java code.
Previous Chapter: Chapter 36 - JSP Implicit Objects
Next Chapter: Quick Recap - Chapters 31 to 37
Chapter 36: JSP - Implicit Objects
In any JSP Page, there are a bunch of implicit objects that are available for the programmer to use. It contains a variety of information that can be used to display stuff on the page. In this chapter, we are going to look at the following JSP Implicit Objects that are available for a programmer.
• request
• response
• out
• session
• config
• application
• page
• pageContext
So, Lets get Started!!!
JSP Implicit Objects
The JSP Implicit objects mentioned in the list in the previous paragraph are available by means of automatically defined variables. These variables have the same name and case as the list above. In the forthcoming paragraphs we will be looking at them one by one.
request
This is the HttpServletRequest instance associated with the client request. As you know, the data between the Servlet and the JSP flows by using the HttpServletRequest and the HttpServletResponse objects. The page receives a request and sends a response. The data sent by a JSP page is available in the request in the Servlet and similarly the data sent by the servlet is available in the JSP again in the request object. There is a surprising amount of information stored in it. For example, you can get the request type (whether it is GET, POST, or HEAD) and the associated cookies. You can extract information from the request object and act on that data.
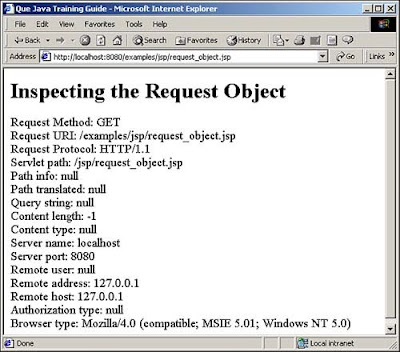
Let us take a look at a small piece of code that would help us understand how to read data from the request object.
< html >
< body >
< h1 > Inspecting the Request Object < / h1 >
< font size="4" >
Request Method: < % = request.getMethod() % >
Request URI: < % = request.getRequestURI() % >
Request Protocol: < % = request.getProtocol() % >
Servlet path: < % = request.getServletPath() % >
Path info: < % = request.getPathInfo() % >
Path translated: < % = request.getPathTranslated() % >
Query string: < % = request.getQueryString() % >
Content length: < % = request.getContentLength() % >
Content type: < % = request.getContentType() % >
Server name: < % = request.getServerName() % >
Server port: < % = request.getServerPort() % >
Remote user: < % = request.getRemoteUser() % >
Remote address: < % = request.getRemoteAddr() % >
Remote host: < % = request.getRemoteHost() % >
Authorization type: < % = request.getAuthType() % >
Browser type: < % = request.getHeader("User-Agent") % >
< / font >
< / body >
< / html >
If you deploy this JSP on your TomCat server and run it, you will see the details of the request on your web page. This is how the page would look if you run your local instance.
response
This is the HttpServletResponse class that manages the response to the client. You use this object to send data back to the client. For example, among other things, you can add cookies (addCookie), add a specified header (addHeader), and return an error that includes a status and a default message (sendError). You can redirect a browser to another URL with sendRedirect. You can set the content type and the HTTP status (setStatus) as well. For ex: you can set the content type on the response using the below line of code.
response.setContentType("text/html")
The response object doesn't do much. It doesn't have any elaborate functionality like the HttpServletRequest but at the same time, it is not trivial. It still can do a lot of things that would affect the whole J2EE application as such.
Besides manipulating the output buffer (such as, setBufferSize(), flushBuffer(), and getBufferSize()), Sun's public interface ServletResponse defines only the following methods: getLocale(), getOutputStream(), getWriter(), isCommitted(), setContentLength(), setContentType(), and setLocale().
session
This is the HttpSession object associated with the request. We have taken a detailed look at the Session Management in the previous few chapters which are as follows:
1. Introduction to Sessions
2. Storing & Retrieving Session Objects
3. Session Event Listeners
4. Invalidating Sessions
5. Session Tracking Through URL Rewriting
The JSP container handles (creates, tracks, and destroys) sessions automatically. You can use the session attribute of the page directive to turn sessions off. When they are explicitly set to - off, there is no session state available for a JSP page, and any reference to the session variable causes a fatal error.
The primary use of the session variable is to store state information between pages for a given user. A session applies to a single user where you can share information across JSP pages. This differs from the application object, which shares information across all users. The session is on by default, so you don't have to set the "session=true" attribute in the JSP page directive, but it is good practice to make your intentions clear.
The exam objectives only address your understanding of what a session is and how to turn on session tracking for a JSP page. Still, you should at least review the methods and properties of the session object, as they might appear in a test question. They are as follows:
• getAttribute
• getAttributeNames
• getCreationTime
• getId
• getLastAccessedTime
• getMaxInactiveInterval
• invalidate
• isNew
• putValue
• removeAttribute
• setAttribute
• setMaxInactiveInterval
I repeat, the Session Management has been covered in great depth as part of this SCWCD series and you can visit those article to understand the HttpSession, if you havent done already…
config
The config implicit object is an instance of the class javax.servlet.ServletConfig. It is usually used in servlets rather than JSP pages. The methods of this object return initialization parameters for the page which are declared in the web.xml file. You define initialization parameters by setting the property when you register a servlet in the web.xml file, the deployment descriptor. The most used methods of this object are getInitParameter and getInitParameterNames.
Though it is used predominantly in servlets, the config object is available in the JSP page as well. Let us take a look at a sample piece of code and see how to use the config object.
< % String DFLT_PARAM_ONE = "first parameter"; String DFLT_PARAM_TWO = "second parameter"; String param_one = config.getInitParameter("first_parameter"); if (param_one == null) { param_one = DFLT_PARAM_ONE; } String param_two = config.getInitParameter("second_parameter"); if (param_two == null) { param_two = DFLT_PARAM_TWO; } % >
< % = "param_one: " + param_one % >
< % = "
Previous Chapter: Chapter 35 - JSP Lifecycle
Next Chapter: Chapter 37 - JSP Scriptlets
• request
• response
• out
• session
• config
• application
• page
• pageContext
So, Lets get Started!!!
JSP Implicit Objects
The JSP Implicit objects mentioned in the list in the previous paragraph are available by means of automatically defined variables. These variables have the same name and case as the list above. In the forthcoming paragraphs we will be looking at them one by one.
request
This is the HttpServletRequest instance associated with the client request. As you know, the data between the Servlet and the JSP flows by using the HttpServletRequest and the HttpServletResponse objects. The page receives a request and sends a response. The data sent by a JSP page is available in the request in the Servlet and similarly the data sent by the servlet is available in the JSP again in the request object. There is a surprising amount of information stored in it. For example, you can get the request type (whether it is GET, POST, or HEAD) and the associated cookies. You can extract information from the request object and act on that data.
Let us take a look at a small piece of code that would help us understand how to read data from the request object.
< html >
< body >
< h1 > Inspecting the Request Object < / h1 >
< font size="4" >
Request Method: < % = request.getMethod() % >
Request URI: < % = request.getRequestURI() % >
Request Protocol: < % = request.getProtocol() % >
Servlet path: < % = request.getServletPath() % >
Path info: < % = request.getPathInfo() % >
Path translated: < % = request.getPathTranslated() % >
Query string: < % = request.getQueryString() % >
Content length: < % = request.getContentLength() % >
Content type: < % = request.getContentType() % >
Server name: < % = request.getServerName() % >
Server port: < % = request.getServerPort() % >
Remote user: < % = request.getRemoteUser() % >
Remote address: < % = request.getRemoteAddr() % >
Remote host: < % = request.getRemoteHost() % >
Authorization type: < % = request.getAuthType() % >
Browser type: < % = request.getHeader("User-Agent") % >
< / font >
< / body >
< / html >
If you deploy this JSP on your TomCat server and run it, you will see the details of the request on your web page. This is how the page would look if you run your local instance.

response
This is the HttpServletResponse class that manages the response to the client. You use this object to send data back to the client. For example, among other things, you can add cookies (addCookie), add a specified header (addHeader), and return an error that includes a status and a default message (sendError). You can redirect a browser to another URL with sendRedirect. You can set the content type and the HTTP status (setStatus) as well. For ex: you can set the content type on the response using the below line of code.
response.setContentType("text/html")
The response object doesn't do much. It doesn't have any elaborate functionality like the HttpServletRequest but at the same time, it is not trivial. It still can do a lot of things that would affect the whole J2EE application as such.
Besides manipulating the output buffer (such as, setBufferSize(), flushBuffer(), and getBufferSize()), Sun's public interface ServletResponse defines only the following methods: getLocale(), getOutputStream(), getWriter(), isCommitted(), setContentLength(), setContentType(), and setLocale().
session
This is the HttpSession object associated with the request. We have taken a detailed look at the Session Management in the previous few chapters which are as follows:
1. Introduction to Sessions
2. Storing & Retrieving Session Objects
3. Session Event Listeners
4. Invalidating Sessions
5. Session Tracking Through URL Rewriting
The JSP container handles (creates, tracks, and destroys) sessions automatically. You can use the session attribute of the page directive to turn sessions off. When they are explicitly set to - off, there is no session state available for a JSP page, and any reference to the session variable causes a fatal error.
The primary use of the session variable is to store state information between pages for a given user. A session applies to a single user where you can share information across JSP pages. This differs from the application object, which shares information across all users. The session is on by default, so you don't have to set the "session=true" attribute in the JSP page directive, but it is good practice to make your intentions clear.
The exam objectives only address your understanding of what a session is and how to turn on session tracking for a JSP page. Still, you should at least review the methods and properties of the session object, as they might appear in a test question. They are as follows:
• getAttribute
• getAttributeNames
• getCreationTime
• getId
• getLastAccessedTime
• getMaxInactiveInterval
• invalidate
• isNew
• putValue
• removeAttribute
• setAttribute
• setMaxInactiveInterval
I repeat, the Session Management has been covered in great depth as part of this SCWCD series and you can visit those article to understand the HttpSession, if you havent done already…
Exam Trivia:
Each new session gets its own unique id number. That is how the JSP container keeps track of browsers. The number has to be long enough to eliminate the possibility of session id collision
config
The config implicit object is an instance of the class javax.servlet.ServletConfig. It is usually used in servlets rather than JSP pages. The methods of this object return initialization parameters for the page which are declared in the web.xml file. You define initialization parameters by setting the property when you register a servlet in the web.xml file, the deployment descriptor. The most used methods of this object are getInitParameter and getInitParameterNames.
Though it is used predominantly in servlets, the config object is available in the JSP page as well. Let us take a look at a sample piece of code and see how to use the config object.
< % String DFLT_PARAM_ONE = "first parameter"; String DFLT_PARAM_TWO = "second parameter"; String param_one = config.getInitParameter("first_parameter"); if (param_one == null) { param_one = DFLT_PARAM_ONE; } String param_two = config.getInitParameter("second_parameter"); if (param_two == null) { param_two = DFLT_PARAM_TWO; } % >
< % = "param_one: " + param_one % >
< % = "
" % >
< % = "param_two: " + param_two % >
< % = "< P >" % >
I will leave you to execute this in your JSP page to ponder the output. It would be a good exercise for you to understand these implicit objects…
application
While a session object shares information between JSP pages for a given user, an application object shares information among all users of a currently active J2EE Web application. You can also use this object to communicate with the Servlet Container running the current JSP page. Normally, there is one application object per Java Virtual Machine. So, every JSP page on a Web server shares the same application object (irrespective of how many sessions are running currently).
When we need to store information to be available throughout a web application, we can store it in the Servlet context, which is used to store the state for an entire Web application. This is sometimes referred to as the application object. In JavaServer pages, the implicit application object represents the Servlet context. Unlike a session object, the Servlet context is not invalidated by any updates or recompiling of a given JSP page, or servlet for that matter. Whatever information you store in the Servlet context will remain until the Web application itself is invalidated.
Beyond sharing information among client requests, the application object provides information about the environment of the JSP page. It also has methods for writing messages to the server log which would prove very useful when you want to debug an application that is throwing out errors during the development phase or even for production support.
A few of the methods and properties for the application are very similar to those of the session object. The primary difference is scope, whether the objects are shared only between pages being viewed by a single user (session) or all users (application). The methods and properties include the following:
• getAttribute
• getAttributeNames
• getMajorVersion/getMinorVersion
• getMimeType
• getRealPath
• getResource
• getServerInfo
• log
• removeAttribute
• setAttribute
pageContext
JSP has an object of the class pageContext. This is used mainly in servlets to encapsulate server-specific features. That being said, the object is available in the JSP as well.
Ex:
HttpSession session = pageContext.getSession();
JspWriter out = pageContext.getOut();
The main goal of the pageContext is to encapsulate the complete state of a single request-execution of a single JSP page. This object is passed to custom actions so that these Java objects have access to anything that the JSP page has access to.
page
In standard Java programs, the “this” keyword is a reference to the object for which the instance method was invoked, or to the object being constructed. The page is JSP's equivalent of Java's this, but it isn't so very useful in JSP. The JSP designers created it to address JSP's support for other scripting languages beside Java. Usually it is recommended to use the Java’s this keyword than JSPs page.
out
This is what the PrintWriter uses to send output to the client. There is also a buffered version of PrintWriter called JspWriter. You can adjust the buffer size, or even turn buffering off, through use of the buffer attribute of the page directive. Also note that out is used almost exclusively in scriptlets, since JSP expressions automatically get placed in the output stream, and thus we rarely need to refer to out explicitly.
Exam Trivia:
The clear method deletes all the content of the current buffer. You need to be very cautious when using this method. Once the buffer has been flushed, automatically or through code, calling clear throws an IOException error. Once data is written to the client response stream, it is illegal to call the clear method.
The out variable is a Java PrintWriter you can use to write HTML to the browser page from inside JSP tags. Let us take a look at an example before we wrap up the chapter.
<% out.clear(); //clears all output to the browser out.print(out.getBufferSize()); //bytes available in Buffer out.print("Hello There!!!"); out.print( out.getRemaining() ); //bytes left in Buffer out.newLine(); //prints a line return out.flush(); //flushes the buffer %>
Previous Chapter: Chapter 35 - JSP Lifecycle
Next Chapter: Chapter 37 - JSP Scriptlets
Tuesday, March 29, 2011
Chapter 28: The setStatus Method
In the previous chapter, we saw the sendError method. We saw how Tomcat implements it and we saw a wrapper method that used it but did some handling for custom error messages. Well, in this chapter, we are going to see the twin brother of the sendError method, the setStatus method.
So, lets get started…
The setStatus Method
The setStatus method sets the status code for a given response. Use this method, instead of sendError, when there is no exception or serious error (such as a blocked or a page inaccessible to the user). If there is a serious error, the sendError method should be used; otherwise use setStatus. Like the sendError method, using this method clears the buffer, but leaves cookies and other headers unmodified.
Let us now take a look at how Tomcat has implemented the setStatus method.
Code:
/**
* Set the HTTP status and message to be returned
* with this response.
*
* @param status The new HTTP status
* @param message The associated text message
*
* @deprecated As of Version 2.1 of the Java Servlet
* API, this method has been deprecated due to the
* ambiguous meaning of the message
* parameter.
*/
public void setStatus(int status, String message) {
if (included)
return; //Ignore any call from included servlet
this.status = status;
this.message = message;
}
As you can see in the code above, this method has been deprecated because the message functionality isn't reliable. The setStatus method will remain (the one taking only a status code), but without a message parameter in a future version, Maybe.
However, you can always write a wrapper to use the setStatus method effectively. (Just like we did for the sendError method)
Code:
/**
* statusManager Method.
*/
void checkCarStatus(HttpServletResponse response)
throws ServletException
{
if( !isValid(carName) )
{
response.setStatus(response.SC_BAD_REQUEST);
} else if( !isValid(carModel) )
{
response.setStatus(response.SC_BAD_REQUEST);
} else if( !isValid(carMakeYear) )
{
response.setStatus(response.SC_BAD_REQUEST);
} else if( !isValid(creditCardNumber) )
{
response.setStatus(response.SC_BAD_REQUEST);
} else
{
response.setStatus(response.SC_OK);
}
}
The code above is pretty straight forward. I suppose this can be used in a car repair garage. We first check if the cars name is valid and then check if the cars model is valid and then check its manufacture year. We also check the credit card number of the customer (because we need to get paid right) and if all these are valid, we set a OK response, else we set a bad request response. It's a simple implementation and you can alter it anyway you want, as long as it serves your purpose and uses the setStatus method, we are good…
The same status codes that are used for the sendError method can be used for the setStatus method, too. The primary difference is that the former prevents any further response to the client and throws an exception if you try. This is not so for the latter. There is one point of confusion with the setStatus method. The specification says the buffer is cleared when called. In other words, you should set this first before you send anything back to the client. However, I looked in Tomcat and did not observe the buffer being cleared. The following snippet:
out.println("pre setStatus message.");
response.setStatus(HttpServletResponse.SC_OK);
out.println("post setStatus message.");
produced this:
pre setStatus message.
post setStatus message.
Previous Chapter: Chapter 27 - sendError Method
Next Chapter: Chapter 29 - WebApp Log
So, lets get started…
The setStatus Method
The setStatus method sets the status code for a given response. Use this method, instead of sendError, when there is no exception or serious error (such as a blocked or a page inaccessible to the user). If there is a serious error, the sendError method should be used; otherwise use setStatus. Like the sendError method, using this method clears the buffer, but leaves cookies and other headers unmodified.
Let us now take a look at how Tomcat has implemented the setStatus method.
Code:
/**
* Set the HTTP status and message to be returned
* with this response.
*
* @param status The new HTTP status
* @param message The associated text message
*
* @deprecated As of Version 2.1 of the Java Servlet
* API, this method has been deprecated due to the
* ambiguous meaning of the message
* parameter.
*/
public void setStatus(int status, String message) {
if (included)
return; //Ignore any call from included servlet
this.status = status;
this.message = message;
}
As you can see in the code above, this method has been deprecated because the message functionality isn't reliable. The setStatus method will remain (the one taking only a status code), but without a message parameter in a future version, Maybe.
However, you can always write a wrapper to use the setStatus method effectively. (Just like we did for the sendError method)
Code:
/**
* statusManager Method.
*/
void checkCarStatus(HttpServletResponse response)
throws ServletException
{
if( !isValid(carName) )
{
response.setStatus(response.SC_BAD_REQUEST);
} else if( !isValid(carModel) )
{
response.setStatus(response.SC_BAD_REQUEST);
} else if( !isValid(carMakeYear) )
{
response.setStatus(response.SC_BAD_REQUEST);
} else if( !isValid(creditCardNumber) )
{
response.setStatus(response.SC_BAD_REQUEST);
} else
{
response.setStatus(response.SC_OK);
}
}
The code above is pretty straight forward. I suppose this can be used in a car repair garage. We first check if the cars name is valid and then check if the cars model is valid and then check its manufacture year. We also check the credit card number of the customer (because we need to get paid right) and if all these are valid, we set a OK response, else we set a bad request response. It's a simple implementation and you can alter it anyway you want, as long as it serves your purpose and uses the setStatus method, we are good…
The same status codes that are used for the sendError method can be used for the setStatus method, too. The primary difference is that the former prevents any further response to the client and throws an exception if you try. This is not so for the latter. There is one point of confusion with the setStatus method. The specification says the buffer is cleared when called. In other words, you should set this first before you send anything back to the client. However, I looked in Tomcat and did not observe the buffer being cleared. The following snippet:
out.println("pre setStatus message.");
response.setStatus(HttpServletResponse.SC_OK);
out.println("post setStatus message.");
produced this:
pre setStatus message.
post setStatus message.
Exam Trivia:
Containers don't always follow the specifications! As you can see, Tomcat does not clear the buffer as the specification says. The specification doesn't make sense as of this moment because, the way Tomcat implemented it is better. However, since other containers may follow the specification here and the exam will be based on the specification, assume that is how it actually works.
Previous Chapter: Chapter 27 - sendError Method
Next Chapter: Chapter 29 - WebApp Log
Monday, March 28, 2011
Chapter 25: Introduction to Servlet Exception Handling
Any technology, any programming language you learn, exception handling is an integral part of it. And the SCWCD exam covers topics related to Exception Handling in the Servlet Technology as well. Though, there are numerous ways of customized error handling available with servlets, the exam covers two main topics. Using the SENDERROR and SETSTATUS.
That is exactly what we are going to learn in this chapter and the next few chapters too.
So, lets get started!!!
Introduction to Servlet Exception Handling:
The way in which you create and manage exceptions in servlets is slightly different from how you do this with standalone applications.
We always use the response object (HttpServletResponse) and not the request object, to tell the browser that there is a problem.
The exam includes both exceptions (The ones caused by the Servlet) and HTTP Error Codes (Those you send back to the client).
Before we jump into the world of exceptions, lets quickly review the HTTP Protocol standards. This is essential because, the servlets communicate with clients using HTTP and it is helpful to know a little about this protocol.
The HTTP Protocol:
The HTTP protocol is a request/response scheme where a client sends a request to the server. There are four major portions of this request, which include, a request method (GET, POST…), URI (such as www.abc.com), protocol version (HTTP/1.1), and finally a MIME-like message. This message can be any size, and normally includes request modifiers, client information, and body content.
In this series of chapters, we will learn how we can send error information to the client using the sendError method, which sends a status line with the protocol version and a success or error code. It also returns a MIME like message containing server information, entity meta information and body content. You must remember that both the severity and type of error to properly tell the client what went wrong. Your error handling logic needs to determine the most appropriate severity for a particular error.
After receiving a request, the server responds. It returns an HTTP response message. The first line of this response message is called the status line. The status line has three parts. They are, in this order, protocol version, numeric status code, and status textual phrase. This status code is what you are setting when you use sendError and setStatus methods.
The Error Codes:
If you have been using the internet and J2EE applications for a while, you are sure to have encountered the 404: PAGE NOT FOUND message at some websites. This tells you that the URL is bad. i.e., if you try login to www.thisissurelyanincorrectwebsite.com you will probably get this message. The emphasis is on the number 404, this is the status code, a 3 digit integer number. The first digit defines the class of response, while the last two digits do not have any categories; they give an indication of what the problem is.
Let us now take a look at all the error codes that we can encounter in a HTTP based J2EE system. This list just contains the broad categorization based on the 1st digit.
While, the above table describes five set of status codes, we will primarily focus on the Server Error Category – the 5XX codes.
As mentioned previously, the HTTP protocol is a request/response scheme where a client sends a request to the server. When you need to inform the client of a problem at the server end, you call the sendError method. This causes the server to respond with a status line, with protocol version and a success or error code (this is what sendError affects directly). Of course, it also returns a MIME-like message containing server information, entity meta information, and body content.
Actually, the sendError() and setStatus are closely related. In fact, they both set the error message to be displayed by the client and the status code used by the client. The default status code is HttpServletResponse.SC_OK ="OK"; however, there are a few other standard codes as well.
That being said, lets take a look at the list of status codes available. These codes were defined by the W3C and are sanctioned by the Internet Society (ISOC). The constant names, quoted messages that get displayed in the browser, and code descriptions are a combination of the servlet specification and Tomcat's implementation of that specification. The exam will not test your memory of these directly. However, taking five minutes to study this table will help you understand what these codes do and figure out which ones you need to use with the sendError and setStatus methods. Notice that the RFC column provides the Request For Comment document and section, the Internet's way of documenting standards. Also, some browsers allow the user to hide “friendly” error messages. If they do that, they will not see many of these errors, even if they occur.
Let me repeat, you need not memorize these status codes but knowing them would be useful to understand the servlet exception handling concepts.
Previous Chapter: Self Test - Chapters 20 to 24
Next Chapter: Chapter 26 - Returning Error Codes
That is exactly what we are going to learn in this chapter and the next few chapters too.
So, lets get started!!!
Introduction to Servlet Exception Handling:
The way in which you create and manage exceptions in servlets is slightly different from how you do this with standalone applications.
We always use the response object (HttpServletResponse) and not the request object, to tell the browser that there is a problem.
The exam includes both exceptions (The ones caused by the Servlet) and HTTP Error Codes (Those you send back to the client).
Before we jump into the world of exceptions, lets quickly review the HTTP Protocol standards. This is essential because, the servlets communicate with clients using HTTP and it is helpful to know a little about this protocol.
The HTTP Protocol:
The HTTP protocol is a request/response scheme where a client sends a request to the server. There are four major portions of this request, which include, a request method (GET, POST…), URI (such as www.abc.com), protocol version (HTTP/1.1), and finally a MIME-like message. This message can be any size, and normally includes request modifiers, client information, and body content.
In this series of chapters, we will learn how we can send error information to the client using the sendError method, which sends a status line with the protocol version and a success or error code. It also returns a MIME like message containing server information, entity meta information and body content. You must remember that both the severity and type of error to properly tell the client what went wrong. Your error handling logic needs to determine the most appropriate severity for a particular error.
After receiving a request, the server responds. It returns an HTTP response message. The first line of this response message is called the status line. The status line has three parts. They are, in this order, protocol version, numeric status code, and status textual phrase. This status code is what you are setting when you use sendError and setStatus methods.
The Error Codes:
If you have been using the internet and J2EE applications for a while, you are sure to have encountered the 404: PAGE NOT FOUND message at some websites. This tells you that the URL is bad. i.e., if you try login to www.thisissurelyanincorrectwebsite.com you will probably get this message. The emphasis is on the number 404, this is the status code, a 3 digit integer number. The first digit defines the class of response, while the last two digits do not have any categories; they give an indication of what the problem is.
Let us now take a look at all the error codes that we can encounter in a HTTP based J2EE system. This list just contains the broad categorization based on the 1st digit.
| Number | Type | Description |
|---|---|---|
| 1XX | Informational | Request received, continuing to process. |
| 2XX | Success | The action was successfully received, understood, and accepted. |
| 3XX | Redirection | Further action must be taken in order to complete the request. |
| 4XX | Client Error | The request contains bad syntax or cannot be fulfilled. |
| 5XX | Server Error | The server failed to fulfill an apparently valid request. |
As mentioned previously, the HTTP protocol is a request/response scheme where a client sends a request to the server. When you need to inform the client of a problem at the server end, you call the sendError method. This causes the server to respond with a status line, with protocol version and a success or error code (this is what sendError affects directly). Of course, it also returns a MIME-like message containing server information, entity meta information, and body content.
Actually, the sendError() and setStatus are closely related. In fact, they both set the error message to be displayed by the client and the status code used by the client. The default status code is HttpServletResponse.SC_OK ="OK"; however, there are a few other standard codes as well.
That being said, lets take a look at the list of status codes available. These codes were defined by the W3C and are sanctioned by the Internet Society (ISOC). The constant names, quoted messages that get displayed in the browser, and code descriptions are a combination of the servlet specification and Tomcat's implementation of that specification. The exam will not test your memory of these directly. However, taking five minutes to study this table will help you understand what these codes do and figure out which ones you need to use with the sendError and setStatus methods. Notice that the RFC column provides the Request For Comment document and section, the Internet's way of documenting standards. Also, some browsers allow the user to hide “friendly” error messages. If they do that, they will not see many of these errors, even if they occur.
| Code | Constant | RFC | Message | Description |
|---|---|---|---|---|
| 100 | SC_CONTINUE | 10.1.1 | “Continue” | Client can continue. |
| 101 | SC_SWITCHING_PROTOCOLS | 10.1.2 | “Switching Protocols” | Server is switching protocols according to Upgrade header. |
| 200 | SC_OK | 10.2.1 | “OK” | Request succeeded normally. |
| 201 | SC_CREATED | 10.2.2 | “Created” | Request succeeded and created a new resource on the server. |
| 202 | SC_ACCEPTED | 10.2.3 | “Accepted” | Request was accepted for processing but was not completed. |
| 203 | SC_NON_AUTHORITATIVE_INFORMATION | 10.2.4 | “Non-Authoritative Information” | Meta information presented by the client did not originate from the server. |
| 204 | SC_NO_CONTENT | 10.2.5 | “No Content” | Request succeeded but there was no new information to return. |
| 205 | SC_RESET_CONTENT | 10.2.6 | “Reset Content” | Agent should reset the document view which caused the request to be sent. |
| 206 | SC_PARTIAL_CONTENT | 10.2.7 | “Partial Content” | Server has fulfilled the partial GET request for the resource. |
| 300 | SC_MULTIPLE_CHOICES | 10.3.1 | “Multiple Choices” | Requested resource corresponds to any one of a set of representations with each with its own specific location. |
| 301 | SC_MOVED_PERMANENTLY | 10.3.2 | “Moved Permanently” | Resource has permanently moved to a new location and future references should use a new URI with their requests. |
| 302 | SC_MOVED_TEMPORARILY | 10.3.3 | “Moved Temporarily” | Resource has temporarily moved to another location but future references should still use the original URI to access the resource. |
| 303 | SC_SEE_OTHER | 10.3.4 | “See Other” | Response to the request can be found under a different URI. |
| 304 | SC_NOT_MODIFIED | 10.3.5 | “Not Modified” | Conditional GET operation found that the resource was available and not modified. |
| 305 | SC_USE_PROXY | 10.3.6 | “Use Proxy” | Requested resource must be accessed through the proxy given by the Location field. |
| 307 | SC_TEMPORARY_REDIRECT | 10.3.8 | N/A | Requested resource resides temporarily under a different URI. The temporary URI should be given by the Location field in the response. |
| 400 | SC_BAD_REQUEST | 10.4.1 | “Bad Request” | Request sent by the client was syntactically incorrect. |
| 401 | SC_UNAUTHORIZED | 10.4.2 | “Unauthorized” | Request requires HTTP authentication. |
| 402 | SC_PAYMENT_REQUIRED | 10.4.3 | “Payment Required” | Reserved for future use. |
| 403 | SC_FORBIDDEN | 10.4.4 | “Forbidden” | Server understood the request but refused to fulfill it. |
| 404 | SC_NOT_FOUND | 10.4.5 | “Not Found” | Requested resource is not available. |
| 405 | SC_METHOD_NOT_ALLOWED | 10.4.6 | “Method Not Allowed” | Method specified in the Request-Line is not allowed for the resource identified by the Request-URI. |
| 406 | SC_NOT_ACCEPTABLE | 10.4.7 | “Not Acceptable” | Resource identified by the request is only capable of generating response entities that have content characteristics not acceptable according to the accept headers sent in the request. |
| 407 | SC_PROXY_AUTHENTICATION_REQUIRED | 10.4.8 | “Proxy Authentication Required” | Client must first authenticate itself with the proxy. |
| 408 | SC_REQUEST_TIMEOUT | 10.4.9 | “Request Timeout” | Client did not produce a request within the time that the server was prepared to wait. |
| 409 | SC_CONFLICT | 10.4.10 | “Conflict” | Request could not be completed due to a conflict with the current state of the resource. |
| 410 | SC_GONE | 10.4.11 | “Gone” | Resource is no longer available at the server and no forwarding address is known. This condition should be considered permanent. |
| 411 | SC_LENGTH_REQUIRED | 10.4.12 | “Length Required” | Request cannot be handled without a defined Content-Length. |
| 412 | SC_PRECONDITION_FAILED | 10.4.13 | “Precondition Failed” | A precondition given in one or more of the request-header fields evaluated to false when it was tested on the server. |
| 413 | SC_REQUEST_ENTITY_TOO_LARGE | 10.4.14 | “Request Entity Too Large” | Server is refusing to process the request because the request entity is larger than the server is willing or able to process. |
| 414 | SC_REQUEST_URI_TOO_LONG | 10.4.15 | “Request URI Too Long” | Server is refusing to service the request because the Request-URI is longer than the server is willing to interpret. |
| 415 | SC_UNSUPPORTED_MEDIA_TYPE | 10.4.16 | “Unsupported Media Type” | Server is refusing to service the request because the entity of the request is in a format not supported by the requested resource for the requested method. |
| 416 | SC_REQUESTED_RANGE_NOT_SATISFIABLE | 10.4.17 | “Requested Range Not Satisfiable” | Server cannot serve the requested byte range. |
| 417 | SC_EXPECTATION_FAILED | 10.4.18 | “Expectation Failed” | Server could not meet the expectation given in the Expect request header. |
| 500 | SC_INTERNAL_SERVER_ERROR | 10.5.1 | “Internal Server Error” | Error inside the server which prevented it from fulfilling the request. This error represents many server problems such as exceptions or perhaps a database hiccup. |
| 501 | SC_NOT_IMPLEMENTED | 10.5.2 | “Not Implemented” | Server does not support the functionality needed to fulfill the request. |
| 502 | SC_BAD_GATEWAY | 10.5.3 | “Bad Gateway” | Server received an invalid response from a server it consulted when acting as a proxy or gateway. |
| 503 | SC_SERVICE_UNAVAILABLE | 10.5.4 | “Service Unavailable” | Server is temporarily overloaded and unable to handle the request. |
| 504 | SC_GATEWAY_TIMEOUT | 10.5.5 | “Gateway Timeout” | Server did not receive a timely response from the upstream server while acting as a gateway or proxy. |
| 505 | SC_HTTP_VERSION_NOT_SUPPORTED | 10.5.6 | “HTTP Version Not Supported” | Server does not support or refuses to support the HTTP protocol version that was used in the request message. |
Previous Chapter: Self Test - Chapters 20 to 24
Next Chapter: Chapter 26 - Returning Error Codes
Wednesday, March 23, 2011
Quick Recap: Chapters 6 to 19
Let us quickly go through what we learnt in the previous chapters…
Request Handling Basics:
• The HTTP methods GET, POST, and PUT are how browsers and Web servers trade data with each other
• The GET retrieves a page without providing much information, while a POST can package huge amounts of information with its request
• The most important objects in the servlet process are the request and response objects
• The request parameters for the servlet are the strings sent by the client to the Servlet Container. The container parses the request and puts the information in a HttpServletRequest object which is passed to the servlet
• The container wraps the response parameters with the HttpServletResponse object which is passed back to the container
Scope:
• When something has Context scope it is application-wide and all users can share data
• Session scope means one user can share data across page views, but other users can't
• Request scope restricts data to only that page
Servlet Lifecycle:
• The init() method is used to initialize the Servlet
• The service() methods (doGet(), doPost() etc) get invoked everytime a user request gets submitted
• The destroy() method is used to kill/invalidate the Servlet once it is no longer required.
Key Terms we Learnt:
The key terms we learnt and understood in these chapters were:
1. Redirection
2. Servlet Life-Cycle
3. Servlet Forwarding and Includes
4. Servlet attribute
5. Context parameters
6. Application session
7. listeners
Previous Chapter: Chapter 19 - Listeners & Interfaces in the Web Context
Next Chapter: Self Test - Chapters 6 to 19
Thursday, March 17, 2011
Chapter 16: Servlet Context
In the previous chapter, we saw how data can be stored and utilized per user session. The session is specific to a users navigation of a website and is not shared among users. If you want the system to retain some information that needs to be shared among various users of the system, we need to user the Context. In this chapter, we are going to see what the context is and what are the methods that are available for us to use.
So, lets get started!!!
The Servlet Context
A Web application includes many parts. It is more than just one servlet or JSP. Numerous JSPs and one or more Servlets and other supporting java classes together form the web application. To help manage an application, you will sometimes need to set and get information that all of the servlets share together, which we will refer to as context-wide.
For Example, if you want a single name using which you can refer to the application, you can set it in the servlet context and have it shared across all instances that use the application.
Ex Code:
public void init(ServletConfig config) throws ServletException
{
super.init(config);
// Get the Context
ServletContext context =config.getServletContext();
// Set the attribute
context.setAttribute(“appName", "My Test App");
}
Any time you want, you can refer to this attribute in the context and get its value like below:
String appName = context.getAttribute(“appName”);
After the above line of code, the variable appName will have the value “My Test App”
Methods in the Servlet Context
Apart from setting and getting custom attributes used for our application, the context also contains various methods that we can use to retrieve specific information about the application and other aspects. They are:
• getAttributeNames() - Returns an Enumeration object containing the attribute names available within this servlet context.
• getContext(String uripath) - Returns a ServletContext object that corresponds to a specified URL on the server.
• getInitParameter(String name) - Returns a string containing the value of the named context-wide initialization parameter, or null if the parameter does not exist.
• getInitParameterNames() - Returns the names of the context's initialization parameters as an Enumeration of string objects, or an empty Enumeration if the context has no initialization parameters.
• getMajorVersion() - Returns the major version as an int of the Java Servlet API that this Servlet Container supports.
• getMimeType(java.lang.String file) - Returns the MIME type as a string of the specified file, or null if the MIME type is not known.
• getMinorVersion() - Returns the minor version as an int of the Servlet API that this Servlet Container supports.
• getNamedDispatcher(String name) Returns a RequestDispatcher object that acts as a wrapper for the named servlet.
• getRealPath(String path) - Returns a string containing the real path for a given virtual path.
• getRequestDispatcher(String path) Returns a RequestDispatcher object that acts as a wrapper for the resource located at the given path.
• getResource(String path) - Returns a URL to the resource that is mapped to a specified path.
• getResourceAsStream(String path) - Returns the resource located at the named path as an InputStream object.
• getServerInfo() Returns the name and version as a String of the Servlet Container on which the servlet is running.
So, as you can see, the context is extremely powerful and useful for any J2EE developer…
Previous Chapter: Chapter 15 - Session
Next Chapter: Chapter 17 - Servlet Life Cycle
Tuesday, March 15, 2011
Chapter 15: The Session
In the previous chapter we took a look at how the HTTP Request can help us move data from the JSP to the Servlet and vice versa and the methods that are available in the Request object that would help us handle the data it carries.
In this chapter, we are going to look at the Session which is a super-set of the request and can contain data that needs to be retained across different pages.
So, lets get started!!!
The HTTP Session:
The Session is the place where data can be stored and retrieved across multiple hits from the same browser for a certain period of time. For example, lets say you want to login to your online banking website and the browser asks you to enter your login id and password after every click? It would be irritating isn’t it?
Exactly yes.
Thankfully we have the Http session.
When we logon to our bank website and enter our login id and password, the application saves our credentials in the session and uses it when we navigate between screens on the banks website.
Note: For reasons of safety and security, usually sessions in sensitive websites like a bank website or a stock brokers site, the session expires automatically after 5 minutes of inactivity or if the user presses the back or refresh buttons.
Getting the Session Object:
The session object can be obtained from the Request using the below line of code:
HttpSession session = request.getSession();
Setting & Getting Attributes from the Session:
We can set and retrieve attributes from the session using the setAttribute & getAttribute methods.
Ex:
session.setAttribute(“Key”, value); //Setting the value
Object obj = session.getAttribute(“Key”); //Getting the value
Here, “Key” is the identifier that will be used to locate the value saved in the session. The “Key” can be used to retrieve the value using the getAttribute() method.
Other Session Methods:
Some other methods available in the Session are:
1. getId() – Every session has a unique id and this method is used to get that id
2. getCreationTime() – To find out when the session was created
3. getLastAccessedTime() – To find out when the session was accessed last
4. getAttributeNames() – To retrieve all the values stored in the session as an Enumeration
To wrap up, sessions are what you can use to track a single user over a short time period (say 5 or 10 mins usually). You get the session object (HttpSession) from the request object. To track multiple users in your application, you can use the Context. Don't worry, that's our next stop…
For now, this chapter is over!!!
Previous Chapter: Chapter 14 - The Request Object
Next Chapter: Chapter 16 - Servlet Context
Monday, March 7, 2011
Chapter 13: Web Application Scope
In the previous Chapters we saw what the HTTP Request object is and how to read stuff from it. In this chapter, we are going to discuss a very important topic. “Scope” – Yes, the Web Application Scope. It is just like basic java programming where you can or cannot see a particular variable depending on its visibility. In Web parlance, the scope of an object defines how long it exists and how you can access it.
So, lets get started!!!
Scope
For the exam, you need to worry about 3 different scopes. They are:
• Request
• Session &
• Application
The scope would play an important part of any web application.
Let us look at the details of these 3 Scopes.
You know that you can set and retrieve attributes (objects) in the request or the session or to the context. So, the purpose of this chapter is to let us identify what attribute is accessible where.
For ex: if you use the request.setAttribute(), you will be able to access it only until this request is alive. Once the request is complete, you will no longer be able to read the attribute that you just set into the request.
But, if you set an attribute into the session you will be able to read it across multiple requests. Similarly if you use the context, you will be able to read it across multiple sessions.
Dont worry if we did not cover the details of the request, scope or the context because, that is exactly what the subsequent chapters are going to do!!!
Previous Chapter: Chapter 12 - Retrieving HTTP Request Header Information
Next Chapter: Chapter 14 - The Request Object
So, lets get started!!!
Scope
For the exam, you need to worry about 3 different scopes. They are:
• Request
• Session &
• Application
The scope would play an important part of any web application.
Let us look at the details of these 3 Scopes.
| Scope | Accessibility | Lifetime |
|---|---|---|
| Request | Current, included, or forwarded pages | Until the response is returned to the user. |
| Session | All requests from same browser within session timeout | Until session timeout or session ID invalidated (such as user quits browser). |
| Application | All request to same Web application | Life of container or explicitly killed (such as container administration action). |
For ex: if you use the request.setAttribute(), you will be able to access it only until this request is alive. Once the request is complete, you will no longer be able to read the attribute that you just set into the request.
But, if you set an attribute into the session you will be able to read it across multiple requests. Similarly if you use the context, you will be able to read it across multiple sessions.
Exam Trivia:
Request is the least available whereas a session is a bit more available and the context is globally available. But, it is not advisable to put all your stuff into the context. Keep only information that you would need across all the users of the website in the context. Keep information that you would need as long as a user is browsing (say his login info) in the session and page specific information in the request.
Dont worry if we did not cover the details of the request, scope or the context because, that is exactly what the subsequent chapters are going to do!!!
Previous Chapter: Chapter 12 - Retrieving HTTP Request Header Information
Next Chapter: Chapter 14 - The Request Object
Chapter 12: Retrieving HTTP Request Header Information
In the Previous Chapter we saw how to get a Servlets Initialization parameters. In this chapter, we are going to take a look at how to get the Header information from the Http Request.
So, lets get started!!!
Retrieving HTTP Request Header Information
The Http Request header is the area where all the details of the request are bundled. This is where the browser specifies the file wanted, date, image file support, and a lot more. Let us take a look at a sample Servlet that is going to read through the Http Request Header.
Servlet code:
import java.io.*;
import java.text.*;
import java.util.*;
import javax.servlet.*;
import javax.servlet.http.*;
/**
* Displaying request headers
*
* @author Anand V
*/
public class ReadHttpRequestHeaderServlet extends HttpServlet {
public void doGet(HttpServletRequest request, HttpServletResponse response)
throws IOException, ServletException
{
response.setContentType("text/html");
PrintWriter out = response.getWriter();
out.println("< html >");
out.println("< head >");
String title = "Read Request Header Example";
out.println("< title >" + title + "");
out.println("< / head >");
out.println("< body >");
out.println("< h3 >" + title + "< / h3 >");
out.println("< table >");
Enumeration e = request.getHeaderNames();
while (e.hasMoreElements())
{
String headerName = (String)e.nextElement();
String headerValue = request.getHeader(headerName);
out.println("< tr >< td bgcolor=\"#CCCCCC\" > " + headerName);
out.println("< / td >< td > " + headerValue + " < / td > < / tr >");
}
out.println("< / table >");
out.println("< / body >");
out.println("< / html >");
}
}
When you deploy this Servlet on your local tomcat server you will see something like below:
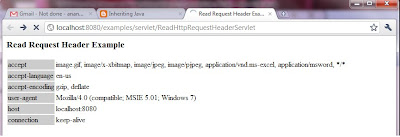
Previous Chapter: Chapter 11 - Obtaining a Servlets Initialization Parameters
Next Chapter: Chapter 13 - Web Application Scope
Wednesday, March 2, 2011
Chapter 11: Obtaining a Servlets Initialization Parameters
We know what a Servlet is (I wouldn't blame you if you said “I know it pal. All you have spoken about in the past chapters is Servlets only”). We also know that a Servlet needs to be initialized in order to be of any use in our application. In this chapter, we are going to find out, how we can access the ServletContext and figure out the Servlets Initialization Parameters.
So, lets get started!!!
The Servlet Context
A Web application consists of many parts. It can be a combination of JSP pages, servlets, tag libraries, Java beans, and other class files. The Java Virtual Machine creates a memory box for all of these called a ServletContext object which maintains information about our Web application. If you want to know more about your application and its state, the first place to go is the “ServletContext”. As the Servlet API states, the ServletContext allows you get many kinds of information about the Application. You can get application-level initialization parameters. You can also set and get application attributes, as well as the major and minor version of the Servlet API that this Servlet Container supports. One very interesting capability is to get hold of RequestDispatcher object to forward requests to other application components within the server, or to include responses from certain components within the servlet and to log a message to application log file. The ServletContext object is how you can set, get, and change application level attributes and talk to the Servlet Container.
Servlet Context Methods
The getInitParameter and getInitParameterNames methods retrieve the application wide or rather the “Web application” parameters.
• The getInitParameter method returns a string containing the value of the parameter or null if the parameter does not exist.
• The getInitParameterNames method retrieves the names of the servlet's initialization parameters as an Enumeration of string objects. If there aren't any, it returns an empty Enumeration.
A Servlet that Reads the ServletContext
Let us now take a look at a simple servlet that is going to read the ServletContext and understand the initialization parameters.
Servlet Code
import java.io.IOException;
import java.io.PrintWriter;
import java.util.Enumeration;
import javax.servlet.*;
import javax.servlet.http.*;
public class ServletContextReadingServlet extends HttpServlet
{
/**
* Method that is going to read the Servlet Context
*/
public void doGet(HttpServletRequest request,
HttpServletResponse response)
throws IOException, ServletException
{
response.setContentType("text/html");
PrintWriter writer = response.getWriter();
writer.println("< h1 >ServletConfig " + "Initialization Parameters < / h1 >");
writer.println("< ul >");
Enumeration params = getServletConfig().getInitParameterNames();
while (params.hasMoreElements())
{
String param = (String) params.nextElement();
String value =
getServletConfig().getInitParameter(param);
writer.println("< li >< b >" + param + "< / b > = " + value);
}
writer.println("< / ul >");
writer.println("< hr >");
}
}
The above Servlet is pretty straight forward (Aren’t all of our example Servlets straight forward?). It gets all the initialization parameters as an enumeration using the getInitParameterNames() method and then just prints them all on screen, one after the other.
Previous Chapter: Chapter 10 - Form Parameters
Next Chapter: Chapter 12 - Retrieving HTTP Request Header Information
So, lets get started!!!
The Servlet Context
A Web application consists of many parts. It can be a combination of JSP pages, servlets, tag libraries, Java beans, and other class files. The Java Virtual Machine creates a memory box for all of these called a ServletContext object which maintains information about our Web application. If you want to know more about your application and its state, the first place to go is the “ServletContext”. As the Servlet API states, the ServletContext allows you get many kinds of information about the Application. You can get application-level initialization parameters. You can also set and get application attributes, as well as the major and minor version of the Servlet API that this Servlet Container supports. One very interesting capability is to get hold of RequestDispatcher object to forward requests to other application components within the server, or to include responses from certain components within the servlet and to log a message to application log file. The ServletContext object is how you can set, get, and change application level attributes and talk to the Servlet Container.
Exam Trivia:
The Servlet context can be used to get, set and change application level attributes. This cannot be used to alter session parameters. Many people get confused about the ServletContext and its ability to alter the Session.
Servlet Context Methods
The getInitParameter and getInitParameterNames methods retrieve the application wide or rather the “Web application” parameters.
• The getInitParameter method returns a string containing the value of the parameter or null if the parameter does not exist.
• The getInitParameterNames method retrieves the names of the servlet's initialization parameters as an Enumeration of string objects. If there aren't any, it returns an empty Enumeration.
A Servlet that Reads the ServletContext
Let us now take a look at a simple servlet that is going to read the ServletContext and understand the initialization parameters.
Servlet Code
import java.io.IOException;
import java.io.PrintWriter;
import java.util.Enumeration;
import javax.servlet.*;
import javax.servlet.http.*;
public class ServletContextReadingServlet extends HttpServlet
{
/**
* Method that is going to read the Servlet Context
*/
public void doGet(HttpServletRequest request,
HttpServletResponse response)
throws IOException, ServletException
{
response.setContentType("text/html");
PrintWriter writer = response.getWriter();
writer.println("< h1 >ServletConfig " + "Initialization Parameters < / h1 >");
writer.println("< ul >");
Enumeration params = getServletConfig().getInitParameterNames();
while (params.hasMoreElements())
{
String param = (String) params.nextElement();
String value =
getServletConfig().getInitParameter(param);
writer.println("< li >< b >" + param + "< / b > = " + value);
}
writer.println("< / ul >");
writer.println("< hr >");
}
}
The above Servlet is pretty straight forward (Aren’t all of our example Servlets straight forward?). It gets all the initialization parameters as an enumeration using the getInitParameterNames() method and then just prints them all on screen, one after the other.
Previous Chapter: Chapter 10 - Form Parameters
Next Chapter: Chapter 12 - Retrieving HTTP Request Header Information
Chapter 10: Form Parameters
By now, we all know what a JSP page is and the contents that can be placed inside it. One of those is the “Form” or the “HTML Form”. This is the entity that is going to capture all the data displayed on the screen (including user entered values) and bring it back to the Servlet.
In this chapter, we are going to take a look at how the servlet will handle/understand the contents of the data that the form sends.
So, lets get started!!!
The ServletRequest Interface
The contents of the HTML Form is made available to the Servlet through the ServletRequest interface. This interface is implemented by the Web container to get the parameters from a request. Parameters are sent in the query string or posted form data. This interface has methods that can be used the servlet to access the contents of the form or the query string. They are:
• getParameter(String). You use this method if you know the particular parameter name. It returns the value of a request parameter as a string, or null if the parameter does not exist. Use this method when you are sure the parameter has only one value
• getParameterMap(). You use this method to create a map of the form parameters supplied with this request.
• getParameterNames(). This method returns an Enumeration of string objects containing the names of the parameters contained in this request, or an empty Enumeration if the request has no parameters.
• getParameterValues(String). This method returns an array of values as strings, or null if the parameter does not exist. If the parameter has a single value, the array has a length of 1. One of the common uses of getParameterValues() is for processing drop down lists that have their “multiple” attribute set.
Servlet Code
import java.io.*;
import java.util.*;
import javax.servlet.*;
import javax.servlet.http.*;
public class RequestParametersReadingServlet extends HttpServlet
{
public void doPost(HttpServletRequest request, HttpServletResponse response)
throws IOException, ServletException
{
Enumeration parameterNames = request.getParameterNames();
PrintWriter out = res.getWriter ();
while (parameterNames.hasMoreElements()) {
String name = (String)parameterNames.nextElement();
String value = request.getParameter(name);
out.println(“Parameter ” + name + " = " + value + "< br / >");
}
}
}
This Servlet is pretty straightforward. It just uses the getParameterNames() method to get the enumeration of all parameters in the request and then loops through it to print out the contents.
Previous Chapter: Chapter 9 - Triggering HttpServlet GET, POST, and HEAD Methods
Next Chapter: Chapter 11 - Obtaining a Servlets Initialization Parameters
In this chapter, we are going to take a look at how the servlet will handle/understand the contents of the data that the form sends.
So, lets get started!!!
The ServletRequest Interface
The contents of the HTML Form is made available to the Servlet through the ServletRequest interface. This interface is implemented by the Web container to get the parameters from a request. Parameters are sent in the query string or posted form data. This interface has methods that can be used the servlet to access the contents of the form or the query string. They are:
• getParameter(String). You use this method if you know the particular parameter name. It returns the value of a request parameter as a string, or null if the parameter does not exist. Use this method when you are sure the parameter has only one value
• getParameterMap(). You use this method to create a map of the form parameters supplied with this request.
• getParameterNames(). This method returns an Enumeration of string objects containing the names of the parameters contained in this request, or an empty Enumeration if the request has no parameters.
• getParameterValues(String). This method returns an array of values as strings, or null if the parameter does not exist. If the parameter has a single value, the array has a length of 1. One of the common uses of getParameterValues() is for processing drop down lists that have their “multiple” attribute set.
Exam Trivia:
If you use the getParameter() method with a multivalued parameter, you won't get an error. You will get the first value in the array returned by getParameterValues() and you will end up losing the other values that were part of the return data.
Let us now take a look at a simple servlet that can read the contents of the form from the request.
Servlet Code
import java.io.*;
import java.util.*;
import javax.servlet.*;
import javax.servlet.http.*;
public class RequestParametersReadingServlet extends HttpServlet
{
public void doPost(HttpServletRequest request, HttpServletResponse response)
throws IOException, ServletException
{
Enumeration parameterNames = request.getParameterNames();
PrintWriter out = res.getWriter ();
while (parameterNames.hasMoreElements()) {
String name = (String)parameterNames.nextElement();
String value = request.getParameter(name);
out.println(“Parameter ” + name + " = " + value + "< br / >");
}
}
}
This Servlet is pretty straightforward. It just uses the getParameterNames() method to get the enumeration of all parameters in the request and then loops through it to print out the contents.
Previous Chapter: Chapter 9 - Triggering HttpServlet GET, POST, and HEAD Methods
Next Chapter: Chapter 11 - Obtaining a Servlets Initialization Parameters
Tuesday, March 1, 2011
Chapter 8: Servlet Request Types
As we saw in the previous chapter, we have many different types of requests that can be handled by the Servlet. For simplicity sake (more importantly the exam has these only) we are going to look at the 3 main types which are Get, Post and Put.
So, lets get started!!!
GET
The GET type request is normally used for simple HTML page requests. The Servlets method that will handle this type of request would look like:
public void doGet(HttpServletRequest request, HttpServletResponse response)
throws IOException, ServletException
{
// code to handle Get Request here
}
This is probably the first of the servlet methods any programmer begins his j2ee journey with. Even if this is the only method in your servlet, you’ll be able to handle a majority of the requests that get submitted to it. When a request gets submitted using the Get method, the whole URL in the browsers address bar gets passed on to the servlet and will be parsed & understood by the servlet when the request is processed.
Note: The init() and service() methods involved in a request are already provided by the HttpServlet class, so they don't need to be overridden. Overriding the init() method is always a good idea and overriding the service method can be done if you want (remember the example in the previous chapter???)
POST
The POST type request is frequently used by pages that use HTML forms. A typical doXXX method that handles these requests would look as below:
public void doPost(HttpServletRequest request, HttpServletResponse response)
throws IOException, ServletException
{
//Code to handle Post request
}
The POST method is more sophisticated than a GET request. Normally, a Web form has fields whose names and values are sent to the server in key-value pairs. The POST is designed for posting large messages or providing a block of data, such as the result of submitting a form; and submitting long data fields to a database etc.
The amount of data you can send from the browser to the Servlet using POST is much larger than what we can send using GET.
Comparison Between Get and Post:
PUT
The PUT type request is used for uploading files to the server. While uploading is its original intent, it isnt used much. Instead, people prefer the POST to upload files over PUT. The doXXX method that handles PUT requests would look like below:
public void doPut(HttpServletRequest request, HttpServletResponse response)
throws IOException, ServletException
{
//code to handle PUT request goes here
}
The doPut() method is called by the server (via the service method) to handle a PUT request. Uploading files from a browser has always been tricky. The idea behind the PUT operation is to make uploading easy. It is supposed to allow a client to place a file on the server, just like sending a file by FTP. The javadoc for this method warns that when overriding this method, you should leave intact any content headers sent with the request (including Content-Length, Content-Type, Content-Transfer-Encoding, Content-Encoding, Content-Base, Content-Language, Content-Location, Content-MD5, and Content-Range). This method is rarely used, but it is powerful if you decide on using it.
Setting Request Submission Type:
We have seen how the GET/POST request submissions work and what their features are. But, we havent yet seen how to set the request submission type. Well, its pretty straightforward. Lets look at an example:
< form method= "GET" action="/myservlet/process" >
The above is a form declaration where the method is set as “GET”. You can replace this with “POST” and your JSP would work without any issues (Remember that you need to have the corresponding doXXX method in your servlet to handle the request that gets submitted)
Previous Chapter: Chapter 7 - Overriding HttpServlet GET, POST, and PUT Methods
Next Chapter: Chapter 9 - Triggering HttpServlet GET, POST, and HEAD Methods
So, lets get started!!!
GET
The GET type request is normally used for simple HTML page requests. The Servlets method that will handle this type of request would look like:
public void doGet(HttpServletRequest request, HttpServletResponse response)
throws IOException, ServletException
{
// code to handle Get Request here
}
This is probably the first of the servlet methods any programmer begins his j2ee journey with. Even if this is the only method in your servlet, you’ll be able to handle a majority of the requests that get submitted to it. When a request gets submitted using the Get method, the whole URL in the browsers address bar gets passed on to the servlet and will be parsed & understood by the servlet when the request is processed.
Note: The init() and service() methods involved in a request are already provided by the HttpServlet class, so they don't need to be overridden. Overriding the init() method is always a good idea and overriding the service method can be done if you want (remember the example in the previous chapter???)
On the Job: The GET is the most common type of browser request.
POST
The POST type request is frequently used by pages that use HTML forms. A typical doXXX method that handles these requests would look as below:
public void doPost(HttpServletRequest request, HttpServletResponse response)
throws IOException, ServletException
{
//Code to handle Post request
}
The POST method is more sophisticated than a GET request. Normally, a Web form has fields whose names and values are sent to the server in key-value pairs. The POST is designed for posting large messages or providing a block of data, such as the result of submitting a form; and submitting long data fields to a database etc.
The amount of data you can send from the browser to the Servlet using POST is much larger than what we can send using GET.
Comparison Between Get and Post:
| GET | POST |
|---|---|
| Query string or form data is simply appended to the URL as name-value pairs. | Form name-value pairs are sent in the body of the request, not in the URL itself. |
| Query length is limited (~1KB). | Query length is unlimited. |
| Users can see data in address bar. | Data hidden from users. |
| Not Safe – A person standing over your shoulder can view your userid/pwd if submitted via Get | Safe – No one will be able to view what data is getting submitted |
| invokes doGet() | invokes doPost() |
| Supports ASCII. | Supports ASCII + Binary. |
| Easy to bookmark | Hard to bookmark. |
PUT
The PUT type request is used for uploading files to the server. While uploading is its original intent, it isnt used much. Instead, people prefer the POST to upload files over PUT. The doXXX method that handles PUT requests would look like below:
public void doPut(HttpServletRequest request, HttpServletResponse response)
throws IOException, ServletException
{
//code to handle PUT request goes here
}
The doPut() method is called by the server (via the service method) to handle a PUT request. Uploading files from a browser has always been tricky. The idea behind the PUT operation is to make uploading easy. It is supposed to allow a client to place a file on the server, just like sending a file by FTP. The javadoc for this method warns that when overriding this method, you should leave intact any content headers sent with the request (including Content-Length, Content-Type, Content-Transfer-Encoding, Content-Encoding, Content-Base, Content-Language, Content-Location, Content-MD5, and Content-Range). This method is rarely used, but it is powerful if you decide on using it.
Setting Request Submission Type:
We have seen how the GET/POST request submissions work and what their features are. But, we havent yet seen how to set the request submission type. Well, its pretty straightforward. Lets look at an example:
< form method= "GET" action="/myservlet/process" >
The above is a form declaration where the method is set as “GET”. You can replace this with “POST” and your JSP would work without any issues (Remember that you need to have the corresponding doXXX method in your servlet to handle the request that gets submitted)
Previous Chapter: Chapter 7 - Overriding HttpServlet GET, POST, and PUT Methods
Next Chapter: Chapter 9 - Triggering HttpServlet GET, POST, and HEAD Methods
Chapter 7: Overriding HttpServlet GET, POST, and PUT Methods
In the previous chapter we saw how a Servlet handles a Http Request that comes from a web browser. We also saw that there are many doXXX() methods inside a Servlet that serve a specific purpose. In this chapter we are going look at the XXX part of the Servlet code.
So, lets get started!!!
The doXXX Methods
There are 3 main types of requests that get processed by a Servlet. They are:
• Get
• Post
• Put
Each of them have a corresponding doXXX() method in the Servlet class which would be:
• doGet
• doPost
• doPut
In the exam you can expect many questions related to this topic so pay attention!!!
These methods are called by the service method in your Servlet.
Let us now take a look at a sample Servlet that has these 3 doXXX methods.
import java.io.*;
import javax.servlet.*;
import javax.servlet.http.*;
/**
* A servlet that has the 3 doXXX Methods
*
* @author Anand
*/
public class OurSecondServlet extends HttpServlet
{
// doGet()
public void doGet(HttpServletRequest request,
HttpServletResponse response)
throws IOException, ServletException
{
requestType("GET", response);
}
// doPost()
public void doPost(HttpServletRequest request,
HttpServletResponse response)
throws IOException, ServletException
{
requestType("POST", response);
}
// doPut()
public void doPut(HttpServletRequest request,
HttpServletResponse response)
throws IOException, ServletException
{
requestType("PUT", response);
}
public void requestType(String requestType,
HttpServletResponse response)
throws IOException, ServletException
{
response.setContentType("text/html");
PrintWriter out = response.getWriter();
out.println("< html >");
out.println("< head >");
out.println("< title >Our Second Servlet" +
"< / title >");
out.println("< / head >");
out.println("< body >");
out.println("< h1 >Servlet Request< / h1 >");
out.println("The Submitted Request type is : " + requestType);
out.println("< / body >");
out.println("< / html >");
}
}
How this code works?
As you can see, we have 3 different doXXX methods in our servlet, each of them calling the same method with just one parameter that differentiates them. Ideally in most cases, our code would be like this too. The logic that gets executed is mostly the same irrespective of the type of request submission. So, the doXXX methods, just receive the request, add some identifier that can be used to identify what request is submitted and then calls another method which will eventually be called by the other doXXX methods too.
The delegate method does the actual processing and returns the results.
In this case, based on the doXXX method calling it, the output will be different. If you submit using the GET option, you will get the below screen:
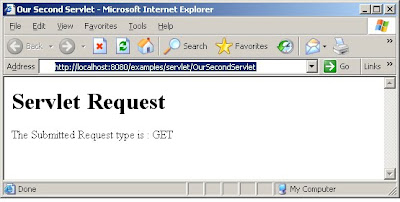
As mentioned earlier, the service method would invoke the appropriate doXXX method based on the request submission type. But, if you are curious and wonder how the code for such a service method would look like, well, you don't have to search anymore. Here is how it would look:
protected void service(HttpServletRequest req,
HttpServletResponse resp)
throws ServletException, IOException
{
String method = req.getMethod();
if (method.equals(METHOD_GET))
{
// Call doGet
doGet(req, resp);
} else if (method.equals(METHOD_POST))
{
// call doPost
doPost(req, resp);
} else if (method.equals(METHOD_PUT))
{
// call doPut
doPut(req, resp);
} else
{
// Our Servlet doesn't currently support
// other types of request.
String errMsg = "Method Not Supported");
resp.sendError(
HttpServletResponse.SC_NOT_IMPLEMENTED, errMsg);
}
}
Previous Chapter: Chapter 6 - Servlet Handling of Http Request
Next Chapter: Chapter 8 - Servlet Request Types
Chapter 6: Servlet Handling of HTTP Requests
In the previous few chapters, we learnt what a Servlet is, what a JSP is, how they fit together in the bigger picture in a J2EE Application. In this chapter, we are going to see how Servlets handle HTTP Requests.
So, lets get started!!!
Servlets & Web Pages:
JSP and servlets have greatly enhanced the way in which we can create and manage Web pages. The difficulty level of coding JSP is between that of coding HTML and pure Java. Servlets are pure Java. The idea behind having both is providing a way for non-programmers to contribute functionality through JSP. You can “program” a JSP page almost as easily as you can write an HTML page. For simple tasks like displaying the current date, you write a normal HTML page and add only a small amount of Java as a scriptlet. For big tasks like processing a shopping cart, you use JSP as the mediator between the Web form and a component(s) (bean or servlet) that has all the processing logic. Most of the code in a Web application will go into servlets. The JSP portion is a just front end to the application (with little logic of course) that a user can use/navigate comfortably.
We all know that the web (Internet) lives over the Http protocol. The servlet as expected is handle the http requests. Well, what use would a servlet be if it cannot handle the most commonly used protocol in the internet.
A lot of things happen when a servlet is invoked because of some user action in a web page. The sequence of events starts with a browser sending a request to a Web server. The server hands the request to a Servlet Container. The container loads the servlet (if it isn't already loaded), instantiates a request and response objects, and then hands these objects to the servlet by calling first its init() method, then its service() method, and lastly the destroy() method. The service() method will typically call one of the doXXX() methods such as doGet(). The response based on the output of the doXXX() methods will be sent back to the browser and will be displayed on screen.
Below is a diagrammatic representation of how data flows from a browser to the servlet and then back to the browser.
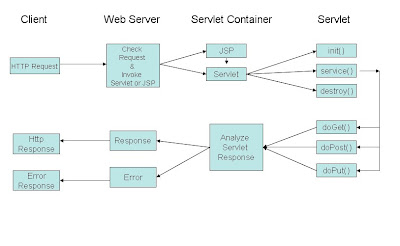
Let’s retrace the sequence of steps:
1. Web Server receives request from the Browser (Http Request)
2. Web Server checks the request and invokes the appropriate Servlet/JSP in the Servlet Container
3. If this is the first time the servlet is invoked its init() method gets called
4. If not, the service() gets called.
5. The service() method in turn delegates the processing to one of the doXXX() methods based on the request received
6. The output of the doXXX() methods is sent back to the servlet container
7. The container analyzes the response and formats it appropriately
8. If the response is normal a Http Response is sent back to the client
9. Else, an error response is sent back to the client
Now that we know how the requests makes its way to the servlet and then comes back to the client, lets look at a sample Servlet that will actually compile and produce some output on the browser.
Servlet Source Code:
import java.io.*;
import javax.servlet.*;
import javax.servlet.http.*;
/**
* A simple servlet.
* @author Anand
*/
public class OurFirstServlet extends HttpServlet
{
public void doGet(HttpServletRequest request,
HttpServletResponse response)
throws IOException, ServletException
{
response.setContentType("text/html");
PrintWriter out = response.getWriter();
out.println("< html >");
out.println("< head >");
out.println("< title > A simple servlet. ");
out.println("");
out.println("< body >");
out.println("< h1 >Simple Servlet");
out.println("This is a Anand’s First Servlet");
out.println("< / body >");
out.println("< / html >");
}
}
The above is a simple servlet that doesn't do anything great but still displays something on the browser when invoked.
On invocation, the servlet code runs and the doGet() method will generate a response that would be equivalent to the below HTML code. This response will be sent to the browser which in turn will display the contents on screen.
< html >
< head >
< title > A simple servlet. < / title >
< / head >
< body >
< h1 >Simple Servlet< / h1 >
This is a Anand’s First Servlet
< / body >
< / html >
On Screen it would look like below:
Previous Chapter: Self Test - Chapters 1 to 5
Next Chapter: Chapter 7 - Overriding HttpServlet GET, POST, and PUT Methods
So, lets get started!!!
Servlets & Web Pages:
JSP and servlets have greatly enhanced the way in which we can create and manage Web pages. The difficulty level of coding JSP is between that of coding HTML and pure Java. Servlets are pure Java. The idea behind having both is providing a way for non-programmers to contribute functionality through JSP. You can “program” a JSP page almost as easily as you can write an HTML page. For simple tasks like displaying the current date, you write a normal HTML page and add only a small amount of Java as a scriptlet. For big tasks like processing a shopping cart, you use JSP as the mediator between the Web form and a component(s) (bean or servlet) that has all the processing logic. Most of the code in a Web application will go into servlets. The JSP portion is a just front end to the application (with little logic of course) that a user can use/navigate comfortably.
We all know that the web (Internet) lives over the Http protocol. The servlet as expected is handle the http requests. Well, what use would a servlet be if it cannot handle the most commonly used protocol in the internet.
A lot of things happen when a servlet is invoked because of some user action in a web page. The sequence of events starts with a browser sending a request to a Web server. The server hands the request to a Servlet Container. The container loads the servlet (if it isn't already loaded), instantiates a request and response objects, and then hands these objects to the servlet by calling first its init() method, then its service() method, and lastly the destroy() method. The service() method will typically call one of the doXXX() methods such as doGet(). The response based on the output of the doXXX() methods will be sent back to the browser and will be displayed on screen.
Below is a diagrammatic representation of how data flows from a browser to the servlet and then back to the browser.
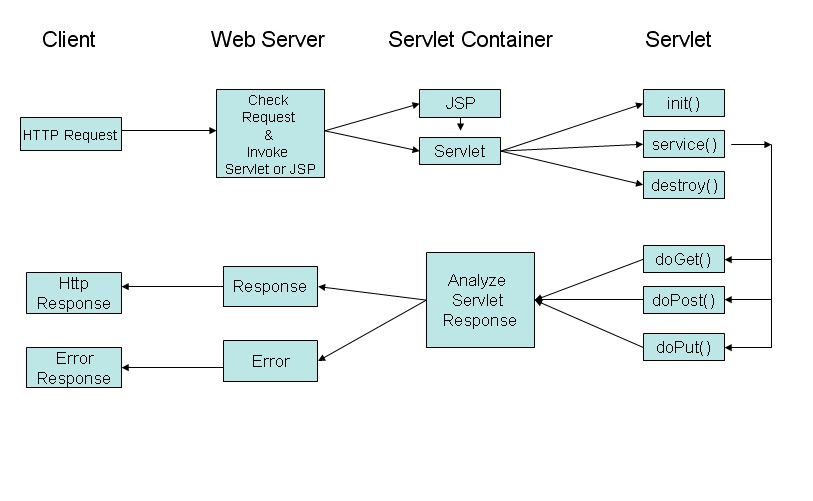
Let’s retrace the sequence of steps:
1. Web Server receives request from the Browser (Http Request)
2. Web Server checks the request and invokes the appropriate Servlet/JSP in the Servlet Container
3. If this is the first time the servlet is invoked its init() method gets called
4. If not, the service() gets called.
5. The service() method in turn delegates the processing to one of the doXXX() methods based on the request received
6. The output of the doXXX() methods is sent back to the servlet container
7. The container analyzes the response and formats it appropriately
8. If the response is normal a Http Response is sent back to the client
9. Else, an error response is sent back to the client
Now that we know how the requests makes its way to the servlet and then comes back to the client, lets look at a sample Servlet that will actually compile and produce some output on the browser.
Servlet Source Code:
import java.io.*;
import javax.servlet.*;
import javax.servlet.http.*;
/**
* A simple servlet.
* @author Anand
*/
public class OurFirstServlet extends HttpServlet
{
public void doGet(HttpServletRequest request,
HttpServletResponse response)
throws IOException, ServletException
{
response.setContentType("text/html");
PrintWriter out = response.getWriter();
out.println("< html >");
out.println("< head >");
out.println("< title > A simple servlet. ");
out.println("");
out.println("< body >");
out.println("< h1 >Simple Servlet");
out.println("This is a Anand’s First Servlet");
out.println("< / body >");
out.println("< / html >");
}
}
The above is a simple servlet that doesn't do anything great but still displays something on the browser when invoked.
On invocation, the servlet code runs and the doGet() method will generate a response that would be equivalent to the below HTML code. This response will be sent to the browser which in turn will display the contents on screen.
< html >
< head >
< title > A simple servlet. < / title >
< / head >
< body >
< h1 >Simple Servlet< / h1 >
This is a Anand’s First Servlet
< / body >
< / html >
On Screen it would look like below:
Previous Chapter: Self Test - Chapters 1 to 5
Next Chapter: Chapter 7 - Overriding HttpServlet GET, POST, and PUT Methods
Quick Recap: Chapters 1 to 5
Let us quickly go over the concepts we have covered in the past few chapters.
JSP & Servlet History
• ARPANET was the initial backbone based on which Internet was built
• Tim Berners Lee paved the way for the current day Internet and World Wide Web
• CGI helped people transfer data from one computer to another
• Because CGI was not scalable, people looked out for better alternatives
• JSP and Servlets became an easier and a more scalable alternative to CGI
Advantages of Using Servlets
a. They are faster than CGI scripts because each CGI script produces an entirely new process that takes a lot of time to execute, whereas a servlet creates only a new thread.
b. Servlet API is standard and available easily on the internet (like JSPs)
c. Servlets have the advantages like ease of development & platform independence (like Java)
d. They can access all the J2SE and J2EE APIs
e. Can take the full advantage & capabilities of the Java programming language
Advantages of Using JSPs
a. Write Once, Run Anywhere
b. Code Re-use
c. Support for Scripting
d. Supports Actions
e. Supports both Static & Dynamic Content
f. Supports N-tier Enterprise Application Architecture
g. Superior Quality Documentation & Examples (All over the internet)
h. Reusable Tag Libraries
Web Servers & Servlet Containers
• A web server is the server on which our J2EE application runs
• A Servlet container is similar to a JVM for java programs and executes our Servlets
• Data is transferred using the request/response model
JSP to Servlet Conversion
• A JSP file gets converted into a Servlet at run time
• The web server (Ex: Tomcat) does the conversion of the JSP
• The web server invokes the converted Servlet version of the JSP page, every time the JSP is invoked.
Previous Chapter: Chapter 5 - JSP to Servlet Conversion
Next Chapter: Self Test - Chapters 1 to 5
Chapter 4: A Sample JSP
In the previous chapter, we took a look at how a sample Servlet would look like. In this Chapter, we are going to take a look at a sample JSP file and the contents of the file.
So, lets get started!!!
A JSP File Contents:
A JSP file can contain the following:
a. HTML contents
b. JavaScript
c. Java Code
Combining the features of the above 3 mentioned items; we get a powerful entity called the JSP. JSPs are used for the User Interface layer or the more colloquially called Front End layer of any J2EE application.
JSP Skeleton
Below is how a Skeleton JSP File would look like. (The file has to be saved as .jsp)
As you can see, a JSP file is pretty straightforward. Also, an important point to note here is the fact that, not all of the entities mentioned above are mandatory. You can include or exclude any of the entities mentioned above, based on your requirement and convenience.
Previous Chapter: Chapter 3 - A Sample Servlet
Next Chapter: chapter 5 - JSP to Servlet Conversion
So, lets get started!!!
A JSP File Contents:
A JSP file can contain the following:
a. HTML contents
b. JavaScript
c. Java Code
Combining the features of the above 3 mentioned items; we get a powerful entity called the JSP. JSPs are used for the User Interface layer or the more colloquially called Front End layer of any J2EE application.
JSP Skeleton
Below is how a Skeleton JSP File would look like. (The file has to be saved as .jsp)
// Page Imports
<%@ page import = “com.xyz.ClassName %>
// Tag Library References
<%@ taglib URI = “path to Taglib file” prefix = “xx” %>
// here xx refers to the prefix with which the tag library will be referred to
// HTML Head & Title Content
// Java Script Content
// HTML Body & Form Contents
Note: Java code can be placed within the <% %> tags in the body part of the JSP page within the Body tags.
As you can see, a JSP file is pretty straightforward. Also, an important point to note here is the fact that, not all of the entities mentioned above are mandatory. You can include or exclude any of the entities mentioned above, based on your requirement and convenience.
Previous Chapter: Chapter 3 - A Sample Servlet
Next Chapter: chapter 5 - JSP to Servlet Conversion
Subscribe to:
Posts (Atom)