<?xml version="1.0" encoding="utf-8"?>
<feed xmlns="http://www.w3.org/2005/Atom">

  <title><![CDATA[mupuf.org]]></title>
  <link href="http://www.mupuf.org/atom.xml" rel="self"/>
  <link href="http://www.mupuf.org/"/>
  <updated>2024-07-15T20:38:19+03:00</updated>
  <id>http://www.mupuf.org/</id>
  <author>
    <name><![CDATA[]]></name>
    
  </author>
  <generator uri="http://octopress.org/">Octopress</generator>

  
  <entry>
    <title type="html"><![CDATA[Setting Up a CI System Part 5: Time-sharing your test machines]]></title>
    <link href="http://www.mupuf.org/blog/2023/01/04/setting-up-a-ci-system-part-5-time-sharing-your-test-machines/"/>
    <updated>2023-01-04T14:29:00+02:00</updated>
    <id>http://www.mupuf.org/blog/2023/01/04/setting-up-a-ci-system-part-5-time-sharing-your-test-machines</id>
    <content type="html"><![CDATA[<p>This article is part of a series on how to setup a bare-metal CI system for
Linux driver development. Here are the different articles so far:</p>

<ul>
<li><a href="https://mupuf.org/blog/2021/02/08/setting-up-a-ci-system-preparing-your-test-machine/">Part 1</a>:
The high-level view of the whole CI system, and how to fully control test machines remotely
(power on, OS to boot, keyboard/screen emulation using a serial console);</li>
<li><a href="https://mupuf.org/blog/2021/02/10/setting-up-a-ci-system-part-2-generating-and-deploying-your-test-environment/">Part 2</a>:
A comparison of the different ways to generate the rootfs of your test environment, and introducing the Boot2Container project;</li>
<li><a href="https://mupuf.org/blog/2022/01/10/setting-up-a-ci-system-part-3-provisioning-your-ci-gateway/">Part 3</a>: Analysis of the requirements for the CI gateway, catching regressions before deployment, easy roll-back, and netbooting the CI gateway securely over the internet.</li>
<li><a href="https://mupuf.org/blog/2022/04/15/setting-up-a-ci-system-part-4-live-patching-your-ci-gateway/">Part 4</a>: Generating a live-upgradable operating system image that can also be baked into a container for ease of use.</li>
</ul>


<p>Now that we have a way to netboot and live-update our CI gateway, it is time to start working  on the services that will
enable sharing the test machines to users!</p>

<p>This work is sponsored by the <a href="https://www.valvesoftware.com/en/">Valve Corporation</a>.</p>

<!-- more -->


<h3>Introduction</h3>

<p>Test machines are a valuable resource for any organization, may it be from a tech giant or a small-scale open source
project. Along with automated testing, they are instrumental to keeping the productivity of developers high by shifting
focus from bug fixing to code review, maintenance improvements, and developing new features. Given how valuable test
machines are, we should strive towards keeping the machine utilization as high as possible. This can be achieved by
turning the developer-managed test machines which show low utilization into shared test machine.</p>

<p>Let&#8217;s see how!</p>

<h3>Designing the services needed to time-share your test machines</h3>

<p>Efficient time-sharing of machines comes with the following high-level requirements:</p>

<ol>
<li>Ability to select which hardware you need for your testing;</li>
<li>Ability to deploy the wanted test environment quickly and automatically;</li>
<li>Full isolation between testing jobs (no persistent state);</li>
<li>Bi-directional file-sharing between the testing client and the test machine / device under test (DUT);</li>
<li>Caching resources to speed up the test machines&#8217; set-up/boot time;</li>
<li>Real time feedback from / serial console to the test machine.</li>
</ol>


<p>Let&#8217;s review them and propose services that should be hosted on the CI gateway to satisfy them, with
backwards-compatibility kept in mind at all time.</p>

<blockquote><p><strong>Note</strong>: This post can be very confusing as it tries to focus on the interaction between different services without
focusing on implementation details for the service. To help support my (probably confusing) explanations, I added
sequence diagrams when applicable.</p>

<p>So, please grab a pot of your favourite stimulating beverage before going further. If this were to be still insufficient,
please leave a comment (or <a href="http://www.mupuf.org/contact/mupuf.html">contact me by other means</a>) and I will try my best to address it :)</p></blockquote>

<h4>Boot2container provides transport, deployment, isolation, and caching of test environments</h4>

<p><img class="left" src="http://www.mupuf.org/images/CI/boot2container_logo.png" width="128" height="128" title="Boot2Container"  /></p>

<p>As we have seen in <a href="https://mupuf.org/blog/2021/02/10/setting-up-a-ci-system-part-2-generating-and-deploying-your-test-environment/">Part 2</a>,
using containers to run test jobs is an effective way to allow any job to set whatever test environment they desire
while providing isolation between test jobs. Additionally, it enables caching the test environments so that they do not
have to get re-downloaded every time.</p>

<p>This container could be booted using the initramfs we created in part 2,
<a href="https://gitlab.freedesktop.org/mupuf/boot2container">Boot2container</a>, which runs any list of container, as specified
in the kernel cmdline.</p>

<h4>iPXE &amp; MinIO provide kernel/Boot2Container deployment and configuration</h4>

<div class=" right third"><a href="http://www.mupuf.org/images/CI/dut_boot_sequence.mmd.png" class="fancybox" title="DUT Boot Sequence"><figure><img src="http://www.mupuf.org/images/CI/dut_boot_sequence.mmd.png" title="DUT Boot Sequence"  /><figcaption>DUT Boot Sequence</figcaption></figure></a></div>


<p>To keep things simple, stateless, and fast, the kernel/Boot2Container binaries and the kernel cmdline can be downloaded at
boot time via HTTP by using, for example, <a href="https://ipxe.org/">iPXE</a>. The iPXE binary can itself be netbooted by the
machine&#8217;s firmware (see
<a href="https://en.wikipedia.org/wiki/Preboot_Execution_Environment">PXE</a>, and <a href="https://en.wikipedia.org/wiki/Trivial_File_Transfer_Protocol">TFTP</a>),
or simply flashed onto the test machine&#8217;s drive/attached USB pen-drive.</p>

<p>The iPXE binary can then download the wanted boot script from an HTTP Server, passing in the query URL the MAC address
of the network interface that first got an IP address along with the architecture/platform
(<a href="https://www.iana.org/assignments/dhcpv6-parameters/dhcpv6-parameters.xhtml#processor-architecture">PCBIOS, x64 UEFI, &#8230;</a>).
This allows the HTTP server to serve the wanted boot script for this machine, which contain the URLs of the kernel,
initramfs, and the kernel command line to be used for the test job.</p>

<blockquote><p><strong>Note</strong>: While any HTTP server can be used used to provide the kernel and Boot2Container to iPXE, I would recommend using an
S3-compatible service such as MinIO as it not only acts like an HTTP server, but also provides an industry-standard
interface to manage the data (bucket creation, file uploads, access control, &#8230;). This gives you the freedom to change
where the service is located and which software provides it without impacting other components of the infrastructure.</p></blockquote>

<h4>Boot2container volumes &amp; MinIO provide file-sharing and user-data caching</h4>

<p>Job data caching and bi-directional file-sharing with the test container can be implemented using
<a href="https://docs.docker.com/storage/volumes/">volumes</a> and Boot2Container&#8217;s ability to mirror volumes from/to an
S3-compatible cloud storage system such as MinIO (see <a href="https://gitlab.freedesktop.org/mupuf/boot2container">b2c.volume</a>).</p>

<p>Since this may be a little confusing, here are a couple of examples:</p>

<h5>Bidirectional data sharing</h5>

<p>Test machines are meant to produce test results, and often need input data before executing tests. An effective
solution is to share a folder between the test machine and the machine submitting the job. We suggest using an
S3-compatible bucket to share this data, as it provides an industry-standard way of dealing with file between
multiple machines.</p>

<p>As an example of how this would look like in practice, here are the operations Boot2Container would need to do
in order to start an interactive shell on Alpine Linux on a test machine, with bi-directional data sharing:</p>

<div class=" right third"><a href="http://www.mupuf.org/images/CI/dut_b2c_file_sharing.mmd.png" class="fancybox" title="Bi-directional file sharing using b2c"><figure><img src="http://www.mupuf.org/images/CI/dut_b2c_file_sharing.mmd.png" title="Bi-directional file sharing using b2c"  /><figcaption>Bi-directional file sharing using b2c</figcaption></figure></a></div>


<ol>
<li>Connect to an S3-compatible Storage, which we name <code>local_minio</code>;</li>
<li>Create a volume named <code>job-volume</code>, set the mirror target to <code>local_minio</code>&#8217;s <code>job-bucket</code> bucket, then tell to
download the content of this bucket right after boot (<code>pull_on=pipeline_start</code>), upload all the content of the
volume back to the bucket before shutting down (<code>push_on=pipeline_end</code>), then mark it for deletion when we are done
with execution;</li>
<li>Run Alpine Linux (<code>docker.io/alpine:latest</code>) in interactive mode (<code>-ti</code>), with our volume mounted at <code>/job</code>.</li>
</ol>


<p>Here is how it would look in the kernel command line, as actual Boot2Container arguments:</p>

<pre><code>b2c.minio="local_minio,http://ci-gateway:9000,&lt;ACCESSKEY&gt;,&lt;SECRETKEY&gt;"
b2c.volume="job-volume,mirror=local_minio/job-bucket,pull_on=pipeline_start,push_on=pipeline_end,expiration=pipeline_end"
b2c.container="-v job-volume:/job -ti docker://docker.io/alpine:latest"
</code></pre>

<p>Other acceptable values for <code>{push,pull}_on</code> are: <code>pipeline_start</code>, <code>container_start</code>, <code>container_end</code>, <code>pipeline_end</code>, and
<code>changes</code>. The latter downloads/uploads new files as soon as they get created/modified.</p>

<h5>Caching data across reboots that only certain jobs may access</h5>

<p>In some cases, a test machine may require a lot of confidential data which would be impractical to re-download every
single time we boot the machine.</p>

<p>Once again, Boot2Container has us covered as it allows us to mark a volume as never expiring (<code>expiration=never</code>),
decrypting the data when downloading it from the bucket (<code>encrypt_key=$KEY</code>), then storing it encrypted using
<a href="https://github.com/google/fscrypt">fscrypt</a> (<code>fscrypt_key=$KEY</code>). This would look something like this:</p>

<pre><code>b2c.minio="local_minio,http://ci-gateway:9000,&lt;ACCESSKEY&gt;,&lt;SECRETKEY&gt;"
b2c.volume="job-volume,mirror=local_minio/job-bucket,pull_on=pipeline_start,expiration=never,encrypt_key=s3-password,fscrypt=7u9MGy[...]kQ=="
b2c.container="-v job-volume:/job -ti docker://docker.io/alpine:latest"
</code></pre>

<p>Read up more about these features, and a lot more, in
<a href="https://gitlab.freedesktop.org/mupuf/boot2container">Boot2Container&#8217;s README</a>.</p>

<h4>MaRS &amp; Sergeant Hartman provide test machine enrollment and DB of available machines/hardware</h4>

<p>In the previous section, we focused on how to consistently boot the right test environment, but we also need to make
sure we are booting on the right machine for the job!</p>

<p>Additionally, since we do not want to boot every machine every time a testing job comes just to figure out if we have
the right test environment, we should also have a database available on the gateway that can link a machine
id (MAC address?), a PDU port (see <a href="https://mupuf.org/blog/2021/02/08/setting-up-a-ci-system-preparing-your-test-machine/">Part 1</a>),
and what hardware/peripherals it has.</p>

<p>While it is definitely possible to maintain a structured text file that would contain all of this information, it is
also very error-prone, especially for test machines that allow swapping peripherals as maintenance operations can
inadvertently swap multiple machines and testing jobs would suddenly stop being executed on the expected machine.</p>

<p>
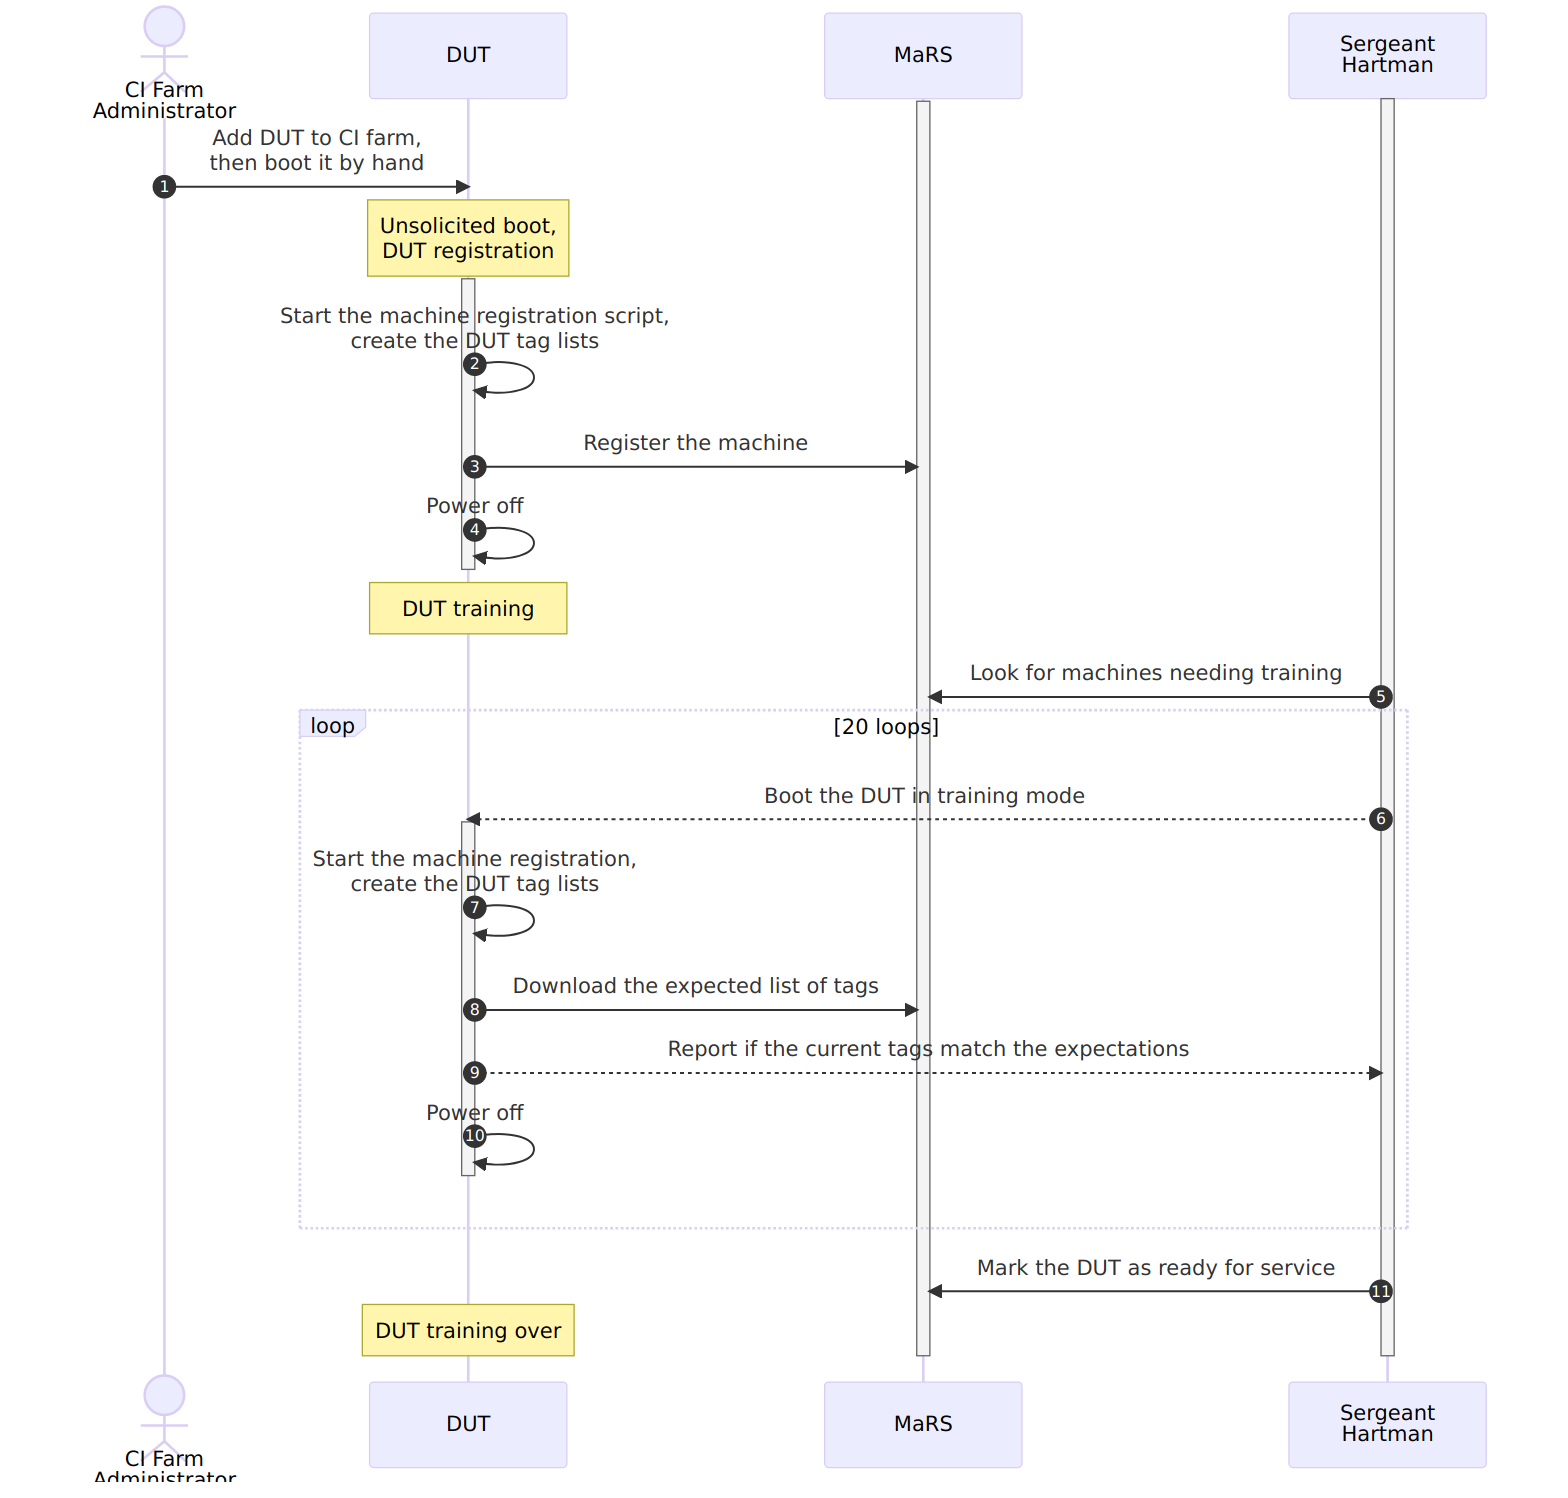
To mitigate this risk, it would be advisable to verify at every boot that the hardware found on the machine is the same
as the one expected by the CI gateway. This can be done by creating a container that will enumerate the hardware at boot,
generate a list of tags based on them, then compare it with a database running on the CI gateway, exposed as a REST
service (the Machine Registration Service, AKA MaRS). If the machine is not known to the CI gateway, this machine
registration container can automatically add it to MaRS&#8217;s database.</p>

<p>New machines reported to (the) MaRS should however not be directly exposed to users, not until they undergo training to
guarantee that:</p>

<ol>
<li>They boot reliably;</li>
<li>The serial console is set properly and reliable;</li>
<li>The reported list of tags is stable across reboots.</li>
</ol>


<div class=" float left fifth"><a href="http://www.mupuf.org/images/CI/srgt_hartman.jpg" class="fancybox" title="Sergeant Hartman"><figure><img src="http://www.mupuf.org/images/CI/srgt_hartman.jpg" title="Sergeant Hartman"  /><figcaption>Sergeant Hartman</figcaption></figure></a></div>


<p>Fortunately, the Sergeant Hartman service is constantly on the look out for new recruits (any machine not deemed ready
for service), to subject them to a bootloop to test their reliability. The service will then deem them ready for service
if they reach a predetermined success rate (19/20, for example), at which point the test machine should be ready to
accept test jobs \o/.</p>

<p>Sergeant Hartman can also be used to perform a sanity check after every reboot of the CI gateway, to check if any of the
test machine in the MaRS database has changed while the CI gateway was offline.</p>

<p>Finally, CI farm administrators need to occasionally work on a test machine, and thus need to prevent execution of
future jobs on this test machine. We call this operation &#8220;Retiring&#8221; a test machine. The machine can later be &#8220;activated&#8221;
to bring it back into the pool of test machines, after going through the training sequence.</p>

<p>The test machines&#8217; state machine and the expected training sequence can be seen in the following images:
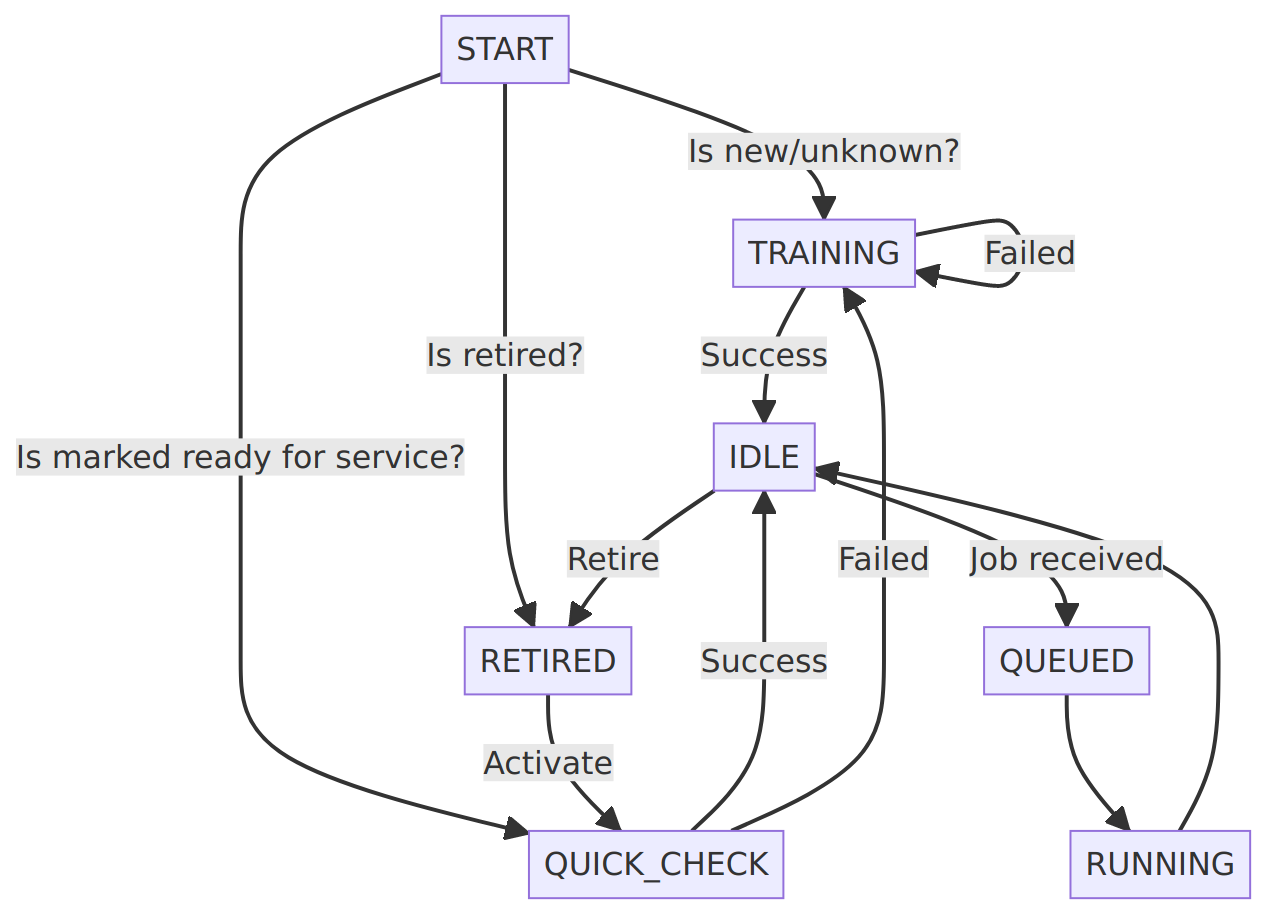
</p>

<ul class="gallery">
<li><a href="http://www.mupuf.org/images/CI/executor_dut_state_machine.mmd.png" class="fancybox" rel="gallery-c65c9b91c91b95378a118c0e05b73acf" title="DUT State Machine"><img src="http://www.mupuf.org/images/CI/executor_dut_state_machine.mmd.png" alt="DUT State Machine"/></a></li><li><a href="http://www.mupuf.org/images/CI/dut_mars_training.mmd.png" class="fancybox" rel="gallery-c65c9b91c91b95378a118c0e05b73acf" title="DUT Registration and Training Sequence"><img src="http://www.mupuf.org/images/CI/dut_mars_training.mmd.png" alt="DUT Registration and Training Sequence"/></a></li>
</ul>


<blockquote><p><strong>Note</strong>: Rebooting test machines booting using the <code>Boot on AC</code> boot
method (see <a href="https://mupuf.org/blog/2021/02/08/setting-up-a-ci-system-preparing-your-test-machine/">Part 1</a>) may
require to be disconnected from the power for a relatively long in order for the firwmare to stop getting power from
the power supply. A delay of 30 seconds seems to be relatively conservative, but some machines may require more. It is
thus recommended to make this delay configurable on a per-machine basis, and store it in MaRS.</p></blockquote>

<h4>SALAD provides automatic mapping between serial consoles and their attached test machine</h4>

<p>Once a test machine is booted, a serial console can provide a real time view of the testing in progress while also
enabling users to use the remote machine as if they had an SSH terminal on it.</p>

<p>To enable this feature, we first need to connect the test machine to the CI gateway using serial consoles, as explained
in <a href="https://mupuf.org/blog/2021/02/08/setting-up-a-ci-system-preparing-your-test-machine/">Part 1</a>:</p>

<pre><code>Test Machine &lt;-&gt; USB &lt;-&gt; RS-232 &lt;-&gt; NULL modem cable &lt;-&gt; RS-232 &lt;-&gt; USB Hub &lt;-&gt; Gateway
</code></pre>

<p>As the CI Gateway may be used for more than one test machine, we need to figure out which serial port of the test
machine is connected to which serial port of the CI gateway. We then need to make sure this information is kept up to
date as we want to make sure we are viewing the logs of the right machine when executing a job!</p>

<p>This may sound trivial when you have only a few machines, but this can quickly become difficult to maintain when you
have 10+ ports connected to your CI gateway! So, if like me you don&#8217;t want to maintain this information by hand, it is
possible to auto-discover this mapping at the same time as we run the machine registration/check process, thanks to the
use of another service that will untangle all this mess: SALAD.</p>

<p>For the initial registration, the machine registration container should output, at a predetermined baudrate, a
well-known string to every serial port (<code>SALAD.ping\n</code>, for example) then pick the first console port that answers another
well-known string (<code>SALAD.pong\n</code>, for example). Now that the test machine knows which port to use to talk to the CI
gateway, it can send its machine identifier (MAC address?) over it so that the CI gateway can keep track of which serial
port is associated to which machine (<code>SALAD.machine_id=...\n</code>).</p>

<p>As part of the initial registration, the machine registration container should also transmit to MaRS the name of the
serial adapter it used to talk to SALAD (ttyUSB0 for example) so that, at the next boot, the machine can be configured
to output its boot log on it (<code>console=ttyUSB0</code> added to its kernel command line). This also means that the verification
process of the machine registration container can simply simply send <code>SALAD.ping\n</code> to stdout, and wait for
<code>SALAD.pong\n</code> on stdin before outputing <code>SALAD.machine_id=...</code> to stdout again to make sure the association is still
valid.</p>

<div class=" right third"><a href="http://www.mupuf.org/images/CI/dut_salad.mmd.png" class="fancybox" title="Overview of the SALAD service"><figure><img src="http://www.mupuf.org/images/CI/dut_salad.mmd.png" title="Overview of the SALAD service"  /><figcaption>Overview of the SALAD service</figcaption></figure></a></div>


<p>On the CI gateway side, we propose that SALAD should provide the following functions:</p>

<ol>
<li>Associate the local serial adapters to a test machine&#8217;s ID;</li>
<li>Create a TCP server per test machine, then relay the serial byte stream from the test machine&#8217;s serial console to
the client socket and vice versa;</li>
<li>Expose over a REST interface the list of known machine IDs along with the TCP port associated with their machine;</li>
<li>Create preemptively a test machine/TCP server when asked for the TCP port over the REST interface.</li>
</ol>


<p>This provides the ability to host the SALAD service on more than just the CI gateway, which may be useful in case the
machine runs out of USB ports for the serial consoles.</p>

<p>Here are example outputs from the proposed REST interface:</p>

<pre><code>$ curl -s http://${SALAD_HOST}:${SALAD_PORT}/api/v1/machine/
  machines:
    "00:d8:61:7a:51:cd":
      has_client: false
      tcp_port: 48841
    "00:e0:4c:68:0b:3d":
      has_client:   true
      tcp_port: 57791

$ curl -s http://${SALAD_HOST}:${SALAD_PORT}/api/v1/machine/00:d8:61:7a:51:cd
  has_client: false
  tcp_port: 48841
</code></pre>

<p>Interacting with a test machine machine&#8217;s serial console is done by connecting to the <code>tcp_port</code> associated to the
test machine. In a shell script, one could implement this using curl, jq, and netcat:</p>

<pre><code>$ MACHINE_ID=00:d8:61:7a:51:cd
$ netcat ${SALAD_HOST} $(curl -s http://${SALAD_HOST}:${SALAD_PORT}/api/v1/machine/${MACHINE_ID} | jq ".tcp_port")
# You now have a read/write access to the serial console of the test machine
</code></pre>

<h4>Power Delivery Unit: Turning ON/OFF your test machines on command</h4>

<p>As we explained in <a href="https://mupuf.org/blog/2021/02/08/setting-up-a-ci-system-preparing-your-test-machine/">Part 1</a>, the
only way to guarantee that test jobs don&#8217;t interfere with each other is to reset the hardware fully between every job&#8230;
which unfortunately means we need to cut the power to the test machine long-enough for the power supply to empty its
capacitors and stop providing voltage to the motherboard even when the computer is already-off (30 seconds is usually
enough).</p>

<p>Given that there are many switchable power delivery units on the market (industrial, or for home use), many communication
mediums (serial, Ethernet, WiFi, Zigbee, Z-Wave, &#8230;), and protocols (SNMP, HTTP, MQTT, &#8230;), we really want to create
an abstraction layer that will allow us to write drivers for any PDU without needing to change any other component.</p>

<p>One existing abstraction layer is <a href="https://github.com/pdudaemon/pdudaemon/">pdudaemon</a>, which has many drivers for
industrial and home-oriented devices. It however does not provide a way to
<a href="https://github.com/pdudaemon/pdudaemon/blob/main/pdudaemon/drivers/driver.py#L36">read back the state of a certain port</a>,
which prevents verifying that the operation succeeded and makes it difficult to check that the power was indeed off at
all time during the mandatory power off period.</p>

<p>The PDU abstraction layer should allow its users to:</p>

<ol>
<li>List the supported PDUs / PDU drivers</li>
<li>Register and validate a PDUs by providing a driver name and any other needed configuration (IP address, &#8230;)</li>
<li>Query the list of registered PDUs, and their ports (label, state, last state change date, power usage, &#8230;)</li>
<li>Set the state of a port, its label, or mark it as reserved / read-only to prevent accidental changes</li>
</ol>


<p>While this layer could be developed both as a library or a REST service, we would recommend implementing it as a
standalone service because it makes the following easier:</p>

<div class=" quarter left"><a href="http://www.mupuf.org/images/CI/pdu_gateway.mmd.png" class="fancybox" title="Proposed PDU service"><figure><img src="http://www.mupuf.org/images/CI/pdu_gateway.mmd.png" title="Proposed PDU service"  /><figcaption>Proposed PDU service</figcaption></figure></a></div>


<ol>
<li>Synchronizing PDU access between clients: required for PDUs using a telnet-/serial-based interface</li>
<li>Reducing the amount of PDU queries by centralizing all requests in one place, and caching results</li>
<li>Deploying updates transparently and on-the-fly by running it as a socket-activated systemd service</li>
<li>Exporting metrics to monitoring systems as a background task (port power consumptions, reboot count, percentage of utilization)</li>
</ol>


<h4>Container registries: Caching containers to reduce bandwidth usage</h4>

<div class=" third right"><a href="http://www.mupuf.org/images/CI/dut_registry_caching.mmd.png" class="fancybox" title="Caching Container Registry"><figure><img src="http://www.mupuf.org/images/CI/dut_registry_caching.mmd.png" title="Caching Container Registry"  /><figcaption>Caching Container Registry</figcaption></figure></a></div>


<p>Even though our test machines cache containers when they first download them, it would still be pretty inefficient if
every test machine in the CI farm had to download them directly from the internet.</p>

<p>Rather than doing that, test machines can download the containers through a proxy registry hosted on the CI gateway.
This means that the containers will only be downloaded from the internet <em>ONCE</em>, no matter how many test machines you
have in your farm. Additionally, the reduced reliance on the internet will improve your farm&#8217;s reliability and
performance.</p>

<h4>Executor: Sequencing the different CI services to time-share test machines</h4>

<p>All the different services needed to time-share the test machines effectively have now been described. What we are
missing is a central service that coordinates all the others, exposes an interface to describe and queue test jobs, then
monitor its progress.</p>

<p>In other words, this service needs to:</p>

<ol>
<li>Interface with/implement MaRS/Sergent Hartman to list the test machines available and their state;</li>
<li>Specify a way for clients to describe jobs;</li>
<li>Provide an interface for clients to queue jobs;</li>
<li>Provide exclusive access to a DUT to one job at a time;</li>
<li>Detect the end of a job or failure, even across reboots by direct messaging from the test machine, or snooping on
the serial console;</li>
<li>Implement watchdogs and retry counters to detect/fix anomalous situations (machine failed to boot, &#8230;).</li>
</ol>


<h5>Job description</h5>

<p>The job description should allow users of the CI system to specify the test environment they want to use without
constraining them needlessly. It can also be viewed as the reproduction recipe in case anyone would like to reproduce
the test environment locally.</p>

<blockquote><p>By its nature, the job description is probably the <strong>most important</strong> interface in the entire CI system. It is very
much like a kernel&#8217;s ABI: you don&#8217;t want an updates to break your users, so you need to make
<strong>backwards-compatible changes only</strong> to this interface!</p></blockquote>

<p>Job descriptions should be generic and minimalistic to even have a chance to maintain backwards compatibility. To
achieve this, try to base it on industry standards such as PXE, UEFI, HTTP, serial consoles, containers, and others that
have proven their versatility and interoperability over the years.</p>

<p>Without getting tangled too much into details, here is the information it should contain:</p>

<ol>
<li>The machine to select, either by ID or by list of tags</li>
<li>The kernel(s) and initramfs to boot</li>
<li>The kernel command line to use</li>
<li>The different serial console markers used to detect various conditions and trigger responses</li>
<li>The different timeouts or watchdogs used</li>
</ol>


<p>And here are some of the things it should <strong>NOT</strong> contain:</p>

<ol>
<li><strong>Deployment method</strong>: DUTs should use auto-discoverable boot methods such as PXE. If the DUT can&#8217;t do that
natively, flash a small bootloader that will be able to perform this action rather than asking your users
to know how to deploy their test environment.</li>
<li><strong>Scripts</strong>: Streaming commands to a DUT is asking for trouble! First, you need to know how to stream the
commands (telnet, SSH, serial console), then you need to interpret the result of each command to know
when you can send the next one. This will inevitably lead to a disaster either due to mismatching locales,
over synchronization which may affect test results, or corrupted characters from the serial console.</li>
</ol>


<p>Now, good luck designing your job description format&#8230; or wait for the next posts which will document the one we came
up with!</p>

<h5>Job execution</h5>

<p>Job execution is split into the following phases:</p>

<ol>
<li>Job queuing: The client asks the executor to run a particular job</li>
<li>Job setup: The executor gathers all the artifacts needed for the boot and makes them accessible to the DUT</li>
<li>Job execution: The DUT turns on, deploy, executes the test environment, uploads results, then shut down</li>
<li>Job tear-down: The results from the job get forwarded to the client, before releasing all job resources</li>
</ol>


<p>While the executor could perform all of these actions from the same process, we would recommend splitting the job
execution into its own process as it prevents configuration changes from affecting currently-running jobs, make it
easier to tell if a machine is running or idle, make live-updating the executor trivial (see
<a href="https://mupuf.org/blog/2022/04/15/setting-up-a-ci-system-part-4-live-patching-your-ci-gateway/">Part 4</a> if you are
wondering why this would be desirable), and make it easier to implement job preemption in the future.</p>

<p>Here is how we propose the executor should interact with the other services:</p>

<center>
  <div class=" half"><a href="http://www.mupuf.org/images/CI/executor_sequence_diagram.mmd.png" class="fancybox" title="Overall Executor Sequence"><figure><img src="http://www.mupuf.org/images/CI/executor_sequence_diagram.mmd.png" title="Overall Executor Sequence"  /><figcaption>Overall Executor Sequence</figcaption></figure></a></div>
</center>


<h3>Conclusion</h3>

<p>In this post, we defined a list of requirements to efficiently time-share test machines between users, identified sets
of services that satisfy these requirements, and detailed their interactions using sequence diagrams.
Finally, we provided both recommendations and cautionary tales to help you set up your CI gateway.</p>

<p>In the next post, we will take a bit of breather and focus on the maintainability of the CI farm through the creation of
an administrator dashboard, easing access to the gateway using a Wireguard VPN, and monitoring of both the CI gateway
and the test machines.</p>

<p>By the end of this blog series, we aim to have propose a plug-and-play experience throughout the CI farm, and have it
automatically and transparently expose runners on GitLab/GitHub. This system will also hopefully be partially hosted on
<a href="https://www.freedesktop.org">Freedesktop.org</a> to help developers write, test, and maintain their drivers. The goal
would be to have a setup time of under an hour for newcomers!</p>

<p>That&#8217;s all for now, thanks for making it to the end of this post!</p>
]]></content>
  </entry>
  
  <entry>
    <title type="html"><![CDATA[Setting Up a CI System Part 4: Live patching your CI gateway]]></title>
    <link href="http://www.mupuf.org/blog/2022/04/15/setting-up-a-ci-system-part-4-live-patching-your-ci-gateway/"/>
    <updated>2022-04-15T09:11:00+03:00</updated>
    <id>http://www.mupuf.org/blog/2022/04/15/setting-up-a-ci-system-part-4-live-patching-your-ci-gateway</id>
    <content type="html"><![CDATA[<p>This article is part of a series on how to setup a bare-metal CI system for
Linux driver development. Here are the different articles so far:</p>

<ul>
<li><a href="https://mupuf.org/blog/2021/02/08/setting-up-a-ci-system-preparing-your-test-machine/">Part 1</a>:
The high-level view of the whole CI system, and how to fully control test machines remotely
(power on, OS to boot, keyboard/screen emulation using a serial console);</li>
<li><a href="https://mupuf.org/blog/2021/02/10/setting-up-a-ci-system-part-2-generating-and-deploying-your-test-environment/">Part 2</a>:
A comparison of the different ways to generate the rootfs of your test environment, and introducing the boot2container project;</li>
<li><a href="https://mupuf.org/blog/2022/01/10/setting-up-a-ci-system-part-3-provisioning-your-ci-gateway/">Part 3</a>: Analysis of the requirements for the CI gateway, catching regressions before deployment, easy roll-back, and netbooting the CI gateway securely over the internet.</li>
</ul>


<p>In this article, we will finally focus on generating the rootfs/container image of the CI Gateway in a way that enables live patching the system without always needing to reboot.</p>

<p>This work is sponsored by the <a href="https://www.valvesoftware.com/en/">Valve Corporation</a>.</p>

<!-- more -->


<h3>Introduction: The impact of updates</h3>

<p>System updates are a necessary evil for any internet-facing server, unless you want your system to become part of a botnet. This is especially true for CI systems since they let people on the internet run code on machines, often leading to unfair use such as <a href="https://drewdevault.com/2021/04/26/Cryptocurrency-is-a-disaster.html">cryptomining</a> (this one is hard to avoid though)!</p>

<p><span class='pullquote-left' data-pullquote='The problem with system updates is not the 2 or 3 minutes of downtime that it takes to reboot, it is that we cannot reboot while any CI job is running'>
The problem with system updates is not the 2 or 3 minutes of downtime that it takes to reboot, it is that we cannot reboot while any CI job is running. Scheduling a reboot thus first requires to stop accepting new jobs, wait for the current ones to finish, then finally reboot. This solution may be acceptable if your jobs take ~30 minutes, but what if they last 6h? A reboot suddenly gets close to a typical 8h work day, and we definitely want to have someone looking over the reboot sequence so they can revert to a previous boot configuration if the new one failed.
</span></p>

<p>This problem may be addressed in a cloud environment by live-migrating services/containers/VMs from a non-updated host to an updated one. This is unfortunately a lot more complex to pull off for a bare-metal CI without having a second CI gateway and designing synchronization systems/hardware to arbiter access to the test machines&#8217;s power/serial consoles/boot configuration.</p>

<p>So, while we cannot always avoid the need to drain the CI jobs before rebooting, what we can do is reduce the cases in which we need to perform this action. Unfortunately, containers have been designed with atomic updates in mind (this is why we want to use them), but that means that trivial operations such as adding an ssh key, a Wireguard peer, or updating a firewall rule will require a reboot. A hacky solution may be for the admins to update the infra container then log in the different CI gateways and manually reproduce the changes they have done in the new container. These changes would be lost at the next reboot, but this is not a problem since the CI gateway would use the latest container when rebooting which already contains the updates. While possible, this solution is error-prone and not testable ahead of time, which is against the requirements for the gateway we laid out in <a href="https://mupuf.org/blog/2022/01/10/setting-up-a-ci-system-part-3-provisioning-your-ci-gateway/">Part 3</a>.</p>

<h3>Live patching containers</h3>

<p>An improvement to live-updating containers by hand would be to use tools such as <a href="https://www.ansible.com/">Ansible</a>, <a href="https://saltproject.io/">Salt</a>, or even <a href="https://puppet.com/">Puppet</a> to manage and deploy non-critical services and configuration. This would enable live-updating the currently-running container but would need to be run after every reboot. An Ansible playbook may be run locally, so it is not inconceivable for a service to be run at boot that would download the latest playbook and run it. This solution is however forcing developers/admins to decide which services need to have their configuration baked in the container and which services should be deployed using a tool like Ansible&#8230; unless&#8230;</p>

<p><span class='pullquote-right' data-pullquote='In other words, we simply morph the currently-running container to the wanted configuration by running the same Ansible playbook we used to create the container, but against the live CI gateway!'>
We could use a tool like Ansible to describe all the packages and services to install, along with their configuration. Creating a container would then be achieved by running the Ansible playbook on a base container image. Assuming that the playbook would truly be idem-potent (running the playbook multiple times will lead to the same final state), this would mean that there would be no differences between the live-patched container and the new container we created. In other words, we simply morph the currently-running container to the wanted configuration by running the same Ansible playbook we used to create the container, but against the live CI gateway! This will not always remove the need to reboot the CI gateways from time to time (updating the kernel, or services which don&#8217;t support live-updates without affecting CI jobs), but all the smaller changes can get applied in-situ!
</span></p>

<p>The base container image has to contain the basic dependencies of the tool like Ansible, but if it were made to contain all the OS packages, it would split the final image into three container layers: the base OS container, the packages needed, and the configuration. Updating the configuration would thus result in only a few megabytes of update to download at the next reboot rather than the full OS image, thus reducing the reboot time.</p>

<h3>Limits to live-patching containers</h3>

<p>Ansible is perfectly-suited to morph a container into its newest version, provided that all the resources used remain static between when the new container was created and when the currently-running container gets live-patched. This is because of Ansible&#8217;s core principle of <a href="https://en.wikipedia.org/wiki/Idempotence#Computer_science_meaning">idempotency</a> of operations: Rather than running commands blindly like in a shell-script, it first checks what is the current state then, if needed, update the state to match the desired target. This makes it safe to run the playbook multiple times, but will also allow us to only reboot services if its configuration or one of its dependencies&#8217; changed.</p>

<p><span class='pullquote-left' data-pullquote='Unfortunately, package managers of Linux distributions are usually not idempotent: They were designed to ship updates, not pin software versions!'>
When version pinning of packages is possible (Python, Ruby, Rust, Golang, &#8230;), Ansible can guarantee the idempotency that make live-patching safe. Unfortunately, package managers of Linux distributions are usually not idempotent: They were designed to ship updates, not pin software versions! In practice, this means that there are no guarantees that the package installed during live-patching will be the same as the one installed in the new base container, thus exposing oneself to potential differences in behaviour between the two deployment methods&#8230; The only way out of this issue is to create your own package repository and make sure its content will not change between the creation of the new container and the live-patching of all the CI Gateways. Failing that, all I can advise you to do is pick a stable distribution which will try its best to limit functional changes between updates within the same distribution version (Alpine Linux, CentOS, Debian, &#8230;).</span></p>

<p>In the end, Ansible won&#8217;t always be able to make live-updating your container strictly equivalent to rebooting into its latest version, but as long as you are aware of its limitations (or work around them), it will make updating your CI gateways way less of a trouble than it would be otherwise! You will need to find the right balance between live-updatability, and ease of maintenance of the code-base of your gateway.</p>

<h3>Putting it all together: The example of valve-infra-container</h3>

<p>At this point, you may be wondering how all of this looks in practice! Here is the example of the CI gateways we have been developping for Valve:</p>

<ul>
<li><a href="https://gitlab.freedesktop.org/mupuf/valve-infra/-/tree/09448e67/ansible">Ansible playbook</a>: You will find here the entire configuration of our CI gateways. NOTE: we are still working on live-patching!;</li>
<li><a href="https://gitlab.freedesktop.org/mupuf/valve-infra/-/blob/09448e67/.gitlab-ci/valve-infra-base-container-build.sh">Valve-infra-base-container</a>: The buildah script used to generate the base container;</li>
<li><a href="https://gitlab.freedesktop.org/mupuf/valve-infra/-/blob/09448e67/.gitlab-ci/valve-infra-container-build.sh">Valve-infra-container</a>: The buildah script used to generate the final container by running the Ansible playbook.</li>
</ul>


<p>And if you are wondering how we can go from these scripts to working containers, here is how:</p>

<pre><code>$ podman run --rm -d -p 8088:5000 --name registry docker.io/library/registry:2
$ env \
    IMAGE_NAME=localhost:8088/valve-infra-base-container \
    BASE_IMAGE=archlinux \
    buildah unshare -- .gitlab-ci/valve-infra-base-container-build.sh
$ env \
    IMAGE_NAME=localhost:8088/valve-infra-container \
    BASE_IMAGE=valve-infra-base-container \
    ANSIBLE_EXTRA_ARGS='--extra-vars service_mgr_override=inside_container -e development=true' \
    buildah unshare -- .gitlab-ci/valve-infra-container-build.sh
</code></pre>

<p>And if you were willing to use our <a href="https://gitlab.freedesktop.org/mupuf/valve-infra/-/blob/09448e67/Makefile">Makefile</a>, it gets even easier:</p>

<pre><code>$ make valve-infra-base-container BASE_IMAGE=archlinux IMAGE_NAME=localhost:8088/valve-infra-base-container
$ make valve-infra-container BASE_IMAGE=localhost:8088/valve-infra-base-container IMAGE_NAME=localhost:8088/valve-infra-container
</code></pre>

<p>Not too bad, right?</p>

<p>PS: These scripts are constantly being updated, so make sure to check out their current version!</p>

<h3>Conclusion</h3>

<p>In this post, we highlighted the difficulty of keeping the CI Gateways up to date when CI jobs can take multiple hours to complete, preventing new jobs from starting until the current queue is emptied and the gateway has rebooted.</p>

<p>We have then shown that despite looking like competing solutions to deploy services in production, containers and tools like Ansible can actually work well together to reduce the need for reboots by morphing the currently-running container into the updated one. There are however some limits to this solution which are important to keep in mind when designing the system.</p>

<p>In the next post, we will be designing the executor service which is responsible for time-sharing the test machines between different CI/manual jobs. We will thus be talking about deploying test environments, BOOTP, and serial consoles!</p>

<p>That&#8217;s all for now, thanks for making it to the end!</p>
]]></content>
  </entry>
  
  <entry>
    <title type="html"><![CDATA[Setting Up a CI System Part 3: Provisioning your CI gateway]]></title>
    <link href="http://www.mupuf.org/blog/2022/01/10/setting-up-a-ci-system-part-3-provisioning-your-ci-gateway/"/>
    <updated>2022-01-10T14:51:00+02:00</updated>
    <id>http://www.mupuf.org/blog/2022/01/10/setting-up-a-ci-system-part-3-provisioning-your-ci-gateway</id>
    <content type="html"><![CDATA[<p>This article is part of a series on how to setup a bare-metal CI system for
Linux driver development. Here are the different articles so far:</p>

<ul>
<li><a href="https://mupuf.org/blog/2021/02/08/setting-up-a-ci-system-preparing-your-test-machine/">Part 1</a>:
The high-level view of the whole CI system, and how to fully control test machines remotely
(power on, OS to boot, keyboard/screen emulation using a serial console);</li>
<li><a href="https://mupuf.org/blog/2021/02/10/setting-up-a-ci-system-part-2-generating-and-deploying-your-test-environment/">Part 2</a>:
A comparison of the different ways to generate the rootfs of your test environment, and introducing the boot2container project.</li>
</ul>


<p>In this article, we will further discuss the role of the CI gateway, and which
steps we can take to simplify its deployment, maintenance, and disaster
recovery.</p>

<p>This work is sponsored by the <a href="https://www.valvesoftware.com/en/">Valve Corporation</a>.</p>

<!-- more -->


<h3>Requirements for the CI gateway</h3>

<p>As seen in the
<a href="https://mupuf.org/blog/2021/02/08/setting-up-a-ci-system-preparing-your-test-machine/">part 1</a>
of this CI series, the testing gateway is sitting between the test machines
and the public network/internet:</p>

<center>
  <div class=" half"><a href="http://www.mupuf.org/images/CI/infra_overview.mmd.png" class="fancybox" title="Overview of the infrastructure"><figure><img src="http://www.mupuf.org/images/CI/infra_overview.mmd.png" title="Overview of the infrastructure"  /><figcaption>Overview of the infrastructure</figcaption></figure></a></div>
</center>


<p>The testing gateway&#8217;s role is to expose the test machines to the users, either
directly or via GitLab/Github. As such, it will likely require the following
components:</p>

<ul>
<li>a host Operating System;</li>
<li>a config file describing the different test machines;</li>
<li>a bunch of services to expose said machines and deploy their test environment on demand.</li>
</ul>


<p>Since the gateway is connected to the internet, both the OS and the different
services <em>needs</em> to be be kept updated relatively often to prevent your CI farm
from
<a href="https://www.engadget.com/2016-10-28-that-time-your-smart-toaster-broke-the-internet.html">becoming part of a botnet</a>.
This creates interesting issues:</p>

<ol>
<li>How do we test updates ahead of deployment, to minimize downtime due to bad updates?</li>
<li>How do we make updates atomic, so that we never end up with a partially-updated system?</li>
<li>How do we rollback updates, so that broken updates can be quickly reverted?</li>
</ol>


<p>These issues can thankfully be addressed by running all the services in a
container (as systemd units), started using
<a href="https://gitlab.freedesktop.org/mupuf/boot2container">boot2container</a>.
Updating the operating system and the services would simply be done by generating a new
container, running tests to validate it, pushing it to a container registry, rebooting
the gateway, then waiting while the gateway downloads and execute the new services.</p>

<p>Using boot2container does not however fix the issue of how to update the
kernel or boot configuration when the system fails to boot the current one.
Indeed, if the kernel/boot2container/kernel command line are stored locally,
they can only be modified via an SSH connection and thus require the machine
to always be reachable, the gateway will be bricked until an operator boots an
alternative operating system.</p>

<p>The easiest way not to brick your gateway after a broken update is to power it
through a switchable
<a href="https://www.cyberpowersystems.com/product/pdu/switched/pdu41001/">PDU</a> (so
that we can power cycle the machine), and to download the kernel,
initramfs (boot2container), and the kernel command line from a remote server
at boot time. This is fortunately possible even through the internet by using
fancy bootloaders, such as
<a href="https://ipxe.org/">iPXE</a>, and this will be the focus of this article!</p>

<p>Tune in for part 4 to learn more about how to create the container.</p>

<h3>iPXE + boot2container: Netbooting your CI infrastructure from anywhere</h3>

<p>iPXE is a tiny bootloader that packs a punch! Not only can it boot kernels from
local partitions, but it can also connect to the internet, and download
kernels/initramfs using HTTP(S). Even more impressive is the little scripting
engine which executes boot scripts instead of declarative boot configurations
like grub. This enables creating loops, endlessly trying to boot until one
method finally succeeds!</p>

<p>Let&#8217;s start with a basic example, and build towards a production-ready
solution!</p>

<h4>Netbooting from a local server</h4>

<p>In this example, we will focus on netbooting the gateway from a local HTTP
server. Let&#8217;s start by reviewing a simple script that makes iPXE acquire an IP
from the local DHCP server, then download and execute another iPXE script from
<code>http://&lt;ip of your dev machine&gt;:8000/boot/ipxe</code>.
If any step failed, the script will be restarted from the start until a successful
boot is achieved.</p>

<pre><code>#!ipxe

echo Welcome to Valve infra's iPXE boot script

:retry
echo Acquiring an IP
dhcp || goto retry # Keep retrying getting an IP, until we get one
echo Got the IP: $${netX/ip} / $${netX/netmask}

echo

echo Chainloading from the iPXE server...
chain http://&lt;ip of your dev machine&gt;:8000/boot.ipxe

# The boot failed, let's restart!
goto retry
</code></pre>

<p>Neat, right? Now, we need to generate a bootable ISO image starting iPXE with
the above script run as a default. We will then flash this ISO to a USB
pendrive:</p>

<pre><code>$ git clone git://git.ipxe.org/ipxe.git
$ make -C ipxe/src -j`nproc` bin/ipxe.iso EMBED=&lt;boot script file&gt;
$ sudo dd if=ipxe/src/bin/ipxe.iso of=/dev/sdX bs=1M conv=fsync status=progress
</code></pre>

<p>Once connected to the gateway, ensure that you boot from the pendrive, and you
should see iPXE bootloader trying to boot the kernel, but failing to download
the script from
<code>http://&lt;ip of your dev machine&gt;:8000/boot.ipxe</code>. So, let&#8217;s write one:</p>

<pre><code>#!ipxe

kernel /files/kernel b2c.container="docker://hello-world"
initrd /files/initrd
boot
</code></pre>

<p>This script specifies the following elements:</p>

<ul>
<li>kernel: Download the kernel at <code>http://&lt;ip of your dev machine&gt;:8000/files/kernel</code>, and set the kernel command line to ask boot2container to start the <code>hello-world</code> container</li>
<li>initrd: Download the initramfs at <code>http://&lt;ip of your dev machine&gt;:8000/files/initrd</code></li>
<li>boot: Boot the specified boot configuration</li>
</ul>


<p>Assuming your gateway has an architecture supported by boot2container, you may
now download the kernel and initrd from
<a href="https://gitlab.freedesktop.org/mupuf/boot2container/-/releases">boot2container&#8217;s releases page</a>.
In case it is unsupported,
<a href="https://gitlab.freedesktop.org/mupuf/boot2container/-/issues/new">create an issue</a>,
or a <a href="https://gitlab.freedesktop.org/mupuf/boot2container/-/merge_requests/new">merge request</a>
to add support for it!</p>

<p>Now that you have created all the necessary files for the boot, start the
web server on your development machine:</p>

<pre><code>$ ls
boot.ipxe  initrd  kernel
$ python -m http.server 8080
Serving HTTP on 0.0.0.0 port 8000 (http://0.0.0.0:8000/) ...
&lt;ip of your gateway&gt; - - [09/Jan/2022 15:32:52] "GET /boot.ipxe HTTP/1.1" 200 -
&lt;ip of your gateway&gt; - - [09/Jan/2022 15:32:56] "GET /kernel HTTP/1.1" 200 -
&lt;ip of your gateway&gt; - - [09/Jan/2022 15:32:54] "GET /initrd HTTP/1.1" 200 -
</code></pre>

<p>If everything went well, the gateway should, after a couple of seconds, start
downloading the boot script, then the kernel, and finally the initramfs. Once
done, your gateway should boot Linux, run docker&#8217;s hello-world container, then
shut down.</p>

<p>Congratulations for netbooting your gateway! However, the current solution has
one annoying constraint: it requires a trusted local network and server because
we are using HTTP rather than HTTPS&#8230; On an untrusted network, a man in the
middle could override your boot configuration and take over your CI&#8230;</p>

<p>If we were using HTTPS, we could download our boot script/kernel/initramfs
directly from any public server, even GIT forges, without fear of any man in
the middle! Let&#8217;s try to achieve this!</p>

<h4>Netbooting from public servers</h4>

<p>In the previous section, we managed to netboot our gateway from the local
network. In this section, we try to improve on it by netbooting using HTTPS.
This enables booting from a public server hosted at places such as
<a href="https://www.linode.com/products/shared/">Linode</a> for $5/month.</p>

<p>As I said earlier, iPXE supports HTTPS. However, if you are anyone like me,
you may be wondering how such a small bootloader could know which root
certificates to trust. The answer is that iPXE generates an SSL certificate
at compilation time which is then used to sign all of the root certificates
trusted by Mozilla (default), or any amount of certificate you may want.
See <a href="https://ipxe.org/crypto">iPXE&#8217;s crypto</a> page for more information.</p>

<p><strong>WARNING</strong>: iPXE currently does not like certificates exceeding 4096 bits. This
can be a limiting factor when trying to connect to existing servers. We hope to
one day fix this bug, but in the mean time, you may be forced to use a 2048 bits
Let&#8217;s Encrypt certificate on a self-hosted web server.
See <a href="https://gitlab.freedesktop.org/mupuf/valve-infra/-/issues/34">our issue</a>
for more information.</p>

<p><strong>WARNING 2</strong>: iPXE only supports a limited amount of ciphers. You&#8217;ll need to make
sure they are listed in nginx&#8217;s <code>ssl_ciphers</code> configuration:
AES-128-CBC:AES-256-CBC:AES256-SHA256 and AES128-SHA256:AES256-SHA:AES128-SHA</p>

<p>To get started, install NGINX + Let&#8217;s encrypt on your server, following your
favourite tutorial, copy the <code>boot.ipxe</code>, <code>kernel</code>, and <code>initrd</code> files to the root
of the web server, then make sure you can download them using your browser.</p>

<p>With this done, we just need to edit iPXE&#8217;s general config C header to enable
HTTPS support:</p>

<pre><code>$ sed -i 's/#undef\tDOWNLOAD_PROTO_HTTPS/#define\tDOWNLOAD_PROTO_HTTPS/' ipxe/src/config/general.h
</code></pre>

<p>Then, let&#8217;s update our boot script to point to the new server:</p>

<pre><code>#!ipxe

echo Welcome to Valve infra's iPXE boot script

:retry
echo Acquiring an IP
dhcp || goto retry # Keep retrying getting an IP, until we get one
echo Got the IP: $${netX/ip} / $${netX/netmask}

echo

echo Chainloading from the iPXE server...
chain https://&lt;your server&gt;/boot.ipxe

# The boot failed, let's restart!
goto retry
</code></pre>

<p>And finally, let&#8217;s re-compile iPXE, reflash the gateway pendrive, and boot the gateway!</p>

<pre><code>$ make -C ipxe/src -j`nproc` bin/ipxe.iso EMBED=&lt;boot script file&gt;
$ sudo dd if=ipxe/src/bin/ipxe.iso of=/dev/sdX bs=1M conv=fsync status=progress
</code></pre>

<p>If all went well, the gateway should boot and run the hello world container
once again! Let&#8217;s continue our journey by provisioning and backup&#8217;ing the local
storage of the gateway!</p>

<h4>Provisioning and backups of the local storage</h4>

<p>In the previous section, we managed to control the boot configuration of our
gateway via a public HTTPS server. In this section, we will improve on that by
provisioning and backuping any local file the gateway container may need.</p>

<p>Boot2container has a nice feature that enables you to create a volume, and
provision it from a bucket in a S3-compatible cloud storage, and sync back any
local change. This is done by adding the following arguments to the kernel
command line:</p>

<ul>
<li><code>b2c.minio="s3,${s3_endpoint},${s3_access_key_id},${s3_access_key}"</code>: URL and credentials to the S3 service</li>
<li><code>b2c.volume="perm,mirror=s3/${s3_bucket_name},pull_on=pipeline_start,push_on=changes,overwrite,delete"</code>: Create a <code>perm</code> podman volume, mirror it from the bucket <code>${s3_bucket_name}</code> when booting the gateway, then push any local change back to the bucket. Delete or overwrite any existing file when mirroring.</li>
<li><code>b2c.container="-ti -v perm:/mnt/perm docker://alpine"</code>: Start an alpine container, and mount the <code>perm</code> container volume to <code>/mnt/perm</code></li>
</ul>


<p>Pretty, isn&#8217;t it? Provided that your bucket is configured to save all the
revisions of every file, this trick will kill three birds with one stone:
initial provisioning, backup, and automatic recovery of the files in case
the local disk fails and gets replaced with a new one!</p>

<p>The issue is that the boot configuration is currently open for everyone to see,
if they know where to look for. This means that anyone could tamper with your
local storage or even use your bucket to store their files&#8230;</p>

<h4>Securing the access to the local storage</h4>

<p>To prevent attackers from stealing our S3 credentials by simply pointing their
web browser to the right URL, we can authenticate incoming HTTPS requests by
using an SSL client certificate. A different certificate would be embedded in
every gateway&#8217;s iPXE bootloader and checked by NGINX before serving the boot
configuration for this precise gateway. By limiting access to a machine&#8217;s boot
configuration to its associated client certificate fingerprint, we even
prevent compromised machines from accessing the data of other machines.</p>

<p>Additionally, secrets should not be kept in the kernel command line, as any
process executed on the gateway could easily gain access to it by reading
<code>/proc/cmdline</code>. To address this issue, boot2container has a
<code>b2c.extra_args_url</code> argument to source additional parameters from this URL.
If this URL is generated every time the gateway is downloading its boot
configuration, can be accessed only once, and expires soon after being created,
then secrets can be kept private inside boot2container and not be exposed to
the containers it starts.</p>

<p>Implementing these suggestions in a blog post is a little tricky, so I suggest
you check out valve-infra&#8217;s
<a href="https://gitlab.freedesktop.org/mupuf/valve-infra/-/tree/master/ipxe-boot-server/README.md">ipxe-boot-server</a>
component for more details. It provides a
<a href="https://gitlab.freedesktop.org/mupuf/valve-infra/-/blob/master/ipxe-boot-server/Makefile">Makefile</a>
that makes it super easy to generate working certificates and create bootable
gateway ISOs, a small python-based web service that will serve the right
configuration to every gateway (including one-time secrets), and step-by-step
instructions to deploy everything!</p>

<p>Assuming you decided to use this component and followed the README, you should
then configure the gateway in this way:</p>

<pre><code>$ pwd
/home/ipxe/valve-infra/ipxe-boot-server/files/&lt;fingerprint of your gateway&gt;/
$ ls
boot.ipxe  initrd  kernel  secrets
$ cat boot.ipxe
#!ipxe

kernel /files/kernel b2c.extra_args_url="${secrets_url}" b2c.container="-v perm:/mnt/perm docker://alpine" b2c.ntp_peer=auto b2c.cache_device=auto
initrd /files/initrd
boot
$ cat secrets
b2c.minio="bbz,${s3_endpoint},${s3_access_key_id},${s3_access_key}" b2c.volume="perm,mirror=bbz/${s3_bucket_name},pull_on=pipeline_start,push_on=changes,overwrite,delete"
</code></pre>

<p>And that&#8217;s it! We <em>finally</em> made it to the end, and created a secure way to
provision our CI gateways with the wanted kernel, Operating System, and even
local files!</p>

<p>When <a href="https://gitlab.freedesktop.org/chturne">Charlie Turner</a> and I started
designing this system, we felt it would be a clean and simple way to solve our
problems with our CI gateways, but the implementation ended up being quite a
little trickier than the high-level view&#8230; especially the SSL certificates!
However, the certainty that we can now deploy updates and fix our CI gateways
even when they are physically inaccessible from us (provided the hardware and
PDU are fine) definitely made it all worth it and made the prospect of having
users depending on our systems less scary!</p>

<p>Let us know how you feel about it!</p>

<h3>Conclusion</h3>

<p>In this post, we focused on provisioning the CI gateway with its boot
configuration, and local files via the internet. This drastically reduces
the risks that updating the gateway&#8217;s kernel would result in an extended
loss of service, as the kernel configuration can quickly be reverted by
changing the boot config files which is served from a cloud service provider.</p>

<p>The local file provisioning system also doubles as a backup, and disaster
recovery system which will automatically kick in in case of hardware failure
thanks to the constant mirroring of the local files with an S3-compatible
cloud storage bucket.</p>

<p>In the next post, we will be talking about how to create the infra container,
and how we can minimize down time during updates by not needing to reboot the
gateway.</p>

<p>That&#8217;s all for now, thanks for making it to the end!</p>
]]></content>
  </entry>
  
  <entry>
    <title type="html"><![CDATA[Setting up a CI system part 2: Generating and deploying your test environment]]></title>
    <link href="http://www.mupuf.org/blog/2021/02/10/setting-up-a-ci-system-part-2-generating-and-deploying-your-test-environment/"/>
    <updated>2021-02-10T10:11:00+02:00</updated>
    <id>http://www.mupuf.org/blog/2021/02/10/setting-up-a-ci-system-part-2-generating-and-deploying-your-test-environment</id>
    <content type="html"><![CDATA[<p>This article is part of a series on how to setup a bare-metal CI system for
Linux driver development. Check out <a href="https://mupuf.org/blog/2021/02/08/setting-up-a-ci-system-preparing-your-test-machine/">part
1</a>
where we expose the context/high-level principles of the whole CI system, and
make the machine fully controllable remotely (power on, OS to boot,
keyboard/screen emulation using a serial console).</p>

<p>In this article, we will start demystifying the boot process, and discuss about
different ways to generate and boot an OS image along with a kernel for your
machine. Finally, we will introduce boot2container, a project that makes running
containers on bare metal a breeze!</p>

<p>This work is sponsored by the <a href="https://www.valvesoftware.com/en/">Valve
Corporation</a>.</p>

<!-- more -->


<h3>Generating a kernel &amp; rootfs for your Linux-based testing</h3>

<p>To boot your test environment, you will need to generate the following items:</p>

<ul>
<li>A kernel, providing all the necessary drivers for your test;</li>
<li>A userspace, containing all the dependencies of your test (rootfs);</li>
<li>An initramfs (optional), containing the drivers/firmwares needed to
access the userspace image, along with an init script performing the early
boot sequence of the machine;</li>
</ul>


<p>The initramfs is optional because the drivers and their <a href="https://www.kernel.org/doc/html/latest/driver-api/firmware/built-in-fw.html">firmwares can be built
in</a>
the kernel directly.</p>

<p>Let&#8217;s not generate these items just yet, but instead let&#8217;s look at the
different ways one could generate them, depending on their experience.</p>

<h4>The embedded way</h4>

<p><a href="https://buildroot.org/"><img class="left" src="http://www.mupuf.org/images/CI/Buildroot_logo.png" width="110" title="Buildroot&apos;s logo" alt="Buildroot&apos;s logo" /></a></p>

<p>If you are used to dealing with embedded devices, you are already familiar with
projects such as <a href="https://www.yoctoproject.org/">Yocto</a> or
<a href="https://buildroot.org/">Buildroot</a>. They are well-suited to generate a tiny
rootfs which can be be useful for netbooted systems such as the one we set up
in <a href="https://mupuf.org/blog/2021/02/08/setting-up-a-ci-system-preparing-your-test-machine/">part
1</a>
of this series. They usually allow you to describe everything you
want on your rootfs, then will configure, compile, and install all the wanted
programs in the rootfs.</p>

<p>If you are wondering which one to use, I suggest you check out the
presentation from <a href="https://events.static.linuxfound.org/sites/events/files/slides/%0Abelloni-%20petazzoni-buildroot-oe_0.pdf">Alexandre Belloni / Thomas
Pettazoni</a> which will give you an overview of both
projects, and help you decide on what you need.</p>

<p><strong>Pros</strong>:</p>

<ul>
<li>Minimal size: Only what is needed is included</li>
<li>Complete: Configures and compiles the kernel for you</li>
</ul>


<p><strong>Cons</strong>:</p>

<ul>
<li>Slow to generate: Everything is compiled from source</li>
<li>Small selection of software/libraries: Adding build recipes is
however relatively easy</li>
</ul>


<h4>The Linux distribution way</h4>

<p><a href="https://www.debian.org/"><img class="left" src="http://www.mupuf.org/images/CI/debian-openlogo-nd-100.jpg" width="99" title="Debian logo, www.debian.org" alt="Debian Logo, www.debian.org" /></a></p>

<p>If you are used to installing Linux distributions, your first instinct might be
to install your distribution of choice in a
<a href="https://en.wikipedia.org/wiki/Chroot">chroot</a> or a Virtual Machine, install
the packages you want, and package the folder/virtual disk into a tarball.</p>

<p>Some tools such as <a href="https://github.com/go-debos/debos">debos</a>, or
<a href="https://ostechnix.com/quickly-build-virtual-machine-images-with-virt-builder/">virt-builder</a>
make this process relatively painless, although they will not be compiling an
initramfs, nor a kernel for you.</p>

<p>Fortunately, building the kernel is relatively simple, and there are plenty of
tutorials on the topic (see <a href="https://wiki.archlinux.org/index.php/Kernel/Traditional_compilation">ArchLinux&#8217;s
wiki</a>).
Just make sure to compile modules and firmware in the kernel, to avoid the
complication of using an initramfs. Don&#8217;t forget to also <a href="https://programmer.help/blogs/research-on-linux-kernel-compression.html">compress your
kernel</a>
if you decide to netboot it!</p>

<p><strong>Pros</strong>:</p>

<ul>
<li>Relatively fast: No compilation necessary (except for the kernel)</li>
<li>Familiar environment: Closer to what users/developers use in the wild</li>
</ul>


<p><strong>Cons</strong>:</p>

<ul>
<li>Larger: Packages tend to bring a lot of unwanted dependencies, drastically
increasing the size of the image</li>
<li>Limited choice of distros: Not all distributions are easy to install in a
chroot</li>
<li>Insecure: Requires root rights to generate the image, which may accidentally
trash your distro</li>
<li>Poor reproducibility: Distributions get updates continuously, leading to
different outcomes when running the same command</li>
<li>No caching: all the steps to generate the rootfs are re-done every time</li>
<li>Incomplete: does not generate a kernel or initramfs for you</li>
</ul>


<h4>The refined distribution way: containers</h4>

<p><a href="https://www.docker.com/legal/trademark-guidelines"><img class="left" src="http://www.mupuf.org/images/CI/Moby-logo.png" width="127" title="Docker and the Docker logo are trademarks or registered trademarks of Docker, Inc." alt="Docker and the Docker logo are trademarks or registered trademarks of Docker, Inc." /></a></p>

<p>Containers are an evolution of the old chroot trick, but instead made secure
thanks the addition of multiple namespaces to Linux. Containers and their
runtimes have been addressing pretty much all the cons of the &#8220;Linux
distribution way&#8221;, and became a standard way to share applications.</p>

<p>On top of generating a rootfs, containers also allow setting environment
variables, control the command line of the program, and have a standardized
transport mechanism which simplifies sharing images.</p>

<p>Finally, container images are constituted of cacheable layers, which can be
used to share base images between containers, and also speed up the generation
of the container image by only re-computing the layer that changed and all the
layers applied on top of it.</p>

<p>The biggest draw-back of containers is that they usually are meant to be run on
pre-configured hosts. This means that if you want to run the container
directly, you will need to make sure to include an initscript or install
systemd in your container, and set it as the entrypoint of the container. It is
however possible to perform these tasks before running the container, as we&#8217;ll
explain in the following sections.</p>

<p><strong>Pros</strong>:</p>

<ul>
<li>Fastest: No compilation necessary (except for the kernel), and layers cached</li>
<li>Familiar: Shared environment between developers and the test system</li>
<li>Flexible: Full choice of distro</li>
<li>Secure: No root rights needed, everything is done in a user namespace</li>
<li>Shareable: Containers come with a transport/storage mechanism (registries)</li>
<li>Reproducible: Easily run the exact same userspace on your dev and test
machines</li>
</ul>


<p><strong>Cons</strong>:</p>

<ul>
<li>Larger: Packages tend to bring a lot of dependencies, drastically increasing
the size of the image</li>
<li>Incomplete: does not generate a kernel or initramfs for you</li>
</ul>


<h3>Deploying and booting a rootfs</h3>

<p>Now we know how we could generate a rootfs, so the next step is to be able to
deploy and boot it!</p>

<h4>Challenge #1: Deploying the Kernel / Initramfs</h4>

<p>There are multiple ways to deploy an operating system:</p>

<ul>
<li>Flash and reboot: Typical on ARM boards / Android phones;</li>
<li>Netboot: Typical in big organizations that manage thousands of machines.</li>
</ul>


<p>The former solution is great at preventing the <a href="https://en.wikipedia.org/wiki/Brick_(electronics)">bricking of a
device</a> that depends on an
Operating System to be flashed again, as it enables checking the deployment on
the device itself before rebooting.</p>

<p>The latter solution enables diskless test machines, which is an effective way
to reduce state (the enemy #1 of reproducible results). It also enables a faster
deployment/boot time as the CI system would not have to boot the machine, flash
it, then reboot. Instead, the machine simply starts up, requests an IP address
through BOOTP/DHCP, downloads the kernel/initramfs, and executes the kernel.
This was the solution we opted for in <a href="https://mupuf.org/blog/2021/02/08/setting-up-a-ci-system-preparing-your-test-machine/">part
1</a>
of this blog series.</p>

<p>Whatever solution you end up picking, you will now be presented with your next
challenge: making sure the rootfs remains the same across reboots.</p>

<h4>Challenge #2: Deploying the rootfs efficiently</h4>

<p>If you have chosen the <code>Flash and reboot</code> deployment method, you may be
prepared to re-flash the entire Operating System image every time you boot.
This would make sure that the state of a previous boot won&#8217;t leak into
following boots.</p>

<p>This method can however become a big burden on your network when scaled to
tens of machines, so you may be tempted to use a Network File System such as
<a href="https://en.wikipedia.org/wiki/Network_File_System">NFS</a> to spread the load
over a longer period of time. Unfortunately, using NFS brings its own set of
challenges (how deep is this rabbit hole?):</p>

<ul>
<li>The same rootfs directory cannot be shared across machines without
duplication unless mounted read-only, as machines should not be able to
influence each-other&#8217;s execution;</li>
<li>The NFS server needs to remain available as long as at least one test
machine is running;</li>
<li>Network congestion might influence the testing happening on the machine,
which can affect functional testing, but will definitely affect performance
testing.</li>
</ul>


<p>So, instead of trying to spread the load, we could try to reduce the size of
the rootfs by only sending the content that changed. For example, the rootfs
could be split into the following layers:</p>

<ul>
<li>The base Operating System needed for the testing;</li>
<li>The driver you want to test (if it wasn&#8217;t in the kernel);</li>
<li>The test suite(s) you want to run.</li>
</ul>


<p>Layers can be downloaded by the test machine, through a short-lived-state
network protocol such as HTTP, as individual
<a href="https://en.wikipedia.org/wiki/SquashFS">SquashFS</a> images. Additionally,
SquashFS provides compression which further reduces the storage/network
bandwidth needs.</p>

<p>The layers can then be directly combined by first mounting the layers to
separate folders in read-only mode (only mode supported by SquashFS), then
merging them using
<a href="https://www.kernel.org/doc/html/latest/filesystems/overlayfs.html">OverlayFS</a>.
OverlayFS will store all the writes done to this file system into the <code>workdir</code>
directory. If this work directory is backed up by a ramdisk
(<a href="https://en.wikipedia.org/wiki/Tmpfs">tmpfs</a>) or a never-reused temporary
directory, then this would guarantee that no information from previous boots
would impact the new boots!</p>

<p>If you are familiar with containers, you may have recognized this approach as
what is used by containers: layers +
<a href="https://docs.docker.com/storage/storagedriver/overlayfs-driver/">overlay2</a>
storage driver. The only difference is that container runtimes depend on
tarballs rather than SquashFS images, probably because this is a Linux-only
filesystem.</p>

<p>If you are anything like me, you should now be pretty tempted to simply use
containers for the rootfs generation, transport, and boot! That would be a wise
move, given that thousands of engineers have been working on them over the last
decade or so, and whatever solution you may come up with will inevitably have
even more quirks than these industry standards.</p>

<p>I would thus recommend using containers to generate your rootfs, as there are
plenty of tools that will generate them for you, with varying degree of
complexity. Check out <a href="https://github.com/containers/buildah">buildah</a>, if
<a href="https://docker.com">Docker</a>, or <a href="https://podman.io/">Podman</a> are not too
high/level for your needs!</p>

<p>Let&#8217;s now brace for the next challenge, deploying a container runtime!</p>

<h4>Challenge #3: Deploying a container runtime to run the test image</h4>

<p>In the previous challenge, we realized that a great way to deploy a rootfs
efficiently was to simply use a container runtime to do everything for us,
rather than re-inventing the wheel.</p>

<p>This would enable us to create an initramfs which would be downloaded along
with the kernel through the usual netboot process, and would be responsible for
initializing the machine, connecting to the network, mounting the layer cache
partition, setting the time, downloading a container, then executing it. The
last two steps would be performed by the container runtime of our choice.</p>

<p>Generating an initramfs is way easier than one can expect. Projects like
<a href="https://dracut.wiki.kernel.org/index.php/Main_Page">dracut</a> are meant to
simplify their creation, but my favourite has been
<a href="https://github.com/u-root/u-root">u-root</a>, coming from the
<a href="https://www.linuxboot.org/">LinuxBoot</a> project. I generated my first initramfs
in less than 5 minutes, so I was incredibly hopeful to achieve the outlined
goals in no time!</p>

<p>Unfortunately, the first setback came quickly:
container runtimes (<a href="https://docker.com">Docker</a>, or
<a href="https://podman.io/">Podman</a>) are huge (~150 to 300 MB), if we are to believe
Alpine Linux&#8217;s size of their respective packages and dependencies! While this
may not be a problem for the <code>Flash and reboot</code> method, it is definitely a
significant issue for the <code>Netboot</code> method which would need to download it for
every boot.</p>

<h5>Challenge #3.5: Minifying the container runtime</h5>

<p>After spending a significant amount of time studying container runtimes, I
identified the following functions:</p>

<ul>
<li>Transport / distribution: Downloading a container image from a container
registry to the local storage
(<a href="https://github.com/opencontainers/distribution-spec/blob/master/spec.md">spec</a>
);</li>
<li>De-layer the rootfs: Unpack the layers&#8217; tarball, and use OverlayFS to
merge them (default storage driver, but there are many other ways);</li>
<li>Generate the container manifest: A JSON-based config file specifying <a href="https://github.com/opencontainers/runtime-spec/blob/master/config.md">how
the container should be
run</a>;</li>
<li>Executing the container</li>
</ul>


<p>Thus started my quest to find lightweight solutions that could do all of these
steps&#8230; and wonder just how deep is this rabbit hole??</p>

<p>The usual executor found in the likes of Podman and Docker is
<a href="https://github.com/opencontainers/runc">runc</a>. It is written in
<a href="https://golang.org/">Golang</a>, which compiles everything statically and leads to
giant binaries. In this case, runc clocks at
<a href="https://pkgs.alpinelinux.org/package/edge/community/x86_64/runc">~12MB</a>.
Fortunately, a knight in shining armour came to the rescue, re-implemented runc
in C, and named it <a href="https://github.com/containers/crun">crun</a>. The final binary
size is <a href="https://pkgs.alpinelinux.org/package/edge/community/x86_64/crun">~400
KB</a>, and it
is fully compatible with runc. That&#8217;s good-enough for me!</p>

<p>To download and unpack the rootfs from the container image, I found
<a href="https://github.com/genuinetools/img">genuinetools/img</a> which supports that out
of the box! Its size was however much bigger than expected, at
<a href="https://pkgs.alpinelinux.org/package/edge/community/x86_64/img">~28.5MB</a>.
Fortunately, compiling it ourselves, stripping the symbols, then compressing it
using <a href="https://upx.github.io/">UPX</a> led to a much more manageable ~9MB!</p>

<p>What was left was to generate the container manifest according to the runtime
<a href="https://github.com/opencontainers/runtime-spec/blob/master/config.md">spec</a>. I
started by hardcoding it to verify that I could indeed run the container. I was
relieved to see it would work on my development machine, even thought it
fails on my initramfs. After spending a couple of hours diffing
<a href="https://man7.org/linux/man-pages/man1/strace.1.html">strace</a>s, poking a couple
of files sysfs/config files, and realizing that <a href="https://github.com/torvalds/linux/blob/v4.17/Documentation/filesystems/ramfs-rootfs-initramfs.txt#L118">pivot_root does not work in an
initramfs</a>
, I finally managed to run the container with <code>crun run --no-pivot</code>!</p>

<p>I was over the moon, as the only thing left was to generate the container
manifest by patching genuinetools/img to generate it according to the
container image manifest (like docker or podman does). This is where I started
losing grip: lured by the prospect of a simple initramfs solving all my
problems, being so close to the goal, I started free-falling down what felt like
the deepest rabbit hole of my engineering career&#8230; Fortunately, after a couple
of weeks, I emerged, covered in mud but victorious! Queue the gory battle log
:)</p>

<p>When trying to access the container image&#8217;s manifest in img, I realized that it
was re-creating the layers and manifest, and thus was losing the information
such as entrypoint, environment variables, and other important parameters.
After scouring through its source code and its 500 kLOC of dependencies, I came
to the conclusion that it would be easier to start a project from scratch that
would use Red Hat&#8217;s
<a href="https://github.com/containers/image">image</a> and
<a href="https://github.com/containers/storage">storage</a> libraries to download and
store the container on the cache partition. I then needed to unpack the
layers, generate the container manifest, and start runc. After a couple of
days, <a href="https://gitlab.freedesktop.org/mupuf/containerruntime">~250 lines of
code</a>, and tons of
staring at straces to get it working, it finally did! Out was img, and the new
runtime&#8217;s size was under 10 MB \o/!</p>

<p>The last missing piece in the puzzle was performance-related:
use OverlayFS to merge the layers, rather than <a href="https://gitlab.freedesktop.org/mupuf/containerruntime/-/blob/master/utils.go#L99">unpacking them
ourselves</a>.</p>

<p>This is when I decided to have another look at Podman, saw that they have
their own internal library for all the major functions, and decided to compile
podman to try it out. The binary size was ~50 MB, but after removing some
features, setting the <code>-w -s</code> LDFLAGS, and compressing it using <code>upx --best</code>, I
got the final size to be ~14 MB! Of course, Podman is more than just one binary,
so trying to run a container with it failed. However, after a bit of
experimentation and stracing, I realized that running the container with
<code>--privileged --network=host</code> would work using crun&#8230; provided we force-added
the <code>--no-pivot</code> parameter to crun. My happiness was however short-lived,
replaced by a MAJOR FACEPALM MOMENT:</p>

<center>
  <a href="https://giphy.com/gifs/reactionseditor-classic-facepalm-3og0INyCmHlNylks9O" target="_blank">
    <img title="Epic face palm" src="https://media.giphy.com/media/3og0INyCmHlNylks9O/giphy.gif" width="33%"/>
  </a>
</center>


<p>After a couple of minutes of constant facepalming, I realized I was also
relieved, as Podman is a battle-tested container runtime, and I would not need
to maintain a single line of Go! Also, I now knew how deep the rabbit was,
and we just needed to package everything nicely in an initramfs and we would
be good. Success, at last!</p>

<h3>Boot2container: Run your containers from an initramfs!</h3>

<p>If you have managed to read through the article up to this point,
congratulations! For the others who just gave up and jumped straight to this
section, I forgive you for teleporting yourself to the bottom of the rabbit
hole directly! In both cases, you are likely wondering where is this breeze you
were promised in the introduction?</p>

<pre style="vertical-align: middle;">
    <img src="http://www.mupuf.org/images/CI/boot2container_logo.png" width="32" style="border: 0"/> Boot2container enters the chat.
</pre>


<p><a href="https://gitlab.freedesktop.org/mupuf/boot2container">Boot2container</a> is a
lightweight (sub-20 MB) and fast initramfs I developed that will allow you to
ignore the subtleties of operating a container runtime and focus on what
matters, your test environment!</p>

<p>Here is an example of how to run boot2container, using
<a href="https://wiki.syslinux.org/wiki/index.php?title=The_Syslinux_Project">SYSLINUX</a>:</p>

<pre><code>LABEL root
    MENU LABEL Run docker's hello world container, with caching disabled
    LINUX /vmlinuz-linux
    APPEND b2c.container=docker://hello-world b2c.cache_device=none b2c.ntp_peer=auto
    INITRD /initramfs.linux_amd64.cpio.xz
</code></pre>

<p>The <a href="https://hub.docker.com/_/hello-world">hello-world</a> container image will be
run in privileged mode, without the host network, which is what you want when
running the container for bare metal testing!</p>

<p>Make sure to check out the list of
<a href="https://gitlab.freedesktop.org/mupuf/boot2container#features">features</a> and
<a href="https://gitlab.freedesktop.org/mupuf/boot2container#options">options</a> before
either generating the initramfs yourself or downloading it from the <a href="https://gitlab.freedesktop.org/mupuf/boot2container/-/releases/">releases
page</a>.
Try it out with your kernel, or the example one bundled in in the release!</p>

<p>With this project mostly done, we pretty much conclude the work needed to set
up the test machines, and the next articles in this series will be focusing on
the infrastructure needed to support a fleet of test machines, and expose it to
Gitlab/Github/&#8230;</p>

<p>That&#8217;s all for now, thanks for reading that far!</p>
]]></content>
  </entry>
  
  <entry>
    <title type="html"><![CDATA[Setting up a CI system part 1: Preparing your test machines]]></title>
    <link href="http://www.mupuf.org/blog/2021/02/08/setting-up-a-ci-system-preparing-your-test-machine/"/>
    <updated>2021-02-08T15:03:00+02:00</updated>
    <id>http://www.mupuf.org/blog/2021/02/08/setting-up-a-ci-system-preparing-your-test-machine</id>
    <content type="html"><![CDATA[<p>Under contracting work for <a href="https://www.valvesoftware.com/en/">Valve
Corporation</a>, I have been working with
Charlie Turner and Andres Gomez from <a href="https://www.igalia.com/">Igalia</a> to
develop a CI test farm for driver testing (most graphics).</p>

<p>This is now the fifth CI system I have worked with / on, and I am growing tired
of not being able to re-use components from the previous systems due to how
deeply-integrated its components are, and how implementation details permeate
from one component to another. Additionally, such designs limit the ability
of the system to grow, as updating a component would impact a lot of components,
making it difficult or even impossible to do without a rewrite of the system, or
taking the system down for multiple hours.</p>

<p>With this new system, I am putting emphasis on designing good interfaces
between components in order to create an open source toolbox that CI systems can
re-use freely and tailor to their needs, while not painting themselves in
a corner.</p>

<p>I aim to blog about all the different components/interfaces we will be
making for this test system, but in this article, I would like to start with
the basics: proposing design goals, and setting up a machine to be controllable
remotely by a test system.</p>

<!-- more -->


<h3>Overall design principles</h3>

<p>When designing a test system, it is important to keep in mind that test results
need to be:</p>

<ul>
<li>Stable: Re-executing the same test should yield the same result;</li>
<li>Reproducible: The test should be runnable on other machines with the same
hardware, and yield the same result;</li>
</ul>


<p>What this means is that we should use the default configuration as much as
possible (no weird setup in CI). Additionally, we need to reduce the amount of
state in the system to the absolute minimum. This can be achieved in the
following way:</p>

<ul>
<li>Power cycle the machine between each test cycle: this helps reset the
hardware;</li>
<li>Go diskless if at all possible, or treat the disk as a cache that can be
flushed when testing fails;</li>
<li>Pre-compute as much as possible outside of the test machine, to reduce the
impact of the environment of the machine running the test.</li>
</ul>


<p>Finally, the machine should not restrict which kernel / Operating System can be
loaded for testing. An easy way to achieve this is to use netboot (PXE), which
is a common BIOS feature allowing diskless machines to boot from the network.</p>

<h3>Converting a machine for testing</h3>

<p>Now that we have a pretty good idea about the design principles behind
preparing a machine for CI, let&#8217;s try to apply them to an actual machine.</p>

<h4>Step 0: Select machines without internal batteries</h4>

<p>While laptops and other hand-held devices are compact devices you may already
have available, they can be tricky to power cycle. They may not boot once the
battery gets disconnected, their performance may be degraded, or they may
outright crash when under stress as the battery isn&#8217;t there to smooth out the
power rails, leading to brownouts&#8230;</p>

<p>Your time is valuable, and this is especially true if this is your first
experience with a bare-metal CI system. I would suggest start with x86-based
single-board computers, or (small-form-factor?) desktop PCs if at all possible.
As an example, if you wanted to test Apple Silicon, I would recommend sourcing
<a href="https://www.apple.com/mac-mini/">Mac Minis</a> rather than a
<a href="https://www.apple.com/macbook-air/">Macbook Air</a>.</p>

<p>Anyway, if you decide to go forward with a battery-powered machine, the first step
is simply to attempt booting it with the battery disconnected. Be <strong>really</strong> patient
as the machine may take longer to boot than usual due to the embedded controller
repeatedly failing to communicate with the now-disconnected battery. This can take a
minute or two&#8230;</p>

<p>If the machine did manage to boot up, congratulations! You will now need to verify
that its performance is unaffected by the change, and that it remains stable. A quick
and easy check would be to run the following stress test while checking which
CPU frequencies were reached by the CPU:</p>

<pre><code>$ stress -c `nproc` -i 10 -d 5 -t 120
</code></pre>

<p>If the test passed, consider yourself lucky! You may want to proceed with this tutorial!</p>

<p>However, if the boot fails/takes too long, or if the machine is not operating at its
expected performance or reliability, all is not lost. Check out your options in our
<a href="#boot--run-normally-slowunreliable-without-a-batter">dedicated entry in the FAQ</a>.</p>

<h4>Step 1: Powering up the machine remotely</h4>

<p>In order to power up, a machine often needs both power and a signal to start.
The latter is usually provided by a power button, but additional ways exist
(non-exhaustive):</p>

<ul>
<li><a href="https://en.wikipedia.org/wiki/Wake-on-LAN">Wake on LAN</a>: An Ethernet frame
sent to the network adapter triggers the boot;</li>
<li>Power on by Mouse/Keyboard: Any activity on the mouse or the keyboard will
boot the computer;</li>
<li>Power on AC: Providing power to the machine will automatically turn it on;</li>
<li>Timer: Boot at a specified time.</li>
</ul>


<p><img src="http://www.mupuf.org/images/CI/bios_intel_wake_up_events.jpg" title="An Intel motherboard's list of
wakeup events" alt="An Intel motherboard's list of wakeup
events" /></p>

<p>Unfortunately, none of these triggers can be used to also turn off the machine.
The only way to guarantee that a machine will power down and reset its internal
state completely is to cut its power supply for a significant amount of time. A
safe way to provide/cut power is to use a remotely-switchable Power Distribution
Unit
(<a href="https://www.cyberpowersystems.com/product/pdu/switched/pdu41001/">example</a>),
a managed ethernet switch with per-port switchable PoE (Power over Ethernet) ports,
or simply using some smart plug such as
<a href="https://www.shelly.cloud/en-fi/products/product-overview/shelly-plug-s">Shelly plugs</a>
or Ikea&#8217;s
<a href="https://www.ikea.com/us/en/p/tradfri-control-outlet-kit-70364803/">TRÅDFRI</a>. In
any case, make sure you rely on as few services as possible (no cloud!),
that you won&#8217;t exceed the ratings of the power supply (voltage, power, and cycles),
and can read back the state to make sure the command was well received. If you opt
out for the industrial PDUs, make sure to check out <a href="https://gitlab.freedesktop.org/mupuf/pdu-gateway/">PDU
Gateway</a>, our REST service
to control the machines.</p>

<p><img src="http://www.mupuf.org/images/CI/pdu.jpg" title="An example of a PDU" alt="An example of a PDU" /></p>

<p>Now that we can reliably cut/provide power, we still need to control the boot
signal. The difficulty here is that the signal needs to be received <em>after</em> the
machine received power <em>and</em> initialized enough to receive this event. To make
things as easy as possible, the easiest is to configure the BIOS to boot as
soon as the power is brought to the computer. This is usually called &#8220;Boot on
AC&#8221;. If your computer does not support this feature, you may want to try the
other ones, or use a microcontroller to press the power button for you when
powering up (see the <a href="#boot-on-ac">HELP! My machine can&#8217;t &#8230; Boot on
AC</a> section at the end of this article).</p>

<h4>Step 2: Net booting</h4>

<p>Net booting is quite commonly supported on x86 and ARM bootloaders.</p>

<p>On x86 platforms, you can generally find this option in the boot option priorities
under the name <code>PXE boot</code> or <code>network boot</code>. You may also need to enable the
<code>LAN option ROM</code>, <code>LAN controller</code>, or the UEFI <code>network stack</code>. Reboot, and
check that your machine is trying to get an IP!</p>

<p>On ARM/RiscV platforms, the board&#8217;s bootloader may already default to PXE booting
when no bootable media is found (see
<a href="https://www.raspberrypi.com/documentation/computers/raspberry-pi.html#boot-sequence">Raspberry Pi&#8217;s boot sequence</a>).
Don&#8217;t panic if your board doesn&#8217;t do it by default, you&#8217;ll just need to install
one that will do the job:</p>

<ul>
<li>Modern:

<ul>
<li><a href="https://www.barebox.org/doc/latest/boards.html">barebox</a>: A POSIX/Linux-like interface, but few boards supported;</li>
<li><a href="https://tow-boot.org/getting-started.html">tow-boot</a>: Good support for the popular SBCs, sane defaults, good UI;</li>
<li><a href="https://github.com/tianocore/edk2">tianocore / EDK2</a>: Full-UEFI environment, nice UI, but slow to boot;</li>
</ul>
</li>
<li>Old-school:

<ul>
<li><a href="https://u-boot.readthedocs.io/en/latest/board/index.html">u-boot</a>: Widest boards compatibility, good feature-set,
but only works with small kernels. Use as a last resort!</li>
</ul>
</li>
</ul>


<p>The next step will be to set up a machine, called Testing Gateway, that will
provide a PXE service. This machine should have two network interfaces, one
connected to a public network, and one connected to the test machines (through
a switch). Setting up this machine will be the subject of an upcoming blog
post, but if your are impatient, you may use our
<a href="https://gitlab.freedesktop.org/mupuf/valve-infra/">valve-infra</a> container or
the simpler <a href="https://gitlab.freedesktop.org/mupuf/netboot2container">netboot2container</a>.</p>

<h4>Step 3: Emulating your screen and keyboard using a serial console</h4>

<p>Thanks to the previous steps, we can now boot in any Operating System we want,
but we cannot interact with it&#8230;</p>

<p>One solution could be to run an <a href="https://www.ssh.com/ssh/server/">SSH server</a> on
the Operating System, but until we could connect to it, there would be no way
to know what is going on. Instead, we could use an ancient technology, a
<a href="https://en.wikipedia.org/wiki/Serial_port">serial port</a>, to drive a
console. This solution is often called &#8220;Serial console&#8221; and is supported by
most Operating Systems. Serial ports come in <a href="https://www.sparkfun.com/tutorials/215">two
types</a>:</p>

<ul>
<li>UART: voltage changing between 0 and VCC (TTL signalling), more common in
the System-on-Chip (SoC) and microcontrollers world;</li>
<li>RS-232: voltage changing between a positive and negative voltage, more
common in the desktop and datacenter world.</li>
</ul>


<p>In any case, I suggest you find a serial-to-USB adapter adapted to the computer
you are trying to connect:</p>

<ul class="gallery">
<li><a href="http://www.mupuf.org/images/CI/FTDI_UART.jpg" class="fancybox" rel="gallery-1a608809898318ed67b64f9c75ed8b11" title="A UART to USB mini converter"><img src="http://www.mupuf.org/images/CI/FTDI_UART.jpg" alt="A UART to USB mini converter"/></a></li><li><a href="http://www.mupuf.org/images/CI/FTDI_RS232.jpg" class="fancybox" rel="gallery-1a608809898318ed67b64f9c75ed8b11" title="An RS-232 to USB Type A converter"><img src="http://www.mupuf.org/images/CI/FTDI_RS232.jpg" alt="An RS-232 to USB Type A converter"/></a></li>
</ul>


<p>On Linux, using a serial console is relatively simple, just add the following
in the command line to get a console on your screen <em>AND</em> over the <code>/dev/ttyS0</code>
serial port running at 9600 bauds:</p>

<pre><code>console=tty0 console=ttyS0,9600 earlyprintk=vga,keep
</code></pre>

<p>If your machine does not have a serial port but has USB ports, which is more
the norm than the exception in the desktop/laptop world, you may want to connect
two RS-232-to-USB adapters together, using a <a href="https://en.wikipedia.org/wiki/Null_modem">Null
modem</a> cable:</p>

<pre><code>Test Machine &lt;-&gt; USB &lt;-&gt; RS-232 &lt;-&gt; NULL modem cable &lt;-&gt; RS-232 &lt;-&gt; USB Hub &lt;-&gt; Gateway
</code></pre>

<p>And the kernel command line should use <code>ttyACM0</code> / <code>ttyUSB0</code> instead of <code>ttyS0</code>.</p>

<h4>Putting it all together</h4>

<p>Start by removing the internal battery if it has one (laptops), and any built-in
wireless antenna. Then set the BIOS to boot on AC, and use netboot.</p>

<p>Steps for an AMD motherboard:</p>

<ul class="gallery">
<li><a href="http://www.mupuf.org/images/CI/bios_amd_power_ac.jpg" class="fancybox" rel="gallery-ff5ab2d609aafcd68e0499af6344777f" title="Boot on AC power"><img src="http://www.mupuf.org/images/CI/bios_amd_power_ac.jpg" alt="Boot on AC power"/></a></li><li><a href="http://www.mupuf.org/images/CI/bios_amd_onboard_lan_controller.jpg" class="fancybox" rel="gallery-ff5ab2d609aafcd68e0499af6344777f" title="Enable the LAN controller, for legacy boot"><img src="http://www.mupuf.org/images/CI/bios_amd_onboard_lan_controller.jpg" alt="Enable the LAN controller, for legacy boot"/></a></li><li><a href="http://www.mupuf.org/images/CI/bios_amd_uefi_network.jpg" class="fancybox" rel="gallery-ff5ab2d609aafcd68e0499af6344777f" title="Enable the network stack, for UEFI boot"><img src="http://www.mupuf.org/images/CI/bios_amd_uefi_network.jpg" alt="Enable the network stack, for UEFI boot"/></a></li><li><a href="http://www.mupuf.org/images/CI/bios_amd_netboot.jpg" class="fancybox" rel="gallery-ff5ab2d609aafcd68e0499af6344777f" title="Set to netboot first"><img src="http://www.mupuf.org/images/CI/bios_amd_netboot.jpg" alt="Set to netboot first"/></a></li>
</ul>


<p>Steps for an Intel motherboard:</p>

<ul class="gallery">
<li><a href="http://www.mupuf.org/images/CI/bios_intel_power_ac.jpg" class="fancybox" rel="gallery-8339accc839629ee9e81bb866a76af73" title="Boot on AC power"><img src="http://www.mupuf.org/images/CI/bios_intel_power_ac.jpg" alt="Boot on AC power"/></a></li><li><a href="http://www.mupuf.org/images/CI/bios_intel_lan_option_rom.jpg" class="fancybox" rel="gallery-8339accc839629ee9e81bb866a76af73" title="Enable the LAN option ROM / UEFI network stack"><img src="http://www.mupuf.org/images/CI/bios_intel_lan_option_rom.jpg" alt="Enable the LAN option ROM / UEFI network stack"/></a></li><li><a href="http://www.mupuf.org/images/CI/bios_intel_netboot.jpg" class="fancybox" rel="gallery-8339accc839629ee9e81bb866a76af73" title="Set to netboot first"><img src="http://www.mupuf.org/images/CI/bios_intel_netboot.jpg" alt="Set to netboot first"/></a></li>
</ul>


<p>Finally, connect the test machine to the wider infrastructure in this way:</p>

<center>
  <div class=" half"><a href="http://www.mupuf.org/images/CI/infra_overview.mmd.png" class="fancybox" title="Overview of the infrastructure"><figure><img src="http://www.mupuf.org/images/CI/infra_overview.mmd.png" title="Overview of the infrastructure"  /><figcaption>Overview of the infrastructure</figcaption></figure></a></div>
</center>


<p>If you managed to do all this, then congratulations, you are set! If you got
some issues with any of the previous steps, brace yourself, and check out the
following section!</p>

<h3>HELP! My machine can&#8217;t &#8230;</h3>

<h4>Net boot</h4>

<p>It&#8217;s annoying, but it is super simple to work around that. What you need
is to install a bootloader on a drive or USB stick which supports PXE.</p>

<p>I would recommend you look into <a href="https://ipxe.org/download">iPXE</a>, as it is
super easy to setup and amazingly versatile!</p>

<h4>Boot on AC</h4>

<p>Well, that&#8217;s a bummer, but that&#8217;s not the end of the line either if you have
some experience dealing with microcontrollers, such as
<a href="https://www.arduino.cc/">Arduino</a>. Provided you can find the following 4 wires,
you should be fine:</p>

<ul>
<li>Ground: The easiest to find;</li>
<li>Power rail: 3.3 or 5V depending on what your controller expects;</li>
<li>Power LED: A signal that will change when the computer turns on/off;</li>
<li>Power Switch: A signal to pull-up/down to start the computer.</li>
</ul>


<p>On desktop PCs, all these wires can be easily found in the motherboard&#8217;s
manual. For laptops, you&#8217;ll need to scour the motherboard for these signals
using a multimeter. Pay extra attention when looking for the power rail, as it
needs to be able to source enough current for your microcontroller. If you are
struggling to find one, look for the VCC pins of some of the chips and you&#8217;ll
be set.</p>

<p>Next, you&#8217;ll just need to figure out what voltage the power LED is at when the
machine is ON or OFF. Make sure to check that this voltage is compatible with
your microcontroller&#8217;s input rating and plug it directly into a GPIO of your
microcontroller.</p>

<p>Let&#8217;s then do the same work for the power switch, except this time we also need
to check how much current will flow through it when it is activated. To do that,
just use a multimeter to check how much current is flowing when you connect the
two wires of the power switch. Check that this amount of current can be
sourced/sinked by the microcontroller, and then connect it to a GPIO.</p>

<p>Finally, we need to find power for the microcontroller that will be present as
soon as we plug the machine to the power. For desktop PCs, you would find this
in <a href="https://en.wikipedia.org/wiki/ATX#/media/File:ATX_PS_signals.svg">Pin 9 of the ATX
connector</a>.
For laptops, you will need to probe the motherboard until you find a pin that
has one with a voltage suitable for your microcontroller (5 or 3.3V). However,
make sure it is able to source enough current without the voltage dropping
bellow the minimum acceptable VCC of your microcontroller. The best way to make
sure of that is to connect this rail to the ground through a ~100 Ohm and check
that the voltage at the leads of the resistor, and keep on trying until you
find a suitable place (took me 3 attempts). Connect your microcontroller&#8217;s VCC
and ground to the these pads.</p>

<p>The last step will be to edit <a href="https://gitlab.freedesktop.org/mupuf/valve-infra/-/raw/master/firmwares/boot_on_AC.ino">this Arduino
code</a>
for your needs, flash it to your microcontroller, and iterate until it works!</p>

<p>Here is a photo summary of all the above steps:</p>

<ul class="gallery">
<li><a href="http://www.mupuf.org/images/CI/lappy_open_back.jpg" class="fancybox" rel="gallery-b293c2adafff9369636d89a2ee41cc64" title="Let's start by opening the laptop's back and removing the battery"><img src="http://www.mupuf.org/images/CI/lappy_open_back.jpg" alt="Let's start by opening the laptop's back and removing the battery"/></a></li><li><a href="http://www.mupuf.org/images/CI/lappy_pwr_sw.jpg" class="fancybox" rel="gallery-b293c2adafff9369636d89a2ee41cc64" title="Locate the power switch"><img src="http://www.mupuf.org/images/CI/lappy_pwr_sw.jpg" alt="Locate the power switch"/></a></li><li><a href="http://www.mupuf.org/images/CI/lappy_pwr_sw_after.jpg" class="fancybox" rel="gallery-b293c2adafff9369636d89a2ee41cc64" title="Solder a wire to the pad. In my case, I had to remove the switch, so I soldered two to make it easy to start the machine by hand"><img src="http://www.mupuf.org/images/CI/lappy_pwr_sw_after.jpg" alt="Solder a wire to the pad. In my case, I had to remove the switch, so I soldered two to make it easy to start the machine by hand"/></a></li><li><a href="http://www.mupuf.org/images/CI/lappy_pwr_sw_after_with_glue.jpg" class="fancybox" rel="gallery-b293c2adafff9369636d89a2ee41cc64" title="Secure the wire using hot glue"><img src="http://www.mupuf.org/images/CI/lappy_pwr_sw_after_with_glue.jpg" alt="Secure the wire using hot glue"/></a></li><li><a href="http://www.mupuf.org/images/CI/lappy_pwr_led.jpg" class="fancybox" rel="gallery-b293c2adafff9369636d89a2ee41cc64" title="Locate the power LED"><img src="http://www.mupuf.org/images/CI/lappy_pwr_led.jpg" alt="Locate the power LED"/></a></li><li><a href="http://www.mupuf.org/images/CI/lappy_pwr_led_after.jpg" class="fancybox" rel="gallery-b293c2adafff9369636d89a2ee41cc64" title="Solder a wire to the pad that changes voltage"><img src="http://www.mupuf.org/images/CI/lappy_pwr_led_after.jpg" alt="Solder a wire to the pad that changes voltage"/></a></li><li><a href="http://www.mupuf.org/images/CI/lappy_pwr_led_after_with_glue.jpg" class="fancybox" rel="gallery-b293c2adafff9369636d89a2ee41cc64" title="Secure the wire using hot glue"><img src="http://www.mupuf.org/images/CI/lappy_pwr_led_after_with_glue.jpg" alt="Secure the wire using hot glue"/></a></li><li><a href="http://www.mupuf.org/images/CI/lappy_pwr_rails.jpg" class="fancybox" rel="gallery-b293c2adafff9369636d89a2ee41cc64" title="Found these pads with ~3V, soldered my wires there, only to find out they couldn't source enough current... Found a proper power supply at the pin of BIOS's flash chip"><img src="http://www.mupuf.org/images/CI/lappy_pwr_rails.jpg" alt="Found these pads with ~3V, soldered my wires there, only to find out they couldn't source enough current... Found a proper power supply at the pin of BIOS's flash chip"/></a></li><li><a href="http://www.mupuf.org/images/CI/lappy_arduino_proto.jpg" class="fancybox" rel="gallery-b293c2adafff9369636d89a2ee41cc64" title="Plug the wires to a prototype arduino board, and make sure it tries to turn on the machine until the power LED turns on"><img src="http://www.mupuf.org/images/CI/lappy_arduino_proto.jpg" alt="Plug the wires to a prototype arduino board, and make sure it tries to turn on the machine until the power LED turns on"/></a></li><li><a href="http://www.mupuf.org/images/CI/lappy_uc.jpg" class="fancybox" rel="gallery-b293c2adafff9369636d89a2ee41cc64" title="Solder the wires to your microcontroller. I used an STM32 BluePill, but Arduino nanos work too"><img src="http://www.mupuf.org/images/CI/lappy_uc.jpg" alt="Solder the wires to your microcontroller. I used an STM32 BluePill, but Arduino nanos work too"/></a></li><li><a href="http://www.mupuf.org/images/CI/lappy_uc_flashing.jpg" class="fancybox" rel="gallery-b293c2adafff9369636d89a2ee41cc64" title="Flash the firmware to the microcontroller"><img src="http://www.mupuf.org/images/CI/lappy_uc_flashing.jpg" alt="Flash the firmware to the microcontroller"/></a></li><li><a href="http://www.mupuf.org/images/CI/lappy_overall.jpg" class="fancybox" rel="gallery-b293c2adafff9369636d89a2ee41cc64" title="And Tadam, we are done here, after ~4 hours of work!"><img src="http://www.mupuf.org/images/CI/lappy_overall.jpg" alt="And Tadam, we are done here, after ~4 hours of work!"/></a></li>
</ul>


<p>Thanks to <a href="https://hiler.eu/">Arkadiusz Hiler</a> for giving me a couple of these
<a href="https://stm32duinoforum.com/forum/wiki_subdomain/index_title_Blue_Pill.html">BluePills</a>,
as I did not have any microcontroller that would be small-enough to fit in place of
a laptop speaker. If you are a novice, I would suggest you pick an Arduino nano
instead.</p>

<p>Oh, and if you want to create a board that would be generic-enough for most
motherboards, check out the <a href="http://www.mupuf.org/blog/2013/05/11/wtrpm-a-web-based-wt-suite-to-power-up-slash-down-your-computers/">schematics from my almost-decade-old blog
post</a>
about doing just that!</p>

<h4>Boot / run normally (slow/unreliable) without a battery</h4>

<p>Before going any further, I would really urge you to reconsider your decision to use
this machine for CI. If there are no other alternatives, don&#8217;t despair, things will
be &#8230;. juuuuuust fine!</p>

<center><img src="http://www.mupuf.org/images/CI/this-is-fine.jpg" title="Your state of mind, right now!" alt="Your state of mind, right now!"></center>


<p>Since we want our test machines to behave in the same way as users&#8217;, we should
strive for minimizing the impact of our modifications to the machine.</p>

<p>When it comes to the internal battery, we ideally want it to be connected while
the machine is running (mirroring how users would use the machine), and disconnected
between test jobs so as to minimize the chances of any state leaking between jobs
which would affect reproducibility of results.</p>

<p>We can achieve this goal at two levels: in software by hacking on the embedded controller,
or physically by modifying the power-delivery.</p>

<h5>1. Hack the Embedded Controller (EC)</h5>

<p>If your device&#8217;s firmware or embedded controller (EC) is open source, you should be able to
monitor the state of the power supply, and you probably can find a way to turn off the
machine (the routine called when pressing the power button for 10s) when the main power
supply is disconnected.</p>

<p>Unfortunately, the only devices with open source EC I am aware of are
<a href="https://chromium.googlesource.com/chromiumos/platform/ec/+/master/README.md">chromebooks</a>,
so your only choice may be to&#8230;</p>

<h5>2. Instrument the machine&#8217;s power delivery</h5>

<p>If we can&#8217;t get the embedded controller to do the work for us, we can do the same using
a 5V relay with a normally-open contact, a few wires, a soldering iron, and an old USB
power supply!</p>

<p>The first step is to figure out a way to detect whether the power supply is connected
or not. The foolproof way is to use use an old USB charger, connected to the same PDU
port as the machine&#8217;s power supply. This will provide us with a 5V power supply when
the machine is supposed to be ON, and 0V otherwise.</p>

<ol>
<li>Disconnect the power to the machine</li>
<li>Open up the machine enough to access its main PCB and battery</li>
<li>Disconnect the battery</li>
<li>Identify the negative and positive leads of the battery using a voltmeter</li>
<li>Cut the positive lead(s)</li>
<li>Solder extension wires to both sides</li>
<li>Solder them to the normally-open contacts of your 5V relay</li>
<li>Solder the coil leads of the relay to an old USB-A cable</li>
<li>Secure everything with heatshrink and hotglue</li>
<li>Close the machine and test it</li>
</ol>


<ul class="gallery">
<li><a href="http://www.mupuf.org/images/CI/battery_plugger_schematic.png" class="fancybox" rel="gallery-3784060343862186e2db41fce530958f" title="A schematic of how the battery could be connected on demand"><img src="http://www.mupuf.org/images/CI/battery_plugger_schematic.png" alt="A schematic of how the battery could be connected on demand"/></a></li><li><a href="http://www.mupuf.org/images/CI/external_control.jpg" class="fancybox" rel="gallery-3784060343862186e2db41fce530958f" title="A simple a 5V PWR_GOOD signal... just plug a phone charger into the same power socket as the machine's power supply!"><img src="http://www.mupuf.org/images/CI/external_control.jpg" alt="A simple a 5V PWR_GOOD signal... just plug a phone charger into the same power socket as the machine's power supply!"/></a></li><li><a href="http://www.mupuf.org/images/CI/sd_battery_cut_1.jpg" class="fancybox" rel="gallery-3784060343862186e2db41fce530958f" title="Disconnect the battery connector, identify the positive leads, then cut them"><img src="http://www.mupuf.org/images/CI/sd_battery_cut_1.jpg" alt="Disconnect the battery connector, identify the positive leads, then cut them"/></a></li><li><a href="http://www.mupuf.org/images/CI/sd_battery_cut_2.jpg" class="fancybox" rel="gallery-3784060343862186e2db41fce530958f" title="Solder the wires together, ahead of extending them"><img src="http://www.mupuf.org/images/CI/sd_battery_cut_2.jpg" alt="Solder the wires together, ahead of extending them"/></a></li><li><a href="http://www.mupuf.org/images/CI/sd_battery_cut_3.jpg" class="fancybox" rel="gallery-3784060343862186e2db41fce530958f" title="Solder a higher-gage wire to both sides of the wire, and add heatshrink to secure them"><img src="http://www.mupuf.org/images/CI/sd_battery_cut_3.jpg" alt="Solder a higher-gage wire to both sides of the wire, and add heatshrink to secure them"/></a></li><li><a href="http://www.mupuf.org/images/CI/sd_battery_cut_4.jpg" class="fancybox" rel="gallery-3784060343862186e2db41fce530958f" title="Route the higher gage wires to the relay's Normally-Open (NO) leads, add heatshrink and hot glue to prevent them from breaking"><img src="http://www.mupuf.org/images/CI/sd_battery_cut_4.jpg" alt="Route the higher gage wires to the relay's Normally-Open (NO) leads, add heatshrink and hot glue to prevent them from breaking"/></a></li><li><a href="http://www.mupuf.org/images/CI/sd_battery_cut_5.jpg" class="fancybox" rel="gallery-3784060343862186e2db41fce530958f" title="Cut the end of a USB-A cable, find the VBUS+ and GND wires"><img src="http://www.mupuf.org/images/CI/sd_battery_cut_5.jpg" alt="Cut the end of a USB-A cable, find the VBUS+ and GND wires"/></a></li><li><a href="http://www.mupuf.org/images/CI/sd_battery_cut_6.jpg" class="fancybox" rel="gallery-3784060343862186e2db41fce530958f" title="Solder these wires to relay's coil leads (check the polarity first!), add heatshrink and hot glue to prevent them from breaking"><img src="http://www.mupuf.org/images/CI/sd_battery_cut_6.jpg" alt="Solder these wires to relay's coil leads (check the polarity first!), add heatshrink and hot glue to prevent them from breaking"/></a></li><li><a href="http://www.mupuf.org/images/CI/sd_battery_cut_7.jpg" class="fancybox" rel="gallery-3784060343862186e2db41fce530958f" title="Test using a power bank that the machine can turn on when the PWR_GOOD signal is present, and turns off when missing"><img src="http://www.mupuf.org/images/CI/sd_battery_cut_7.jpg" alt="Test using a power bank that the machine can turn on when the PWR_GOOD signal is present, and turns off when missing"/></a></li><li><a href="http://www.mupuf.org/images/CI/sd_battery_cut_8.jpg" class="fancybox" rel="gallery-3784060343862186e2db41fce530958f" title="The machine is now ready for CI!"><img src="http://www.mupuf.org/images/CI/sd_battery_cut_8.jpg" alt="The machine is now ready for CI!"/></a></li>
</ul>


<p>That&#8217;s all, folks!</p>
]]></content>
  </entry>
  
  <entry>
    <title type="html"><![CDATA[Final week at Intel, moving on to being a self-employed contractor]]></title>
    <link href="http://www.mupuf.org/blog/2020/10/02/final-week-at-intel/"/>
    <updated>2020-10-02T17:34:00+03:00</updated>
    <id>http://www.mupuf.org/blog/2020/10/02/final-week-at-intel</id>
    <content type="html"><![CDATA[<p>This week was my last week at Intel after over 5.5 years there. My journey at Intel has been really interesting, going from Mesa development to Continuous Integration / Validation, then joining the i915 display team and realizing my vision of production-ready upstream drivers through the creation of the Intel GFX CI system! Finally, my last year at Intel was as the CI/Tooling Architect for the validation organization. There, I was writing tools and processes to improve program management and validation rather than just focusing on developers like I used to. This taught me quite a bit about managerial structures, and organizations in general, but kept on pushing me on a narrower and narrower type of work which left me longing for the days where I could go and hack on any codebase and directly collaborate with other engineers, no matter where they are.</p>

<p>This opportunity came to me in the form of becoming a self-employed contractor, hired by Valve. I am expecting to be work throughout the stack on improving Linux as a gaming platform, and be strengthening a fantastic team of engineers who, despite being a community effort, contributed to deliver arguably one of the best vulkan driver in the industry (Radv with ACO). This definitely brings me back to my Nouveau days (minus the power management issues) but this time I will come with a lot more experience, especially around testing and Windowing System Integration!</p>

<p>I am very thankful for everything I learnt at Intel, contributing to improve the quality of the drivers, and considering world-class talents as being my colleagues and friends. However, unlike traditional companies where moving to another one means changing projects and not interacting with the same people again, open source drivers trancends companies, so I know that we will still be working together one way or another!</p>

<p>So long, and thanks for all the fish!</p>
]]></content>
  </entry>
  
  <entry>
    <title type="html"><![CDATA[3 ways of hosting a live-streamed conference using Jitsi]]></title>
    <link href="http://www.mupuf.org/blog/2020/09/28/3-ways-to-host-a-conference-using-jitsi/"/>
    <updated>2020-09-28T09:11:00+03:00</updated>
    <id>http://www.mupuf.org/blog/2020/09/28/3-ways-to-host-a-conference-using-jitsi</id>
    <content type="html"><![CDATA[<p>A bit over a week ago, I finished hosting the virtual X.Org Developer Conference (XDC) 2020 with my friend <a href="https://hiler.eu/">Arkadiusz Hiler</a> (AKA Arek / ivyl). This conference has been livestreamed every single year since 2012, but this was the first time that we went fully-virtual and needed to have hosts / speakers present from their homes.</p>

<p>Of course, the XDC was not the only conference this year that needed to become fully virtual, so we have been lucky-enough to learn from them (thanks to LWN for its <a href="https://lwn.net/Articles/830436/">article on LPC2020</a> and Guy Lunardi), and this blog post is my attempt at sharing some of the knowledge we acquired by running XDC 2020.</p>

<p>Over this blog post, I will answer the questions how we selected jitsi over other video-conferencing solutions, how to deploy it, then present 3 different ways to use it for live-streaming your conference. Let&#8217;s get to it, shall we?</p>

<!-- more -->


<p><img src="http://www.mupuf.org/images/xdc2020/xdc-main.jpg" alt="XDC 2020 title page" /></p>

<p><a id="sec:why_jitsi"></a></p>

<h3>Why we selected Jitsi? Scaling concerns!</h3>

<p>Given that the XDC is about open source graphics, it felt wrong to use proprietary tools for the conference. This pretty much limited our choices to two options:
<a href="https://bigbluebutton.org/">Big Blue Button</a>(BBB), and <a href="https://bigbluebutton.org/">Jitsi</a>. Luckily, both are excellent!</p>

<p>BBB is a fantastic all-in-one conference tool that is meant for online learning and collaboration. Rooms are controlled by one-or-more moderators who split participants into multiple sub-room which is useful for group work in an eLearning environment, or for break-out rooms in a conference. It excells at keeping bandwidth/cpu usage low as images are shared rather than a full video stream. This also makes it less likely to hit webRTC-related issues. Sounds great for schools where students could be running anything, from some cheap chromebooks to Windows laptops. The recommended server specifications are 8GB or RAM and 8 cores.</p>

<p>Jitsi on the other hand has a simpler UI centered around webRTC. Users join a room, share their webcam or screen, and talk using their microphones. It is also possible to collaboratively work on a shared document with a local etherpad (an open-source web-based UI for collaborative text edition). Most of the work done by Jitsi is happening client-side, which means that bandwidth and CPU requirements are higher than BBB&#8217;s, and that browser compatibility is also more problematic (Chromium is fine, Firefox is problematic, Safari is bust), although I am sure the situation will continuously improve. On the other hand, the server requirements are much lower than BBB. The only real resource-heavy feature is the built-in livestreaming which spawns an X-Server, Chromium, screen grabs the output and streams it to youtube using ffmpeg for the encoding.</p>

<p>XDC had an expected attendance of up to 200 participants, which meant that we needed to make sure that whatever solution we would go for had to work nicely with that many attendees. Additionally, we needed to test this solution ahead of time. Using an integrated solution such as BBB presented the risk that too many attendees would try to join and overload the server which would have prevented the conference from happening. Instead, by limiting the audience to just the speakers, testing was relatively easy (find 10 friends to have a chat with on a test instance), and viewers could just watch the stream live on Youtube (AKA, scaling is not my problem). The inconvenient of such method is of course that we need to provide a way for attendees to interact with the speaker and discuss with each other. For this, we just use IRC since this is what the community is used to. See <a href="https://blog.hiler.eu/xdc-2020/">Arek&#8217;s blog post</a> to learn more about maximizing the satisfaction of livestream viewers.</p>

<p>So, in the end, the choice to use Jitsi for XDC2020 came down to&#8230; being a chicken and not having the time to organize the needed testing, like the Linux Plumber Conference did! However, in hindsight, I would still not have changed anything (more on that later).</p>

<p><a id="sec:deploying_jitsi"></a></p>

<h3>How to deploy Jitsi?</h3>

<p>If you are going to deploy Jitsi for a conference, I highly suggest using the &#8220;cloud&#8221; for this! It brings a lot of convenience for testing, duplicating instances, backups, and it keeps the infra cost extremely low! FYI, for XDC 2020, we used 4 instances of Jitsi (Yes, I am a paranoid chicken!), and the overall cost was less than $39. This includes the test instances I set up, up to a month ahead of the conference.</p>

<p>I personnally selected <a href="https://www.digitalocean.com/">Digital Ocean</a> because I was already a customer of theirs, and it was easy for me to create a $5/month instance that could be scaled to a $80/month instance with 4 dedicated CPUs and 16GB of RAM just for the conference.</p>

<p>When selecting a location for the VM, choose one that is somewhat at the center of the expected participants. For example, if the conference has a majority of Europeans and Americans (North and South), selecting New York City (NYC) or London (LON) will bring the lowest average latency between participants. In case of doubt, set up multiple instances of Jitsi in different data centers so as you can move people to another server in case of an issue. Check out <a href="http://speedtest-ams2.digitalocean.com/">Digital Ocean&#8217;s speed test</a> to experience the effect of world-wide routing on your ping and bandwidth, and ask your attendees to verify ahead of time that they will meet the bandwidth requirements.</p>

<p>When installing Jitsi, I strongly suggest you follow the <a href="https://jitsi.github.io/handbook/docs/devops-guide/devops-guide-docker">Docker Self-Hosting Guide</a> if you want a painless deployment. I tried the other two recommended methods and always had issues with the bridge which I never managed to fix. Just go with docker, don&#8217;t waste your time!</p>

<p>If you want to customize some style/code, I suggest you modify docker-compose.yml to mount-bind some resources such as a replacement watermark for the jitsi instance, or a new css file.</p>

<p>Finally, I suggest you create a systemd service to auto-start Jitsi on boot. Create the following file at /etc/systemd/system/jitsi.service:</p>

<pre><code>[Unit]
Description=Jitsi
Requires=docker.service
After=docker.service

[Service]
Type=simple
WorkingDirectory=/root/docker-jitsi-meet
ExecStart=/usr/bin/docker-compose -f docker-compose.yml -f etherpad.yml -f jibri.yml up

[Install]
WantedBy=multi-user.target
</code></pre>

<p>Don&#8217;t forget to enable/start the service after that:</p>

<pre><code># systemctl daemon-reload
# systemctl enable jitsi
# systemctl start jitsi
</code></pre>

<p><a id="sec:3levels_of_conference"></a></p>

<h3>Jitsi-based live-streamed conference: 3 levels of professionalism</h3>

<p>Okay, let&#8217;s now get into the gist of this article! Proposing three different ways of hosting a Jitsi-based conference.</p>

<p>Providing a good experience to livestream viewers is important, especially since it also ends up being the recordings for the conference. As suggested by Arek on his <a href="https://blog.hiler.eu/xdc-2020/">XDC2020 blog post</a>, here are important aspects that should drive the quality up:</p>

<ul>
<li>No dead air (the stream appears dead);</li>
<li>Minimize the room for (serious) errors;</li>
<li>Focus on the audio quality;</li>
<li>Embrace existing means of communication.</li>
</ul>


<p>We will use these ideas when proposing solutions.</p>

<p><a id="sec:level_1_of_conference"></a></p>

<h4>Level 1: All participants in a Jitsi room</h4>

<p>This is the simplest solution by far. All it requires is to deploy a beefy Jitsi instance, create a room, and invite the participants there.</p>

<p>To start live-streaming, simply click on the settings button, press &#8220;Start livestreaming&#8221;, then copy the livestreaming key you got from Youtube live!</p>

<p>At this point, you will have two pools of attendees: the live ones on Jitsi, and the viewers-only on Youtube. It is up to you to decide how many people will be on one or the other, but in the event of poor performance of the server, it is possible to just kick people out of the room to keep only the most important people there.</p>

<p>Rather than using Jitsi&#8217;s and Youtube&#8217;s chat, Arek and I suggest having the same chat system for both groups of attendees. Use your community&#8217;s favourite mode of text communication (IRC?) there!</p>

<p>To reduce the amount of dead-air which can happen in-between two talks, and to improve the experience of live-viewers that would just tune in the conference during a break, the organizer should share their desktop showing the name of the next talk and when it will start. It could be as simple as a full-screen text editor containing the data, but if you want to do it very well, having a countdown helps reduce confusion with timezones:</p>

<p><a href="https://youtu.be/FxFPFsT1wDw?t=10001"><img src="http://www.mupuf.org/images/xdc2020/xdc-timer.jpg" alt="Timer inbetween talks" /><br>(Click to go to the video)</a></p>

<p><strong>Pros</strong>:</p>

<ul>
<li>Simple to deploy</li>
<li>Multiple hosts can take care of asking questions or preparing/showing the next-talk slide</li>
</ul>


<p><strong>Cons</strong>:</p>

<ul>
<li>Impossible to improve the sound quality of participants for the viewers on Youtube as Jitsi streams directly</li>
<li>No pre-testing possible for presenters on the live instance, so the switch from one presenter to another can be shaky</li>
<li>Can&#8217;t change rooms without losing the livestream: if a presenter can&#8217;t join, tough luck!</li>
</ul>


<p> <a id="sec:level_2_of_conference"></a></p>

<h4>Level 2: Only speakers in a room + streaming using OBS</h4>

<p>Level 2 is focusing on improving the sound quality of presenters, and the flexibility of presentation. This can be achieved by moving the streaming from the Jitsi instance to a host&#8217;s computer. This enables the streaming of almost anything: video, other jitsi instances, &#8230;</p>

<p>For any kind of streaming setup, I would recommend using <a href="https://obsproject.com/">OBS Studio</a> which has pretty much everything you need built-in. Please follow <a href="https://blog.hiler.eu/xdc-2020/">Arek&#8217;s blog post</a> to get tips on how to maximize the quality of your setup!</p>

<p>The live-streaming host should focus on video and sound quality only, leaving another host to deal with collecting questions during the talk, then asking them live on Jitsi.</p>

<p>The major drawback of this solution is that the host&#8217;s internet connection is becoming critical to streaming the conference. This means that any power or internet cut will lead to a loss of livestreaming. To reduce the power risk, I suggest buying a UPS to power both the modem, the computer, and all the equiments needed for streaming. To reduce the internet cut risk, I suggest setting a router with a failover to a 4G network so as OBS would just re-establish the connection after losing it.</p>

<p><strong>Pros</strong>:</p>

<ul>
<li>Flexibility to adjust sound, video, and show any waiting screen with a nice transition</li>
<li>Setting up of the next presenter can happen off-camera during the breaks</li>
<li>Possibility to tell speakers how much time is left without the stream hearing it</li>
</ul>


<p><strong>Cons</strong>:</p>

<ul>
<li>The host needs to take steps to reduce the risk of internet or power issues during the conference</li>
<li>Presenters might not be able to set up their system during the break, which increases stress level of everyone</li>
</ul>


<p><a id="sec:level_3_of_conference"></a></p>

<h4>Level 3: Only speakers in a room, tripple OBS setup</h4>

<p>For our last level, we will focus on reducing the risk that presenters might not be able to set up their system during the break, and allowing the host to take breaks by having 2 Jitsi and 3 OBS instances.</p>

<p>Why create so many instances? Having 3 OBS instances enables two hosts to share the load. When one is live, the other one can take a break and can prepare for the next talk. The 3rd OBS instance is simply used to switch between the two hosts.</p>

<p>Now, you may wonder why would we need 2 Jitsi instances? Remember what I said about being paranoid and a chicken? Well, I really don&#8217;t like touching anything system that is live, so having one Jitsi instance per host enable each host to have full control of their Jitsi and OBS instance, with nothing else happening in the background. This thus reduces the chances of crashes or that setting up the next talk would starve the live room \o/!</p>

<p>Again, see <a href="https://blog.hiler.eu/xdc-2020/">Arek&#8217;s blog post</a> for the full reasoning behind this, and how to set it up!</p>

<p><strong>Pros</strong>:</p>

<ul>
<li>Flexibility to adjust sound, video, and show any waiting screen with a nice transition</li>
<li>Setting up of the next presenter can happen off-camera during the breaks</li>
<li>Possibility to speak to speakers without the stream hearing anything (good for time-checking presenters)</li>
<li>Enables hosts to take breaks every other talk</li>
</ul>


<p><strong>Cons</strong>:</p>

<ul>
<li>The hosts needs to take steps to reduce the risk of internet or power issues during the conference</li>
</ul>


<p><a id="sec:conclusion"></a></p>

<h3>Final thoughts?</h3>

<p>Hosting a conference using Jitsi is relatively simple! Now that I have done it, I could host a new one in less than an hour if needed, and that is pretty impressive!</p>

<p>Of course, there are a lot of aspects that will elevate the level of professionalism of your conference, but many of these things can be done as time permits. However, the major jump in quality really comes from improving the audio, and going with at least the level 2 architecture for anything but a breakout room is recommended as it enables a lot more control over what goes in the livestream.</p>

<p>No matter what solution you end up with, I highly suggest you document the way attendees and speakers should interact with the conference. For reference, here are the <a href="https://docs.google.com/document/d/1K3lCMboLaOPbHGXl8sxL6elMmrsDsWZvBTZmZU8z8ow/edit?usp=sharing">presenter&#8217;s guide</a> and the <a href="https://docs.google.com/document/d/1ty8skakkdoTVBP6nUbAVGjT3PfF-OqtDf-HxKsMGNpo/edit?usp=sharing">attendee&#8217;s guide</a>.</p>

<p>I guess that&#8217;s it! I am sure I forgot many things which commenters might remind me of, so expect updates!</p>
]]></content>
  </entry>
  
  <entry>
    <title type="html"><![CDATA[FPGA: Why so few open source drivers for open hardware?]]></title>
    <link href="http://www.mupuf.org/blog/2020/06/09/FPGA-why-so-few-drivers/"/>
    <updated>2020-06-09T16:21:00+03:00</updated>
    <id>http://www.mupuf.org/blog/2020/06/09/FPGA-why-so-few-drivers</id>
    <content type="html"><![CDATA[<p>Field-Programmable Gate Arrays (FPGA) have been an interest of mine for well over a decade now. Being able to generate
complex signals in the tens of MHz range with nanosecond accuracy, dealing with fast data streams, and doing all of this
at a fraction of the power consumption of fast CPUs, they really have a lot of potential for fun. However, their
prohibitive cost, proprietary toolchains (some running only on Windows), and the insanely-long bitstream generation made
them look more like a curiosity to me rather than a practical solution. Finally, writing verilog / VHDL directly felt
like the equivalent of writing an OS in assembly and thus felt more like torture than fun for the young C/C++ developer
that I was. Little did I know that 10+ years later, I would find HW development to be the most amazing thing ever!</p>

<p>The first thing that changed is that I got involved in reverse engineering NVIDIA GPUs&#8217; power management in order to write
an open source driver, writing in a reverse-engineed assembly to implement automatic power management for this driver,
creating my own smart wireless modems which detects the PHY parameters of incoming transmissions on the fly (modulation,
center frequency) by using software-defined radio, and having fun with arduinos, single-board computers, and designing my
custom PCBs.</p>

<p>The second thing that changed is that Moore&#8217;s law has grinded to a halt, leading to a more architecture-centric instead
of a fab-oriented world. This reduced the advantage ASICs had on FPGAs, by creating a software eco-system that is more
geared towards parallelism rather than high-frequency single-thread performance.</p>

<p>Finally, FPGAs along with their community have gotten a whole lot more attractive! From the FPGAs themselves to their
toolchains, let&#8217;s review what changed, and then ask ourselves why this has not translated to upstream Linux drivers for
FPGA-based open source designs.</p>

<!-- more -->


<h3>Even hobbyists can make useful HW designs</h3>

<p>Programmable logic elements have <a href="https://ieeexplore.ieee.org/stamp/stamp.jsp?arnumber=7086413">gone through multiple ages</a>
throughout their life. Since their humble beginning, they have always excelled at low-volune designs by spreading the
cost of creating a new ASIC onto as many customers as possible. This has enabled start-ups and hobbyists to create their
own niche and get into the market without breaking the bank.</p>

<p>Nowadays, FPGAs are all based around Lookup Tables (LUT) rather than a set of logic gates as they can re-create any
logic function and can also serve as flip-flops (memory unit). Let&#8217;s have a quick look at what changed throughout the
&#8220;stack&#8221; that makes designing FPGA-based HW designs so approachable even to hobbyists.</p>

<h4>Price per LUT</h4>

<p>Historically, FPGAs have compared negatively to ASICs due to their increased latency (limiting the maximum frequency of
the design), and power efficiency. However, just like CPUs and GPUs, one can compensate for these limitations by making
a wider/parallel design operating at a lower frequency. Wider designs however require more logic elements / LUTs.</p>

<p>Fortunately, the price per LUT has fallen dramatically since the
<a href="https://ieeexplore.ieee.org/stamp/stamp.jsp?arnumber=7086413">introduction of FPGAs</a>, to the point that pretty much all but
the biggest designs would fit in them. Since then, the focus has shifted on providing hard IPs (fixed functions) instead.
This enables a <a href="https://www.digikey.com/product-detail/en/xilinx-inc/XC7A12T-1CSG325I/122-2155-ND/6823606">$37</a> part
(<a href="https://www.xilinx.com/support/documentation/selection-guides/cost-optimized-product-selection-guide.pdf#A7">XC7A12T</a>)
to be able to fit over 3 <a href="https://github.com/SpinalHDL/VexRiscv">Linux-worthy RISC-V</a> processors running at 180 MHz,
with 80 kB of block RAM available for caches, FIFOs, or anything else. By raising the budget to the
<a href="https://www.digikey.fi/product-detail/en/xilinx-inc/XC7A100T-1FTG256C/122-1882-ND/3925807">$100</a> mark, the specs improve
dramatically with an FPGA capable of running 40 Linux-worthy RISC-V CPUs and over 500 kB of block RAM available for
caches!</p>

<p>And just in case this would not be enough for you, you could consider the Alveo line up such as the
<a href="https://www.xilinx.com/products/boards-and-kits/alveo/u250.html#specifications">Alveo U250</a> which has 1.3M
LUTs and a peak throughput in INT8 operations of 33 TOPs and 64 GB of DDR4 memory (77 GB/s bandwidth). For memory-bandwidth-hungry
designs, the <a href="https://www.xilinx.com/products/boards-and-kits/alveo/u280.html#specifications">Alveo U280</a>
brings 8 GB of HBM2 memory to the table (460GB/s bandwidth) and 32 GB of DDR4 memory (38 GB/s of bandwidth), at the
expense of having &#8220;only&#8221; 24.5 INT8 TOPs and 1M LUTs. Both models can be found for ~$3000 on ebay, used. What a bargain :D !</p>

<h4>Toolchains</h4>

<h5>Proprietary toolchains</h5>

<p>Linux is now really supported by the major players of the industry. Xilinx&#8217;s
<a href="https://www.design-reuse.com/news/10014/xilinx-cost-ise-webpack-7-1i.html">support came first (2005)</a>, while Altera
<a href="https://www.intel.com/content/www/us/en/programmable/downloads/software/quartus-ii-we/91.html">joined the club in 2009</a>.
Both are however the definition of bloated, with toolchains weighing multiple GB
(<a href="https://www.intel.com/content/www/us/en/programmable/downloads/software/quartus-ii-we/91.html">~6GB for Altera</a>,
while Xilinx is <a href="https://www.xilinx.com/support/download.html">at a whooping 27 GB</a>)!</p>

<h5>Open source toolchains for a few FPGAS</h5>

<p><a href="http://www.clifford.at/icestorm/">Project icestorm</a> created a fully-functional fully-opensource toolchain for Lattice&#8217;s
ice40 FPGAs. Its regular structure made the reverse engineering and writing the toolchain easier. Since then, the more
complex Lattice ECP5 FPGA got full support, and Xilinx&#8217;s 7-series is under way. All these projects are now working
under the <a href="https://symbiflow.github.io/">Symbiflow</a> umbrella, which aims to become the GCC of FPGAs.</p>

<h4>Languages:</h4>

<h5>Migen / LiteX</h5>

<p>VHDL/Verilog are error-prone and do not land themselves to complex parametrization. This reduces the re-usability of
modules. On the contrary, the Python language excels at meta-programming, and <a href="https://github.com/m-labs/migen">Migen</a>
provides a way to generate verilog from relatively-simple python constructs.</p>

<p>On top of Migen, <a href="https://github.com/enjoy-digital/litex">LiteX</a> provides easy-to-use and space-efficient modules to
create your own System On Chip (SoC) in less than an hour! It already has support for
<a href="https://github.com/enjoy-digital/litex/tree/master/litex/boards/platforms">16+ popular boards</a>, generates
verilog, builds, and loads the bitstream for you. Documentation is however quite sparse, but I would suggest you
read the <a href="https://github.com/timvideos/litex-buildenv/wiki/LiteX-for-Hardware-Engineers">LiteX for Hardware Engineers</a>
guide if you want to learn more.</p>

<h5>High-level Synthesis (HLS)</h5>

<p>For complex algorithms, Migen/VHDL/Verilog are not the most efficient languages as they are too low-level and are akin
to writing image recognition applications in assembly.</p>

<p>Instead, high-level synthesis enables writing an untimed model of the design in C, and convert it in an efficient
Verilog/VHDL module. This makes it easy to validate the model, and to target multiple FPGA vendors with the same code
without an expensive rewrite of the module. Moreover, changes in the algorithm or latency requirements will not require
an expensive rewrite and re-validation. Sounds amazing to me!</p>

<p>The bad part is that most of C/C++-compatible HLS tools are
<a href="https://en.wikipedia.org/wiki/High-level_synthesis">proprietary or seem to be academic toy projects</a>. I hope I
am wrong though, so I&#8217;ll need to look more into them as the prospects are just too good to pass! Let me know in the
comments which projects are your favourite!</p>

<h4>Hard IPs (Fixed functions)</h4>

<p>Initially, FPGAs were only made of a ton of gates / LUTs, and designs would be fully implemented using them. However,
some functions could be better implemented as a fast and efficient fixed function: block memory, Serializer/Deserializer
(parallel to serial and vice versa, often call SERDES), PLLs (clock generators), memory controlers, PCIe, &#8230;</p>

<p>These fixed-function blocks are called Hard IPs, while the part implemented using the programmable part of the FPGA is
by extension called a soft IP. Hard IPs used to be reserved to higher-end parts, but they are nowadays found on most
FPGAs, save the cheapest and smallest ones which are designed for low-power and self-reliance.</p>

<p>For example, the <a href="https://www.digikey.fi/product-detail/en/xilinx-inc/XC7A100T-1FTG256C/122-1882-ND/3925807">$100</a> part
mentioned earlier includes multiple SERDES that are sufficient to achieve HDMI 1.4 compliance, a PCIe 2.0 with
4 lanes block, and a DDR3 memory controler. This makes it sufficient for implementing display controlers with multiple
outputs and inputs, as seen on the <a href="https://www.crowdsupply.com/alphamax/netv2">NeTV2</a> open hardware board.</p>

<p>Hard IPs can also be the basis of proprietary soft IPs. For instance, Xilinx sells
<a href="https://www.xilinx.com/products/intellectual-property/hdmi.html">HDMI 1.4/2.0 receivers IPs</a> that use the SERDES hard
IPs to achieve the necessary 18Gb/s bandwidth needed to achieve HDMI compliance.</p>

<h4>Soft-CPUs</h4>

<p>One might wonder why use an FPGA to implement a CPU. Indeed, physical CPUs which are dirt-cheap and better-performing
could simply be installed alongside the FPGA! So, why waste LUTs on a CPU? This
<a href="https://lxp32.github.io/docs/why-use-a-soft-cpu-core/">article</a> addresses it better than I could, but the gist of it is
that they really complement fixed-logic well for less latency-oriented parts and provide a lot of value. The
inconvenients are that an additional firmware is needed for the SoC, but that is no different from having external CPUs.</p>

<p>There has been quite a few open source toy soft-CPUs for FPGAs, and some proprietary vendor-provided ones. The problem has been
that their toolchain was often out of tree, and/or Linux couldn&#8217;t run on them. This really changed with the introduction
of RISC V, which is pretty efficient, is <a href="https://github.com/litex-hub/linux-on-litex-vexriscv">supported in mainline Linux</a>
and <a href="https://gcc.gnu.org/onlinedocs/gcc/RISC-V-Options.html">GCC</a>, and can
<a href="https://github.com/SpinalHDL/VexRiscv">fit comfortably in even the smallest FPGAs</a> from Altera and Xilinx. What&#8217;s
there not to love?</p>

<h4>Open design / open hardware boards</h4>

<p>So, all of these nice improvements in FPGAs and their community is great, but it wouldn&#8217;t be as attractive if not for
all the cheap and relatively-open boards (if not <a href="https://www.oshwa.org/definition/">fully-OSHW-compliant</a>) with their
inovative designs using them:</p>

<ul>
<li><a href="https://www.crowdsupply.com/sutajio-kosagi/fomu">Fomu</a> ($50): an ice40-based FPGA that fits in your USB port and is
sufficient to play with RISC V and a couple of IOs using a full-opensource toolchain!</li>
<li><a href="https://www.crowdsupply.com/1bitsquared/icebreaker-fpga">IceBreaker</a> ($69): a more traditional ice40-based board
that is oriented towards IOs, low-cost, and a full-opensource toolchain.</li>
<li><a href="https://www.crowdsupply.com/radiona/ulx3s">ULX3S</a> ($115-200): the ultimate ECP5-based board? It can be used as a
complete handheld or static game console (including wireless controlers) with over-the-air updates, a USB/Wireless
display controler, an arduino-compatible home-automation gateway including surveillance cameras. All of that with
a full-opensource toolchain.</li>
<li><a href="https://www.crowdsupply.com/alphamax/netv2">NeTV2</a>: Video-oriented platform with 2 HDMI inputs and 2 HDMI outputs
which can run as a standalone device with USB and Ethernet connectivity, or as an accelerator using the PCIe 2.0 4x
connector. The most expensive board has enough gates to get into serious computing power which could be used to
create a slow GPU, with a pretty-decent display controler! Being Xilinx&#8217;s Artix7-based, the opensource toolchains is
not yet complete, but by the time you will be done implementing your design, I am sure the toolchain will be ready!</li>
</ul>


<p>Ultimately, these boards provide a good platform for any sort of project, further reducing the cost of entry in the
hobby / market, and providing ready-made designs to be incorporated in your projects. All seem pretty good on the
hardware side, so why don&#8217;t we have a huge community around a board that would provide the flexibility of arduinos but
with Raspberry-Pi-like feature set?</p>

<h3>Open source hardware blocks exist</h3>

<p>We have seen that board availability, toolchains, languages, speed, nor price are limiting even hobbyists from getting
into hardware design. So, there must be open blocks that could be incorporated in designs, right?</p>

<p>The answer is a resounding YES! The first project I would like to talk about is
<a href="https://github.com/enjoy-digital/litex">LiteX</a>, which is a HDL language with batteries included (like Python). Here is a
trimmed-down version of the different blocks it provides:</p>

<ul>
<li>LiteX

<ul>
<li>Soft CPUs: blackparrot, cv32e40p, lm32, microwatt, minerva, mor1kx, picorv32, rocket, serv, and vexriscv</li>
<li>Input/Outputs: GPIO, I2C, SPI, I2S, UART, JTAG, PWM, XADC, &#8230;</li>
<li><a href="https://en.wikipedia.org/wiki/Wishbone_(computer_bus">Wishbone bus</a>: Enable
<a href="https://en.wikipedia.org/wiki/Memory-mapped_I/O">MMIO</a> access to the different IPs for the soft-CPUs, or through
different buses (PCIe, USB, ethernet, &#8230;)</li>
<li>Clock domains, ECC, random number generation, &#8230;</li>
</ul>
</li>
<li><a href="https://github.com/enjoy-digital/litedram">LiteDRAM</a>: A SDRAM controller soft IP, or wrapper for DDR/LPDDR/DDR2/DDR3/DDR4 hard
IPs of Xilinx or DDR3 for the ECP5.</li>
<li><a href="https://github.com/enjoy-digital/liteeth">LiteEth</a>: A 10/100/1000 ethernet soft IP which also allows you to access the wishbone
bus through it!</li>
<li><a href="https://github.com/enjoy-digital/litepcie">LitePCIe</a>: Wrapper for the PCIe Gen2 x4 hard IPs of Xilinx and Intel</li>
<li><a href="https://github.com/enjoy-digital/litesata">LiteSATA</a> / <a href="https://github.com/enjoy-digital/litesdcard">LiteSDCard</a>:
Soft IP to access SATA drives / SD Cards, providing extensive storage capabilities to your soft CPU.</li>
<li><a href="https://github.com/enjoy-digital/litevideo">LiteVideo</a>: HDMI input/output soft IPs, with DMA, triple buffering, and
color space conversion.</li>
</ul>


<p>Using LiteX, one may create a complete System of Chip in a matter of hours. Adding a block is as simple as adding two
lines of code to the SoC: One line to instantiate the block (like one would instantiate an object), and one to expose it
through the wishbone bus. And if this isn&#8217;t enough, check out the new <a href="https://github.com/open-sdr/openwifi">Open WiFi project</a>,
or the <a href="https://opencores.org/projects">OpenCores</a> project which seems to have pretty much everything one could hope for.</p>

<h3>So&#8230; where are the drivers for open source blocks?</h3>

<p>We have seen that relatively-open boards with capable FPGAs and useful IOs are affordable even to hobbyists. We
have also seen that creating SoCs can be done in a matter of hours, so why don&#8217;t we have drivers for all of them?</p>

<p>I mean, we have a <a href="https://www.kernel.org/doc/html/v4.18/driver-api/fpga/fpga-mgr.html">FPGA subsystem</a> that is
focused on loading bitstreams at boot, or even supporting on-the-fly FPGA reconfiguration. We have support for <a href="https://github.com/torvalds/linux/search?p=1&amp;q=ZYNQ&amp;unscoped_q=ZYNQ">most hard
IPs</a>, but only when accessed through the integrated
ARM processor of some FPGAs. So, why don&#8217;t we have drivers for soft IPs? Could it be their developers would not want to
upstream drivers for them because the interface and the base address of the block is subject to change? It certainly looks
like it!</p>

<p>But what if we could create an interface that would allow listing these blocks, the current version of their
interface, and their base address? This would basically be akin to the <a href="https://elinux.org/Device_Tree_Reference">Device Tree</a>,
but without the need to ship to every single user the netlist for the SoC you created. This would enable the creation
of a generic upstream driver for all the versions of a soft IPs and all the boards using them, and thus make open source
soft IPs more usable.</p>

<p>Removing the fear of ABI instability in open cores is at the core of my new project,
<a href="https://gitlab.freedesktop.org/mupuf/litedip/">LiteDIP</a>. To demonstrate its effectiveness, I would like to expose all
the hardware available on the <a href="https://www.crowdsupply.com/alphamax/netv2">NeTV2</a> (HDMI IN/OUT, 10/100 ethernet,
SD Card reader, Fan, temperature, voltages), and the <a href="https://www.crowdsupply.com/radiona/ulx3s">ULX3S</a> (HDMI IN/OUT,
WiFi, Bluetooth, SD Card reader, LEDs, GPIOs, ADC, buttons, Audio, FM/AM radio, &#8230;) using the same driver. Users could
pick and chose modules, configure them to their liking, and no driver changes would be necessary. It sounds ambitious,
but also seems like a worthy challenge! Not only do I get to enjoy a new hobby, but it would bring together software and
hardware developers, enabling the creation of modern-ish computers or accelerators using one size fits all open development
boards.</p>

<p>Am I the only one excited by the prospect? Stay tuned for updates on the project!</p>

<p><strong>2020-06-12 edit: Fixed multiple typos spotted by <em>Forest Crossman</em>, the confusion between kb and kB spotted by <em>Mic</em>,
added a link to the Linux-worthy VexRiscv CPU, removed the confusion spotted by <em>TD-Linux</em> between HLS and Scala-based
HDLs, link to the open-source hardware definition and do not label all boards as being fully open as suggested by the
feedback from <em>inamberclad</em> and <em>abetusk</em>.</strong></p>
]]></content>
  </entry>
  
  <entry>
    <title type="html"><![CDATA[xf86-video-modesetting: Tear-free desktops for all!]]></title>
    <link href="http://www.mupuf.org/blog/2018/09/24/teaching_x_modesetting_new_tricks/"/>
    <updated>2018-09-24T16:21:00+03:00</updated>
    <id>http://www.mupuf.org/blog/2018/09/24/teaching_x_modesetting_new_tricks</id>
    <content type="html"><![CDATA[<p>We have all had this bad experience. You are watching a video of your favorite show or playing your
favourite game, and a jumpy horizontal (and/or diagonal) line breaks your immersion and reminds you
that this all fiction. This effect is usually called tearing, and you can see an example of this in
the following video (already visible in the thumbnail):</p>

<p>Another issue that some users have been hitting is not being able to have <a href="https://bugs.freedesktop.org/show_bug.cgi?id=102508">three 4k displays set
horizontally</a>. In this blog post, I will explain
how I managed to kill these two birds with my per-CRTC framebuffer stone.</p>

<iframe width="560" height="315" src="https://www.youtube.com/embed/jVAFuUAKPMc" frameborder="0"
allow="autoplay; encrypted-media" allowfullscreen></iframe>


<!-- more -->


<h3>Some historical context</h3>

<p>Back in the &#8216;good&#8217; old days, the Linux kernel was not in charge of anything graphics-related, except
<a href="https://en.wikipedia.org/wiki/Virtual_console">VT-switching</a>. The userspace was thus responsible
for everything, and the X-server happily was providing all the features you may have wanted.</p>

<p>Most of the code of the X-Server was common because it started as a CPU-only rendering, but as GPUs
got introduced to the market, the X-server learnt how to use them for both changing the modes,
performing 2D acceleration and, later on, 3D acceleration. However, a driver had to be written for every GPU on
the market. This is how we came to <a href="https://www.archlinux.org/packages/?q=xf86-video-">have over 10 drivers</a>.</p>

<p>In 2008, Kernel ModeSetting (KMS) came to Linux, which took away the responsibility of changing
the screen resolution from the X-server, and allowed for cool projects such as
<a href="https://www.youtube.com/watch?v=2jSh1ZOaNYs">Plymouth</a> (splash screen during boot), or fast
VT-switching (because the mode did not have to be re-set after every switch).
It also introduced a unified interface across GPU vendors for the userspace, allowing applications
to interact with the different displays without having to care whether the GPU would be from Intel,
AMD/ATI, NVIDIA, or any other vendor.</p>

<p>Later in the same year, the X-server received a new driver (called xf86-video-modesetting), targeting the
generic KMS interface. It allowed providing mode setting for every KMS driver (which was admitedly
not that many at the time, but which is now over <a href="https://github.com/torvalds/linux/tree/master/drivers/gpu/drm">50</a>).
The xf86-video-modesetting has however remained a niche because it lacked support for 2D acceleration.
Thankfully, 2D acceleration using OpenGL has been introduced in 2014 to the X-server under the name
<a href="https://keithp.com/blogs/glamor-hacking/">glamor</a>, making xf86-video-modesetting a usable and generic
driver.</p>

<p>Fast-forward to 2016,
<a href="https://tjaalton.wordpress.com/2016/07/23/intel-graphics-gen4-and-newer-now-defaults-to-modesetting-driver-on-x/">Debian-</a>
and <a href="https://hansdegoede.livejournal.com/16976.html">Fedora-based</a> distributions switched to using the modesetting driver
instead of the Intel-only xf86-video-intel driver, often named after one of its backend: SNA. The
decision happened because the SNA driver lacked acceleration support for Skylake processors, and
because of the limited development the driver was seeing.</p>

<p>As a whole, X-specific development is on the decline, because Wayland is the new display server standard.
In a Wayland environment, X11 retro-compatibility is provided by XWayland, which only supports the
xf86-video-modesetting driver. So, last year, Intel took the decision to support the -modesetting
driver in favor of the SNA driver.</p>

<p>This decision however impacted a small percentage of users who relied on features that used to be
available on SNA but are missing on xf86-video-modesetting. The most important one being TearFree. This feature
allows users of uncomposited environments to experience a tear-free environment for both windowed
and fullscreen applications. Luckily, users of modern desktops desktop environments have been unimpacted
because they are using a OpenGL-based window managers which uses DRI2&#8217;s and DRI3&#8217;s PageFlip capability.
This capability allows fullscreen applications (or window managers) to provide the full framebuffer to the
X-server and use KMS&#8217;s ability to flip to it at the next <a href="https://en.wikipedia.org/wiki/Vertical_blanking_interval">vblank</a>
of all displays used. This results in a tear-free experience, if the application is
<a href="https://en.wikipedia.org/wiki/Multiple_buffering">double buffered</a> (one buffer is used to render
to while another one is used to scan out to the display).</p>

<h3>Advantages of per-CRTC framebuffers</h3>

<p>The X-server has the concept of screens, but it is closer to the concept of a seat than an actual display as
the screen&#8217;s framebuffer actually contains the content of all displays (every display would use
a different x/y offset in this pixmap). In un-composited scenarios, the applications render directly
into this buffer, which creates tearing as the rendering is not synchronised with the different
displays.</p>

<p>Another issue with this gigantic framebuffer is that it is limited to the maximum width and height
supported by the display engines of the GPU. On recent Intel GPUs, the limit is 8k which is sufficient
for two 4k displays or three full-HD displays in a row, but
<a href="https://bugs.freedesktop.org/show_bug.cgi?id=102508">some users have wanted more</a>.</p>

<p>The solution to both problems is to introduce per-display
(AKA per-<a href="https://en.wikipedia.org/wiki/Video_display_controller">CRTC</a>) framebuffers.
Indeed, once the gigantic framebuffer gets split into per-CRTC ones, the maximum width of the
framebuffer supported by the HW will only limit the maximum resolution achievable per screen rather
than the combined size of all the displays put together. This feature can then be used to achieve
a tear-free desktop by making sure that we never copy the changes done on this gigantic framebuffer
to the per-CRTC framebuffer while this display is scanning out. Unfortunately, we cannot copy these
changes fast-enough to fit into the <a href="https://en.wikipedia.org/wiki/Vertical_blanking_interval">vblank period</a>
of the display, so we instead have to use the <a href="https://en.wikipedia.org/wiki/Multiple_buffering">double buffering</a>
technique described earlier to achieve the same effect.</p>

<p>Another issue is that the concept of screen is so central to X11 that allowing fullscreen applications and
window managers to provide one framebuffer per CRTC would require a lot of work which these compositors
should instead spend on porting their codebase to become Wayland-enabled. Wayland has been designed
from the ground-up to be efficient and provide a silky-smooth/tear-free experience. In the mean time,
we can catter for the users of uncomposited environments by transparently implementing such support
in the xf86-video-modesetting driver.</p>

<h3>Implementing per-CRTC framebuffers in xf86-video-modesetting</h3>

<p><strong>WARNING: Please skip this section if you are not interested in the implementation details</strong></p>

<p>I am not what one would call a regular contributor to the -modesetting driver, or to the
X-server&#8217;s code base in general. I <a href="https://cgit.freedesktop.org/xorg/xserver/log/?qt=author&amp;q=Martin+Peres">contributed</a>
3 patches over the last 3 years (2 bug fixes, and 1 feature), and 2 reviews.</p>

<p>Hacking on the X-server has always been a little more complex than hacking on other projects
because co-installing the X-server requires quite a lot of fiddling with configuration files, starting scripts and
logind integration. However, I must say that recent changes such as
<a href="https://anholt.livejournal.com/52574.html">moving to Meson</a>, the consolidation of
<a href="https://lists.x.org/archives/xorg-announce/2018-February/002835.html">all protocols headers into one repository</a>, and the
merge-request workflow provided by gitlab (along with
<a href="https://gitlab.freedesktop.org/xorg/xserver/pipelines/latest">automated testing</a>) have made working
on the X-server and the modesetting driver easier. Thanks a lot guys!</p>

<p>Upon looking at the code of the -modesetting driver, I realized that there was already support for
per-CRTC framebuffers. They were however only oriented towards supporting rotated displays. Making
this code more generic to support the non-rotated case turned out to be quite a challenge as it
would have required to change the ABI between the X-Server and the device drivers. This proved to
be too great of a hassle, and I instead opted to encapsulate all the generic code into functions and
a structure to represent the per-CRTC buffers (drmmode_shadow_scanout_rec). This work was mostly done
in patch <a href="https://gitlab.freedesktop.org/xorg/xserver/-/merge_requests/24/diffs?commit_id=49f164b061d861386e59fccbbdbbec88cff11be9">1</a>
and <a href="https://gitlab.freedesktop.org/xorg/xserver/-/merge_requests/24/diffs?commit_id=4de78ece2d6152551dda5043924224f48f60d3e3">2</a>.</p>

<p>I then worked on reducing the amount of pixels that need to be copied for every frame. Instead of
copying damages instantly, I would like to buffer them and perform the copy at the same frequency as
the refresh rate of the screen. This reduces the performance impact of this technique for applications
with a refresh rate vastly higher than the display&#8217;s refresh rate (hello <a href="https://en.wikipedia.org/wiki/GLX#/media/File:Xf86_glxgears.png">glxgears</a>).
The X-server keeps track of which pixels need to be updated (damages) in a
<a href="https://gitlab.freedesktop.org/xorg/xserver/-/blob/master/include/regionstr.h">RegionRec</a> data structure,
which is simply a list of boxes and supporting various set operations such as unions or
intersections. Damage information is received from the X-server through the BlockHandler function.
I thus only have to aggregate all the damaged regions into per-CRTC invalid regions and store
that in a new field of stored in drmmode_shadow_scanout_rec (screen_damage). The accumulation of
damages is done by the ms_update_scanout_damages() function, and the copy (blitting) of the damages
is done by drmmode_update_scanout_buffer(), and these functions can be found in
<a href="https://gitlab.freedesktop.org/xorg/xserver/-/merge_requests/24/diffs?commit_id=ef26008dead94d697073313faea7c6ebee8d520f">patch 3</a>.</p>

<p>In <a href="https://gitlab.freedesktop.org/xorg/xserver/-/merge_requests/24/diffs?commit_id=8156d6cbecb407372f9b43a1f186604cbd8e5f52">patch 4</a>,
I am finally adding support for per-CRTC framebuffers, albeit disabled because
I wanted to make this patch as short as possible so as not to clutter it with future details. The
function drmmode_need_shadow_scanout() is introduced in order to dynamically be able to use this
feature based on different conditions. Right now, we always return FALSE. We also do not limit the
blitting to the refresh rate of the screen yet (but this is coming soon). Despite not doing much,
this patch is however exercising the X-server is a new way, which led to a crash when the X-server
would restart because the CRTC datastructures were re-used without being zero&#8217;ed, leading to a
use-after-free bug which this patch already fixes. One oddity about this patch is the call to
glamor_finish() after blitting damages. This is because we want to make sure all the operations
are done before returning, which reduces stuttering because some drawcalls may not have been queued
on the GPU yet and will not until the next damages appear (which may take seconds).</p>

<p>The <a href="https://gitlab.freedesktop.org/xorg/xserver/-/merge_requests/24/diffs?commit_id=af97f2a5e4e73ac2763b1efced3848bdb6a3f7ff">patch 5</a>
starts making use of all of this new code by enabling per-CRTC framebuffers in
case the width or height of the screen&#8217;s pixmap is larger than the GPU&#8217;s display engines&#8217; capabilities.
Because of this, it is now safe to raise the limits for the pixmap to the maximum supported by
X11 (64kx64k). This limit will never be lifted because all the X11 protocols and extensions depend
on 16 bits integers to represent positions.</p>

<p>Now that we enabled the feature at least in one case,
<a href="https://gitlab.freedesktop.org/xorg/xserver/-/merge_requests/24/diffs?commit_id=46a2577d6d87452669cd89d51be84d46d8dfff72">patch 6</a>
improves its performance by finally limiting the blitting of damages to the refresh rate of one of the displays.
Luckily, the -modesetting driver already allows us to request a function to be called at the next vblank
event (ms_queue_vblank). We just need to schedule an update whenever we receive damage events, and
revert back to a synchronous update if the scheduling of the call failed.</p>

<p>Patch <a href="https://gitlab.freedesktop.org/xorg/xserver/-/merge_requests/24/diffs?commit_id=2bf9dca64ebf7b01779554c76b977dda48114039">7</a>
is a trivial patch that allows users to force-enable the per-CRTC framebuffer. The
option is called ShadowPrimary, to mimic the xf86-video-ati driver. It may improve performance
in some edge cases, but the primary purpose of this option is to allow testing of this codepath.</p>

<p>Now that we have per-CRTC framebuffers, we need to work towards double buffering them to prevent
tearing. This work requires the KMS feature to exchange the scanout buffer during
vblank (Page Flipping). Patches
<a href="https://gitlab.freedesktop.org/xorg/xserver/-/merge_requests/24/diffs?commit_id=de9ef18d9adb3f14baaae241ddb03ede93c63506">8</a> and
<a href="https://gitlab.freedesktop.org/xorg/xserver/-/merge_requests/24/diffs?commit_id=981499c8b5003eadd55a79405cb389521c6bde77">9</a>
are performing preliminary work towards this goal by respectively making some code more generic and removing the assumption
that pageflipping always happen on the gigantic framebuffer.</p>

<p>Patch <a href="https://gitlab.freedesktop.org/xorg/xserver/-/merge_requests/24/diffs?commit_id=f5cd9357855b62421f91d021f5d5e31e7238701f">10</a>
finally enables TearFree support! It does so by introducing a shadow back buffer (named shadow_nonrotated_back), adding
damage tracking on this buffer, setting up the page flips instead of performing the damage updates at the next vblank,
and adding a TearFree option. This patch ends up being relatively small because it re-uses a lot of the infrastructure
we set-up previously.</p>

<p>Unfortunately, more work is needed to the TearFree support compatible with the PageFlip feature. This would allow modern
desktop environments to skip the extra copy unless it hits the limits of the display engines. In the mean time, trying
to use the PageFlip feature will lead to increased latencies, and the kernel complaining that the flipping queue reached
its maximum length! I&#8217;ll make sure to disable pageflips before the patch series lands.</p>

<h3>Testing the feature</h3>

<p>There are a lot of different scenarios that are affected by my patch series (multi-GPU being one of the hairiest one),
and I would appreciate your feedback.</p>

<p>You can find all my patches in my
<a href="https://gitlab.freedesktop.org/xorg/xserver/merge_requests/24">pull request</a> on freedesktop.org.
They should apply cleanly on the latest X-server release (1.20.1), in case you are already running this
version (looking at you, ArchLinux users). I am quite pleased that the patch series ended up so small:</p>

<pre><code>8 files changed, 605 insertions(+), 72 deletions(-)
</code></pre>

<p>Once you recompiled your X-server with the patches, please set the TearFree option in your xorg.conf
like so:</p>

<pre><code>Section "Device"
    Identifier "modesetting"
    Driver "modesetting"
    Option "TearFree" "True"
EndSection
</code></pre>

<p>You can use this <a href="https://www.youtube.com/watch?v=9hIRq5HTh5s">youtube video</a> to check for differences
with and without TearFree. Make sure to try this video in both fullscreen and windowed mode as the
fullscreen mode may utilise the PageFlip feature to provide tear-free rendering.</p>

<p><strong>WARNING: The extra copy incurred by the TearFree option can use up a lot of memory bandwidth when using
a lot of 4k monitors, which can lead to up 50% performance loss.</strong></p>

<p><strong>That&#8217;s all, folks!</strong></p>
]]></content>
  </entry>
  
  <entry>
    <title type="html"><![CDATA[Nura headphones on Linux]]></title>
    <link href="http://www.mupuf.org/blog/2018/01/14/nura-headphones-on-linux/"/>
    <updated>2018-01-14T16:21:00+02:00</updated>
    <id>http://www.mupuf.org/blog/2018/01/14/nura-headphones-on-linux</id>
    <content type="html"><![CDATA[<p><em>Tl;dr: Quirk for the USB mode is on the way for fixing the problem upstream, force a sampling rate of 48kHz to get sound out in the mean time</em></p>

<p>I received a couple of days ago my <a href="https://www.nuraphone.com/">nuraphones</a> which
I backed on Kickstarter some time ago. So far, I really like the sound quality
and they sound a bit better than my monitoring loud speakers. I really like in-ear
monitors, so this headset is no issue for me, on the contrary!</p>

<p>Since I am exclusively a Linux user, I wanted to get things working on my work&#8217;s PC
and my Sailfish OS X. I had no issue with bluetooth on my phone and Desktop PC (<a href="https://wiki.archlinux.org/index.php/Bluetooth_headset">instructions</a>), but the tethered mode was not
on either platforms&#8230; The sound card would be recognized but no sounds coming out&#8230;</p>

<!-- more -->


<h3>Debugging the issue</h3>

<p>After verifying that the headset indeed works out of the box on Windows (no driver needed),
I knew the headset was likely misconfigured. Back on Linux, I tried using alsa directly to
reduce the problem as much as possible, and the sound just came out without any hickups!</p>

<p>After fiddling with some pulseaudio parameters to mimic as closely as possible the
settings used by aplay, I managed to get the sound out simply by setting the following
parameter in /etc/pulse/daemon.conf:</p>

<pre><code>default-sample-rate = 48000
</code></pre>

<p>Now that we have some sound out, let&#8217;s try to understand why pulseaudio was defaulting
to 44.1kHz. It would seem like Windows, or ALSA (protocol used by aplay to play sound)
are using the default sampling rate of the headphones. However, pulseaudio uses 44.1kHz
and 16 bit samples by default because it is already sufficient to cover the entire
spectrum that can be heard by the human ear and increasing it for playback is just <a href="https://people.xiph.org/~xiphmont/demo/neil-young.html">a
waste of computing power</a>.
So, to avoid resampling from 44.1kHz to 48kHz, which reduces the quality of the
sound and uses more CPU, pulseaudio prefers selecting a matching sampling rate
if the USB interface supports it.</p>

<p>Let&#8217;s check what are the supported sampling rates:</p>

<pre><code>$ cat /proc/asound/nuraphone/stream0
nura nuraphone at usb-0000:00:14.0-4, full speed : USB Audio

Playback:
Status: Stop
Interface 2
    Altset 1
    Format: S16_LE
    Channels: 2
    Endpoint: 3 OUT (NONE)
    Rates: 48000, 44100, 32000, 22050, 16000, 8000

Capture:
Status: Stop
Interface 1
    Altset 1
    Format: S16_LE
    Channels: 1
    Endpoint: 3 IN (NONE)
    Rates: 48000
</code></pre>

<p>Bingo, 44.1kHz is indeed a valid option, if are to believe what the headphones
report! After trying to operate pulseaudio at all the listed sampling rates, it appears
that only the 48kHz mode actually works&#8230; Also, I never managed to make use
of the microphone, on Windows or Linux. So, to avoid any problem, we need to
instruct Linux to deactivate the features the headset is falsely claiming to
support.</p>

<h3>Patching the Linux kernel (<a href="http://mailman.alsa-project.org/pipermail/alsa-devel/2018-January/130701.html">patch</a>)</h3>

<p>I have been a kernel developer for almost 8 years, and have been compiling Linux
kernels for a bit more than a decade, but I never had to deal with the sound
sub-system, so that was an interesting feeling.</p>

<p>Identifying the driver I needed to fix was quite easy, and I quickly found the
file <em>sound/usb/quirks-table.h</em> which contains most of the quirks for the USB
sound cards.</p>

<p>After that, it was just a matter of following the countless examples found
in the file, figuring out some parameters by using printk, testing the result,
iterating until it worked as expected, and then crafting a
patch that I
<a href="http://mailman.alsa-project.org/pipermail/alsa-devel/2018-January/130701.html">sent to the alsa-devel mailing list</a>.</p>

<p>I am now waiting for reviews, which will end either with me having to implement
a better solution or with the patch getting accepted directly. I&#8217;ll keep you
up to date.</p>

<p>EDIT 2017-01-15: My patch got accepted as-is (<a href="https://git.kernel.org/pub/scm/linux/kernel/git/tiwai/sound.git/commit/?id=33193dca671c8b75eb030234cefdcd2ceebd7516">link</a>), and it will land in Linux 4.16 or 4.17.</p>

<p>EDIT 2017-01-21: My patch is part of <a href="http://lkml.iu.edu/hypermail/linux/kernel/1801.2/03925.html">the 4.16 sound pull request</a>, which means it will almost certainly be part of Linux 4.16.</p>

<h3>Workaround until Linux is fixed</h3>

<p>For some distributions, it may take years until the fixed code lands. In the mean
time, you may change pulseaudio&#8217;s configuration by adding the following line:</p>

<pre><code>default-sample-rate = 48000
</code></pre>

<p>This will slightly increase your CPU consumption, but you will likely not be able
to measure it, so don&#8217;t sweat about it!</p>

<h3>What&#8217;s next?</h3>

<p>Here is a list of features I would like to see on the Linux desktop:</p>

<ul>
<li>Battery status: Not sure this is even possible with the current hardware, I will need to investigate</li>
<li>Selecting profile: Right now, profiles can only be changed using a smartphone. I would like to change that.</li>
</ul>


<p>I am not commiting to implementing any of this, but that would be nice to see.</p>

<p><strong>That&#8217;s all, folks!</strong></p>
]]></content>
  </entry>
  
  <entry>
    <title type="html"><![CDATA[Beating outdated software, the cancer of smart devices]]></title>
    <link href="http://www.mupuf.org/blog/2017/08/31/beating-outdated-software/"/>
    <updated>2017-08-31T01:20:00+03:00</updated>
    <id>http://www.mupuf.org/blog/2017/08/31/beating-outdated-software</id>
    <content type="html"><![CDATA[<p><em>Foreword: This article has originally been written for the <strong>Interdisciplinary Journal of the Environment</strong> <a href="http://tvergastein.com">Tvergastein</a>, and has been published in its <a href="http://tvergastein.com/9-cultivating-change.html">9th edition</a>. Thanks to the journal&#8217;s commitee for allowing me to re-post it on my blog (great for search engines), but definitely bad for the styling&#8230; Finally, I would like to thank Outi Pitkänen for motivating me to write this article, reviewing it countless times and pushing me to make it as accessible as possible!</em></p>

<p>Our society relies more and more on smart devices to ease communication and to be more efficient. Smart devices are transforming both industries and personal lives. Smart and self-organising wide-area sensor networks are now used to increase the efficiency of farms, cities, supply chains or power grids. Because they are always connected to the Internet, they can constantly and accurately monitor assets and help deliver what is required precisely when and where it is needed. Also the general public has seen the transition to smart devices, cell phones being switched to smartphones, TVs to smart-TVs and cars to semi-autonomous cars.</p>

<!-- more -->


<p><img class="left" src="http://www.mupuf.org/images/outdated_software/watch-756487.jpg" width="500" title="Smart watches are growing in popularity" alt="Smart watches are growing in popularity" /></p>

<p>This “Internet of Things” (IoT) revolution is happening at a frantic pace as companies digitalize the physical world. Gartner estimated that there were 4.9 billion smart devices deployed in 2015, with this number expected to grow to 25 billion by 2020.<sup id="fnref:1"><a href="#fn:1" rel="footnote">1</a></sup> With such high numbers, IoT devices have the potential to create significant amounts of waste, which may exceed their potential to reduce resource consumption thanks to their ability to keep the state of every asset of interest up to date.</p>

<p>In this article, I discuss how smart devices’ software is an artificial cause that limits their lifetime. I then explain the need for an alternative model that decouples the software and the hardware, to allow the software to be changed according to its owner’s need. Finally, I explain how the Open Source movement has already solved the software’s planned obsolescence for personal computers and servers, and how this model also naturally applies to the IoT devices.</p>

<p><a id="sec:software_reduces_lifetime"></a></p>

<h3>How software reduces our devices’ lifetime</h3>

<p>While a relatively old smartphone may still function perfectly as a phone, for many it is not good-enough if it does not support the newest applications. For instance, in 2016, the very popular messaging application WhatsApp dropped support for iOS up to 6.1, which is the latest operating system that can be used on the iPhone 3, which was taken out of production in 2012. This has left iPhone 3 users with three choices: they must either find alternative ways to communicate with their contacts, replace it with a second-hand phone, or buy a new one. Replacing an iPhone 3 with a new iPhone 6 would lead to 80.75 kg of CO2-equivalent in emissions.<sup id="fnref:2"><a href="#fn:2" rel="footnote">2</a></sup> Given that the world’s average carbon footprint per year per capita is 4.6 tons of CO2-equivalent,<sup id="fnref:3"><a href="#fn:3" rel="footnote">3</a></sup> buying an iPhone 6 would represent 1.75% of the annual budget of the average world citizen.</p>

<p>For some, buying a new device every four years may be acceptable because the devices genuinely improve a lot, however, cars do not change as drastically. A lot of people only buy a new car when it is more expensive to fix their current car than to buy a new one. New cars, however, can come with internet access and a wide range of driving assistance features, such as lane or break assist, that can take control of the car at any time, in order to keep everyone inside and outside the car safe. This ability for the software to control the car also technically means that any security issues in the car’s software can allow hackers to remotely crash the car, for example by driving it into a wall at full speed while disabling airbags, or ask for money to unlock the car (i.e. ransomware). While neither of the scenarios may have happened yet, hackers have already managed to remotely control a willing journalist’s car through the internet.<sup id="fnref:4"><a href="#fn:4" rel="footnote">4</a></sup> Afterwards, they released some of their tools to help others replicate their work.<sup id="fnref:5"><a href="#fn:5" rel="footnote">5</a></sup> This opens the way for the same kind of viruses found in the computer world, which can lead to hackers asking for ransoms to retrieve your files.<sup id="fnref:6"><a href="#fn:6" rel="footnote">6</a></sup> For owners of hackable cars, either the manufacturer fixes the issue or the owner should consider buying another car to reduce the risks, provided that governments do not prevent such cars from being on the road, due to the safety risk. If a car is replaced by a new one, this incurs a significant environmental cost (1.5 to 7.6 times the global average carbon footprint per year per capita).<sup id="fnref:7"><a href="#fn:7" rel="footnote">7</a></sup></p>

<p>On top of being an environmental cost, a financial risk and a safety issue, smart devices with outdated and insecure software are also a danger for our increasingly digital infrastructure. As these devices are meant to be connected at all times and usually never get automatic security updates, they make a valuable target for hackers to take control of the device and add it to virtual networks (botnets). These botnets can be used to perform illegal tasks such as to disrupt the internet access of an entire country, as demonstrated in the fall 2016 incident involving the botnet Mirai.<sup id="fnref:8"><a href="#fn:8" rel="footnote">8</a></sup> This botnet, constituted of smart toasters, web-enabled vibrators, and other types of smart devices, managed to bring down dozens of websites, including The New York Times, Twitter and Paypal. Manufacturers have very few incentive to make secure devices, as they view this as a cost that does not lead to more sales. Even when faced with public shaming, some of these manufacturers fail to fix the issue.<sup id="fnref:9"><a href="#fn:9" rel="footnote">9</a></sup></p>

<p>Owners of internet-connected smart devices also have very few incentives and little interest to actually take steps in order to properly secure their devices. From a user perspective, are not the devices supposed to be smart, as the name says? Since the device is connected to the internet at all times, why doesn’t it use this connection to update itself? This automatic over-the-air update approach is the one taken by the automotive-company Tesla motors.<sup id="fnref:10"><a href="#fn:10" rel="footnote">10</a></sup> Thus they do not require their customers to make expensive trips to the dealer who sold the car in order to get security fixes and new features.</p>

<p>Even with automated over-the-air updates of smart devices, can we realistically expect manufacturers to provide security updates throughout the lifetime of the hardware? The average age of cars on US roads in 2016 was 11.6 years as opposed to software standards where a decade is considered like an eternity.<sup id="fnref:11"><a href="#fn:11" rel="footnote">11</a></sup> For instance, Microsoft, the company behind the most widely-used operating system, announced in 2017 the end of the extended support for Windows Vista, released in 2007.<sup id="fnref:12"><a href="#fn:12" rel="footnote">12</a></sup> The general support had already stopped in 2012. If even one of the most stable software companies, who produces an operating system used by hundreds of millions of people, is not willing or capable of supporting the operating system sold along with most computers bought between 2007 and 2009, should we expect a hardware company to be able to do any better?</p>

<p>The planned obsolescence of smart devices is indeed planned, as the software’s maintenance period is often explicitly mentioned by big companies. For instance, Google will stop updating the software of their Nexus phones two years after their introduction. Security fixes are however guaranteed for another year.<sup id="fnref:13"><a href="#fn:13" rel="footnote">13</a></sup> This behaviour results in a lot of perfectly-functioning hardware waste, and the unnecessary production and transport of new smartphones, which have a non-negligible environmental impact. Using a hackable device is, however, not only a financial risk to its user, but also a threat to our communication infrastructure.</p>

<p>The IoT explosion is analogous to the revolution of personal computing of the 80’s when most computer hardware, operating systems, and applications were incompatible. This meant that programs had to be written for each computer and operating system. Over the years, both the hardware and software interfaces of personal computers got standardized, allowing applications to be written once and used on multiple machines and operating systems. Nowadays, old applications usually run also on newer versions of operating systems.</p>

<p>While applications may be executed on a wide variety of operating systems, the operating system sold with a computer may not necessarily be easily upgradable or even fully maintained during the entire length of the warranty. For instance, the user editions of Microsoft Windows 7, the de-facto standard operating system of the personal computing, were sold until October 31, 2014, while its main support ended on January 13, 2015, a mere 2.5 months later. Security fixes are, however, provided for another five years.[^12]</p>

<p>When the computer’s operating system becomes completely unmaintained, users are left with the following choices: Buy a new computer; keep on using the current version; update to the next version; or install an alternative operating system. The first choice is the least sustainable one, as the hardware could be used for a longer time, until its processing power becomes unsatisfactory. The second choice is not a responsible one, unless the computer is not connected to the Internet, as it may be taken over by hackers. These hackers may use the computer as part of an illegal virtual network of infected computers (botnet), which can be rented to take down parts of the Internet.8 They may also encrypt the users’ files and request a ransom to decrypt them, like with the Wannacry virus from spring 2017, which infected more than 200,000 computers that had disabled or delayed Windows 7’s security updates.<sup id="fnref:14"><a href="#fn:14" rel="footnote">14</a></sup></p>

<p><img class="center" src="http://www.mupuf.org/images/outdated_software/Wana_Decrypt0r_screenshot.png" width="500" title="Ransomware Wannacry’s window, asking users to pay to recover their files" alt="Ransomware Wannacry’s window, asking users to pay to recover their files" /></p>

<p>With the third and fourth options, updating or changing the operating system, there are no guarantees that the computer will still be able to use all the features that it was originally sold for, or that it will be able to perform as fast as it used to. The ability to update to a newer version of Windows is not guaranteed and depends on the availability of all the drivers for the newer version and the knowledge to find out which ones are needed. Most alternative operating systems already come with all the necessary drivers and will most likely work without checking what components are installed or installing any driver. That makes them a good candidate for replacing an unmaintained operating system. They also provide new versions continuously, while remaining compatible with older computers. The most popular alternative operating systems are free of charge and based on the Linux kernel, which will be introduced in the next section. One of the most popular Linux-based operating systems is Canonical’s Ubuntu, which can be downloaded for free and installed on most personal computers by following a simple tutorial,<sup id="fnref:15"><a href="#fn:15" rel="footnote">15</a></sup> usually without the need to install any additional driver.</p>

<p><a id="sec:open_source_shifted_paradigm"></a></p>

<h3>The Open Source movement shifted the paradigm</h3>

<p><img class="right" src="http://www.mupuf.org/images/outdated_software/Tux.svg" title="Tux, the mascot of Linux" alt="Tux, the mascot of Linux" /></p>

<p>Linux is much more than free and open source software. It revolutionized the way software is developed. Instead of following a pyramidal approach where people at the top would design the entire project and give directions to people under them, Linux’s development model is akin to a bazaar, where everyone can propose changes.<sup id="fnref:16"><a href="#fn:16" rel="footnote">16</a></sup> Before talking more about this model, let’s introduce what the Linux kernel actually is, and how central it is in increasing the lifetime of our smart devices.</p>

<p>The kernel is a piece of software at the heart of the operating system. It exposes the ever-changing hardware to applications, through a set of standard and stable interfaces. This is what allows an application to work on multiple machines and operating systems. The Linux kernel is open source and, although originally limited to personal computers, it is now found on most computers. It powers most of the Internet’s infrastructure (websites, networking equipments, etc.), and is used in/on more than 80% of smartphones,<sup id="fnref:17"><a href="#fn:17" rel="footnote">17</a></sup> 65% of tablets,<sup id="fnref:18"><a href="#fn:18" rel="footnote">18</a></sup> the majority of smart TVs,<sup id="fnref:19"><a href="#fn:19" rel="footnote">19</a></sup> most cars and in-flight infotainment systems,<sup id="fnref:20"><a href="#fn:20" rel="footnote">20</a></sup> and 498 out of the 500 fastest supercomputers.<sup id="fnref:21"><a href="#fn:21" rel="footnote">21</a></sup></p>

<p>Linus Torvalds, the creator of Linux, attributes the success of Linux to its software license, the GPLv2. This licence guarantees users the following freedoms:<sup id="fnref:22"><a href="#fn:22" rel="footnote">22</a></sup></p>

<ul>
<li>The freedom to run the program as you wish, for any purpose (freedom 0).</li>
<li>The freedom to study how the program works, and change it so it does your computing as you wish (freedom 1). Access to the source code is a precondition for this.</li>
<li>The freedom to redistribute copies so you can help your neighbor (freedom 2).</li>
<li>The freedom to distribute copies of your modified versions to others (freedom 3). By doing this you can give the whole community a chance to benefit from your changes. Access to the source code is a precondition for this.</li>
</ul>


<p>This licence enforced an open development model,<sup id="fnref:23"><a href="#fn:23" rel="footnote">23</a></sup> which mandates anyone making changes to Linux to redistribute their changes back to the project. It created an incentive for people to collaborate, whether they come from academia, the industry or are private individuals. Nowadays, a new Linux kernel is released roughly every 3 months by Linus Torvalds. Linux 4.10, released mid-February 2017, saw the contributions of more than 1500 developers, out of whom 27% were private individuals and the rest were employed by 218 companies.<sup id="fnref:24"><a href="#fn:24" rel="footnote">24</a></sup></p>

<p>Companies and individuals collaborate on the same Linux version for widely different reasons, making the Linux kernel very generic. The changes made by individuals or companies are accepted after people working on the project agree that the change will not cause compatibility problems with applications and/or hardware. This enables companies to optimize their products while allowing them to always update to the latest version and benefit from the other improvements made by the Linux community without having to re-do the same changes for every version.</p>

<p>Contributors to the Linux kernel use it themselves, and make changes according to their own or someone else’s needs. Companies like Intel, AMD, ARM or TI contribute to Linux to make it as easy as possible to use their hardware platforms, which drives their sales up. If a company does not have the knowledge to make changes, they can contract service companies such as Red Hat or Collabora to do so. Individuals or companies may also collaborate to create a “bounty” that is high-enough to fund the development of a feature, using a platform such as bountysource.com.<sup id="fnref:25"><a href="#fn:25" rel="footnote">25</a></sup> Individuals can directly tweak Linux to suit their needs or for fun. In some cases user communities have written software to support decades-old hardware after companies stopped supporting them, beating this planned obsolescence (e.g. writing drivers for NVIDIA&#8217;s deprecated graphics processors from 1998-2010).<sup id="fnref:26"><a href="#fn:26" rel="footnote">26</a></sup></p>

<p>The development model of Linux is the opposite of Microsoft Windows’. No company owns or dictates the direction of the project, and instead of selling different versions every couple of years, Linux follows a gradual improvement model which is never allowed to break anyone’s computer. This is sufficient to guarantee that users never have to throw away their hardware because of software reasons, as there will always be a new update to improve the operating system’s performance, power efficiency, and security. This allows Linux-based operating systems to run on 29-years-old processors (Intel’s 80486) when the more traditional product-based approach fails to deliver security updates a decade after its introduction. This helps to reduce the computer-related waste by keeping alive computers that are fast enough for their task, while not having to compromise on security or features.</p>

<p>This alternative development model is not just a nice idea, it is also a very profitable business. Last year, Red Hat became the first Open Source company to generate revenue of more than two billion dollars a year, doubling their revenue in just four years.<sup id="fnref:27"><a href="#fn:27" rel="footnote">27</a></sup> This model is being adopted by a lot of companies, Microsoft included,<sup id="fnref:28"><a href="#fn:28" rel="footnote">28</a></sup> which can be seen in the domination of Linux in most domains.</p>

<p>Multiple service companies now sell their services to other companies to modify Linux in the way they need, guaranteeing that anyone with a bit of money could make sure their IoT deployment is maintained. This is different from the current model where the hardware and software is controlled by a unique company, and users have a very limited control of the level of support they will receive.</p>

<p>The open source development model has however unique challenges. In order for the development to be sustainable, contributors need to stay engaged so as to: review other people’s changes; verify that they do not have unintended side effects; and file bug reports if the bugs still managed to make it into a released version. Engagement leads to a virtuous circle, since the more used and developed a project is, the more likely it is that improvements will be made, which attracts more users and developers. Finally, the open nature of the development also brings certification issues as everyone is free to change the code. This may make this model not applicable to all software, as laws may prevent user changes.<sup id="fnref:29"><a href="#fn:29" rel="footnote">29</a></sup></p>

<p><a id="sec:beating_software_obsolescence"></a></p>

<h3>Beating the planned obsolescence of IoT devices</h3>

<p>In order to increase the life expectancy of smart devices, the lack of software and security updates should never be a reason to scrap perfectly-working hardware. However, unlike personal computers, smart devices are too new to have enough hardware standardisation to expect Linux to automatically run on them. This increases the cost of maintenance of smart devices that use a modified version of Linux, or a closed-source operating system of their own.</p>

<p>Regardless of the technical choice, some manufacturers have shown a lot of hostility against the idea of users tinkering with and fixing their devices. Indeed, some manufacturers state that their customers merely buy a license to operate the device they bought. For example, John Deere actively prevent fixes for their tractors, forcing some US farmers to go back to their dealer for even trivial repair.<sup id="fnref:30"><a href="#fn:30" rel="footnote">30</a></sup> John Deere has been using the Digital Millennium Copyright Act (DMCA) to prevent making changes to its software, putting farmers at the mercy of John Deere’s dealers to fix their tractors in a timely fashion and will continue to do so in the future. This approach of fiercely protecting intellectual property rights opposes the collaboration-based open source model and promotes the planned obsolescence of products. This sort of problems arise when hardware manufacturers also write the software for their platform.</p>

<p>Fortunately, some companies do release products with open source software and allow users to tinker with it. For example, Google’s laptops (Chromebooks), which are quite popular in the USA,<a href="" title="Alex Hern, 2016. “World carbon emissions: the league table of every country”. Accessed May 31, 2017. Theguardian. &lt;a href=&quot;https://www.theguardian.com/technology/2016/may/23/chromebook-mac-google-pc-sales&quot;&gt;https://www.theguardian.com/technology/2016/may/23/chromebook-mac-google-pc-sales&lt;/a&gt;">^31</a> use a modified version of the Linux kernel along with their web-oriented user interface (ChromeOS). Automatic feature and security updates are provided for five years.<sup id="fnref:31"><a href="#fn:31" rel="footnote">31</a></sup> After this point, security-conscious users are free to switch to using any version of Linux,<sup id="fnref:32"><a href="#fn:32" rel="footnote">32</a></sup> at the potential cost of losing features. This is due to laptop manufacturers not only having no interest but also being negatively incentivised to make sure their hardware work for longer than the stated time. One or multiple users could, however, rework or pay a company to add the missing features and get them accepted in Linux, thus beating the planned obsolescence of the product.</p>

<p>Small environment-friendly IoT companies may not have the resources to provide security updates for their products for decades. By basing their products on popular open source platforms and by making sure they are upgradable over-the-air, these companies can give the best chances for their product to be maintainable as long as people are interested in them. Indeed, such open source platforms are beginning to appear (Raspberry Pi zero W, C.H.I.P. pro, etc.), and they already have an impressive community backing them, which maximizes the chances of security bugs being fixed.</p>

<p><a id="sec:software_not_spell_end_old_devices"></a></p>

<h3>Software should not spell the end of your old smart device</h3>

<p>The Internet of Things has the potential to make our society more efficient, offsetting the environmental and economic cost of deploying this network of smart devices. However, they are currently associated with security issues (ransomware or botnets) and, when they do get updated by their manufacturers, they still have an expiration date after which users should stop using them, if they do not want to expose themselves and others to increased risk.</p>

<p>Fortunately, another development model has been used for decades by the open source community. Paid and hobbyist developers collaborate on software development in order to improve it for everyone. The Open Source model, by providing system improvements, lowers products costs, increases device longevity and security. This benefits even people who do not have the skills or the experience to tweak computers.</p>

<p>This collaborative model creates a more environmentally sustainable and decentralized business model, while the rest of the industry is striving for greater centralization and control of the few over the many. This alternative model enables any software company to be contracted by anyone to maintain the software, or improve the software to fit the ever-changing purpose of the users of smart devices and wireless sensors. Thus the environmental and climate cost gets reduced by the increased longevity of such devices.</p>

<p><a id="sec:references"></a></p>
<div class="footnotes">
<hr/>
<ol>
<li id="fn:1">
<p>Gartner, 2014. “Gartner Says 4.9 Billion Connected &ldquo;Things&rdquo; Will Be in Use in 2015”. Accessed May 31, 2017. <a href="http://www.gartner.com/newsroom/id/2905717">http://www.gartner.com/newsroom/id/2905717</a><a href="#fnref:1" rev="footnote">&#8617;</a></p></li>
<li id="fn:2">
<p>Suckling, James, and Jacquetta Lee, 2015. &ldquo;Redefining scope: the true environmental impact of smartphones?.&rdquo; The International Journal of Life Cycle Assessment 20, no. 8 (2015): 1181-1196. Accessed May 31, 2017. <a href="https://link.springer.com/article/10.1007/s11367-015-0909-4">https://link.springer.com/article/10.1007/s11367-015-0909-4</a><a href="#fnref:2" rev="footnote">&#8617;</a></p></li>
<li id="fn:3">
<p>The Guardian, 2012. “World carbon emissions: the league table of every country”. Accessed May 31, 2017. <a href="https://www.theguardian.com/environment/datablog/2012/jun/21/world-carbon-emissions-league-table-country">https://www.theguardian.com/environment/datablog/2012/jun/21/world-carbon-emissions-league-table-country</a><a href="#fnref:3" rev="footnote">&#8617;</a></p></li>
<li id="fn:4">
<p>Andy Greenberg, 2015. “Hackers Remotely Kill a Jeep on the Highway—With Me in It”. Accessed May 31, 2017. Wired. <a href="https://www.wired.com/2015/07/hackers-remotely-kill-jeep-highway/">https://www.wired.com/2015/07/hackers-remotely-kill-jeep-highway/</a><a href="#fnref:4" rev="footnote">&#8617;</a></p></li>
<li id="fn:5">
<p>Charlie Miller and Chris Valasek, 2017. “Car Hacking: The definitive source”. Accessed May 31, 2017. <a href="http://illmatics.com/carhacking.html">http://illmatics.com/carhacking.html</a><a href="#fnref:5" rev="footnote">&#8617;</a></p></li>
<li id="fn:6">
<p>Keith Collins, 2017. “Inside the WannaCry ransomware cyberattack that terrorized the world—and only made $100k”. Accessed May 31, 2017. <a href="https://qz.com/985093/inside-the-digital-heist-that-terrorized-the-world-and-made-less-than-100k/">https://qz.com/985093/inside-the-digital-heist-that-terrorized-the-world-and-made-less-than-100k/</a><a href="#fnref:6" rev="footnote">&#8617;</a></p></li>
<li id="fn:7">
<p>Mike Berners-Lee and Duncan Clark, 2010. “What&rsquo;s the carbon footprint of &hellip; a new car?”. Accessed May 31, 2017. Theguardian. <a href="https://www.theguardian.com/environment/green-living-blog/2010/sep/23/carbon-footprint-new-car">https://www.theguardian.com/environment/green-living-blog/2010/sep/23/carbon-footprint-new-car</a><a href="#fnref:7" rev="footnote">&#8617;</a></p></li>
<li id="fn:8">
<p>Violet Blue, 2015. “That time your smart toaster broke the internet”. Engadget. Accessed May 31, 2017. <a href="https://www.engadget.com/2016/10/28/that-time-your-smart-toaster-broke-the-internet/">https://www.engadget.com/2016/10/28/that-time-your-smart-toaster-broke-the-internet/</a><a href="#fnref:8" rev="footnote">&#8617;</a></p></li>
<li id="fn:9">
<p>Reuters, 2016. “​China&rsquo;s Xiongmai to recall up to 10,000 webcams after hack”. Reuters. Accessed May 31, 2017. <a href="http://www.reuters.com/article/us-cyber-attacks-china-idUSKCN12P1TT">http://www.reuters.com/article/us-cyber-attacks-china-idUSKCN12P1TT</a><a href="#fnref:9" rev="footnote">&#8617;</a></p></li>
<li id="fn:10">
<p>Alex Brisbourne, 2015. “Tesla’s Over-the-Air Fix: Best Example Yet of the Internet of Things?”. Wired. Accessed May 31, 2017. <a href="https://www.wired.com/insights/2014/02/teslas-air-fix-best-example-yet-internet-things/">https://www.wired.com/insights/2014/02/teslas-air-fix-best-example-yet-internet-things/</a><a href="#fnref:10" rev="footnote">&#8617;</a></p></li>
<li id="fn:11">
<p>Reuters, 2017. “​Age of vehicles on U.S. roads rises to 11.6 years: IHS Markit”. Reuters. Accessed May 31, 2017. <a href="http://www.reuters.com/article/us-usa-autos-age-idUSKBN13H1M7">http://www.reuters.com/article/us-usa-autos-age-idUSKBN13H1M7/a><a href="#fnref:11" rev="footnote">&#8617;</a></p></li>
<li id="fn:12">
<p>“Windows lifecycle fact sheet”. Accessed May 31, 2017. <a href="https://support.microsoft.com/en-us/help/13853/windows-lifecycle-fact-sheet">https://support.microsoft.com/en-us/help/13853/windows-lifecycle-fact-sheet</a><a href="#fnref:12" rev="footnote">&#8617;</a></p></li>
<li id="fn:13">
<p>Shaun Nichols, 2017. “​What is this bullsh*t, Google? Nexus phones starved of security fixes after just three years”. The Register. Accessed May 31, 2017. <a href="https://www.theregister.co.uk/2017/05/01/google_eol_for_nexus_phones">https://www.theregister.co.uk/2017/05/01/google_eol_for_nexus_phones</a><a href="#fnref:13" rev="footnote">&#8617;</a></p></li>
<li id="fn:14">
<p>Dan Goodin, 2017. “​Windows 7, not XP, was the reason last week’s WCry worm spread so widely”. Ars Technica. Accessed May 31, 2017. <a href="https://arstechnica.com/security/2017/05/windows-7-not-xp-was-the-reason-last-weeks-wcry-worm-spread-so-widely/">https://arstechnica.com/security/2017/05/windows-7-not-xp-was-the-reason-last-weeks-wcry-worm-spread-so-widely/</a><a href="#fnref:14" rev="footnote">&#8617;</a></p></li>
<li id="fn:15">
<p>“wikiHow to Install Ubuntu Linux”. Accessed May 31, 2017. <a href="http://www.wikihow.com/Install-Ubuntu-Linux">http://www.wikihow.com/Install-Ubuntu-Linux</a><a href="#fnref:15" rev="footnote">&#8617;</a></p></li>
<li id="fn:16">
<p>Raymond, E. S. 1999. “The cathedral and the bazaar”. Accessed May 31, 2017.  <a href="http://www.catb.org/esr/writings/cathedral-bazaar/cathedral-bazaar/">http://www.catb.org/esr/writings/cathedral-bazaar/cathedral-bazaar/</a><a href="#fnref:16" rev="footnote">&#8617;</a></p></li>
<li id="fn:17">
<p>James Vincent, 2017. “​99.6 percent of new smartphones run Android or iOS”. Forbes. Accessed May 31, 2017. <a href="https://www.theverge.com/2017/2/16/14634656/android-ios-market-share-blackberry-2016">https://www.theverge.com/2017/2/16/14634656/android-ios-market-share-blackberry-2016</a><a href="#fnref:17" rev="footnote">&#8617;</a></p></li>
<li id="fn:18">
<p>Ewan Spence, 2016. “​Apple&rsquo;s Continued Domination Of A Shrinking Tablet Market”. Forbes. Accessed May 31, 2017. <a href="https://www.forbes.com/sites/ewanspence/2016/08/02/apple-ipad-pro-market-share/#161999665d1f">https://www.forbes.com/sites/ewanspence/2016/08/02/apple-ipad-pro-market-share/#161999665d1f</a><a href="#fnref:18" rev="footnote">&#8617;</a></p></li>
<li id="fn:19">
<p>Steven J. Vaughan-Nichols, 2015. “​​CES 2015: The Linux penguin in your TV”. ZDNet. Accessed May 31, 2017. <a href="http://www.zdnet.com/article/the-linux-in-your-car-movement-gains-momentum/">http://www.zdnet.com/article/the-linux-in-your-car-movement-gains-momentum/</a><a href="#fnref:19" rev="footnote">&#8617;</a></p></li>
<li id="fn:20">
<p>Steven J. Vaughan-Nichols, 2016. “​Linux will be the major operating system of 21st century cars”. ZDNet. Accessed May 31, 2017. <a href="http://www.zdnet.com/article/the-linux-in-your-car-movement-gains-momentum/">http://www.zdnet.com/article/the-linux-in-your-car-movement-gains-momentum/</a><a href="#fnref:20" rev="footnote">&#8617;</a></p></li>
<li id="fn:21">
<p>“List Statistics | TOP500 Supercomputer Sites”. Accessed May 31, 2017. <a href="https://www.top500.org/statistics/list/">https://www.top500.org/statistics/list/</a><a href="#fnref:21" rev="footnote">&#8617;</a></p></li>
<li id="fn:22">
<p>“GNU &ndash; What is free software?”. Accessed May 31, 2017. <a href="https://www.gnu.org/philosophy/free-sw.en.html">https://www.gnu.org/philosophy/free-sw.en.html</a><a href="#fnref:22" rev="footnote">&#8617;</a></p></li>
<li id="fn:23">
<p>Chris DiBona and Sam Ockman, 1999. “Open Sources: Voices from the Open Source Revolution”. O’Reilly. Accessed May 31, 2017. <a href="http://www.oreilly.com/openbook/opensources/book/linus.html">http://www.oreilly.com/openbook/opensources/book/linus.html</a><a href="#fnref:23" rev="footnote">&#8617;</a></p></li>
<li id="fn:24">
<p>Jonathan Corbet, 2017. “Free-software concerns with Europe&rsquo;s radio directive”. Linux Weekly News. Accessed May 31, 2017. <a href="https://lwn.net/Articles/713803/">https://lwn.net/Articles/713803/</a><a href="#fnref:24" rev="footnote">&#8617;</a></p></li>
<li id="fn:25">
<p>“Bountysource &ndash; Support for Open-Source Software”. Accessed May 31, 2017. <a href="https://www.bountysource.com/">https://www.bountysource.com/</a><a href="#fnref:25" rev="footnote">&#8617;</a></p></li>
<li id="fn:26">
<p>“Nouveau &ndash; CodeNames”. Accessed May 31, 2017. <a href="https://nouveau.freedesktop.org/wiki/CodeNames/#NV04">https://nouveau.freedesktop.org/wiki/CodeNames/#NV04</a><a href="#fnref:26" rev="footnote">&#8617;</a></p></li>
<li id="fn:27">
<p>Steven J. Vaughan-Nichols, 2016. “​Red Hat becomes first $2b open-source company”. ZDNet. Accessed May 31, 2017. <a href="http://www.zdnet.com/article/red-hat-becomes-first-2b-open-source-company/">http://www.zdnet.com/article/red-hat-becomes-first-2b-open-source-company/</a><a href="#fnref:27" rev="footnote">&#8617;</a></p></li>
<li id="fn:28">
<p>Klint Finley, 2015. “Whoa. Microsoft Is Using Linux to Run Its Cloud”. Wired. Accessed May 31, 2017. <a href="https://www.wired.com/2015/09/microsoft-using-linux-run-cloud/">https://www.wired.com/2015/09/microsoft-using-linux-run-cloud/</a><a href="#fnref:28" rev="footnote">&#8617;</a></p></li>
<li id="fn:29">
<p>Jake Edge, 2017. “Free-software concerns with Europe&rsquo;s radio directive”. Linux Weekly News. Accessed May 31, 2017. <a href="https://lwn.net/Articles/722197/">https://lwn.net/Articles/722197/</a><a href="#fnref:29" rev="footnote">&#8617;</a></p></li>
<li id="fn:30">
<p>Kyle Wiens, 2015. “We Can’t Let John Deere Destroy the Very Idea of Ownership”. Wired. Accessed May 31, 2017. <a href="https://www.wired.com/2015/04/dmca-ownership-john-deere/">https://www.wired.com/2015/04/dmca-ownership-john-deere/</a><a href="#fnref:30" rev="footnote">&#8617;</a></p></li>
<li id="fn:31">
<p>“Auto Update policy”. Accessed May 31, 2017. <a href="https://support.google.com/chrome/a/answer/6220366?hl=en">https://support.google.com/chrome/a/answer/6220366?hl=en</a><a href="#fnref:31" rev="footnote">&#8617;</a></p></li>
<li id="fn:32">
<p>The Chromium Projects, 2017. “Using an Upstream Kernel on Chrome OS”. Accessed May 31, 2017. <a href="https://www.chromium.org/chromium-os/how-tos-and-troubleshooting/using-an-upstream-kernel-on-snow">https://www.chromium.org/chromium-os/how-tos-and-troubleshooting/using-an-upstream-kernel-on-snow</a><a href="#fnref:32" rev="footnote">&#8617;</a></p></li>
</ol>
</div>

]]></content>
  </entry>
  
  <entry>
    <title type="html"><![CDATA[Learning Finnish - making comparaisons]]></title>
    <link href="http://www.mupuf.org/blog/2016/11/07/learning-finnish/"/>
    <updated>2016-11-07T08:46:00+02:00</updated>
    <id>http://www.mupuf.org/blog/2016/11/07/learning-finnish</id>
    <content type="html"><![CDATA[<p>As I said in the previous article, I have dedicated a lot of my spare time on learning Finnish. It is by far the most complex and weird language I have ever encountered. To give you an example, I will explain what are the rules that I need to have in mind to write one word: cheaper.</p>

<!-- more -->


<p>Let&#8217;s start with the adjective in the nominative form:</p>

<pre><code>The shirt is cheap: Paita on halpa (Shirt is cheap)
</code></pre>

<p>Now, let&#8217;s say this shirt is cheaper. To do so, you need to add the suffix -mpi to the stem of the word. In the case of halpa, the stem is &#8230; halva.</p>

<p>Why did the p become a v? Because the stem is in weak form while the nominative case was in strong form. Unfortunately, Finnish is very inconsistant and the nominative case and the stem may be in either the weak or strong form depending on &#8230; the word type. To go from the strong to the weak form, we need to change p->v, k -> nothing, t->d, kk->k, nt->nn, nk->ng,&#8230;. The &#8220;funny&#8221; thing is that there are more word types than I can remember, we are talking about ~20 (<a href="http://thefinnishteacher.weebly.com/nominityypit--word-types.html">more information here</a>). In the case of halpa, the p just becomes a v.</p>

<p>Let&#8217;s not get already depressed by how much we need to learn and keep on moving forward with our new word:</p>

<pre><code>The shirt is cheaper: paita on halvempi
</code></pre>

<p>Wait, what? Why did the &#8216;a&#8217; become an &#8216;e&#8217;? I thought we just had to add the suffix -mpi? Well, you would be right, but there is this lovely rule (that is not applicable to all the cases), that states that the last letter before -mpi should become an &#8216;e&#8217; if it is an &#8216;a&#8217; or &#8216;ä&#8217;. But beware, if you have -aa or -ää, the rule does not apply!</p>

<p>Still following? This was Suomi 3 material, but I am now in level 4 and, you know and I am still falling down the rabbit hole with no end in sight. So, it turns out that adjectives expressing a comparison should also have the same case applied to them as the noun they refer to. This is a common rule for adjectives. For example:</p>

<pre><code>On the shirt: paidalla (the 't' became a 'd' as it went from the strong to week form)(the suffix -lla in Finnish means 'on top of')
On the small shirt: pienellä (pieni = small) paidalla
</code></pre>

<p>So, when we want to make a comparison, we need both the -mpi and the right case applied to it:</p>

<pre><code>On the cheaper shirt: Halvemmalla paidalla
</code></pre>

<p>Why did the -mpi become -mma? Well, because it would have been too easy, wouldn&#8217;t it? Instead, we need to ask ourselves a few more questions:</p>

<ul>
<li>Is the noun plural or singular? WARNING: saying 400 shirts in Finnish is considered as being singular&#8230; this was one of the most important teaching of the third level of Finnish&#8230;</li>
<li>What is the case of the noun? This is important to know whether we should use the weak or strong form of the &#8216;declination&#8217; of the comparison.</li>
</ul>


<p>If the noun is singular, use -mma/-mmä (read up on <a href="https://en.wikipedia.org/wiki/Vowel_harmony#Finnish">Finnish&#8217;s vocal harmony</a> if you wonder about this) instead of -mpi for the weak form and use -mpa/-mpä for the strong form. There are 11 cases in my book right now (<a href="https://en.wikipedia.org/wiki/Finnish_noun_cases">15 in reality</a>), and the strong form is the one needed for the partitiivi (too much arguing here with Elisa to explain what it actually is, too complex for a parenthesis, check out the previous link if you care), illatiivi (getting inside of), essiivi (in the role of). For all the other cases, use the weak form.</p>

<p>If the noun is plural, use -mmi for the weak form and -mpi for the strong form. Yes, the latter case actually makes sense, good! The strong form needs to be used for the same cases as for the singular form &#8230; with an extra bonus one, the genetiivi (genitive, the idea of belonging, like the &#8216;s in English).</p>

<p>So, just to finish it up, here is:</p>

<pre><code>On the cheaper shirts: Halvemmilla paidoilla
</code></pre>

<p>Trust me, you do NOT want to know why paidalla became paidoilla. I have many flowcharts for this, and in the last class, I failed 2 times out of 3&#8230;</p>

<p>Here it is, you now know what questions one needs to ask oneself when making a comparison in Finnish. I hope I managed to convey how everything has to be inter-connected and very difficult to master.
Now, to my Finnish friends, bear with me until this becomes an automatism. Until then, let&#8217;s just stick to English ￼;)</p>

<p>PS: Thanks to Elisa for fixing all my mistakes in all these simple sentences!</p>
]]></content>
  </entry>
  
  <entry>
    <title type="html"><![CDATA[Life in Finland]]></title>
    <link href="http://www.mupuf.org/blog/2016/10/31/life-in-finland/"/>
    <updated>2016-10-31T22:07:00+02:00</updated>
    <id>http://www.mupuf.org/blog/2016/10/31/life-in-finland</id>
    <content type="html"><![CDATA[<p>Hey everyone, long time no sign of life!</p>

<p>I have been quite busy at <a href="http://www.mupuf.org/blog/2015/01/09/first-week-as-intel-employee/">Intel</a>, helping here and there on mesa, the kernel or the X-server. I have however recently been focusing on the testing side of the Graphics Stack and got my testing project on Freedesktop (<a href="https://cgit.freedesktop.org/ezbench/">EzBench</a>) which I also presented at <a href="https://www.x.org/wiki/Events/XDC2015/Program/#peres_pitfalls_benchmarking">XDC2015</a>(<a href="http://lwn.net/Articles/658740/">LWN recap</a>), <a href="https://archive.fosdem.org/2016/schedule/event/ezbench/">FOSDEM 2016</a> and <a href="https://www.x.org/wiki/Events/XDC2016/Program/peres_ezbench/">XDC2016</a> (which I organized in Helsinki with Tuomo Ryynänen from Haaga-Helia Pasila).</p>

<!-- more -->


<p>On my personal time, I am still on the board of directors of the X.Org Foundation, helping mostly with the <a href="https://www.x.org/wiki/SummerOfCodeIdeas/">Google Summer of Code</a>, the transition to SPI and <a href="https://plus.google.com/u/1/b/102057777074369211973/+XOrgFoundationOfficial/posts">communication on Google+</a>. I have kept working on Nouveau, mostly with Karol Herbst for power management and we made quite a few improvements thanks to his dedication! I have also been way more social than during my PhD and decided to pick up languages again. I have mostly been studying Finnish though, which is&#8230; insanely difficult to pick up properly! I tried on my own for a few months and then gave up and decided to go back to the university to study. I first had a 1-month intensive course and then followed by 3 normal semesters. I am now at a point where I have a good grasp on the language but would require a lot more work on actually using it! This part is the hardest since Finns usually speak a perfect english almost everywhere.</p>

<p>Life in Finland is really sweet. People are clean and very respectful. Nature is present all around but so is technology! Indeed, 4G coverage is almost perfect even on the country side, so much that a group of colleagues and I have been using it to <a href="https://www.youtube.com/channel/UC7NO4QqZZz12-njP-SGOBAw">broadcast live cycling events on Youtube</a> (yours truly would be on the back of a motorbike with a camera). I also got involved a lot in the CouchSurfing community and I am now co-hosting the Helsinki weekly meetups where I met amazing Finns and foreigners alike.</p>

<p>I also used some of my spare time to roam nordic countries (Norway, Sweden, Estonia, Russia) and hunt for northern lights in Sweden.</p>

<p>That&#8217;s all, folks!</p>
]]></content>
  </entry>
  
  <entry>
    <title type="html"><![CDATA[Making GNOME Planner more Keyboard-Friendly]]></title>
    <link href="http://www.mupuf.org/blog/2015/04/05/making-planner-keyboard-friendly/"/>
    <updated>2015-04-05T16:06:00+03:00</updated>
    <id>http://www.mupuf.org/blog/2015/04/05/making-planner-keyboard-friendly</id>
    <content type="html"><![CDATA[<p>I&#8217;ve needed a tool to draw timelines and dependencies between tasks lately, to help me schedule the studies I&#8217;m running and writing activities (been told I should publish more, heh!). I ended up using the desktop app &#8217;<a href="https://git.gnome.org/browse/planner">GNOME Planner</a>&#8217;, and changed it a tiny bit to boost my productivity. I haven&#8217;t bothered with talking to upstream since it&#8217;s been unmaintained for years, but you can find patches attached to this post if you too need a quick planning tool.</p>

<!-- more -->


<p>After a day of trying multiple online tools, I&#8217;ve resorted to GNOME Planner which contains none of the fuss I don&#8217;t need and allows me to be somewhat productive with data entry. After an hour, I decided to poke in the code and optimise the keyboard shortcuts a bit. Mainly, I couldn&#8217;t deal with the fact that I had to use my mouse to type in a new task (no direct editing when inserting a task). Besides this, there were some inconsistencies in how shortcuts were assigned (mainly, many do-undo relationships that used completely different keys instead of the <code>key</code> - <code>shift+key</code> pair), and some useful shortcuts were assigned to rarely used operations such as selecting all tasks or creating a brand new projects, making the shortcuts unavailable for routine operations such as selecting the text of a task or inserting a task.</p>

<table class="firsth">
  <caption>List of changes made to Planner</caption>
  <tr>
    <th scope="col">Feature name</th>
    <th scope="col">Before</th>
    <th scope="col">After</th>
    <th scope="col">Reason</th>
  </tr>
  <tr>
    <td>Insert Task</td>
    <td class="key">&lt;Ctrl&gt; I</td>
    <td class="key">&lt;Ctrl&gt; N</td>
    <td>Confusion / cognitive dissonance with Indent Task, and nobody creates a new project every other minute</td>
  </tr>
  <tr>
    <td>Delete Task</td>
    <td class="key">&lt;Ctrl&gt; D</td>
    <td class="key">Delete</td>
    <td>Old shortcut in keyboard hotspot, easier to make mistakes</td>
  </tr>
  <tr>
    <td>Indent Task</td>
    <td class="key">&lt;Ctrl&gt;&lt;Shift&gt; I</td>
    <td class="key">&lt;Ctrl&gt; I</td>
    <td>Shift feels too much like undo, hence doesn&#8217;t fit &#8220;undoing&#8221; an &#8220;insert task&#8221;</td>
  </tr>
  <tr>
    <td>Unindent Task</td>
    <td class="key">&lt;Ctrl&gt; U</td>
    <td class="key">&lt;Ctrl&gt;&lt;Shift&gt; I</td>
    <td>Now aligned with indent&#8230;</td>
  </tr>
  <tr>
    <td>Move Upwards</td>
    <td class="key">ø</td>
    <td class="key">&lt;Ctrl&gt; Up</td>
    <td>Was missing</td>
  </tr>
  <tr>
    <td>Move Downwards</td>
    <td class="key">ø</td>
    <td class="key">&lt;Ctrl&gt; Down</td>
    <td>Was missing</td>
  </tr>
  <tr>
    <td>Edit Task</td>
    <td class="key">&lt;Ctrl&gt;&lt;Shift&gt; E</td>
    <td class="key">&lt;Ctrl&gt; E</td>
    <td><a href="http://en.wikipedia.org/wiki/KISS_principle">KISS</a></td>
  </tr>
  <tr>
    <td>Select All</td>
    <td class="key">&lt;Ctrl&gt; A</td>
    <td class="key">ø</td>
    <td>Prevented me from selecting text whilst editing a task</td>
  </tr>
  <tr>
    <td>Link Task</td>
    <td class="key">ø</td>
    <td class="key">&lt;Ctrl&gt; L</td>
    <td>Was missing</td>
  </tr>
  <tr>
    <td>Unlink Task</td>
    <td class="key">ø</td>
    <td class="key">&lt;Ctrl&gt;&lt;Shift&gt; L</td>
    <td>Was missing</td>
  </tr>
  <tr>
    <td>New Project</td>
    <td class="key">&lt;Ctrl&gt; N</td>
    <td class="key">ø</td>
    <td>Making room for Insert Task</td>
  </tr>
  <tr>
    <td>Open Project</td>
    <td class="key">F3</td>
    <td class="key">&lt;Ctrl&gt; O</td>
    <td>As much as I can violate conventions myself (e.g. Insert Task), the original shortcut didn&#8217;t make sense</td>
  </tr>
  <tr>
    <td>Close Project</td>
    <td class="key">&lt;Ctrl&gt; W</td>
    <td class="key">&lt;Ctrl&gt; Q</td>
    <td>I triggered it several times trying to erase lines (thanks terminal&#8230;) or delete a task</td>
  </tr>
  <tr>
    <td>Quit (close all projects)</td>
    <td class="key">&lt;Ctrl&gt; Q</td>
    <td class="key">&lt;Ctrl&gt;&lt;Shift&gt; Q</td>
    <td>To avoid conflicts with previous edit</td>
  </tr>
  <tr>
    <td>Redo</td>
    <td class="key">&lt;Ctrl&gt; R</td>
    <td class="key">&lt;Ctrl&gt;&lt;Shift&gt; Z</td>
    <td>Conventions + making it consistent with Undo</td>
  </tr>
  <tr>
    <td colspan="4">And also, I&#8217;ve made task cells directly editable/focused when inserting a new task.</td>
  </tr>
</table>


<p>The patches are available as a series of 3 files. <a href="http://www.mupuf.org/media/files/planner/0001-Fixed-keyboard-shortcuts.patch">The first one</a> applies most shortcut changes, apart from Insert Task, Unlink Task (uses <code>&lt;Ctrl&gt; U</code>), Indent Task, Unindent Task and New Project. <a href="http://www.mupuf.org/media/files/planner/0002-Make-new-tasks-directly-editable-when-inserted.patch">The second one</a> changes the editability of tasks when inserted. <a href="http://www.mupuf.org/media/files/planner/0003-Reworking-indent-around-Ctrl-Shift-I-moving-Insert-t.patch">The third one</a> applies the last shortcut changes.</p>

<h4>Edit</h4>

<p>I&#8217;ve put the code <a href="https://github.com/Sidnioulz/Planner">on Github</a> for now, and fixed a handful of Planner&#8217;s many memory leaks&#8230; I&#8217;m primarily hunting leaks because Planner currently uses well over 1GB for a simple project with about 50 tasks.</p>
]]></content>
  </entry>
  
  <entry>
    <title type="html"><![CDATA[My first week as an Intel employee]]></title>
    <link href="http://www.mupuf.org/blog/2015/01/09/first-week-as-intel-employee/"/>
    <updated>2015-01-09T00:00:00+02:00</updated>
    <id>http://www.mupuf.org/blog/2015/01/09/first-week-as-intel-employee</id>
    <content type="html"><![CDATA[<p>As you may have seen, my time has been very limited since my previous blog article.
Since my previous articles. I have mostly been busy writing
my <a href="http://phd.mupuf.org/publication/2014/12/19/a-holistic-approach-to-green-networking-in-wireless-networks/">Ph.D. thesis</a>,
organising the <a href="http://www.x.org/wiki/Events/XDC2014/">XDC 2014</a>, giving a few talks
(most notably at <a href="http://phd.mupuf.org/publication/2014/09/26/the-linux-graphics-stack-and-nouveau-driver/">Kernel Recipes 2014</a>
and <a href="http://phd.mupuf.org/publication/2014/10/09/security-in-wayland-based-desktop-environments">XDC 2014</a>),
defending the thesis and &#8230; moving to Helsinki/Finland!</p>

<p>Indeed, I got hired by Intel Finland to work on the performance of their integrated GPU
on Linux! This work will mostly lead me to work on mesa-related project even though
I will also help on the power management runtime front.</p>

<p>I am still in the process of settling down, finding an appartment and getting used
to my new life so do not expect me to be highly available this first month.
For this reason, I will not be able to attend FOSDEM this year&#8230;</p>

<p><em>Edit 20/01/2015:</em>  Found everything, should be up and running in the coming week.</p>

<p>You may wonder what this will change with regards to my current involvement in
Open Source projects. Hopefuly, the next sections will answer most of your questions.
If not, please send me a comment.</p>

<!-- more -->


<p><a id="sec:nouveau"></a></p>

<h3>What does it changes for my involvement in Nouveau?</h3>

<p>Starting from January, Intel GPUs are <em><em>my main focus</em></em>.</p>

<p>However, on my spare time, I will still keep a presence on IRC and mailing lists
and will likely keep on working on reverse engineering and implementing power
management as I used to in the past years.</p>

<p>I will also consider mentoring a student this year for the GSoC. I will try
to propose topics that will be more manageable than the ones I proposed in previous
years!</p>

<p><a id="sec:xorg_foundation"></a></p>

<h3>What does it changes for the X.Org Foundation?</h3>

<p>Absolutely nothing! I originally thought that we would be 2 Intel employees at the
board of directors which would have been the maximum allowed in our by-laws, but
<a href="http://keithp.com/blogs/Back_to_HP/">Keith Packard joined HP</a> the same month I joined Intel.</p>

<p>I think working at Intel will actually allow me to contribute more to the X.Org
foundation as I will have more spare time than in the past 2 years when I was
working countless hours on my research and/or writing my thesis or research articles.</p>

<p><a id="sec:linuxfr"></a></p>

<h3>What does it change for LinuxFR?</h3>

<p>Aside from a notice and disclaimer in the &#8220;Open Source Graphics drivers&#8221; section
of the Kernel release articles, not much should change.</p>

<p>As an Intel employee, I cannot damage the reputation of the company but I am also
asked to be fair and accurate on my reporting and communication with the outside
world. I do not think that my new status will change anything as I always tried
to preserve the reputation of every company I talked about while also being factual
and fair.</p>

<p>Also, to prepare this section, I will keep on using only public material just
like I did before as doing otherwise would not allow readers to check what I am
saying. However, it may happen that I will quote myself which I already did
when talking about the improvement in the Nouveau section.</p>

<p>So, in the end, not much should change!</p>

<p><a id="sec:other"></a></p>

<h3>What does it changes for my other Open Source projects?</h3>

<p>Nothing should change when it comes to the development of my non-GPU-related projects
such as the Arduide or WtRPM. Development will thus continue there &#8230; as slowly
as usual :p</p>
]]></content>
  </entry>
  
  <entry>
    <title type="html"><![CDATA[Who Do I Design Security For?]]></title>
    <link href="http://www.mupuf.org/blog/2014/05/16/who-do-i-design-security-for/"/>
    <updated>2014-05-16T01:01:00+03:00</updated>
    <id>http://www.mupuf.org/blog/2014/05/16/who-do-i-design-security-for</id>
    <content type="html"><![CDATA[<p>This post is a space to discuss some of the assumptions I make when thinking about the
security of Linux. It&#8217;s aimed at being a quick reference so does not include extensive
references to refeered papers and actual statistics, though I will at some point write
a long version. I&#8217;ll update the post over time to clarify it.</p>

<!-- more -->


<h3>What Computer are we Speaking About?</h3>

<p>I am designing for desktops, laptops and tablets – not for phones (which are
used only for a subset of activities which I see as having lesser security needs).
I design for productive and recreational users – not for occasional users who
have very basic needs, because I find it easier to accomodate those on a UI that
offers complex features and shortcuts than to accomodate productive types on
limited UIs. You&#8217;ll guess that my focus is on multitaskers, work and home settings, and security
rather than merely privacy.</p>

<h4>Types of Devices</h4>

<ul>
<li>Desktop (interactions based on keyboard + mouse)</li>
<li>Laptop (keyboard + mouse, a little bit keyboard-oriented)</li>
<li>Tablet (touch + virtual keyboard, touch-oriented)</li>
<li>Mobile Phone (touch + small virtual keyboard, touch-oriented and keyboard-averse)</li>
</ul>


<p>Whilst there is a temptation to go all-touch these days, this just kills the
efficiency of the UI for anyone who does have a keyboard. I appreciate cleaner
UIs which work well with touch, but that shouldn&#8217;t mean that all keyboard-navigation
shortcuts (such as immediate access to the location bar when opening a file) should
disappear.</p>

<p><strong>A well-designed UI accomodates fast touch <em>and</em> fast keyboard navigation.</strong></p>

<p>I&#8217;d also like to point out that Tablet/Phone OSes have an app model based on massive
privacy violations. There is no indication that an open OS with apps that do not
pay for themselves with data theft and resale would gather any developer
audience.</p>

<h4>Types of Users</h4>

<ul>
<li>Productive (absolutely all complex tasks and workplace usages)</li>
<li>Recreational (typically personal computer of any kind)</li>
<li>Data consuming (e.g. phones where the only value is ads+online shopping)</li>
</ul>


<p><strong>Productive</strong> users basically all workplace practices; anything that requires using
complex/specific apps that manipulate data in complex ways, and usually those users
have lots of heterogenous data. If you think this type no longer exists, ask yourself
whether people manage client profiles, do graphic design, type reports, write programs,
produce videos, manage the schedule of a company, do accounting, etc. on a mobile
phone. Productives multitask a lot. They handle sensitive or at least valuable
information routinely and they need security to just work. Often they have no patience for
security mechanisms that require attention and for permission prompts as these make them
lose a lot of work time. Productives need to get the job done, and so they need
shortcuts, good defaults, and apps that do their job without tweaking.</p>

<p><strong>Recreational</strong> users are much closer to data-consuming. It&#8217;s the people who use a device of
any type for multiple but relatively easy/passive tasks, such as reading news,
listening to music, watching videos, chatting on IM or social network apps, playing
basic games. These users have maybe less heterogeneity but can have very large
amount of music/photo/video files. They may occasionally need to be productive
with their machines (writing a CV, etc.) though it&#8217;s not a day-to-day use case for
them. Recreationals enjoy windowed environments designed around multitasking, they
can switch easily between their web browsing, social networks, IMs, movie watching,
etc.</p>

<p><strong>Data-consuming</strong> users are the users who exclusively do simple things, mostly online
or on-the-cloud, and don&#8217;t really have files. These are typically mobile users.
Data consumers are maybe less prone to multitasking because they actively engage
with the app they&#8217;re using, or because their UI is more centered on displaying data
than on providing controls and shortcuts for complex tasks. Some of these may have
a very limited usage of computers, whilst some others could well be recreationals
that just delegate any productive task to separate devices or even other people
because their mobiles don&#8217;t answer their productive needs. Mobiles have simple UIs
where data consumption can be made straightforward and more convenient than on heavier
devices (via more specialised apps and better integration between major web content
providers and apps), but it&#8217;s not easy to get any work done on these machines.
A typical symptom of these data-consuming devices is the prominence of the &#8220;Mark as
Unread&#8221; button on mobile email apps – you can easily read your emails but it&#8217;s so
painful to write them that you&#8217;ll do it elsewhere.</p>

<p>If you&#8217;re designing a general-purpose desktop environment
only with the data-consuming people in mind (and thus forcing other categories to
adapt mouse-based interactions on unscalable interfaces), you&#8217;re probably making a
mistake. <strong>The rise of mobile devices does not mean people all of a sudden dropped
their desk job across the globe</strong>. It simply means that people who had
never needed a PC in the first place don&#8217;t buy PCs anymore. Mobiles will probably
never cater for all those complex jobs that require you sitting in front of a screen
8-12 hours a day. Hence, intensive users who need to get a job done should still be
part of your target audience, and your designs should scale up to their needs.</p>

<h3>The Threats Linux is Facing</h3>

<p>I&#8217;m not a malware expert but I have a good grasp of how the industry works. Things
are not as pretty as you&#8217;ve been told when installing your first Linux, and both
<strong>Windows and OS X are significantly more secure than a desktop Linux</strong> nowadays
We still have no OS-provided app sandboxing (even for apps who want to sandbox
themselves). What we have right now is far from easy to use, and app devs cannot
bundle their apps so that they can be transparently sandboxed. The only examples
of relatively sandboxed apps are Chromium and Firefox, both using their own solutions
since none is provided on modern Linux distros. In contrast, both Windows 8 and
OS X have an API for userland apps to restrict their privileges. We&#8217;re also missing
graphic stack security, though this is obviously going to change with Wayland.</p>

<p>People often claim that Linux is protected from malware. This is false. Commodity malware
vendors support OS X with only 5-8% market share. Our time will come at some point
because the malware industry is very professionalised and the Linux market is one
among few that are left to be conquered. In fact Advanced Persistent Threat
malware authors do support Linux, as suggested by the analysis of <a href="https://www.securelist.com/en/blog/208216078/The_Careto_Mask_APT_Frequently_Asked_Questions">The Mask</a>. This
one has been around since 2007.</p>

<p>I&#8217;ve played a few years ago with <a href="http://shh.thathost.com/secadv/adobexxe/">the Adobe XXE attack</a>.
It is said in CVE-2005-1306 that one can only discover file names with XXE attacks on Acroread 7, but
I rewrote the exploit showcasing the theft of system config files based on this principle, and even
with SELinux enabled and a default policy, I could steal some <code>/etc</code> files that were
allowed by <code>audit2allow</code>, sometimes including <code>/etc/passwd</code> – because writing the strictly minimal policy for any app, especially proprietary ones,
is so utterly complex, you&#8217;ll probably still find some data to gnaw on with your exploit. Nicer exploits could allow proper
remote code execution and hence <strong>theft of absolutely all documents</strong> that the PDF reader has access to.</p>

<p>I&#8217;ve also fuzz-tested evince a bit for teaching purposes and it&#8217;s clear to me that
there are many low-hanging fruits waiting to be exploited by black hats, because FOSS
apps crash too often, too easily, and some of the crashes produce invalid writes that
probably contain a handful of buffer overflow or format string vulns.</p>

<p>In short: <strong> Linux is attackable and most of the FOSS apps that we all trust are
excellent attack vectors</strong>. Crafted downloads are one of the most common attack
vectors for the productive types (see the <a href="http://www.verizonenterprise.com/resources/reports/rp_data-breach-investigations-report-2013_en_xg.pdf">Verizon DBIR 2013</a>, I&#8217;m still reading the 2014 one), so one cannot assume
that even a PDF reader is safe to use, and that even a PDF reader written by your
friends at the GNOME Foundation can legitimately have access to <em>all</em> your PDF files
at any given time.</p>

<p>We need as many apps as possible to have access only to what
they&#8217;re using at the time they&#8217;re using it, because otherwise we&#8217;ll take a huge
blow to the face on the day Linux exploits are first noticed – at that time Windows
and OS X will probably have all apps sandboxed by default and we&#8217;ll look like idiots
– which is a shame since sandboxing on other platforms is still clearly suboptimal
at the moment.</p>

<h4>Desktop Capabilities</h4>

<p>See my post on authorisation UIs: things like clipboard management, screen capturing,
etc. could be enabled by default for one Desktop Environment provided app, so that users
can use the system out of the box. However, other apps that occasionally need a capability and are not
explicitely trusted by the user should obtain permissions per-session, by:</p>

<ul>
<li>displaying a system-provided UI element whose activation indubitably indicates user authorisation</li>
<li>trigerring a one-time or session-long permission prompt</li>
</ul>


<h4>Who Should be Trusted by End-Users?</h4>

<p>The following cannot be avoided, because they write and provide all the privileged OS components:</p>

<ul>
<li>Linux and driver developers</li>
<li>Distributors and their core packagers (Red Hat, Debian, Arch)</li>
<li>Desktop Environment developers (KDE, GNOME, XFCE core devs)</li>
</ul>


<p>However, app developers and packagers are not trustworthy. There&#8217;s no evidence that
the hundreds of app packagers all have security training and can evaluate properly
whether an app is resilient enough to be granted a capability or default access to
a large chunck of the user&#8217;s assets.</p>

<p>I don&#8217;t see the point in making a distinction between FOSS and proprietary devs here,
and would rather segregate between people who already need to be trusted and have
some staff responsible for security and people who cannot be clearly identified and
whose security competence cannot be assessed.</p>

<h4>What and How to Sandbox</h4>

<p>In conclusion, I&#8217;d rather take a rather drastic approach to sandboxing and see what
can be designed under that view. It&#8217;s probably better to lower security a bit on
some components that to merely provide illusory security because of potential
complexity issues. Here is what I want to achieve:</p>

<ul>
<li><strong>all apps should be sandboxed</strong> – core DE components that may easily be exploited should be sandboxed when possible</li>
<li><strong>sandboxed apps should have access to almost nothing</strong> when launched</li>
<li>the best way to give access is a seamless, trusted-path-based user interaction; APIs should be crafted to make such UIs robust to attacks by apps</li>
<li>apps output data either via a legacy file system or sharing mechanisms that expose a wider range of stores in a secure fashion</li>
<li>exceptionally, DE-provided apps have default permissions for the sake of good UX; DE devs can compensate with stringent security testing</li>
</ul>


<p>It&#8217;d be really great if others who are interested in app sandboxing explained what
goals they want to achieve, for which users and based on which assumptions. It&#8217;d be
great if our goals were identical, but also if we could just keep other use cases
in mind when we can make decisions that fit a larger audience than ours. What I
find interesting is that apart from the target audiences that we have, it seems
most people have the same security requirements list! I&#8217;ll include
links to other similar documents below in this post.</p>

<h3>Other Views</h3>

<ul>
<li><a href="https://wiki.gnome.org/Design/OS/Sandboxing">GNOME OS Sandboxing</a></li>
</ul>

]]></content>
  </entry>
  
  <entry>
    <title type="html"><![CDATA[Sandbox Utils and the Cranky File Chooser Dialog]]></title>
    <link href="http://www.mupuf.org/blog/2014/05/14/introducing-sandbox-utils-0-6-1/"/>
    <updated>2014-05-14T04:35:00+03:00</updated>
    <id>http://www.mupuf.org/blog/2014/05/14/introducing-sandbox-utils-0-6-1</id>
    <content type="html"><![CDATA[<h3>Once Upon a Time</h3>

<p><a id="sec:intro"></a>
Trying my best to make the title sound like one of those tales you&#8217;d tell your kids when putting them to bed. Those who know me well know that I&#8217;m doing a PhD, allegedly on activity confinement, and those who know me even better have witnessed me rant every day for three months about how it&#8217;s impossible (because ethnomethodology, phenomenology, embodied interaction, situated action, etc.). So I decided to convert to another religion. I&#8217;m now a guru of the church of sandboxing. Hopefully neither cognitive dissonance nor my PhD advisor will catch up on me before my defense (ah ah).</p>

<p>There&#8217;s a plethora of tools for app sandboxing out there, on every major OS, and even more people arguing over which is the most secure – nothing I can convince myself to care about. Because all these sandboxing tools assume, in one way or another, that the thing they&#8217;re trying to contain is designed to be put in their box. This worldview fits server apps incredibly well: they&#8217;re designed to process one type of data, continuously, and to produce a specific output at a specific place for a specific input. Security researchers also got very wealthy exploiting the silicia nugget of mobile phones: phone apps have such little utility and phones such restricted interaction techniques that you never do any substantial multitasking or process any complex kind of data, you have fewer options for app customization than on the desktop, and as a result most mobile apps process their own data rather than your documents.</p>

<p>All of that is wonderful, but when you&#8217;re interested in general purpose multitasking-capable complex operating systems, it doesn&#8217;t work. Users tend to keep a lot of data around on their desktop OS, they have apps that process multiple formats and they reuse a file across multiple apps. They constantly multitask with apps that don&#8217;t care the least about proper password storage, etc. You&#8217;re even routinely asked to process data from multiple untrusted sources on a routine basis to earn your salary! And yet apps easily get compromised (especially Linux apps), and stay compromised afterwards. They can destroy all of your data, abuse your resources and steal your root password with surprisingly little effort!</p>

<p>It should be obvious to all that access control policies and &#8220;fine-grained&#8221; sandboxing are no cure to the disease of the desktop. If not, read field studies on information workers&#8217; daily life, contemplate the sheer complexity of their work days and then come back and ask them if they want to sit and write policies because they get any work done. Our challenge is to have the policy be produced on-the-fly, and with no user cost (time, money or cognitive load) <em>s&#8217;il-vous-plaît</em>. Sandbox Utils is my collection of black magic tricks that do just that.</p>

<!-- more -->


<h3>App Sandboxing: Friends vs Foes</h3>

<p><a id="sec:sota"></a></p>

<p>Remember, I said sandboxing tools were designed to sandbox cooperative apps, that accept dropping their privileges, tell you what they need and don&#8217;t need, and naturally process data in well-isolated chuncks. They can be put into <a href="http://qubes-os.org/trac">VMs</a>, <a href="http://danwalsh.livejournal.com/">SELinux domains</a>, <a href="https://code.google.com/p/nativeclient/">NaCl</a>, <a href="https://linuxcontainers.org/">LXC</a>s, etc. to serve them. What we want on the desktop is not to satisfy friend apps who&#8217;ll work with us, but enable the writing and use of foe apps who&#8217;ll cheat on us. So rather than the &#8220;start-almighty-and-keep-yourself-under-control&#8221; paradigm, we&#8217;ll adopt &#8220;start-from-the-bottom-and-prove-your-worth&#8221;. Apps start entirely sandboxed, and the user decides on-the-fly what apps gain access too – an access which (unless stated otherwise) lasts only until the user moves on to something else. This concept is called <a href="http://zesty.ca/pubs/yee-sid-ieeesp2004.pdf">security by designation</a>: the user designates what a process should be allowed to access.</p>

<p>Given that zero-user-effort is critical for the technology to be deployed and adopted, I want the designation to occur naturally in the ways people use their computers. There has been at least one implementation called <a href="http://research.microsoft.com/apps/pubs/default.aspx?id=152495">User-Driven Access Control</a> (albeit in the wonderful world of Samsung Nuggets), that allows providing access to devices like a phone&#8217;s camera when a user clicks a button. The concepts behind are no wonder to a security engineer: capabilities and a trusted path. No black magic. And yet no major OSes until very recently implemented anything similar!</p>

<p>What I want to do with Sandbox Utils is serve the foes, and provide them all the features they need to write awesome apps for my users! I want them to be able to access files, with whatever model they enjoy best (atomic accesses, access to recent files, scanning for all your videos, retrieving groups of inter-related files in one interaction, etc.). Because I want my users to know what they&#8217;re up to, access will be granted via a user interaction in a trusted and privileged widget. Like what has been done in UDAC, I&#8217;ll provide access to all the capabilities we&#8217;ve been speaking about <a href="http://mupuf.org/blog/2014/02/19/wayland-compositors-why-and-how-to-handle/">here</a> and <a href="http://mupuf.org/blog/2014/03/18/managing-auth-ui-in-linux/">there</a> through special buttons and dialogs. That&#8217;s for the theory.</p>

<p>In practice, GUI apps already exist and make use of permissive APIs. Nobody wants to rewrite their apps just for fun, let alone to use a more restrictive API and lose key features. Feature parity is hardly reachable (as we shall see on one example) so yes, APIs will break and yes, we&#8217;ll have to rewrite apps. I&#8217;d like to use the occasion to reflect upon things that programmers commonly try to achieve, to reduce their workload in exchange for a more tightly-controlled workflow and the ability for me to do security by designation. This is also an occasion to improve user experience by forcing more key elements of their interactions with apps to become more consistent. Users learn automatisms so we might as well make use of that from times to times rather than resent it when trying to catch their attention and get them to make security decisions (<a href="http://mupuf.org/blog/2014/03/18/managing-auth-ui-in-linux/">oh, the irony</a>).</p>

<p>I won&#8217;t even speak about how one goes about sandboxing an app, launching it and providing it with a privileged helper that exposes the API I&#8217;ll discuss. This is engineering details. Let&#8217;s have a look at this example used by Ka-Ping Yee and many others, that seems so trivial at first: the almighty and honorable file chooser dialog.</p>

<h3>Sandbox File Chooser Dialog</h3>

<p>The <a href="http://mupuf.org/project/sandboxutils/doc/unstable/SandboxFileChooserDialog.html">SandboxFileChooserDialog</a> class is the Sandbox Utils equivalent of GTK+&#8217;s <a href="https://developer.gnome.org/gtk3/stable/GtkFileChooserDialog.html">GtkFileChooserDialog</a>. It allows developers to display a dialog in which users will either select files or folders to open or a location for them to save a file.</p>

<p>In GTK+ this API is only a convenient method for apps to use a standardized pre-coded dialog, and since apps have access to the file system, they can do a lot of neat things such as previewing the currently selected file, modify the filename typed by the user to include a forgotten extension, etc. Once file system access has been taken, two consequences arise:</p>

<ul>
<li>Users must also be protected into apps that attempt to fool them, for instance by modifying the dialog just before they press <code>Open</code></li>
<li>Apps lose the ability to read files or covertly modify the user-chosen filename, and the API must be expanded for all valid use cases that made use of such an ability</li>
</ul>


<p>The former issue is solved by introducing statefulness to the dialog: developers must finish configuring their dialog before they run it. Once it runs, it cannot be touched (only cancelled, brought to the foreground or destroyed). Then, and only if the run was successful, developers can read whatever files the user selected. The workflow induced by the states actually maps the common way of using a <a href="https://developer.gnome.org/gtk3/stable/GtkFileChooserDialog.html">GtkFileChooserDialog</a>. Major differences with the standard API for basic usages are that all functions take a GError parameter and that the <a href="http://mupuf.org/project/sandboxutils/doc/unstable/SandboxFileChooserDialog.html#sfcd-run"><code>sfcd_run()</code></a> method no-longer returns a response directly. Instead, one must connect to the <a href="http://mupuf.org/project/sandboxutils/doc/unstable/SandboxFileChooserDialog.html#SandboxFileChooserDialog-response"><code>response</code></a> signal. Both changes are side-effects of needing to carry method calls across D-Bus to a remote server: IPC is more failure-prone.</p>

<p>A developer might attempt to cheat by selecting a file they want to steal whilst in the configuration state, running the dialog and waiting for a bewildered user to click <code>Cancel</code>. To prevent that, only certain labels can be associated with a positive outcome granting access to files. This is somewhat a regression back to the good old world of stock labels, but I&#8217;m afraid it&#8217;s necessary to prevent social engineering attacks. One can also argue it reinforces consistency across apps to limit the possible labels.</p>

<p><img class="noborder" src="http://www.mupuf.org/images/sandboxutils/sfcd-states.jpg" /></p>

<p>API extension is a bit harder to tackle. At the moment my API does not support certain things. I provide support for embedding (sandboxed) extra widgets into a (privileged) dialog using the <a href="www.freedesktop.org/wiki/Specifications/xembed-spec/">XEmbed spec</a> (knowing that this is temporary and will be replaced with a solution that will be security-assessed later on in Wayland/Weston). Support for file filters will be reintroduced (except for custom file filters which pose the problem of leaking the current folder&#8217;s content). The GFile functions will not be reintroduced without a good reason (because they&#8217;re mostly featuritis from my layman view, and they&#8217;re hard to carry across D-Bus).</p>

<p>For preview widgets, I&#8217;m tempted to say app devs should write thumbnailers rather than previewers. Thumbnailers can be used both by the file chooser dialog and by the file manager, and allow rendering files inside sandboxes! This means no risk of information leakage, and no more dangers inherent to bugs in rendering libraries. In any case, app devs would need to provide a separate piece of code or method to do file previewing from the CLI for us to run a sandboxed previewer live. I&#8217;d rather rely on something like <a href="http://git.xfce.org/xfce/tumbler/">Tumbler</a> and a bit of extra sandboxing than ask app devs to provide sandboxable libraries that end up being used just for previewing.</p>

<p>Finally, the <a href="https://developer.gnome.org/gtk3/stable/GtkFileChooser.html#gtk-file-chooser-get-current-name">gtk_file_chooser_get_current_name()</a> method suggests developers may need to append an extension to the user-provided filename based on the state of a file format selection extra widget. In fact, it seems to me that file format selection is the most common usage for an extra widget. I&#8217;m also a bit annoyed at how extra widgets are placed in <a href="https://developer.gnome.org/gtk3/stable/GtkFileChooserDialog.html">GtkFileChooserDialog</a> (very frankly, the left alignment of the extra widget and right alignment of the file filter make for a big waste of screen real estate).</p>

<p>Since it is known to developers what formats they want to support and how they&#8217;d change the file extension depending on this format, I&#8217;m tempted to have a specialised widget in <a href="http://mupuf.org/project/sandboxutils/doc/unstable/SandboxFileChooserDialog.html">SandboxFileChooserDialog</a> that maps a currently selected format to an extension, without the developer ever seeing the filename and with the user getting immediate feedback. Many interactions can be imagined to allow users to either copy the corrected filename in their buffer and further edit it, or to modify the extension on-the-fly with a <a href="https://developer.gnome.org/gtk3/3.11/GtkPopover.html">GtkPopover</a>. Actually, this widget could serve extra purposes such as enforcing filenames that are compatible with a specific file system (e.g., automatically replacing <code>:</code> with <code>-</code> for FAT), or timestamping saved files. There are only so many things that developers need on a regular basis to improve their users&#8217; experience, but those things will no longer be possible for sandboxed applications unless catered for.</p>

<ul class="gallery">
<li><a href="http://www.mupuf.org/images/sandboxutils/sfcd-original.jpg" class="fancybox" rel="gallery-9c0d75fa8c78e4cb4aff17ffb6b14a97" title="The original SandboxFileChooserDialog"><img src="http://www.mupuf.org/images/sandboxutils/sfcd-original.jpg" alt="The original SandboxFileChooserDialog"/></a></li><li><a href="http://www.mupuf.org/images/sandboxutils/sfcd-autocompletion.jpg" class="fancybox" rel="gallery-9c0d75fa8c78e4cb4aff17ffb6b14a97" title="Mockup #1 for filename autocompletion – the blue widget is clickable and hosts a combo box"><img src="http://www.mupuf.org/images/sandboxutils/sfcd-autocompletion.jpg" alt="Mockup #1 for filename autocompletion – the blue widget is clickable and hosts a combo box"/></a></li><li><a href="http://www.mupuf.org/images/sandboxutils/sfcd-extraline-xml.jpg" class="fancybox" rel="gallery-9c0d75fa8c78e4cb4aff17ffb6b14a97" title="Mockup #2 for filename completion – an extra line offers interactions with a combo box"><img src="http://www.mupuf.org/images/sandboxutils/sfcd-extraline-xml.jpg" alt="Mockup #2 for filename completion – an extra line offers interactions with a combo box"/></a></li><li><a href="http://www.mupuf.org/images/sandboxutils/sfcd-extraline-time.jpg" class="fancybox" rel="gallery-9c0d75fa8c78e4cb4aff17ffb6b14a97" title="Mockup #2 – completion is not only about file extensions"><img src="http://www.mupuf.org/images/sandboxutils/sfcd-extraline-time.jpg" alt="Mockup #2 – completion is not only about file extensions"/></a></li>
</ul>


<h4>Internally, Two Dialogs for one API</h4>

<p>I won&#8217;t describe the whole inner bolts, but it&#8217;s worth nothing that the class used by the server to map to GTK+ and the one used by the client to perform D-Bus calls have the same parent class, and that it is this parent class that is exposed to developers and documented. Consequently, users can choose whether to use sandbox-capable or local dialogs simply by typing <code>--sandbox</code> or <code>--no-sandbox</code> when launching their app. With <a href="https://wiki.gnome.org/HowDoI/DBusApplicationLaunching">D-Bus activatable apps</a>, a desktop environment could determine in situation whether it should launch a sandboxed app or not, and adjust the launching environment and parameters accordingly. App developers only need to use a single lib, and not to worry about compile-time parameters. It&#8217;s not quite the same as not being aware of the sandbox, however: app developers just have to use the sandbox-compatible API all the time – which is why it needs to rock and provide even higher value than GTK+3 !</p>

<h3>Epilogue</h3>

<p>I&#8217;d like to thank Martin (mupuf) for our usual chatting and his sanity checks on the Git tree, but also all the GTK+ and GNOME people I&#8217;ve been bugging on IRC in the past few weeks! <a href="http://blogs.gnome.org/mclasen/">Matthias Clasen</a> also provided very useful input and I&#8217;m afraid he was right on all the line! You guys probably saved me an extra week-end&#8217;s worth of time!</p>

<p>A final note: I don&#8217;t care much whether sandbox-capable APIs are implemented <em>inside</em> a toolkit, or as an additional layer; whether they should be written as plain C code or neat GObjects with properties, etc.; whether one should use G-DBus or another lib, etc. I care about the exposed APIs feeling to app developers like system APIs rather than a toolkit they can tweak in whatever way they want, because the distinction should be made clear and developers should know that hacks will not result in features but in denied accesses. I&#8217;m merely writing code to play with ideas, because that&#8217;s what my job is about (lucky students&#8230;)!</p>

<p>I hope Sandbox Utils can get us started discussing exactly how apps will obtain and use user documents, and so I&#8217;m interested in the opinions of app developers: which features do you need – which are useless to you? What type of data do you want from your users and how do you process it? What makes your day when using a toolkit – and what ruins it and makes you lose time? How can we improve the APIs you use to build apps, to the point where we provide you more value than what you currently have?</p>

<h5>Extra Links</h5>

<ul>
<li><a href="http://mupuf.org/project/sandboxutils.html">Project Page</a> (will be updated)</li>
<li><a href="http://mupuf.org/project/sandboxutils/doc/unstable/index.html">API Reference</a></li>
<li><a href="https://github.com/Sidnioulz/SandboxUtils">GitHub Repository</a></li>
</ul>

]]></content>
  </entry>
  
  <entry>
    <title type="html"><![CDATA[Managing Authorisation and Authentication UIs in a Wayland-Based Linux]]></title>
    <link href="http://www.mupuf.org/blog/2014/03/18/managing-auth-ui-in-linux/"/>
    <updated>2014-03-18T11:00:00+02:00</updated>
    <id>http://www.mupuf.org/blog/2014/03/18/managing-auth-ui-in-linux</id>
    <content type="html"><![CDATA[<h3>1. Introduction</h3>

<p><a id="sec:intro"></a>
After Martin published his article on the security on Wayland, we received plenty of feedback, and among it emerged a discussion on the difficulty of preventing the spoofing of authentication and authorisation dialogs (the former often being used as a by-product for the latter). Such dialogs appear either when you require a privilege escalation (<code>gksu</code>-like) or access to a restricted/privileged interface controlled by the compositor/desktop environment. In the system we envision, applications have restricted privileges and some are awarded special ones (such as the ability to record the screen, receive special keyboard input, etc.). When an app needs a privilege it does not naturally have, it must ask for it through an authorisation protocol. Besides, we also need to provide a means of authentication that resists spoofing, for the few cases where authentication remains necessary. In this article, I explore the threat model, security requirements and design options for usable and secure authorisation and authentication on modern Linux.</p>

<p><strong>Errata:</strong> this article is not about when to use authorisation, but about how to design it. I perfectly concur to the view that the best permission request is the one that does not involve disturbing the user! The ideas discussed here apply for those few edge cases where we may not be able to design authorisation requests away <em>(updated on 2014-03-28)</em>.</p>

<!-- more -->


<h3>2. State of the Art</h3>

<p><a id="sec:sota"></a></p>

<h4>Linux</h4>

<p><strong>Authentication:</strong> Most of the time, a user will be asked to authenticate by a <a href="www.freedesktop.org/software/polkit/docs/latest/"><code>polkit</code></a> authentication agent, when trying to perform an operation that requires another account&#8217;s credentials. Polkit is quite paradoxal to me, being described as providing an &#8220;authorisation API&#8221; yet only knowing how to ask users to authenticate rather than authorise. Other forms of authentication include graphical front-ends to <a href="http://man7.org/linux/man-pages/man1/su.1.html"><code>su</code></a> (<a href="http://techbase.kde.org/Projects/kdesu"><code>KdeSu</code></a> and <a href="https://wiki.gnome.org/Apps/Attic/gksu"><code>gksu</code></a>) which allow running commands with a different identity than one already has.</p>

<p><strong>Authorisation:</strong> At the moment, very few situations trigger proper authorisation dialogs on Linux systems. <code>polkitd</code> seems to be the authorisation API of choice, and it maps requested privileged operations a user&#8217;s UNIX permissions and a system-wide policy. Hence, <code>polkitd</code> would either directly authorise an operation, or it will ask the user to authenticate as someone else who has the requested privileges. With Martin&#8217;s proposal on Wayland security, we seek to introduce some forms of capabilities in userland which would create process authorisation use cases, though.</p>

<p>Here are some examples of commonly-faced authentication dialogs on Linux nowadays (and the only authorisation dialog I could find). As far as I could bother to check, BSD flavours also use <code>polkitd</code>.</p>

<ul class="gallery">
<li><a href="http://www.mupuf.org/images/auth-ui/linux-polkit-1.png" class="fancybox" rel="gallery-05ded84901f1b5952804b79c71886ce7" title="GNOME Shell's polkitAuthenticationAgent.js code, image stolen from http://mathematicalcoffee.blogspot.co.uk/2012/09/gnome-shell-javascript-source.html"><img src="http://www.mupuf.org/images/auth-ui/linux-polkit-1.png" alt="GNOME Shell's polkitAuthenticationAgent.js code, image stolen from http://mathematicalcoffee.blogspot.co.uk/2012/09/gnome-shell-javascript-source.html"/></a></li><li><a href="http://www.mupuf.org/images/auth-ui/linux-polkit-2.png" class="fancybox" rel="gallery-05ded84901f1b5952804b79c71886ce7" title="A very generic polkit authentication agent used by Ubuntu, asking to authenticate as one among authorised users (https://en.wikipedia.org/wiki/Comparison_of_privilege_authorization_features)"><img src="http://www.mupuf.org/images/auth-ui/linux-polkit-2.png" alt="A very generic polkit authentication agent used by Ubuntu, asking to authenticate as one among authorised users (https://en.wikipedia.org/wiki/Comparison_of_privilege_authorization_features)"/></a></li><li><a href="http://www.mupuf.org/images/auth-ui/linux-polkit-3.png" class="fancybox" rel="gallery-05ded84901f1b5952804b79c71886ce7" title="Example of authentication agent from the Polkit documentation, which actually indicates what process wants whose privileges to perform what operation (http://www.freedesktop.org/software/polkit/docs/0.105/pkexec.1.html)"><img src="http://www.mupuf.org/images/auth-ui/linux-polkit-3.png" alt="Example of authentication agent from the Polkit documentation, which actually indicates what process wants whose privileges to perform what operation (http://www.freedesktop.org/software/polkit/docs/0.105/pkexec.1.html)"/></a></li><li><a href="http://www.mupuf.org/images/auth-ui/linux-kdesu.png" class="fancybox" rel="gallery-05ded84901f1b5952804b79c71886ce7" title="A Kdesu dialog informing that a specific program requires authenticating as root (https://en.wikipedia.org/wiki/Comparison_of_privilege_authorization_features)"><img src="http://www.mupuf.org/images/auth-ui/linux-kdesu.png" alt="A Kdesu dialog informing that a specific program requires authenticating as root (https://en.wikipedia.org/wiki/Comparison_of_privilege_authorization_features)"/></a></li><li><a href="http://www.mupuf.org/images/auth-ui/linux-3rdparty-vinagre.png" class="fancybox" rel="gallery-05ded84901f1b5952804b79c71886ce7" title="The VNC client Vinagre asking for a remote password to access a VNC server (http://doc.opensuse.org/documentation/htmlsingle/openSUSE_121/opensuse-kvm.html)"><img src="http://www.mupuf.org/images/auth-ui/linux-3rdparty-vinagre.png" alt="The VNC client Vinagre asking for a remote password to access a VNC server (http://doc.opensuse.org/documentation/htmlsingle/openSUSE_121/opensuse-kvm.html)"/></a></li><li><a href="http://www.mupuf.org/images/auth-ui/linux-3rdparty-gnome-shell-keyring.png" class="fancybox" rel="gallery-05ded84901f1b5952804b79c71886ce7" title="GNOME Shell's keyringPrompt.js code, image stolen from http://mathematicalcoffee.blogspot.co.uk/2012/09/gnome-shell-javascript-source.html"><img src="http://www.mupuf.org/images/auth-ui/linux-3rdparty-gnome-shell-keyring.png" alt="GNOME Shell's keyringPrompt.js code, image stolen from http://mathematicalcoffee.blogspot.co.uk/2012/09/gnome-shell-javascript-source.html"/></a></li><li><a href="http://www.mupuf.org/images/auth-ui/linux-authorisation-seahorse.png" class="fancybox" rel="gallery-05ded84901f1b5952804b79c71886ce7" title="An authorisation dialog used to prevent an application from accessing another's store in SeaHorse. From http://mindbending.org/en/bending-gnome-keyring-with-python-part-4 which explains an attack on Python app authentication in GNOME Keyring"><img src="http://www.mupuf.org/images/auth-ui/linux-authorisation-seahorse.png" alt="An authorisation dialog used to prevent an application from accessing another's store in SeaHorse. From http://mindbending.org/en/bending-gnome-keyring-with-python-part-4 which explains an attack on Python app authentication in GNOME Keyring"/></a></li>
</ul>


<h4>Microsoft Windows</h4>

<p>Windows uses a single interface for authorisation since Vista, which is named User Account Control (UAC). Despite its bad reputation and a couple of glitches and security flaws, a bit of scrutiny into the issues surrounding privilege authorisations convinced me that Microsoft&#8217;s decision to setup UAC is pretty good (the implementation / security benefits not so, as pointed out <a href="http://theinvisiblethings.blogspot.co.uk/2007/02/vista-security-model-big-joke.html">here</a> or <a href="http://theinvisiblethings.blogspot.co.uk/2007/02/confiusion-about-joke.html">there</a> &#8211; read the comments too). I&#8217;m hoping that we can do even better than them by learning from the attacks on UAC and from the reasons that push Windows users to disable it.</p>

<p>UAC is an API that applications must use in order to declare which privileges they require or to ask for extra privileges. Applications start with relatively low privileges, even when the user running them is an administrator. Only some apps signed by Microsoft itself can run on administrator privileges by default. Most apps run with &#8220;medium&#8221; privileges and they can even drop some if they feel they are at risk of being exploited (hence reducing the impact they can have on others). This is commonly done by Web browsers.</p>

<p>When apps require a user intervention to acquire a new privilege or to run, the user is either prompted to authorise the request or to authenticate as an administrator with sufficient permissions (note also the configuration option that requires an administrator to re-authenticate before the authorisation is granted). The interface for all these requests consists of a dim background being applied to the current desktop, and a modal dialog &#8211; completely isolated and protected from other applications &#8211; appearing and waiting for the user to input her information/decision. The dialog presents information on the identity of the app (sometimes as little as the executable name, which is not very informative) and the name of its publisher (with different decorations and icons being used to emphasize whether the user should trust that publisher information or not, from signed Microsoft software to unknown publishers&#8217; software).</p>

<p>The topic of this post is Linux so I won&#8217;t discuss this further, but note that any app can apparently imitate this UAC dialog&#8217;s look (<a href="https://security.stackexchange.com/questions/3759/how-does-the-windows-secure-desktop-mode-work">example with KeePass</a>).</p>

<ul class="gallery">
<li><a href="http://www.mupuf.org/images/auth-ui/Windows_7_UAC.png" class="fancybox" rel="gallery-0f1c956f2ee4072a72b87ed59915913f" title="Taken from https://en.wikipedia.org/wiki/User_Account_Control, rights belong to Microsoft"><img src="http://www.mupuf.org/images/auth-ui/Windows_7_UAC.png" alt="Taken from https://en.wikipedia.org/wiki/User_Account_Control, rights belong to Microsoft"/></a></li><li><a href="http://www.mupuf.org/images/auth-ui/Windows_7_UAC_Signedcode.png" class="fancybox" rel="gallery-0f1c956f2ee4072a72b87ed59915913f" title="Taken from https://en.wikipedia.org/wiki/User_Account_Control, rights belong to Microsoft"><img src="http://www.mupuf.org/images/auth-ui/Windows_7_UAC_Signedcode.png" alt="Taken from https://en.wikipedia.org/wiki/User_Account_Control, rights belong to Microsoft"/></a></li><li><a href="http://www.mupuf.org/images/auth-ui/Windows_7_Password_ND.png" class="fancybox" rel="gallery-0f1c956f2ee4072a72b87ed59915913f" title="Taken from http://www.ntwind.com/tutorials/taking-screenshots-of-uac-prompts-with-winsnap.html, rights belong to NTWind"><img src="http://www.mupuf.org/images/auth-ui/Windows_7_Password_ND.png" alt="Taken from http://www.ntwind.com/tutorials/taking-screenshots-of-uac-prompts-with-winsnap.html, rights belong to NTWind"/></a></li><li><a href="http://www.mupuf.org/images/auth-ui/Windows_7_Password.png" class="fancybox" rel="gallery-0f1c956f2ee4072a72b87ed59915913f" title="Taken from http://www.ntwind.com/tutorials/taking-screenshots-of-uac-prompts-with-winsnap.html, rights belong to NTWind"><img src="http://www.mupuf.org/images/auth-ui/Windows_7_Password.png" alt="Taken from http://www.ntwind.com/tutorials/taking-screenshots-of-uac-prompts-with-winsnap.html, rights belong to NTWind"/></a></li>
</ul>


<h4>Apple OS X</h4>

<p>Albeit very interesting, OS X&#8217;s authorisation system is not discussed because of the outrageous terms of use of their website, covering the documentation I wanted to cite (see point 3.b of <a href="https://www.apple.com/legal/intellectual-property/guidelinesfor3rdparties.html">this document</a>).</p>

<p>Let us just note the following:</p>

<ul>
<li>apps need to get the user to re-authenticate through a third-party daemon to perform privileged operations</li>
<li>apps can check whether the user will need to authorise them for certain operations, so they can reflect their lack of authority in their GUI (useful for system settings)</li>
<li>spoofing attacks on the content of the authorisation dialog are (or were at least in the past) greatly facilitated by the API</li>
</ul>


<h3>3. Privileges in a Wayland-Based Linux</h3>

<p><a id="sec:privileges"></a></p>

<p>Martin has presented a list of restricted privileged interfaces that could require an application to request an authorisation in <a href="mupuf.org/blog/2014/02/19/wayland-compositors-why-and-how-to-handle/">his Wayland article</a>. My list is a bit different because I&#8217;d include privileges unrelated to Wayland / windowed applications. The reason is because consistency of UIs is a very important element of the security mental model of the user: if they are used to seeing the same UI all the time, they will be more suspicious of spoofing attacks (cf. Section 4). Some typical privileges that require authorisation:</p>

<ul>
<li>Screenshot taking and screen recording</li>
<li>Screen sharing (VPN, Skype) &#8211; possibly identical to the one above</li>
<li>Virtual keyboards and pointing devices</li>
<li>Audio (microphone, amplifier) and video (webcam, CCTV) capture devices</li>
<li>Binding to specific keyboard shortcuts one does not own</li>
<li>Clipboard management</li>
<li>Access to data in app-specific password stores in the user&#8217;s keyring</li>
<li>Ability to run without a GUI (off-topic, coming in a later article)</li>
</ul>


<p>I don&#8217;t include interfaces that actually require authentication rather than just authorisation, though I&#8217;ll try to discuss the cohabitation between the two mechanisms. These interfaces show the need for both a within-session authentication UI (e.g., <code>gksu</code>) and a cross-sessions authentication UI (the DM&#8217;s greeter). Generally speaking, one may either need to provide credentials for an administrator&#8217;s account, the root account, or her own account (only when it&#8217;s legitimate to include physical adversaries in the threat model):</p>

<ul>
<li>Installing applications (auth as admin)</li>
<li>Managing users (auth as admin)</li>
<li>Configuring system-wide settings (auth as admin)</li>
<li>Changing one&#8217;s own password (requires re-auth, security best practice)</li>
<li>Session locking (requires re-auth from within the greeter)</li>
</ul>


<p>To sum up, we want to manage three categories of interactions: a user authorising a process, a user authenticating as someone else to borrow their privileges, and a user re-authenticating. <strong>It&#8217;s important to come up with a single way to graphically do all those things, because consistency is a key to making users differentiate the system&#8217;s UI from those of malicious applications.</strong> I would love to see a system presenting the following simple motto to the user: <em>&#8220;We will ask you to type your own password only when you change it. We will ask you to type an administrator&#8217;s password only when you manage system-wide settings.&#8221;</em></p>

<p><strong>Errata:</strong> I would like to clarify that privilege granting, in my view, should be done through three sequential processes and not systematically through authorisation UIs:</p>

<ul>
<li>default system-wide lists of privileged apps (maintained by DEs and by distributors), which can be customised by users</li>
<li>evidence of user intent (e.g., <a href="sid.toolness.org/ch13yee.pdf">Security by Designation</a> or <a href="http://dl.acm.org/citation.cfm?id=2310678">User-Driven AC</a>)</li>
<li>when none of the above works, authorisation prompts (to provide a situated way to manage security for untrusted apps or uncommon use cases)</li>
</ul>


<p><em>(updated on 2014-03-28)</em>.</p>

<h3>4. Threat Model</h3>

<p>A normal threat model would include a justification why certain adversaries exist and a clear view of their capabilities. When designing general-purpose operating systems, we can only consider general adversaries with general capabilities. We need to decide what adversaries we design against and which are not our responsibility&#8217;s but that of the people deploying our system.</p>

<p>Here, we consider <strong>any adversary able to remotely execute code</strong> with the user&#8217;s privileges. For instance, an application may turn out to be malicious, or it may be partially or entirely controlled by an adversary through some crafted input fed into it by the user. An adversary may be very interested in either of <strong>obtaining restricted privileges</strong> (for whatever reason) <strong>or stealing authentication credentials</strong> typically used to grant such privileges.</p>

<h4>Snooping/Spying on authentication dialogs (theft of credentials)</h4>

<p>Very very few people are aware of this, but the current display server X11 does not provide any isolation between the input events of various applications (which in itself is a sufficient argument in favour of the development and adoption of Wayland). You can easily find <a href="http://theinvisiblethings.blogspot.co.uk/2011/04/linux-security-circus-on-gui-isolation.html">tutorials on how to snoop passwords from other windowed applications</a> including <code>su</code>/<code>sudo</code> utilities inside a Terminal app. This allows stealing credentials from any authentication dialog that the user runs. As explained by Martin, this will be <a href="http://mupuf.org/blog/2014/02/19/wayland-compositors-why-and-how-to-handle/">prevented by design in Wayland compositors</a>.</p>

<h4>Injecting input into auth dialogs (theft of privileges)</h4>

<p>Another thing that is possible with X11 is to inject keyboard/mouse input into other windowed applications (<a href="http://gareus.org/oss/genxkey">example</a>). Attacks to utilities like <code>gksu</code> or <code>kdesu</code> are very easy to perform and can be sophisticated to the point of being barely noticeable by attentive users.</p>

<p>One may for instance <strong>perform a timing attack to inject their own binary name instead of the one typed in by the user</strong>. This can be slightly mitigated by displaying the full path of the command to be executed and letting the user read it before authenticating. It can also be entirely mitigated by not letting unprivileged apps inject keyboard events into others&#8217; windows.</p>

<p>Attackers may also invoke any authorisation API themselves and <strong>inject mouse events to click on the &#8220;Authorise&#8221; button of the authorisation dialog</strong> on behalf of the user. There are some hacks to protect against this such as randomizing the starting position of the mouse cursor, dialog and dialog contents, etc. However, the only one proper solution to this problem is making sure that no unprivileged application can inject mouse events.</p>

<p>I wrote a simple <a href="http://www.mupuf.org/media/files/poc-gksu.tar.gz">proof-of-concept</a> that injects a prefix to the path of a command when invoking <code>gksu</code>. To use it, you need to time it so that the events are inserted after the user typed the command and before they type Return, leading to the execution of malicious <code>/tmp/myscript.sh</code> rather than benign <code>/usr/bin/myscript.sh</code>. Note that this is not a <code>gksu</code> vulnerability but a X11 one. If the user called <code>gksu myscript.sh</code> instead, I&#8217;d just need to move the cursor in between <code>gksu</code> and its argument and then inject the prefix that runs my own malware. If I don&#8217;t know the name of the invoked binary, I could replace it rather than prepend it.</p>

<p>These attacks are also <a href="http://mupuf.org/blog/2014/02/19/wayland-compositors-why-and-how-to-handle/">prevented by design in Wayland</a>.</p>

<h4>Confused deputy (theft of privileges)</h4>

<p>I&#8217;m just giving some examples on Windows Vista and 7 here because it&#8217;s a bit of a larger issue than the graphic stack&#8217;s role in UI design.</p>

<ul>
<li>Windows 7 UAC: the user could feed their own library to a system utility, which was white-listed for UAC; The library could then perform authorisation queries with the identity of that system utility and skip authentication (<a href="http://withinwindows.com/2009/02/04/windows-7-auto-elevation-mistake-lets-malware-elevate-freely-easily">link</a>)</li>
<li>Windows Vista UIPI: apps can list windows currently open to find which privileged processes to contact for confused deputy attacks (<a href="http://theinvisiblethings.blogspot.co.uk/2007/02/running-vista-every-day.html">link</a>)</li>
</ul>


<p>Conclusion: we must keep track of which apps possess privileges and hide them from unprivileged apps, in a systematic way. The matter is not discussed in this article, but comments and ideas are very welcome.</p>

<h4>Spoofing dialog UIs (theft of credentials)</h4>

<p>This is in my view the hardest attack to prevent. Spoofing occurs when a third-party application imitates the appearance of an auth dialog in order to cause the user to interact with it as they would with the real dialog. If you spoof an authorisation dialog, then you will obtain nothing as the user &#8220;authorising&#8221; your request on a spoofed dialog will not lead you to receiving the corresponding privilege from the system. Authorisation spoofing is at best annoying noise for the user, nothing that concerns the Wayland protocol.</p>

<p>However, <strong>authentication spoofing has very dramatic consequences:</strong> if a spoof gets the user to type in their real credentials, those can be used to log into the user&#8217;s session or even elsewhere (because of our propensity to reuse credentials whenever possible). Protecting against spoofing is only possible by crafting a UI that cannot be entirely imited (I&#8217;ll present Martin&#8217;s ideas on that below).</p>

<p>However, what really matters is the ability of the user to systematically and immediately distinguish any fake from the true UI and to associate the fake with a strong feeling of insecurity. Otherwise, spoofing may very well still occur. The solution to this is to <strong>have the authentication dialog authenticate itself to the user</strong> by presenting a secret/credential shared with the user (<a href="https://linuxfr.org/nodes/101307/comments/1523850">thanks to GaMa</a> for inspiring this requirement). The secret should be used for that purpose, and not be one that is used to authenticate the user as this would allow shoulder surfing from physical adversaries. This means <strong>we need a way to generate such a secret when an account is created, to update or modify it, and to store it securely</strong>.</p>

<h4>Other attacks</h4>

<p><strong>Spoofing session greeters:</strong> Wayland should impose restrictions on the capabilities of unprivileged applications to leave some design space for greeter designers to make their UIs distinguishable from normal apps&#8217; windows. For instance, unprivileged fullscreen windows shouldn&#8217;t be modal, and greeters could be let to display authentication dialog secrets to users. Any interfaces related to knowing whether the user is active or inactive or related to (especially automatic) session locking and greeter preferences are good candidates for privileged operations as they would allow an attacker to time the spawning of a fake greeter and prevent the real one from being invoked.</p>

<p><strong>Environmental attacks may also arise:</strong> if a distribution allows user-installed <strong>locale files</strong>, a malicious app may replace the descriptions of authorisations in order to fool the user into believing it is asking for more benign privileges than it actually does. Likewise, some <strong>theme engines</strong> may give theme designers the opportunity to customise specific fields of a UI that may be used to design a dialog hiding away security details such as the app name and injecting textual content instead (something easily feasible with CSS 3 for instance).</p>

<p><strong>Management of interpreters:</strong> When an application is expected to run user-supplied untrusted code, it should not qualify for privilege granting (or only for disposable ones). This concerns interpreters such as Python which can for instance cause the GNOME Keyring to <a href="http://mindbending.org/en/bending-gnome-keyring-with-python-part-4">not correctly identify the requesting app</a> (mistaking it for the <code>/usr/bin/python</code> binary).  We might need some interpreter-specific black magic or hacks to identify apps within Python and this is well outside my domain knowledge, so I&#8217;ll leave this issue aside for now and would welcome any contribution to our design!</p>

<p><strong>App identity spoofing:</strong> In a very similar fashion to the interpreter problem, Windows Vista shipped a binary that allowed running Control Panel plugins with a Microsoft-signed utility&#8217;s identity (<a href="http://www.symantec.com/connect/blogs/example-why-uac-prompts-vista-can-t-always-be-trusted#A43">link here</a>), hence preventing users from knowing which app required authorisations.
In OS X, spoofing the app&#8217;s name, the description of the desired permission and a bunch of other things was also possible at least in 2009, though I didn&#8217;t check how reproducible that issue is now. The great flexibility of their permission requesting API surely made it very easy for malware writers to lie to users about their intentions and what it was they were asking for (<a href="http://www.symantec.com/connect/blogs/mac-os-x-dialog-box-spoofing-believe-me-i-m-system-preferences">click here for more</a>). Even better, <a href="https://unix.stackexchange.com/questions/87288/how-do-i-tell-what-program-is-asking-for-a-password">some UIs don&#8217;t even attempt to show the app&#8217;s identity</a> and just leave the user clueless.</p>

<p><strong>Linking to or injecting code into privileged apps:</strong> What worries me more is when a genuine app that is privileged by default (e.g., your virtual keyboard software) or can acquire privileges through the user (a Skype call in which you temporarily authorise screen sharing) is exploited into running malicious code. There are a number of obvious techniques for that such as <code>LD_PRELOAD</code> code injections that would trigger some malicious code in genuine authorised applications (examples <a href="https://stackoverflow.com/questions/378158/code-injection-solaris-linux">here</a> and <a href="http://rafalcieslak.wordpress.com/2013/04/02/dynamic-linker-tricks-using-ld_preload-to-cheat-inject-features-and-investigate-programs/">here</a>), or <a href="https://www.youtube.com/watch?v=6ZcsoBzunUY">hooking into a running privileged program and injecting code</a> using <code>ptrace</code>. These attacks are very tough to defend against and will be examined in a future article (probably featuring PID namespaces).</p>

<h3>5. Security Requirements</h3>

<p>The identified attacks already give us an idea of what requirements must be used to design appropriate auth UIs:</p>

<ol>
<li>Unprivileged applications should not be let to read/modify the input received by other applications&#8217; windows</li>
<li>Applications holding any kind of privileges must be protected from all forms of code injection / debugging.</li>
<li>Applications should receive privileges (and more so be privileged by default) only if they cannot be invoked / controlled by other unprivileged ones</li>
<li>Interpretors of any kind should never receive a privilege, unless the piece of code being interpreted can be safely identified and the privilege cannot be reused/shared</li>
<li>Authorisations make much more sense in a system where apps are sandboxed and access to file systems is limited. If you can&#8217;t take a screenshot but can call the screenshot app and then read the screenshot file, then screenshot-taking privileges are useless</li>
<li>There should be a GUI debugging mode where developers can record the auth UI, <a href="http://www.froglogic.com/squish/gui-testing/index.php">perform automatic testing</a>, etc.</li>
<li>The UI should always spawn through a trusted path, with an environment entirely controlled by the compositor; if the user can use a previous environment, it should be emphasized that this is an attack vector, and there should be no way for any third-party to enable this option prior to the UI being called</li>
<li>Operations leading to authorisations should be documented and limited, convey a clear meaning; Do not allow custom authorisations (else who would verify the description of the authorisation is clear to the user?)</li>
<li>Apps must be identified clearly by the compositor (names taken from <code>.desktop</code> files in <code>/usr</code>, <em>absolutely never</em> from something modifiable by a user-run process)</li>
<li>Authentication dialogs should authenticate themselves in a way very obvious and non-time-consuming for the user</li>
<li>In an ideal world, there would be one window per process and the user would know which window rather than which process is authorised to do something (the explanation behind this one is quite off-topic and will come in a later article)</li>
<li>In an utopian world, the user <em>knows which data can be affected by an authorisation</em> (e.g., whether their bank website currently on screen will appear on a screenshot, which files&#8217; content can be leaked to an app, etc.) so s/he can make a `blink of an eye&#8217; decision; the effects of authorisations should be tangible</li>
</ol>


<h3>6. Authorisation UIs</h3>

<p>Because I&#8217;m not so convinced that we&#8217;ve yet found a UX that makes spoofing untractable by design, I believe <strong>it&#8217;s important to separate authentication from authorisation so that spoofing does not compromise valuable tokens</strong> (i.e., authentication credentials). Authentication has, for long, been used as a proxy for authorisation on information systems, assuming maybe that with the all-too-flexible APIs an app can use to impersonate the user who runs it, asking a user for a secret was the only way to distinguish her from the app. Since we&#8217;re speaking about window isolation in Wayland then we can finally start to put some trust on GUI interactions with the user conveying an authentic rather than fabricated meaning. Hence, GUI operations may become a viable proxy for authorisation tokens. An authorisation token is typically a one-time use object generated by a trusted authority (the compositor) and used by the system controlling access to privileged interfaces (the WSM).  Such tokens can be distributed by having the user interact with an authorisation UI controlled by the compositor.</p>

<h4>Asking for privileges</h4>

<p><span class='pullquote-right' data-pullquote='Security prompts often offer no benefit for the fulfillment of users&#8217; primary task and so are just treated as an unavoidable disturbance.'>
Essentially, authorisation UIs require that a user receives information about a request (the identity of the requester and what is being asked for) and makes a decision (a &#8220;Authorise&#8221; and a &#8220;Deny&#8221; button, or variants in formulation). Additional information can be given such as the history of authorisations for the requester, the duration of the authorisation or whether the system has any trust in the application (if possible). Anything provided by the app itself should be left out of the UI as attackers will make sure to exploit it &#8211; typically one should not let the app explain why the authorisation is being requested, as <a href="http://dl.acm.org/citation.cfm?id=1979245">users&#8217; decisions are influenced by such information</a>. Besides, it is a well known fact among HCI practitioners that <a href="http://dl.acm.org/citation.cfm?doid=2470654.2481328">people get habituated to computer prompts and tend to ignore their contents</a> when they are frequent enough. Security prompts often offer no benefit for the fulfillment of users&#8217; primary task and so are just treated as an unavoidable disturbance. There often is no noticeable immediate consequence to a wrong security decision, and so users will be more likely to authorise systematically than if they could monitor how the authorisation is being used. Hence, I do not assume that the user does realise:
</span></p>

<ul>
<li>which app is asking for a privilege</li>
<li>what privilege is being requested</li>
<li>how long it will be granted for</li>
</ul>


<p>I&#8217;m interested in strengthening the basic authorisation dialog so as to obtain stronger evidence that the above properties hold. When it comes to the privilege being properly identified in a blink-of-an-eye, I can only think of having a very effective visual representation of each privilege, such as displaying a large icon (possibly animated if it helps to come up with a representation, e.g., data flows) on the dialog. Images are recognised better than words (<a href="http://memory.psy.cmu.edu/downloadPaper.php?name=10Oates_Reder">though not always recalled better</a> especially if hard to label, which means we should provide the label with the image). Recognition is superior probably because they contain richer information than short sequences of words. For the same reason, images can be made highly distinguishable from one another for each privilege and hence help users notice a new privilege and take the time to read its description. Below are some quick and dirty examples of such visualisations (showing as well my design iterations).</p>

<ul class="gallery">
<li><a href="http://www.mupuf.org/images/auth-ui/authorisation-mockup-1.jpg" class="fancybox" rel="gallery-7eb90a4f446c8d6ab333949be518c619" title="Firefox asking for permission to open its personal password storage in the system's keyring (which would replace browsers' current master password)"><img src="http://www.mupuf.org/images/auth-ui/authorisation-mockup-1.jpg" alt="Firefox asking for permission to open its personal password storage in the system's keyring (which would replace browsers' current master password)"/></a></li><li><a href="http://www.mupuf.org/images/auth-ui/authorisation-mockup-2.jpg" class="fancybox" rel="gallery-7eb90a4f446c8d6ab333949be518c619" title="Skype asking to share the user's screen with a third-party. Skype is installed with a repository package, but not configured by default to be able to capture the screen"><img src="http://www.mupuf.org/images/auth-ui/authorisation-mockup-2.jpg" alt="Skype asking to share the user's screen with a third-party. Skype is installed with a repository package, but not configured by default to be able to capture the screen"/></a></li><li><a href="http://www.mupuf.org/images/auth-ui/authorisation-mockup-3.jpg" class="fancybox" rel="gallery-7eb90a4f446c8d6ab333949be518c619" title="An unknown script trying to act as a virtual keyboard. The user must be warned that the system cannot guarantee the identity of the app, and that the consequences of authorising are unknown"><img src="http://www.mupuf.org/images/auth-ui/authorisation-mockup-3.jpg" alt="An unknown script trying to act as a virtual keyboard. The user must be warned that the system cannot guarantee the identity of the app, and that the consequences of authorising are unknown"/></a></li>
</ul>


<h4>Knowing Who&#8217;s Asking</h4>

<p>As for app identification, I don&#8217;t think that displaying a short name or icon prominently is sufficient. This data cannot be trusted especially for applications not installed through one&#8217;s distribution repositories. The user should see which running application is requesting a privilege rather than just be given a name. Apps without a window, panel plugin or other GUI element can hardly fulfill this requirement, because users have nothing to hold on to to identify whether that app is running or to shut it down.</p>

<p>Besides, app names and icons identify an application rather than a running instance of it &#8211; a specific window or other tangible entity the user can interact with. Tangibility plays an important role in facilitating users&#8217; understanding of a technological phenomena (examples <a href="http://link.springer.com/article/10.1007/s00779-004-0308-5">on network infrastructures</a> and on <a href="http://isr.uci.edu/projects/swirl/papers/SOUPS06-Final-Submitted.pdf">file sharing mechanisms</a>), hence it would be desirable to provide a relationship between the UI and the app, that makes the user <em>feel</em> which application is receiving a privilege. There are such relationships of spacial nature:</p>

<ul>
<li>Authorisation UI within the app&#8217;s window (when a window exists) &#8211; zero-step cost</li>
<li>drag and drop or copy and paste an authorization token (made tangible) to the app&#8217;s GUI &#8211; one-step cost</li>
<li>using techniques like in <a href="http://cups.cs.cmu.edu/soups/2013/proceedings/a6_Bravo-Lillo.pdf">&#8220;Your Attention Please&#8221;</a> &#8211; zero to many-steps cost</li>
</ul>


<p>In this model, apps would lose their privileges when their GUI is shut (regardless of whether the underlying process still runs) and be restricted from acquiring new ones. Applications without a GUI could obtain a special privilege (&#8220;Performing privileged operations in the background/without telling you&#8221;) to bypass this restriction. Below are some examples of authorison icon mockups I made (with one very obvious trademark violation that cannot be used). Ideas and critiques are welcome, quite obviously.</p>

<p><img class="center" src="http://www.mupuf.org/images/auth-ui/authorisation-icons.jpg" alt="Icons representing various privileges. From top to bottom, from left to right: Keyring -- a magnifying lens passed over a file named 'Passwords' reveals its content / Privileges without GUI 1 -- a remake of a famous movie's logo showing a puppeteer's hand controlling a handful of privileges / Privileges without GUI 2 -- a similar puppeteer's hand, controlling the webcam and password store privileges / Virtual keyboard 1 -- a keyboard is disconnected from a computer, and a monitor shows a virtual keyboard window / Virtual keyboard 2 -- a monitor shows a virtual keyboard being clicked on / CCTV or Webcam 1 -- a human is being watched by a CCTV camera / Webcam 2 -- a human is being watched by a webcam and listened to by a microphone." /></p>

<h3>7. Authentication UIs</h3>

<p>Authentication is much more sensitive to spoofing than authorisation, as previously explained. Let us review three defence mechanisms we came up with for this task: unspoofable UI, Windows&#8217;s secure attention sequence, and UI authentication to the user.</p>

<h4>Stuff Only the Compositor Can Do</h4>

<p>Martin proposed that an unspoofable UI uses abilities that only the compositor has. For instance, a compositor can modify the position, size and display of all windows. When an authorisation UI is launched, windows that were already open could have a wobbly animation applied to them (until the UI is closed). <a href="http://culturacolectiva.com/nydia-lilian-tormentas-visuales/">Some animations</a> are even particularly effective at causing epilepsy attacks! :-) If animations cannot be applied on a system (legacy GPUs, a11y issues, etc.), simple modifications such as an Expose-like display of windows could indicate that the compositor runs the authorisation UI&#8217;s code.</p>

<p>The most compelling issue with manipulating only windows is that it requires windows to be open in the first place. Other approaches could include taskbars, systrays or even the desktop wallpaper, knowing that in each case the information to be used must be hidden from all desktop apps the user runs and that it must vary or be routinely customised by users. The idea is to display/transform elements of the desktop that exist regardless of the app requesting an authorisation, and to make sure that a normal app cannot display exactly the same thing. It also matters that the transformation being applied is very consistent, so the user can be habituated to it and notice differences more easily. Indeed, an attacker may try to apply animations with generic windows placed randomly, or a generic task bar, hoping that the user will not pay attention to the information displayed in the background. This is especially true if such a UI is deployed in a system where the DE&#8217;s config files and the wallpaper can be read by any application. The attacker may also try to run a simple dialog with no animations/transformations if those are not obvious. In any case, security remains mostly the responsibility of the user.</p>

<p>As far as I&#8217;m concerned, I doubt users make the link between the presence of certain visual cues in the background rather than others and the fact that a UI is not a fake but controlled by the compositor. They probably just expect a window to declare who it is run by &#8211; system or apps (links to serious surveys/studies on the topic much appreciated), and I would assume that as long as the spoof looks similar enough to the real UI, attacks will work. Let&#8217;s not throw the baby with the bath water, though. Such ideas may make it a tiny bit harder to abuse the user, at relatively little development cost. Besides, this measure costs nothing to the user in terms of mandatory extra steps to take in a decision process. This means the usage of this defence mechanism is optional and depends on the user&#8217;s willingness to waste time, rather than imposed on her/him.</p>

<h4>Applying Windows&#8217; Secure Attention Sequence</h4>

<p>Input filtering in Wayland allows us to catch and process specific keyboard key sequences that are not exposed to applications. Windows uses the infamous <code>Ctrl+Alt+Suppr</code> sequence (because it was virtually unused by applications at the time Vista was being developed) prior to displaying an authentication dialog to its users. Indeed, users are expected to notice authentication UI spoofs because these would fail to react to them performing the <code>Ctrl+Alt+Suppr</code> sequence. The name for this sequence is Secure Attention Sequence (SAS later on).</p>

<p>Timothee proposed to recycle this idea in a slightly different way. In his model, rather than the auth UI asking the user to perform the SAS, it is the fact of typing the SAS that would allow the auth UI to spawn and allow the currently focused application to request a privilege to the user. Apps would then have to ask the user to type a SAS in whatever way they prefer, which allows users to do nothing if they&#8217;re not willing to authorise the application. This would alleviate some of <a href="https://en.wikipedia.org/wiki/User_Account_Control#Criticism">the exasperation Windows users had with Windows User Account Control</a>, at the expense of some clarity on when the user&#8217;s expected to authorise/authenticate.</p>

<p>There are many potential attacks and reasons for confusion here. What should happen when the user presses SAS but no application is requesting privilege? What if an app asks the user to press SAS, and attempts to spawn an authentication dialog before the user does so (listen to <code>Ctrl+Alt</code> sequences to improve your odds)? Would they key in their password? Even weirder is the case where an app spawns a spoof dialog right after a successful authentication with the compositor&#8217;s UI: the user would probably consider this a glitch/bug and re-type their password.</p>

<p>An app could also ask the user to press a SAS by giving it a very credible justification, and then ask the system for an entirely different privilege, hoping that the user would not double-check the justification given in the compositor-controlled UI. As I&#8217;ve said before, users are quite sensitive to justifications and would probably be less on their guards after they typed in their <code>SAS</code> since they&#8217;ve essentially already made the decision to authenticate.</p>

<p>Some apps could even try to get the user to authenticate without even bothering with asking for a SAS to be typed. After all, major Web broswers already use keyrings with custom master passwords, and there probably are a bunch of other applications asking for users to type passwords on a regular basis. I&#8217;m actually interested in hearing from developers of such applications&#8217; opinions on replacing their authentication mechanisms with a system-provided per-app keyring that only requires (secure) authorisation. The keyring could store a decryption key for those like Google Chrome who want to synchronise passwords with a third-party server, yet allowing users to use authentication-free keyrings and hence reduce the extent of harmful authentication habituation.</p>

<p>All in all the design sounds interesting but is not without consequences. The main issue for me is that plausible attacks result in credential theft, in a system that does come with a systematic cost to the user. We should only consider SAS mechanisms if we cannot find better for the same interaction cost.</p>

<h4>Authenticating to the User</h4>

<p>Apart from the aforementioned anti-spoofing measures, we&#8217;ve identified one key requirement for secure authentication UIs: they must authenticate themselves to the user. Obviously such a dialog should be modal and protected from any form of recording, including applications with screen recording or sharing privileges. The idea that was originally <a href="https://linuxfr.org/nodes/101307/comments/1523850">proposed by GaMa on LinuxFR</a> was to display a secret image chosen by the user at account creation time. The reason I like the idea of an image is that it is easier to recognise than a word or piece of text. Though, one must also consider accessibility issues associated with visual content, and so it should be made possible for a secret to also take the form of a passphrase. Time&#8217;s running and so I won&#8217;t be making mock-ups now for those dialogs.</p>

<p>A secret could be generated at two different moments of an account&#8217;s life: when the account is created in a GUI environment (Live OS installer or account creation from an existing system); or when the user enters the session for the first time (a bit intrusive though). The latter is also necessary should the user&#8217;s secret be erased (which may happen when a disk dies, for instance). Distributions could ship a database of ~120 different thumbnails unsimilar to one another, and of course these should be displayed in a completely random order to guarantee diversity between accounts for those users who don&#8217;t bother to pick one and just click &#8220;Next&#8221; (hopefully these will be able to identify and recognise their secret image over time before they get attacked). When there is evidence the user cannot view images (running the high-contrast theme, having checked a box in the installer indicating a11y issues, running a11y software, etc.), these could be replaced by a database of author citations, or could be accompanied by a description to allow switching back and forth between the normal and a11y modes of the desktop environment.</p>

<p>When it comes to storing this secret, we could either harness mandatory access control enforcement systems (<a href="http://selinuxproject.org/page/Main_Page">SELinux</a>, <a href="http://tomoyo.sourceforge.jp/">TOMOYO Linux</a>, etc.), or create private filesystems for each process. Martin thinks it should be feasible with Linux filesystem namespaces (as supported by <code>systemd</code> <a href="https://fedoraproject.org/wiki/Features/ServicesPrivateTmp">providing private tmp directories to services</a>). I will be looking into options for process isolation (including FS) in the next few months anyway.</p>

<p>From this I conclude that the main issue with unspoofable authentication UIs is accepting the idea of adding a step to user enrollment on Linux systems, which is not an easy one. However, in a world where we still force authentication after authentication down the user&#8217;s throat, I believe the threat of spoofing is too big to be left unaddressed.</p>

<h3>8. Conclusion &amp; Acknowledgments</h3>

<p>First of all I would like to thank <a href="http://www.mupuf.org/contact/mupuf.html">Martin Peres</a> for our lengthy discussions of the threat model and solutions and for coming up with some of the ideas exposed here. Likewise, <a href="https://tim.siosm.fr/">Timothée Ravier</a> has helped shape part of this article, and pseudonymous linuxfr contributor GaMa has hinted a very useful design idea for authentication UIs.</p>

<p>In this paper, I&#8217;ve discussed common attacks against auth UIs, summarized the needs and security/usability requirements for the tasks of authorisation and authentication, and proposed initial interaction designs that would bring what I view as an acceptable compromise between usability, user experience and security. I want to insist on the importance of keeping a clear semantic separation between authorisation and authentication, as both tasks have very different security risks associated and as the cost of authorisation can be greatly reduced by avoiding replacing it with the more interaction-heavy task of authentication.</p>

<p>Besides, credentials spoofing would be harder if all legitimate authentications they are exposed to are performed through a unique interface &#8211; so that they grow used to seeing exactly the same thing. So whatever solution we design for Wayland privileges must be re-usable by other FOSS projects that need to perform authorisation or authentication (e.g., password stores). Rather than reinventing the wheel, I think one should look to extend/adapt <code>polkitd</code>&#8217;s API (to distinguish between authorisation and authentication) and then constrain the APIs for <code>polkitd</code> authorisation and authentication agents to reflect on our identified requirements.</p>

<p>Wayland compositors could then use <code>polkitd</code> and their own auth agents to expose the Wayland-defined privileges and the others I discuss in this article, should they want to. I believe the Wayland project is an excellent place to first acknowledge the need for better polished auth UIs and to provide the necessary infrastructure laid out above. I hope to have demonstrated that building safe auth UIs goes far beyond the extent of just a desktop environment or just the graphic stack. The corollary to this is that compositor developers, distributors and ultimately app developers could/should be issued with recommendations on what next steps, so that we ultimately build a more secure and consistent experience for Linux desktop environment users. Hopefully others will agree with me and I will be able to take a FreeDesktop spec out of this article. If you too think fixing Linux&#8217;s security is worth the effort, please comment below!</p>

<h5>Are you a student?</h5>

<p>If you&#8217;re knowledgeable about usability evaluation (or ergonomics/interaction design/UX), I&#8217;m looking for someone to evaluate the various designs above (with an academic publication in mind). This can be made as a UCL MSc project supervised by me and Prof. Angela Sasse, and I&#8217;m keen to explore available options for non-UCL students willing to collaborate with us.</p>
]]></content>
  </entry>
  
  <entry>
    <title type="html"><![CDATA[Wayland compositors - Why and how to Handle privileged clients! (Updated on the 2014/02/21)]]></title>
    <link href="http://www.mupuf.org/blog/2014/02/19/wayland-compositors-why-and-how-to-handle/"/>
    <updated>2014-02-19T00:00:00+02:00</updated>
    <id>http://www.mupuf.org/blog/2014/02/19/wayland-compositors-why-and-how-to-handle</id>
    <content type="html"><![CDATA[<p>It&#8217;s been more than 3 years since <a href="http://www.mupuf.org/blog/2010/11/23/we_have_won_the_security_challenge_initiated_by_the_french_research_agency/">my last security-related blog post</a>. One might think I lost interest but the reality is that I just suck at blogging. This blog post is meant as a summary of a debate a few of us had privately and publicly on the Wayland ML.</p>

<p>Disclaimer: Although I try to be up to date with everything that surrounds security of X11 and Wayland, what I write in this article may be outdated, incomplete or simply blatantly wrong. This article being the basis for a document I&#8217;m planning on writing to help Wayland compositor developers implement secure compositors, I would love to hear your feedback!</p>

<!-- more -->


<p><a id="sec:need_security"></a></p>

<h3>1. The needs behind every security property</h3>

<p>Before dwelving into how to securely export privileged features to graphics servers, let&#8217;s first have a look at the different security properties that can be expected by users. I&#8217;ll try to illustrate all of them with a simple example that should be important for everyone. Of course, we can imagine many other situations but that&#8217;s an exercise left to the reader.</p>

<p>On a graphics server, the user can only be concerned about 2 cases, input and output. The input being what is used by the user to interact with the computer while the output is what is displayed back to the user.</p>

<h4>Confidentiality</h4>

<p>Input confidentiality means that only the application that is supposed to get the keyboard and mouse events receives them. This is important to avoid situations where a malicious application would record keyboard strokes while you enter a password (key-loggers) or record your mouse movements when clicking on a graphical digit keyboard (used by some bank websites to authenticate you). The result of both cases is that you&#8217;ve lost your credentials&#8217; confidentiality and someone can now impersonate you.</p>

<p>Output confidentiality means an application should not be allowed to read back what is displayed by other applications or the entire screen. At the moment, any application can read the whole screen&#8217;s content. This is problematic when e-shopping because after keying-in your credit card number, it is displayed and one screen-shot can leak those bank credentials (when the heck will they get their shit straight?). No output confidentiality basically means that whatever you can read can be read by another application (and likely be sent over the internet too).</p>

<h4>Integrity</h4>

<p>Input integrity means that no application can pretend to be the user and send forged input to another application. If this were allowed, applications could perform <a href="https://en.wikipedia.org/wiki/Confused_deputy_problem">confused deputy</a>-like privilege escalations. Integrity doesn&#8217;t only mean that the input hasn&#8217;t been tampered with, it also means that the source of the data really is the one advertised. Without integrity, if an application was not allowed to directly access a file but the user could, the application would only have to fake sending the &#8220;Alt + F2&#8221; key sequence and key-in the commands it wants to execute. This isn&#8217;t problematic in poorly-secured Operating Systems but becomes a problem when applications start running with less privileges than the user who started them.</p>

<p>Output integrity means no application can modify the content that is displayed by another application. It also means <a href="https://en.wikipedia.org/wiki/Non-repudiation">non-repudiation</a> of the output content, if it is on the screen, it really comes from the application it claims to be from. An attack scenario could be for an application to launch Firefox on the URL http://www.hsbc.fake.com which would be a copy of the HSBC website, except it would steal your credentials before redirecting you to the real one. With no output integrity, the malicious application could alter the URL bar of Firefox to make it look like you are connected to https://www.hsbc.com and not http://www.hsbc.fake.com. This would make the attack impossible to visually detect, even by careful users.</p>

<h4>Availability</h4>

<p>A service is available if legitimate users can access it whenever they want. One way to make other applications not available is for an application to run full-screen and not allowing the user to switch back to using other applications. This feature is useful for screen lockers but applications such as games often make use of it, which can be very annoying. It has also been found that at least one anti-cheat systems took advantage of games running always in the foreground in order to use the computational power of the gamer&#8217;s PC <a href="http://www.wired.com/wiredenterprise/2013/05/esea/">to mine bitcoins</a>, making it harder for users to realise the problem.</p>

<p>Input availability means no application can redirect all/most of the user&#8217;s input to itself, preventing other applications from receiving input when the user intended them to. This can be achieved by not allowing unconditional routing of events to a single application, thus blocking the compositor from receiving events for the <code>Alt + Tab</code> shortcut.</p>

<p>Output availability means no application can prevent other applications from displaying their content on the screen, if the user desires to see that content. An example would be an application being full-screen and &#8220;top-most&#8221;, thus blocking users from viewing/accessing other applications.</p>

<p><a id="sec:improving_security_x"></a></p>

<h3>2. Improving the security of X</h3>

<p><img class="center" src="http://www.mupuf.org/images/misc/X11_logo.png" /></p>

<p>At XDC2012, <a href="http://tim.siosm.fr/">Tim</a> and I gave a presentation about the <a href="http://phd.mupuf.org/publication/2012/09/19/xdc2012_secu_recap/">security
of the Linux graphics stack</a> which has been relayed
by <a href="http://lwn.net/Articles/517375/">LWN</a> and <a href="https://linuxfr.org/users/bluestorm/journaux/un-article-sur-la-conception-securisee-des-serveurs-graphiques-x-wayland">LinuxFR</a>. The result wasn&#8217;t pretty, as indeed a user can expect neither confidentiality nor integrity or availability on inputs and outputs when using the X11-based standard graphics server.</p>

<p>Input confidentiality is limited as it is possible for any X11 client to snoop on the keyboard inputs and mouse position, but not mouse click events or wheel scrolling (<a href="http://www.jwz.org/xscreensaver/faq.html#mouse-idle">src</a>).</p>

<p>The only security property that can truly be fixed on X11 is the integrity of application&#8217;s output graphic buffers (the image of the application that is displayed on the screen). This work requires applications to share buffers with the x-server using <a href="https://www.kernel.org/doc/Documentation/dma-buf-sharing.txt">DMA-Buf</a> instead of <a href="http://blog.ffwll.ch/2011/05/gem-overview.html">GEM</a>&#8217;s buffer sharing mechanism which has very limited access control. GEM is the kernel interface for open source drivers to allocate graphic buffers and allow applications to share them.</p>

<p>Fixing the other security properties is impossible using the X11 protocol as it would break too many legitimate applications that rely on those features. Disabling access to these features would effectively make the X-Server non-compliant with the X11 protocol. Only authorising the legitimate applications to access those restricted interfaces wouldn&#8217;t increase the security of the system either because of the amount of applications who do require them. As there is a new graphics server emerging, we have decided to fix this one and not repeat X&#8217;s mistakes. In summary, this is where the graphics stack security currently stands:</p>

<pre><code>+-----------------+---------+----------+
|    Property     |  Input  |  Output  |
+-----------------+---------+----------+
| Confidentiality |   NO    |    NO    |
|    Integrity    |   NO    |    WIP   |
|  Availability   |   NO    |    NO    |
+-----------------+---------+----------+
</code></pre>

<p><a id="sec:wayland"></a></p>

<h3>3. Wayland</h3>

<p><img class="center" src="http://www.mupuf.org/images/misc/wayland_logo.png" /></p>

<blockquote><p>Wayland is intended as a simpler replacement for X, easier to develop and maintain. GNOME and KDE are expected to be ported to it.</p>

<p>Wayland is a protocol for a compositor to talk to its clients as well as a C library implementation of that protocol. The compositor can be a standalone display server running on Linux kernel modesetting and evdev input devices, an X application, or a Wayland client itself. The clients can be traditional applications, X servers (rootless or fullscreen) or other display servers.</p>

<p><a href="http://wayland.freedesktop.org/">Source</a></p></blockquote>

<p><a id="sec:current_security_wayland"></a></p>

<h4>Current state of security within Wayland compositors</h4>

<p>The first good point of the Wayland protocol is input management. At the moment, the protocol doesn&#8217;t allow snooping on the input (confidentiality), generating input events (integrity) nor for an application to grab all events (availability). However, Wayland clients allowing <code>LD_PRELOAD</code> are still vulnerable to input attacks, as <a href="https://github.com/MaartenBaert/Wayland-keylogger">demonstrated</a> by Maarten Baert. This is not Wayland compositors&#8217; problem so it won&#8217;t be taken into account in this discussion.</p>

<p>Just like with X, there are multiple ways for applications to send their output buffers to the graphics server. With Wayland/Weston, applications can use shared memory (SHM) or GEM&#8217;s buffer sharing mechanism. SHM buffer sharing is meant for CPU-rendered application while GEM-based buffer sharing is meant for GPU-rendered applications.</p>

<p>SHM buffer sharing seems to be using anonymous files and <a href="http://keithp.com/blogs/fd-passing/">file descriptor(fd) passing</a> in order to transmit buffers from the client to the compositor. This makes sure that only the creator and the receiver of the fd can access the (now-shared) resource, making it impossible for a third-party other than the kernel to spy on or modify the output of other applications (confused-deputy). Confidentiality and integrity seems to be guaranteed but I haven&#8217;t dwelved into the implementation to make sure of it.</p>

<p>GEM buffer sharing <a href="http://www.x.org/wiki/Events/XDC2012/XDC2012AbstractHoegsberg+Peres+Ravier+Vetter/">is known to be insecure</a> because shared buffers are referenced by a easily-guessable 32-bit handle. Once the handle is guessed, the buffer can be opened by other application run by the same user without access control. Once opened, the buffers may be read from or written into. This means confidentiality or integrity cannot be guaranteed on the output of applications using this buffer-sharing method.</p>

<p>On-going work <a href="http://lists.freedesktop.org/archives/wayland-devel/2014-January/012727.html">is being performed</a> to make use of <a href="https://www.kernel.org/doc/Documentation/dma-buf-sharing.txt">DMA-Buf</a> instead of GEM. DMA-Buf, just like SHM, is based on anonymous files and fd-passing and even allows different GPU drivers to exchange GPU buffers. Once the Wayland protocol and GPU applications start using it, confidentiality and integrity of the output buffers won&#8217;t be a problem anymore.</p>

<pre><code>+-----------------+---------+----------+
|    Property     |  Input  |  Output  |
+-----------------+---------+----------+
| Confidentiality |   YES   |   YES*   |
|    Integrity    |   YES   |   YES*   |
|  Availability   |   YES   |   YES    |
+-----------------+---------+----------+
</code></pre>

<p><strong>2014/02/21 UPDATE</strong>: Kristian Høgsberg pointed out in the comments that Wayland&#8217;s EGL code in mesa has supported DMA-BUF for quite a while although it was made secure in mesa 10.0 (confidentiality &amp; integrity). I updated the table above to refect on that.</p>

<p><a id="sec:need_standard_interfaces"></a></p>

<h4>The need for standardised privileged interfaces</h4>

<p>Although Tim and I advised Wayland compositors <a href="http://phd.mupuf.org/publication/2012/09/19/xdc2012_secu_recap/">not to rely on external programs</a> to perform privileged tasks, some people do think it is needed as they want to make it possible to develop cross-compositors applications performing privileged tasks. Examples of such applications would be:</p>

<ul>
<li>Screenshot applications (stills and video)</li>
<li>Virtual keyboards and pointing devices</li>
<li>Screen sharing (VPN, Skype)</li>
<li>Hotkeys handlers (?)</li>
<li>Session lockers</li>
</ul>


<p>All of these applications are violating one or more security properties. Wayland compositors should thus control the access to the interfaces allowing those applications to work. Since we want these applications to be cross-compositors, a standardised way of granting/passing/revoking privileges should be described in the protocol or its implementation reference guide.</p>

<p><a id="sec:bypass_security_properties"></a></p>

<h4>Allowing the user to securely break security properties</h4>

<p>By default, the system should be enforcing all the security properties we defined earlier. However, sometimes, users need/want to automate some process, record their screens or lock the computer with a custom-app. This is why we need ways to by-pass the security when it is really needed. Without such means, people may refuse to use Wayland because it &#8220;takes freedom away from them&#8221;. However an ideal design is so that someone will always come up first with the &#8220;right&#8221; way to do something. Here when it comes to distributors/vendors using Wayland, you want them to use your own preferred security property rather than entirely unlocking Wayland&#8217;s safeguards to support the features of poorly-written apps.</p>

<p>The usual way of dealing with applications needing more privileges is to statically give them at launch time. Once an application has no use of the permission anymore, it can revoke its right to access it, until its next execution. This is very similar to what exists with <a href="http://man7.org/linux/man-pages/man7/capabilities.7.html">capabilities</a>.</p>

<p>The problem with such a system is that a malicious application could potentially take advantage of a poorly-coded application that holds an interesting capability (assigned statically at launch time), and use that application&#8217;s capability to gain indirect access to the restricted interface it is interested in. This is because permissions aren&#8217;t granted according to the immediate intent of the user. Indeed, a user would ideally always have a way to be aware of a reduced security state. This means the user has to take action in order to temporary reduce the security. The user should then be able to check whether the system&#8217;s security is still reduced and should be able to revoke permissions. Capturing the user&#8217;s intent can be done by:</p>

<ul>
<li>Waiting for a user to press the key with a clear semantic before launching the associated application (for instance, PrintScreen launching the screen-shot application)</li>
<li>Prompting the user whenever an application tries to access a restricted interface</li>
<li>Creating secure widgets that are drawn and managed by the compositor but can be imported in applications (<a href="http://research.microsoft.com/pubs/152495/user-driven-access-control-nov2011.pdf">UDAC</a>)</li>
<li>Any other way?</li>
</ul>


<p>The first solution requires absolute trust in the input integrity and requires the compositor to know which application it should run (fullpath to the binary). The second solution requires both trust in input integrity and output integrity (to prevent a malicious application from changing the content of the prompt window to change its semantic and turn it into a fake advertisement, for instance). The third solution requires secure widgets, unfortunately it is -ENOTQUITETHEREYET. We have ideas on how to implement them using sub-surfaces, they will be discussed again later on this very same blog ;)</p>

<p>While I think the user-intent method has a higher security than static privilege assignation, I think  both should be implemented with the latter used as a way for users to specify they are OK with potentially reducing the security of the desktop environment to let the application he/she wants to run properly. This will lower users&#8217; dissatisfaction and should result in a better security than bypassing some security properties for all applications. I am however worried that some stupid applications may be OK with creating snapshot capabilities from the command line, without requiring the user&#8217;s input. A packager would then grant the privileges to this application by default and thus, the mere fact of having this application installed will make your desktop non-confidential anymore.</p>

<p>This is why once privileges have been granted, the user needs to have a way to keep track of who has access to restricted interfaces. This can be done by having a mandatory notification when an application accesses a privileged interface and a compositor-owned application in the systray whose colour would indicate the current security state (no threat, at least one application has the rights to use a restricted interface and at least one application is using a restricted interface). A click on this icon could provide more information about which restricted interfaces are used by which application. A button could then be added to each entry to allow users to revoke some privileges of applications. While I think the interface for the application providing this feedback should be specified, the user shouldn&#8217;t have a choice on it and it should be hardcoded in the Desktop Environment.</p>

<p><a id="sec:recommendations_designers"></a></p>

<h4>Recommendations to restricted Wayland interface designers</h4>

<p>I have never designed an interface for Wayland and don&#8217;t know what the best practice is. However, I know that restricted interfaces should never be considered as always usable.</p>

<p>The first important point is that before being able to use an interface, a client should first bind to it. This binding process could either succeed or fail, depending on the compositor&#8217;s security policy. Clients are mandated to test that binding worked well before using the interface. In case it didn&#8217;t, clients should fail gracefully and tell the user what restricted interface couldn&#8217;t be bound. Also, binding a restricted interface could take some time and the application shouldn&#8217;t block on it.</p>

<p>To support privileges revocation, a revoke signal should be added to the interface in order to inform clients their rights to access the restricted interface have been revoked. Clients should fallback gracefully and tell the user they received such a signal.</p>

<p><a id="sec:launching_priv_clients"></a></p>

<h4>Launching privileged Wayland clients from the compositor</h4>

<p>The most-secure way of launching clients requiring restricted interfaces is to let the compositor run them by itself. This way, it can control the environment in which the process has been launched which lowers the risks of environment attacks such as the <code>LD_PRELOAD</code> one exposed earlier.</p>

<p>Implementing such a system is difficult as the compositor needs to remember that the PID of the client it launched should be granted the privileges to access one or more restricted interfaces when this (soon-to-become)client connects to the Wayland compositor. Not only does it mean that the compositor needs to have a separate table of which PIDs are supposed to get which privileges, it also means the compositor needs to keep track of the death of the client&#8217;s PID to avoid another process from re-using the PID of this client and gaining access to privileged interfaces it wasn&#8217;t supposed to access.</p>

<p>A simpler and more secure solution would be for the compositor to open a UNIX socket to itself before exec&#8217;ing the client. Once opened, it should be simpler for the compositor to set the client&#8217;s capabilities to a flag stored in the structure tracking the client and then execute the client&#8217;s binary. When running the exec() syscall, all the FDs that have not been opened with the <code>O_CLOEXEC</code> <a href="http://linux.die.net/man/2/open">flag</a> will be passed on to the new process. A run-time parameter of the Wayland client could then be used to tell which FD represents the unix socket to the Wayland compositor. An example of such parameter could be <code>--wayland-fd=xxx</code>. The compositor should however be careful it doesn&#8217;t leak any un-needed FD to the new client.</p>

<p><strong>2014/02/21 UPDATE</strong>: Pekka Paalanen <a href="http://lists.freedesktop.org/archives/wayland-devel/2014-February/013381.html">said on the Wayland Mailing List</a> the latter approach is already implemented in Wayland and suggested reading the documentation about the environment variable <code>WAYLAND_SOCKET</code> in <a href="http://manned.org/wl_display_connect/7bfe6598">wl_display_connect</a>. I actually prefer the implemented solution better because it is transparent to applications. Well done!</p>

<p><a id="sec:run-time_requests"></a></p>

<h4>Letting applications require more privileges at run time</h4>

<p>Some times, application may require access to a restricted interface after it has been launched. In this case, they can use the binding call I described earlier and the compositor will grant access to it or not, depending on its configuration or policy.</p>

<p>The problem with allowing applications to require more privileges is that we do not control their environment and we cannot make sure it didn&#8217;t get loaded with <code>LD_PRELOAD</code> or tampered with in any other way. As this decision really depends on which other security tools are being used on the computer, this isn&#8217;t something Wayland compositors should hard-code. This leads us to our final proposal.</p>

<p><a id="sec:WSM"></a></p>

<h4>Wayland Security Modules</h4>

<p>As seen earlier, granting access to a restricted interface or not depends on the context of the client (how it was launched, previous actions). The expected behaviour should be defined by a security policy.</p>

<p>As no consensus on the policy <a href="https://www.mail-archive.com/wayland-devel@lists.freedesktop.org/msg12261.html">can apparently be reached</a> (as usual in security), we have all agreed that we needed to separate the policy from the code. This is very much alike <a href="http://www.nsa.gov/research/_files/selinux/papers/module/x45.shtml">Linux Security Modules (LSM)</a> or <a href="http://www.x.org/releases/X11R7.5/doc/security/XACE-Spec.html">X Access Control Extension (XACE)</a>.</p>

<p>From a software engineering point of view, we would work on a security library called Wayland Security Modules (name subject to changes) that Wayland compositors would call when a security decision would need to be made. The library would then load the wanted security policy, defined by a shared-object that I will refer to as the security backend. In the case of allowing a client to bind a restricted interface or not, the corresponding WSM hook should return <code>ACCEPT</code>, <code>PROMPT</code> or <code>DENY</code>, prompt meaning the compositor would have to ask the user if he wants to accept the risk or not. Let me stress out that prompting should be a last-resort measure as numerous studies have been made proving that unless asked very rarely, users will always allow the operation.</p>

<p>Some additional hooks would also be needed in order to track the state of Wayland clients (open, close, etc&#8230;) but nothing too major should be needed. The compositors would just have to store this context in a <code>void *security;</code> attribute in the Wayland client structure. Finally, WSM could be extended to control the access to the clipboard and maybe other interfaces I haven&#8217;t thought about yet.</p>

<p>The design of this library has not started yet. If you are interested in helping out, I would love to have some feedback on what are your use cases for WSM.</p>

<h5>POSIX security backend</h5>

<p>Most users run their computers without Mandatory Access Control (MAC), it is thus important to provide the best security possible by default. The POSIX security backend shouldn&#8217;t depend on any decision engine or MAC system (such as SELinux, Tomoyo, AppArmor, &#8230;) and should be easy to configure.</p>

<p><strong>2014/02/21 UPDATE</strong>: A <a href="http://www.reddit.com/r/linux/comments/1yh2ii/wayland_compositors_why_and_how_to_handle/cfktcc0">reader on reddit</a> said the following about the above paragraph: &#8220;Pretty weird statement considering both Ubuntu and Fedora several other distros come with MACs enabled by default&#8221;. As far as I know, no user-oriented operating systems has a MAC policy for graphical applications. Both Ubuntu and Fedora run applications unconfined. The only system I know about that has a real MAC policy for all its applications (and many more security layers) is PIGA-OS, a research operating system I helped developping at the ENSI de Bourges.</p>

<p>A default policy could be specified in <code>/etc/wayland/security.conf</code>. Per-client configuration could be stored in <code>/etc/wayland/authorized_clients.d/</code>. This would allow package managers to install application security policies along with the application. Each application-specific policy would define the full path of the allowed binary and which restricted interface the application needs to get access to and in which cases is it acceptable (only when run by the compositor? etc&#8230;). This is enables Trusted Path Execution (TPE) as only the binary specified by the fullpath will match this set of privileges.</p>

<p>Different UNIX users should be allowed to have different security parameters. The easiest way would be to store per-user configuration in different files in <code>/etc/wayland/users.d/</code> in order to simplify the logic. Another possibility would be to have <code>~/.wayland/</code> overriding the <code>/etc/wayland/</code> configuration folder. The latter solution would be harder to implement securely because only the compositor should be allowed to change the configuration.</p>

<p>In any case, to be considered valid, configuration files should all be root-owned and 644 to prevent malicious applications from changing the security policy. This means changing the security policy will be considered as an administrative task which sounds about right.</p>

<h5>Other security backends?</h5>

<p>Other security backends could be implemented/integrated with <a href="http://www.linux-pam.org/">PAM</a>, <a href="http://www.freedesktop.org/wiki/Software/polkit/">Polkit</a> or <a href="http://www.nsa.gov/research/selinux/">SELinux</a>. You could even write your own security backend without needing to patch any Wayland compositor, unless you need new WSM hooks.</p>

<p>Please let me know about what security backend you would be interested in!</p>

<p><a id="sec:ack"></a></p>

<h3>4. Acknowledgment</h3>

<p>This article is the result of countless hours of discussions with my friends <a href="https://tim.siosm.fr/">Timothée Ravier</a> and <a href="http://www.mupuf.org/contact/sidi.html">Steve Dodier-Lazaro</a>. It is also the result of multiple discussions with Sebastian Wick and Maarten Baert on Wayland&#8217;s mailing list (<a href="https://www.mail-archive.com/wayland-devel@lists.freedesktop.org/msg12261.html">latest thread</a>).</p>

<p><a id="sec:conclusion"></a></p>

<h3>5. Conclusion</h3>

<p>This article is just a summary of the current situation we are in security-wise and a summary of all the discussions I have been involved in. My hope is to get some feedback from the Wayland and security communities in order to achieve a secure system with cross-compositor privileged applications!</p>

<p>Please send me some feedback, I would love to hear from you!</p>
]]></content>
  </entry>
  
  <entry>
    <title type="html"><![CDATA[A Return into the World of Static Analysis with Frama-C]]></title>
    <link href="http://www.mupuf.org/blog/2014/02/10/a_return_into_the_world_of_frama-c/"/>
    <updated>2014-02-10T20:13:00+02:00</updated>
    <id>http://www.mupuf.org/blog/2014/02/10/a_return_into_the_world_of_frama-c</id>
    <content type="html"><![CDATA[<p><a href="http://www.frama-c.com">Frama-C</a> is a static analysis tool that does not just match &#8220;dangerous&#8221; function names or code patterns like RATS, and that does more than Splint&#8217;s memory management, control flow checks and reachability analysis. Frama-C uses abstract interpretation to analyse the potential values of variables and detect a whole other bunch of bugs in programs. It also provides a specification language to write assertions or pre-conditions on functions and prove that these assumptions hold. Frama-C is designed for correctness: it will report false positives (for instance fail to validate an assertion on the return value of a function) but never true negatives. It focuses on showing the absence of bugs, by proving assertions respect pre-conditions. This has applications in evaluating the safety of critical systems.</p>

<p>What interests us here is the combination of value analysis and slicing, as the slicing lab with my language-based security students this year was a bit&#8230; light! In my defence, I didn&#8217;t expect them to actually do their homework! We&#8217;ll work through combining value analysis and slicing on code samples, starting up with more basic aspects of Frama-C. This post is in its vast majority inspired from the contents of the Frama-C documentation. In particular, many code samples are taken or derived from the <a href="http://frama-c.com/download/frama-c-value-analysis.pdf">Value analysis documentation</a>.</p>

<p><strong>Update:</strong> I&#8217;ve received interesting feedback on this article from <a href="http://julien.signoles.free.fr/works.en.html">Julien Signoles</a>, one of the many talented people behind Frama-C. I&#8217;ve amended/clarified some of the things I discuss in the post, mostly changing ambiguous vocabulary I used to avoid confusions. Julien also explained in more details some aspects of Frama-C which I had forgotten, and so I&#8217;ll try to inject his own wisdom into the original article. Thanks Julien!</p>

<!-- more -->


<ul class="gallery">
<li><a href="http://www.mupuf.org/images/frama-c/frama-c-lval.jpg" class="fancybox" rel="gallery-ddb630cd61d659298b4ee6acbd1e7fe5" title="The graphical user interface of Frama-C"><img src="http://www.mupuf.org/images/frama-c/frama-c-lval.jpg" alt="The graphical user interface of Frama-C"/></a></li><li><a href="http://www.mupuf.org/images/frama-c/frama-c-dead-code.jpg" class="fancybox" rel="gallery-ddb630cd61d659298b4ee6acbd1e7fe5" title="Frama-C highlighting dead code in red"><img src="http://www.mupuf.org/images/frama-c/frama-c-dead-code.jpg" alt="Frama-C highlighting dead code in red"/></a></li><li><a href="http://www.mupuf.org/images/frama-c/frama-c-OOB-write.jpg" class="fancybox" rel="gallery-ddb630cd61d659298b4ee6acbd1e7fe5" title="An out-of-bounds write has been detected by Frama-C"><img src="http://www.mupuf.org/images/frama-c/frama-c-OOB-write.jpg" alt="An out-of-bounds write has been detected by Frama-C"/></a></li>
</ul>


<p>This post refers to Frama-C Oxygen on a Linux system. Your mileage may vary slightly from version to version.</p>

<h3>Finding undefined functions</h3>

<p>You&#8217;ll sometimes need to spot undefined functions, or will sometimes want to see how the temporary code generated by Frama-C looks like. When using the app in GUI mode, you&#8217;ll always have this information on the middle section of the interface. Otherwise, you may use the following command:</p>

<pre><code>    $ frama-c -metrics &lt;source files&gt;
</code></pre>

<p>You can then include your headers by using the <code>-cpp-extra-args</code> CLI argument, although Frama-C recommends extracting the header signatures or even the source code you need to include and putting it into a separate file, to limit the size of the imported code and hence reduce the amount of unnecessary noise in the analyser&#8217;s output. Missing functions can also be replaced by instrumentations built in Frama-C, as will be explained later.</p>

<p>From now on, we&#8217;ll be referring to a tarball of source files that can be downloaded <a href="http://www.mupuf.org/media/files/frama-c/frama-c-samples.tar.gz">here</a>. The code in these files is by no means meant to make any sense, it&#8217;s barely here for playing and demonstration purposes.</p>

<h3>Small notes on the GUI</h3>

<p>A few things to note before starting:</p>

<ul>
<li><code>frama-c</code> launches the CLI client and <code>frama-c-gui</code> launches the GUI one</li>
<li>Frama-C&#8217;s GUI is <code>frama-c-gui</code>, it contains many options but at times is a bit frustrating</li>
<li>With the GUI, make sure to close all files from previous projects before opening a new one, and to include all deps</li>
<li>The <code>-main</code> option must sometimes be set (for <code>loop.c</code>, see below), it&#8217;s at the top of the Analyzer section of the analysis options</li>
<li>Modifying code must be done outside of Frama-C, then you must refresh the analysis. Be careful, it will re-run value analysis which can be slow when the <code>-slevel</code> is high!</li>
<li>The console tab will give you most of the global information including the output of value analysis for all variables</li>
<li>The information tab will give you local information based on what&#8217;s highlighted by the mouse (keyboard navigation does not work, don&#8217;t bother): lvals return information on value analysis before and after assignments</li>
<li>Right-clicking on lvals and rvals will take you a very long way! This is how you select what to slice, what impact analyses to run, where a variable occurs, etc.</li>
</ul>


<p>Here is an example of what you will see in the information tab when clicking on <code>loop.c</code>&#8217;s line 3 (<code>n = read();</code>):</p>

<pre><code>    Function: loop
    Statement: 1 (line 3 in /home/steve/Teaching/GS10/1314/Labs/3 - Dependencies and Slicing/loop.c)
    Variable n has type "int".
    It is a local variable.
    It is referenced and its address is not taken.
    Before statement:
    n ∈ UNINITIALIZED
    After statement:
        n ∈ [--..--]
</code></pre>

<h3>Splint and Frama-C: not quite the same thing</h3>

<h4>Unreachable code</h4>

<p>In <code>somecode.c</code>, there are two pieces of unreachable code. First, the <code>userAuthChallenge()</code> function has been &#8220;disabled&#8221; and systematically returns 1 &#8211; the rest of the code in it is ignored. Splint catches this because when it builds the control flow graph (CFG later on), <code>return 1;</code> is equivalent to the <code>EXIT</code> state of the CFG, and so the other lines of code of this function are not included into any CFG block.</p>

<p>However Splint does not detect the second unreachable block. The <code>for</code> loop starting at line 59 in <code>someDataProcessingFunc()</code> never gets executed because the conditional check is set to <code>false</code> in that loop. Splint does not try to verify/compute when conditions are true, it analyses the whole source and will go through all branches of a conditional statement. Because Frama-C can do value analysis, it can figure out when a conditional check will return false (things get a bit harder when the conditional expression is in a loop, hence the <code>-slevel</code> argument that allows to unroll loops and reduce the amount of uncertainty in the analysis).</p>

<h4>Out-Of-Bounds memory accesses</h4>

<p>How are out-of-bounds reads or writes detected? Splint keeps a record of variables&#8217; types, and it knows the size of statically allocated arrays. It is able to detect out-of-bounds accesses on such variables, but only when the value used to index an array is static. Indeed, Splint cannot process pointer arithmetics leading to invalid memory accesses, or array indexes that contain variables (neither in the case of the loop in <code>oob.c</code> or the variable <code>v</code> in <code>oob-constant-index.c</code>). Splint, in strict mode, will argue about possible out-of-bounds accesses but will never have certainty about them.</p>

<p>Value analysis can also solve such problems. Let&#8217;s now type:</p>

<pre><code>    $ frama-c -val oob.c
    $ frama-c -val oob-constant-index.c
    $ frama-c -val oob-fixed.c
</code></pre>

<p>If you look at the Frama-C output on <code>oob.c</code> and <code>oob-constant-index.c</code> on one hand and <code>oob-fixed.c</code> on the other hand, you will see that the value analysis will return computed ranges only on the last case and that out-of-bounds writes are properly detected. When there is a bug (or what could be an infinite loop) in a function, the value analysis plugin will indicate that the function does not terminate and return infinite value ranges for all subsequent variables.</p>

<p>This problem also occurs in <code>somecode.c</code> with my simulated crash! This is the file I came up with to keep the lab going last week, when the students had nothing to do because they did their homework! The reason why I couldn&#8217;t slice this code was <del>actually because I introduced this simulated crash (without proper annotations telling Frama-C to ignore it), and the out-of-bounds access prevented the value analysis from running (<code>-val</code> is a dependency of the slicing plugin of Frama-C)</del> (Julien confirmed that the value analysis did work but I cannot slice unreachable code or expect it to appear in a slice &#8211; though my issue was that I couldn&#8217;t enable slicing). I assume at this point I was clicking in the wrong place! Note to self: I need to modify this <code>somecode.c</code> file.</p>

<h3>Value analysis</h3>

<p>It&#8217;s time to get get into the heart of what Frama-C does. The basic idea behind its value analysis plugin (called Value) is that in many simple cases, bounds for the values a variable can take can be easily calculated from the bounds of the other variables assigned to that variable. For instance, if a variable <code>x</code> is assigned 2 and another variable <code>y</code> is assigned a runtime-chosen value between 3 and 6, then the variable <code>z = x+y;</code> must take its values within the interval <code>[5 .. 8]</code>. Value can compute such value ranges easily and correctly (i.e., containing at least all the correct values within the proposed range), for simple forms of dynamically allocated and for statically allocated variables (for code that is sequential and contains no infinite loops). Loops can be managed either by returning over-estimations of the actual value ranges or by unrolling loop iterations to refine the computations.</p>

<p>In our language-based security lab, students are asked to perform backward slices of the two <code>printf()</code> statements in the <code>loop.c</code> file. We&#8217;ll see later that slicing does work on this file with Frama-C (as the exact value of <code>n</code> does not matter for the computation of the CFG and PDG), however value analysis does not yield any insights on the final values of <code>x</code> and <code>y</code> as it depends on the runtime value observed for <code>n = read();</code>.</p>

<h4>Value analysis with the -slevel option</h4>

<p>The <code>-slevel</code> option does two things, as quoted directly from the Frama-C documentation: &#8220;it makes the analyzer unroll loops, and it makes it propagate separately the states that come
from the then and else branches of a conditional statement&#8221;. I forgot long ago the internals of how branch states are separated and then re-merged, and I recall another bunch of options are relevant when it comes to performance-precision trade-offs on assertion proofs, but for the purpose of this post, <code>slevel</code> is all one needs to be aware of.</p>

<p>Let&#8217;s now try a value analysis of the file <code>loop-fixed-val.c</code>, with <code>slevel</code> set to 0. Notice the values of <code>x</code> and <code>y</code> inside the <code>while</code> loops and on the <code>printf</code> functions: they&#8217;re not properly calculated! Value does not know the exact values and so it returns infinite ranges&#8230; Yet it gets <code>i</code> and <code>j</code> right&#8230; Strange! If Value makes the assumption (<del>or rather, somewhat demonstrates that</del> confirmed by Julien that it is an assumption) this piece of code is going to finish, then the values of <code>i</code> and <code>j</code> at the end of the loop must be strictly below 0, and it somehow guesses that 0 is the only possible value, most likely from the fact that these get decremented by 1 just before said loops are exited. I am not sure about the very precise reasoning that allows Value to conclude <code>i</code> and <code>j</code> contain 0, but I think it is along those lines.</p>

<p>As for our <code>x</code> and <code>y</code> variables, the loops must be unrolled enough times for them to be computed precisely. Intuitively, there are 24 main loop iterations in this program, and the second loop iterates <code>i - 1</code> times per first loop iteration. I recall from my own learning of Frama-C that the relationship between <code>slevel</code> and which variables get calculated is somewhat tricky! If we re-run the analysis with any <code>slevel</code> below 298, neither value will be computed. Indeed, there will be precisely (23*24)/2 second loop iterations and 24 first loop iterations, which gives us a total of 300 iterations. An analysis run with <code>slevel = 0</code> corresponds to one loop being unrolled once, hence <code>slevel = 298</code> would give us exactly 299 loops being unrolled. Interestingly, this parameter gives me the following final values: <code>y ∈ {276}</code> and <code>x ∈ [--..--]</code>. Switching to <code>slevel = 299</code> now gives me <code>x ∈ {24}</code> (since the last iteration of the first loop is unrolled).</p>

<p>Generally speaking, it&#8217;s ok to overshoot a little and it&#8217;s recommended by the Frama-C developers to increment <code>slevel</code> slowly until reaching the desired level of accuracy or until the analysis takes longer than acceptable, whichever comes first.</p>

<h4>Value analysis on complicated lines of code</h4>

<p>If you now look at <code>ptr.c</code>, you&#8217;ll see that it mixes assignments, increments and dereferencing of pointers. What&#8217;s going on with this code may be confusing for people who&#8217;re not used to C (or who haven&#8217;t done any in a while). When confronted with this code, Frama-C will separate the various operations and create intermediate variables for each of them, allowing you to understand the order in which they occur and their impact on the values of variables. You can either use the GUI or use the following command to see intermediate state variables:</p>

<pre><code>    $ frama-c -val -print ptr.c

        [...]
        int main(void)
        {
            int __retres;
            int *ptr;
            int x;
            int z;
            int *tmp_0;
            int *tmp_1;
            x = 4;
            ptr = &amp; x;
            { /*undefined sequence*/    tmp_0 = ptr; ptr ++; ; }
            z = *tmp_0;
            { /*undefined sequence*/ 
                tmp_1 = ptr;
                ptr ++;
                *tmp_1 = 12;
            }
            __retres = 0;
            return (__retres);
        }
</code></pre>

<p>Notice the values of <code>tmp_0</code> and <code>tmp_1</code>. The <code>++</code> operator on the right hand side of the variable occurs after the rest of the lval or rval has been evaluated, so here a temporary variable will first be created that contains the same value as <code>ptr</code>. Then <code>ptr</code> will be incremented, and it is <code>tmp_0</code>&#8217;s pointed value that will be assigned to <code>z</code>. If the <code>++</code> operator had been written before <code>ptr</code>, it&#8217;d have been performed before the dereferencing leading to an invalid read when assigning the rval to <code>z</code>. Run a value analysis on <code>ptr-pre.c</code> to see this happen.</p>

<p>Note also that in any case, the ++ operator on a lval would be executed before the rval is assigned, hence the last line on ptr.c could lead to an invalid write &#8211; which is correctly detected by Frama-C. It turns out that sometimes such writes are not invalid, for instance we may be filling up an allocated array&#8217;s next element, and the code would be correct as long as we stop writing before the end of the array. A <code>-slevel</code> high enough to unroll the whole loop would be required to correctly differentiate buggy from valid programs in this case.</p>

<h4>Value analysis with intervals rather than unknown values</h4>

<p>We&#8217;re still annoyed that we cannot run the analysis for any value of <code>read()</code> because the value is obtained at runtime. Frama-C allows you to analyse values for ranges of input values, by using a built-in internal function that will assign an interval of values to a variable. We need to replace the <code>read()</code> call with a call to the appropriately named <code>Frama_C_interval(int, int)</code> function. In order to perform the value analysis, we now need to include the built-in Frama-C source code, which can be done by adding <code><code>frama-c -print-share-path</code>/builtin.c</code> to their CLI call, or by importing that file in their GUI interface (usually located at <code>/usr/share/frama-c/builtin.c</code> on Linux systems).</p>

<p>What now changes when running the value analysis? Open <code>loop-frama-c-interval.c</code> to figure it out. The final ranges of possible values for <code>x</code> and <code>y</code> will be given in the console (not in the information tab), provided that the <code>slevel</code> is sufficiently high! To the best of my understanding, it needs to be set high enough to cover <strong>all iterations from all values within the interval</strong>! For instance, for the interval <code>[-20..10]</code>, I need to set <code>slevel = 514</code> and I have absolutely no idea why this specific number! It is quite obvious however that it increases quickly, and so there are practical limitations to the applications of interval-based value analysis: the time you&#8217;re willing to wait for the results!</p>

<h3>Slicing with Frama-C</h3>

<p>Now onto the actual topic of my students&#8217; lab. I was interested in showing them Frama-C as I had no prior exposure to other slicing-capable open-source tools. Frama-C proposes various types of slicing, though I only wanted to demonstrate backward slices on the <code>printf()</code> statements as a means to validate the slices students had manually computed (the file they used for this exercise was <code>loop.c</code>). Somehow, the options differ whether running the GUI or CLI version of the analyser. In the GUI, one must first enable value analysis and then slicing from the analysis options dialog, and one can then right-click a statement to access a list of possible slicing options. In the CLI, one should instead use the following pattern (note the -then-on that allows printing the output of the slice):</p>

<pre><code>    $ frama-c &lt;source files&gt; &lt;desired slicing mode and appropriate options&gt; -then-on 'Slicing export' -print
</code></pre>

<p>The following options are available, though not all of them are documented and there are naming inconsistencies between CLI and GUI:</p>

<ul>
<li><code>slice calls to</code>: backward slice on all the calls to a selected function, in the whole program, which would return the whole program except the useless <code>j = n;</code> assignment when run on <code>print</code></li>
<li><code>slice calls into</code>: only slicing the calls themselves this time</li>
<li><code>slice results</code> or <code>-slice-return</code>: which I don&#8217;t really understand&#8230;</li>
<li><code>slice stmt</code>: backward slice on the selected statement</li>
<li><code>slice lval</code> or <code>-slice-value</code>: slice all the assignments containing a given variable in the lval (?), until the selected statement in the GUI or the end of the entry point function in the CLI</li>
<li><code>slice rd</code> or <code>-slice-rd</code>: slices the read accesses to selected lvalues (and <code>wr</code> for the write accesses&#8230; probably</li>
<li><code>slice ctrl</code>: it is quite likely that this option returns the part of a backward slice related to the control flow rather than data dependencies</li>
</ul>


<p>Note that this tutorial&#8217;s been written with Frama-C Oxygen. On the current version, Fluorine, the CLI slicing plugin has had quite a bunch of options added and they are better explained than they used to. The command <code>frama-c -slicing-help</code> will return a full list of available CLI slicing options.</p>

<p>The Frama-C documentation will or built-in CLI help will tell you exactly what format is expected. A backward slice of the <code>print(x);</code> statement would look like:</p>

<pre><code>    /* Generated by Frama-C */
    extern int ( /* missing proto */ read)();
    extern int ( /* missing proto */ print)(int x_0);
    void loop(void)
    {
        int x;
        int i;
        int n;
        n = read();
        x = 0;
        i = n;
        while (i &gt; 0) {
            x ++;
            i --; }
        print(x);
        return;
    }
</code></pre>

<h4>Program Dependency Graphs</h4>

<p>I didn&#8217;t even know Frama-C can output the PDG of a program, but of course it needs to compute it prior to slicing so it makes perfect sense being able to output that! PDGs can be exported to the dot format and then generated into PostScript files as follows. Better warn you, the PDG generated by Frama-C looks pretty insane&#8230;</p>

<pre><code>    $ frama-c -fct-pdg loop loop.c -main loop    -pdg-dot loop
    $ dot -Tps loop.loop.dot -o loop.ps
</code></pre>

<p>According to <a href="https://stackoverflow.com/questions/9804591/which-free-tools-can-i-use-to-generate-the-program-dependence-graph-for-c-codes">an anonymous contributor on stackoverflow</a>, you can also use gcc&#8217;s <code>-fdump-rtl-expand</code> parameter to generate a PDG, and then use <code>egypt</code> to turn it into a visualisable graph. This might be of help if like me you&#8217;re confused by Frama-C&#8217;s PDGs.</p>

<h4>Impact analysis and data scope</h4>

<p>You can also use the impact analysis plugin (available by right-clicking statements in the GUI) to compute forward slices of a statement. Likewise, you can obtain the lines of code where a variable&#8217;s content is unchanged by right clicking a variable, clicking on <code>Dependencies</code> and then <code>DataScope</code>. Knowing these shorthands can be quite handy for analysis too, if you&#8217;re trying to understand when and how a specific variable is modified or what other code it affects. If using the CLI, the <code>frama-c -impact-help</code> command will tell you what&#8217;s available.</p>

<h4>Combining slicing and value analysis</h4>

<p>You can run analysis on an existing slice with the CLI, and you can even slice a slice if you want to! As you&#8217;ve seen from the CLI slicing command above, printing a slice requires appending <code>-then-on 'Slicing export' -print</code>. Basically, slicing causes a new project named &#8216;Slicing export&#8217; to be generated, which you can later refer to to execute a second command. Performing multiple slices would cause the creation of &#8216;Slicing export 2&#8217; and so on.</p>

<p>How does this come in handy? Remember that we needed <code>slevel = 299</code> in our previous example to compute the final value range of <code>x</code>. if we first perform a backwards slice on reads to <code>x</code>, we can get rid of the <code>y</code>-related second loop and spare ourselves a lot of computation time! We can now drop to <code>slevel = 24</code> to obtain the same value for <code>x</code>! And this is of course one among many applications of slicing&#8230;</p>

<pre><code>    $ frama-c loop-fixed-val.c -slice-rd x -main loop -then-on 'Slicing export' -val -slevel 24
</code></pre>

<p>To conclude this post, here&#8217;s a little question (primarily directed at my students): if I told you that an app receives attacker-controlled input at a specific line of code in a specific variable, what analyses would you do to <strong>efficiently</strong> discover how this input may influence your app and cause it to be exploited?</p>
]]></content>
  </entry>
  
</feed>
