This chapter is going to be a quick-review guide or an API for the Java Server Pages (JSP) Technology. A point to note is that, you can find all these details in the Sun Specification for JSP Technology in their website. The difference is that, this one is a bit concise and covers just the important stuff that you can use to quickly review the JSP Technology Syntax for the SCWCD Certification Exam.
Syntax Rules for JSP
There are a few general syntax rules to keep in mind while coding JSP Pages:
• All tags are case sensitive.
• A pair of single quotes is equivalent to a pair of double quotes. This is generally true in HTML tags as well. Note that single quotes must be matched with single quotes, and doubles with doubles.
• Outside of quotes, spaces don't count, but inside they do. Also, spaces are not allowed between an equals sign and an attribute value. This is consistent with current XML/HTML tagging practices in that spaces are supposed to be used only to separate attribute-value pairs from each other and from the name of the tag.
• JSP tags and their XML equivalents cannot be mixed (well) within a page. You don't throw JSP inside an XML tag. Likewise, you must be very careful if you try to use an XML tag inside, say, a scriptlet. The following is wrong:
< % customerCount=8;
< myTagLibrary:customer count="8" >
System.out.print(customerCount); % >
A page in one syntax can include or forward to a page in the other syntax.
HTML or Output Comment
These are plain HTML comments that are passed through to the client. The client doesn't process these. There is nothing special about them and the servlet container ignores them, passing them through as text. Notice how you can use a scriptlet to insert text in the comment before it is sent off to the client. For example, you can datestamp a comment.
JSP Syntax
< ! - - comment [ < % = expression % > ] - - >
XML Syntax
None.
Example
< % @ page language="java" % >
< html >
< head >
< title >Hidden Comment< / title >
< / head >
< body >
< h1 >Hidden Comment< / h1 >
< ! - -
Any text between these delimiters
is passed through by the processor and is
included in the response
including this: < % = "scriplet" % >.
- - >
< / body >
< / html >
Which produces
< html >
< head >
< title >Hidden Comment< / title >
< / head >
< body >
< h1 >Hidden Comment< / h1 >
< ! - -
Any text between these delimiters
is passed through by the processor and is
included in the response
including this: scriplet.
- - >
< / body >
< / html >
Hidden Comment
The text within a hidden comment (< % - - - - % >) is ignored by the JSP container. Unlike HTML comments, within which you can embed scriptlets, you don't place scriptlets in a hidden comment. The JSP container does not process anything between the < % - - and - - % > characters. A hidden comment is not inserted into the response.
JSP Syntax
< % - - comment - - % >
XML Syntax
None.
Example
< % @ page language="java" % >
< html >
< head >
< title >Hidden Comment< / title >
< / head >
< body >
< h1 >Hidden Comment< / h1 >
< % - -
Any text between these delimiters
is ignored by the processor and is not
included in the response
- - % >
< / body >
< / html >
Declaration
A declaration declares variables or methods that you can use afterward in the JSP page. The declaration must precede these variables' use in the JSP page. You can place numerous declarations between the delimiters. The following rules apply:
• Terminate the declaration with a semicolon. This is the same for scriptlets, but the opposite of an Expression.
• You don't have to declare variables or methods that are already declared in imported packages.
• Since a static include file is treated as original JSP source, declarations in these must precede use. Conversely, declared variables are accessible from include files if the include directive comes after the declaration. The scope of a declaration does not include dynamic resources included with < jsp : include >
JSP Syntax
< % ! declaration; [ declaration; ]+ ... % >
XML Syntax
< jsp : declaration >
declaration; [ declaration; ]+ ...
< / jsp : declaration >
Example
< % ! String firstName = new String("Patricia"); % >
< % ! int customerCount = 84; % >
Expression
A JSP expression can be any valid Java expression. The container evaluates it, converts the result to a String, and appends this String to the output stream. The only surprise with this element is you do not use a semicolon to terminate the statement. If you remove the equals sign from the opening delimiter, you have a scriptlet and must use a semicolon even though it is the same Java expression.
JSP Syntax
< % = expression % >
XML Syntax
< jsp : expression >
expression
< / jsp:expression >
Example
< % @ page language="java" % >
< html >
< head >
< title >Hidden Comment< / title >
< / head >
< body >
< h1 >Expression < / h1 >
< % = "This expression is simply a String." % >
< / body >
< / html >
Scriptlet
This contains a code fragment, containing valid Java statements and/or local variable declarations. These statements and declarations will be placed in a method (the _jspService method) when the JSP gets converted to a Servlet
JSP Syntax
< % code fragment % >
XML Syntax
< jsp : scriptlet >
code fragment
< / jsp : scriptlet >
Example
< jsp : directive.page import="java.util.Date" / >
< jsp : scriptle t >
Date date = new Date();
String message = getDate(date);
< / jsp : scriptlet >
< jsp : text >
< html >
< head >
< title >Expression in XML Syntax< / title >
< / head >
< body >
< h1 align="center" >
< jsp : expression > message < / jsp : expression >
< / h1 >
< / body >
< / html >
< / jsp : text >
< jsp : declaration >
String getDate(Date date)
{
String message = "The date is: " + date;
return message;
}
< / jsp : declaration >
Which produces this
< html >
< head >
< title >Expression in XML Syntax< / title >
< / head >
< body >
< h 1 align="center" >
The date is: Fri Apr 29 09:47:22 IST 2011
< / h1 >
< / body >
< / html >
Include Directive
An include directive inserts all the text in the named file into the JSP page at the point of the tag. Notice that it is as if this text is part of the JSP, so it is processed along with the rest of the JSP. This is called a static process. In other words, the container copies the text referenced in the file and does not process it in any way before being inserted into the JSP page. The included file can be any text, including pieces of JSP, HTML, XML, or plain text. Once this text is included, it is parsed as if it had been in the original JSP page.
Notice how this static include compares to the HTML equivalent: < ! - - #include file="somefile.html" - - >. This HTML include is performed by the browser, which also inserts the result of this fetch into the HTML page. However, in the HTML include case, the referenced resource can be static (HTML, stylesheet) or dynamic (like a servlet or JSP page). If it is dynamic then whatever that resource sends back is what is placed inline at the point of the include tag.
JSP Syntax
< % @ include file="relativeURL" % >
XML Syntax
< jsp : directive.include file="relativeURL" / >
Example
< jsp : text >
< html >
< head >
< title >Example Include< / title >
< / head >
< body >
< h1 align="center" >
< jsp : directive.include file="message.txt" / >
< / h1 >
< / body >
< / html >
< / jsp:text >
message.txt contains
This text was included from another file.
The output is
< html >
< head >
< title >Example Include< / title >
< / head >
< body >
< h1 align="center" >This text was included from another file.
< / h1 >
< / body >
< / html >
Page Directive
This tag is the most powerful one of the bunch. It defines attributes that apply to an entire JSP page.
Notice that you can use the page directive more than once. However, you can only use each attribute once. Imports are the only exception. Also, you can place it anywhere on the page. I strongly recommend grouping these tags together, normally at the top or bottom of the file.
JSP Syntax
< % @ page
[ language="java" ]
[ extends="package.class" ]
[ import="{package.class | package.*},..." ]
[ session="true|false" ]
[ buffer="none|8kb|sizekb" ]
[ autoFlush="true|false" ]
[ isThreadSafe="true|false" ]
[ info="text" ]
[ errorPage="relativeURL" ]
[ contentType="mimeType [ ; charset=characterSet ]" | "text/html ; charset=ISO-8859-1" ]
[ isErrorPage="true|false" ]
[ pageEncoding="characterSet | ISO-8859-1" ]
% >
XML Syntax
< jsp : directive.page pageDirectiveAttrList / >
Example
< % @ page import="java.util.*" % >
Or
< jsp : directive.page language="java" / >
Taglib Directive
The taglib directive tells the container that you will use custom tags. It names the tag library and specifies their tag prefix. You can use many taglib directives in a single page, but the prefix defined in each must be unique.
JSP Syntax
< % @ taglib uri="URIForLibrary" prefix="tagPrefix" % >
XML Syntax
No direct equivalent, but you can specify a tag library in < jsp : root > .
Example
< % @ taglib uri="/que_taglib_message" prefix="message" % >
< % @ page language="java" % >
< html >
< head >
< title >Tag Library< /title >
< /head >
< body >
< h1 >Tag Library< /h1 >
< message:insert definition="appendix"
parameter="syntax"/ >
< /body >
< /html >
< jsp:text >
A jsp:text element allows you to add text that you want sent to the client unaltered within the XML tags. The text you place in here is appended literally to the output stream.
JSP Syntax
None. There is no direct syntax. Anything that is not JSP syntax is “text.”
XML Syntax
< jsp:text >
your text
< /jsp:text >
Example
< jsp:text >
< html >
< head >
< title >jsp:text Example< /title >
< /head >
< body >
< h1 align="center" >
This is a jsp:text example.
< /h1 >
< /body >
< /html >
< /jsp:text >
< jsp:include >
The < jsp:include > element allows you to include text in a JSP page. There are two kinds. One is static (text is simply inserted as if it were part of the original JSP page) and the other is dynamic (text is processed first and then only the result is inserted into the JSP page). If it is dynamic, you can use a < jsp:param > clause to pass the name and value of a parameter to the resource.
JSP Syntax
< jsp:include page="{relativeURL | < % = expression % >}"
flush="true|false" / >
Or
< jsp:include page="{relativeURL | < % = expression % >}"
flush="true|false" >
< jsp:param name="parameterName"
value="{parameterValue | < % = expression % >}" / >+
< /jsp:include >
XML Syntax
< jsp:include page="{relativeURL | % = expression % }"
[ flush="true | false" ] / >
Or
< jsp:include page="{relativeURL | % = expression % }"
[ flush="true | false" ] >
[ < jsp:param name="parameterName"
value="{parameterValue | % = expression % }" / > ] +
< /jsp:include > }
Example
< jsp:include page="company_logo.html" / >
< jsp:include page="salesTax.jsp" >
< jsp:param name="state" value="CA" / >
< jsp:param name="amount" value="359.92" / >
< /jsp:include >
< jsp:plugin >
This tag tells the browser to load an applet or bean. You have to specify both the applet/bean and the plug-in. If the client can't find the plug-in, the browser should display a dialog to initiate the download of the plug-in software.
JSP Syntax
< jsp:plugin
type="bean|applet"
code="classFileName"
codebase="classFileDirectoryName"
[ name="instanceName" ]
[ archive="URIToArchive, ..." ]
[ align="bottom|top|middle|left|right" ]
[ height="{displayPixels | < % = expression % >}"]
[ width="{displayPixels | < % = expression % >}"]
[ hspace="leftRightPixels" ]
[ vspace="topBottomPixels" ]
[ jreversion="JREVersionNumber | 1.2" ]
[ nspluginurl="URLToPlugin" ]
[ iepluginurl="URLToPlugin" ] >
[ < jsp:params >
[ < jsp:param name="parameterName"
value="{parameterValue | < % = expression % >}" / > ]+
< /jsp:params > ]
[ < jsp:fallback > text message if plugin download fails
< /jsp:fallback > ]
< /jsp:plugin >
XML Syntax
< jsp:plugin
type="bean|applet" code="classFileName"
codebase="classFileDirectoryName"
[ name="instanceName" ] [ archive="URIToArchive, ..." ]
[ align="bottom|top|middle|left|right" ]
[ height="{displayPixels | % = expression % }" ]
[ width="{displayPixels | % = expression % }"]
[ hspace="leftRightPixels" ] [ vspace="topBottomPixels"]
[ jreversion="JREVersionNumber | 1.2" ]
[ nspluginurl="URLToPlugin" ]
[ iepluginurl="URLToPlugin" ] >
[ < jsp:params >
[ < jsp:param name="parameterName"
value="{parameterValue | % = expression % }" / > ]+
< /jsp:params > ]
[ < jsp:fallback > text message if plugin
download fails
< /jsp:fallback > ]
< /jsp:plugin >
Example
< jsp:plugin type=applet code="houseViewer.class" codebase="/html" >
< jsp:params >
< jsp:param name="property_listing" value="A33IN" / >
< /jsp:params >
< jsp:fallback >
< p >Unable to load applet< /p >
< /jsp:fallback >
< /jsp:plugin >
< jsp:useBean >
The < jsp:useBean > element locates or instantiates a JavaBeans component. If it does not exist, the container will attempt to instantiate it from a class or serialized template. You can access a JavaBeans component, but not an enterprise bean directly. However, you can call a JavaBean that in turn calls an EJB.
JSP Syntax
< jsp:useBean id="beanInstanceName"
scope="page|request|session|application"
{
class="package.class" [ type="package.class" ]|
beanName="{package.class | < % = expression % >}"
type="package.class" |
type="package.class"
}
{ / > | > other elements < /jsp:useBean > }
XML Syntax
< jsp:useBean id="beanInstanceName"
scope="page|request|session|application"
{
class="package.class" [ type="package.class" ] |
beanName="{package.class | % = expression % }"
type="package.class" |
type="package.class"
}
{ / > | > other elements < /jsp:useBean > }
Example
< jsp:useBean id="houseLotBean" scope="session" class="session.Realestate" / >
< jsp:setProperty name="houseLotBean" property="id"
value="33245" / >
< jsp:setProperty >
This element sets the value of one or more properties in a bean, using the bean's setter methods. Of course, the < jsp:useBean > tag must be declared first. The most frequent mistake with this tag is to not match the value of name in < jsp:setProperty > with the value of id in < jsp:useBean >.
JSP Syntax
< jsp:setProperty name="beanInstanceName"
{
property="*" |
property="propertyName" [ param="parameterName" ] |
property="propertyName"
value="{stringLiteral| < % = expression % >}"
}
/ >
XML Syntax
< jsp:setProperty name="beanInstanceName"
{
property="*" |
property="propertyName" [ param="parameterName" ] |
property="propertyName"
value="{stringLiteral | % = expression % }"
}
/ >
Example
< jsp:setProperty name="houseLotBean" property="id" value="33245" / >
Another example that takes the values of all form fields coming in from a form and assigns them to bean properties that have the same names as these form fields:
< jsp:setProperty name="request" property="*" / >
< jsp:forward >
This element forwards the request object (which has all client request information) from one JSP page to another resource. The target can be an HTML file, another JSP page, or a servlet, as long as it is in the same application context as the forwarding JSP page. Notice how the lines in the source JSP page after the < jsp:forward > element are not processed.
The biggest problem you'll have with this one is trying to forward after some output has been sent to the client. This happens if you are not buffering output (page directive buffer=”none”). If you forward in this situation you will cause an IllegalStateException.
JSP Syntax
< jsp:forward page="{relativeURL | < % = expression % >}" / >
or
< jsp:forward page="{relativeURL | < % = expression % >}" >
< jsp:param name="parameterName"
value="{parameterValue | < % = expression % >}" / > +
< /jsp:forward >
XML Syntax
< jsp:forward page="{relativeURL | % = expression % }" >
< jsp:param name="parameterName"
value="{parameterValue | % = expression % }" / > +
< /jsp:forward > }
Example
< jsp:forward page="page_moved_page.htm" / >
< jsp:getProperty >
This tag is how you retrieve a value from a bean using its getter method.
JSP Syntax
< jsp:getProperty name="beanInstanceName" property="propertyName" / >
XML Syntax
< jsp:getProperty name="beanInstanceName" property="propertyName" / >
Example
< jsp:useBean id="tax" scope="page" class="state.Tax" / >
Current tax rate is:< jsp:getProperty name="tax" property="taxRate" / >
Previous Chapter: Self Test - chapters
Next Chapter: Chapter 47 - Introduction to Web Application Deployment

Topics Covered in the Blog - Synopsis

Showing posts with label jsp. Show all posts
Showing posts with label jsp. Show all posts
Thursday, April 28, 2011
Wednesday, April 6, 2011
Chapter 31: Introduction to JSP
JSP and Servlets have greatly simplified the life of a J2EE programmer who builds Java based Enterprise Applications for a living. As part of the series of articles on the SCWCD Certification, we have already covered the Servlets in great detail. Next in line is the Java Server Pages Technology also called the JSP Technology
In this chapter and the subsequent many chapters, we will cover the JSP Technology in great detail.
So, lets get started!!!
Introduction to Java Server Pages:
Java Server Pages have become an integral part of any J2EE application. They are used extensively because they can combine the features of HTML and Java. The difficulty level of JSP is half-way between HTML and pure Java. For simple tasks like displaying the current date, you write a normal HTML page and add only a small amount of Java as a scriptlet. For big tasks like processing a shopping cart, you use JSP as the mediator between the Web form and a component (Ex: Servlet) that has all the processing logic.
CGI, Perl, Active Server Pages etc were all the predecessors of Java Server Pages. Am not saying that the JSP Technology was built based on these technologies but it is safe to say that, the JSP Technology was created to overcome many of the shortcomings in the above mentioned technologies. Though the ASP technology is a web server scripting champion and is used very widely, the only problem is the Runs only in Windows Attitude of the technology. Unlike ASP, JSP has equivalent if not better features and can run in any environment making it an invaluable tool for enterprise application developers who don't want to be tied to the limitation of the system running only in Windows.
Not only does JSP run on all major platforms, but the JavaBeans used by these JSPs run on all major platforms as well.
JSP competes directly with ASP. In fact, you would be forgiven if you thought it was a copy. Sun took the same approach to JSP as it did with Java. Sun borrowed the syntax of its best competitor (ASP for JSP and C++ for Java) tweaked it a little, but built everything under the hood from scratch. Java syntax comes from C++, but it works on all platforms with no portability issues like C++ for the developer. Similarly, the JSP structure comes from ASP. The look and feel, and even some syntax is the same. However, ASP primarily uses Microsoft's versatile VBScript, while JSP uses the more powerful and portable Java and JavaScript.
While it helps to know JSP's history, I won't bore you anymore with it. You have learnt as much as you need to know about the history of Java Server Pages and it is time to move on to the Exam Objectives…
How Does JSP Work?
If you remember the initial chapters in this series, you would remember the fact that JSP Pages get converted or rather Translated into Servlets before execution. Kudos to you if you remembered it. The JSP container parses the JSP source and converts the entire JSP page (HTML becomes strings and Java source code embedded in a JSP page gets copied into methods) into a Java servlet class. The HTML text is converted into a bunch of out.println statements in the order encountered. Finally, the container compiles this class into Java bytecodes. This Servlet is invoked by the Server in order to finish displaying the contents on the web browser.
JSP Syntax:
I feel that it is always useful to take a look at the simple syntactical constructs of a technology before we dig deep into it. Well, whether you agree or disagree, below is a synopsis of the JSP syntax. You can use it to get a feel of what we are going to learn in the next few chapters…
Previous Chapter: Chapter 30 - Servlet API
Next Chapter: Chapter 32 - Opening & Closing JSP Tags
In this chapter and the subsequent many chapters, we will cover the JSP Technology in great detail.
So, lets get started!!!
Introduction to Java Server Pages:
Java Server Pages have become an integral part of any J2EE application. They are used extensively because they can combine the features of HTML and Java. The difficulty level of JSP is half-way between HTML and pure Java. For simple tasks like displaying the current date, you write a normal HTML page and add only a small amount of Java as a scriptlet. For big tasks like processing a shopping cart, you use JSP as the mediator between the Web form and a component (Ex: Servlet) that has all the processing logic.
CGI, Perl, Active Server Pages etc were all the predecessors of Java Server Pages. Am not saying that the JSP Technology was built based on these technologies but it is safe to say that, the JSP Technology was created to overcome many of the shortcomings in the above mentioned technologies. Though the ASP technology is a web server scripting champion and is used very widely, the only problem is the Runs only in Windows Attitude of the technology. Unlike ASP, JSP has equivalent if not better features and can run in any environment making it an invaluable tool for enterprise application developers who don't want to be tied to the limitation of the system running only in Windows.
Not only does JSP run on all major platforms, but the JavaBeans used by these JSPs run on all major platforms as well.
JSP competes directly with ASP. In fact, you would be forgiven if you thought it was a copy. Sun took the same approach to JSP as it did with Java. Sun borrowed the syntax of its best competitor (ASP for JSP and C++ for Java) tweaked it a little, but built everything under the hood from scratch. Java syntax comes from C++, but it works on all platforms with no portability issues like C++ for the developer. Similarly, the JSP structure comes from ASP. The look and feel, and even some syntax is the same. However, ASP primarily uses Microsoft's versatile VBScript, while JSP uses the more powerful and portable Java and JavaScript.
While it helps to know JSP's history, I won't bore you anymore with it. You have learnt as much as you need to know about the history of Java Server Pages and it is time to move on to the Exam Objectives…
How Does JSP Work?
If you remember the initial chapters in this series, you would remember the fact that JSP Pages get converted or rather Translated into Servlets before execution. Kudos to you if you remembered it. The JSP container parses the JSP source and converts the entire JSP page (HTML becomes strings and Java source code embedded in a JSP page gets copied into methods) into a Java servlet class. The HTML text is converted into a bunch of out.println statements in the order encountered. Finally, the container compiles this class into Java bytecodes. This Servlet is invoked by the Server in order to finish displaying the contents on the web browser.
JSP Syntax:
I feel that it is always useful to take a look at the simple syntactical constructs of a technology before we dig deep into it. Well, whether you agree or disagree, below is a synopsis of the JSP syntax. You can use it to get a feel of what we are going to learn in the next few chapters…
| Syntax | What it Represents | Example |
|---|---|---|
| < ! -- comment -- > | HTML Comment | < ! -- This HTML comment is passed through to the client -- > |
| <%-- comment --%> | JSP Comment | <%-- This comment is ignored by the server --%> |
| <%@ page [key]="[value]" %> | Page Directive | <%@ page import="java.util.*" %> |
| <%! Declaration %> | Declaration | <%! String name = new String ("Rocky"); %> |
| <%= expression %> | Expression | Your shopping cart total is: <%= shoppingCart.getTotal() %>. |
| <% code %> | Scriptlet | <% String password =request.getParameter("password");
if ( password == null)
{
%> Password is required, thank you. <% } %> |
| <%@ include file="file" %> | Static include, parsed at compile-time | <%@ include file="welcome.jsp> |
| < jsp : include page="file" / > | Dynamic include, request-time and not parsed | < jsp : include page="welcome.html" / > |
Previous Chapter: Chapter 30 - Servlet API
Next Chapter: Chapter 32 - Opening & Closing JSP Tags
Tuesday, March 1, 2011
Quick Recap: Chapters 1 to 5
Let us quickly go over the concepts we have covered in the past few chapters.
JSP & Servlet History
• ARPANET was the initial backbone based on which Internet was built
• Tim Berners Lee paved the way for the current day Internet and World Wide Web
• CGI helped people transfer data from one computer to another
• Because CGI was not scalable, people looked out for better alternatives
• JSP and Servlets became an easier and a more scalable alternative to CGI
Advantages of Using Servlets
a. They are faster than CGI scripts because each CGI script produces an entirely new process that takes a lot of time to execute, whereas a servlet creates only a new thread.
b. Servlet API is standard and available easily on the internet (like JSPs)
c. Servlets have the advantages like ease of development & platform independence (like Java)
d. They can access all the J2SE and J2EE APIs
e. Can take the full advantage & capabilities of the Java programming language
Advantages of Using JSPs
a. Write Once, Run Anywhere
b. Code Re-use
c. Support for Scripting
d. Supports Actions
e. Supports both Static & Dynamic Content
f. Supports N-tier Enterprise Application Architecture
g. Superior Quality Documentation & Examples (All over the internet)
h. Reusable Tag Libraries
Web Servers & Servlet Containers
• A web server is the server on which our J2EE application runs
• A Servlet container is similar to a JVM for java programs and executes our Servlets
• Data is transferred using the request/response model
JSP to Servlet Conversion
• A JSP file gets converted into a Servlet at run time
• The web server (Ex: Tomcat) does the conversion of the JSP
• The web server invokes the converted Servlet version of the JSP page, every time the JSP is invoked.
Previous Chapter: Chapter 5 - JSP to Servlet Conversion
Next Chapter: Self Test - Chapters 1 to 5
Chapter 5: JSP to Servlet Conversion
In the previous chapter, we took a look at how a JSP file looks like and the contents that can be present inside a typical JSP file.
As you might already know (If you have J2EE programming experience) a JSP file gets converted into a Servlet at runtime and then gets executed. Well, if you did not know this, don't worry. That is what this chapter is for. To tell you the fact that JSPs get converted into Servlets for execution and also to tell you how that happens.
So, lets get started!!!
JSP to Servlet Conversion
JSPs are converted to servlets before the container runs them. This is actually cool because you don't need hardcore java programming skills to create a JSP page whereas you’ll need them to write a servlet. Moreover, all you’ll need to write a JSP is some expertise in creating HTML files and in using JavaScript. You can create front-end JSP pages without having much expertise in Java at all. Although JSP reduces the required skill level, JSP becomes a servlet, with the nice performance and portability benefits.
Below is how the conversion happens.
First lets look at a sample JSP page that we will consider for this conversion process. It's the same sample JSP we saw in the previous chapter. Lets name this guy my_first_jsp.jsp
Sample JSP File Code:
< html >
< body >
I Like Cars, Especially Ferrari .
< / body >
< / html >
This JSP file has to be placed in the …\jakarta-tomcat-4.0.1\webapps\examples\jsp folder in our system. To access this JSP through the tomcat server we can use the below URL:
http://localhost:8080/examples/jsp/my_first_jsp.jsp.
When you hit enter after typing the contents above in the browsers address bar, tomcat covnerts this JSP into a servlet, compiles it and then invokes it.
The servlet that gets created will be placed in …\jakarta-tomcat-4.0.1\work\localhost\examples\jsp as my_0005fservlet$jsp.java.
The contents of this converted Servlet would be as below:
package org.apache.jsp;
import javax.servlet.*;
import javax.servlet.http.*;
import javax.servlet.jsp.*;
import org.apache.jasper.runtime.*;
public class my_0005fservlet$jsp extends HttpJspBase {
static {
}
public my_0005fservlet$jsp( ) {
}
private static boolean _jspx_inited = false;
public final void _jspx_init()
throws org.apache.jasper.runtime.JspException {
}
public void _jspService(HttpServletRequest request,
HttpServletResponse response)
throws java.io.IOException, ServletException {
JspFactory _jspxFactory = null;
PageContext pageContext = null;
HttpSession session = null;
ServletContext application = null;
ServletConfig config = null;
JspWriter out = null;
Object page = this;
String _value = null;
try {
if (_jspx_inited == false) {
synchronized (this) {
if (_jspx_inited == false) {
_jspx_init();
_jspx_inited = true;
}
}
}
_jspxFactory = JspFactory.getDefaultFactory();
response.setContentType("text/html;charset=" +
"ISO-8859-1");
pageContext = _jspxFactory.getPageContext(this,
request, response, "",
true, 8192, true);
application = pageContext.getServletContext();
config = pageContext.getServletConfig();
session = pageContext.getSession();
out = pageContext.getOut();
// HTML // begin [file="/jsp/my_first_jsp.jsp"]
out.write(">
\r\n< html >\r\n< body >"+
"\r\nI Like Cars, Especially Ferrari ."+
"\r\n\r\n\r\n");
// end
} catch (Throwable t) {
if (out != null && out.getBufferSize() != 0)
out.clearBuffer();
if (pageContext != null)
pageContext.handlePageException(t);
} finally {
if (_jspxFactory != null)
jspxFactory.releasePageContext(pageContext);
}
}
}
A point to note here is that, the exact code that gets generated for your Servlet might vary slightly and may not exactly match what is given above.
As you can see, Tomcat does a lot of work when it converts our JSP into a servlet. If you look at the source that is sent to your browser, you will see the original HTML in the JSP file.
Well, the above example was a little too easy and in reality we will have some Java code too in our JSP. So, lets take a look at how the conversion happens if we put some java code into our earlier example.
Our Modified JSP:
< html >
< body >
I Like Cars, Especially Ferrari .
< % ! int val1 = 10, val2=5; % >
< % = val1 * val2 % >
//Close the html and body tags here too
Tomcat will now convert the Java embedded in the JSP to the following:
// begin [file="/jsp/my_first_jsp.jsp";from=(7,3);to=(7,31)]
int val1 = 10, val2=5;
// end
It also generates this version of the try block, which differs slightly from the previous servlet code:
try {
if (_jspx_inited == false) {
synchronized (this) {
if (_jspx_inited == false) {
_jspx_init();
_jspx_inited = true;
}
}
}
_jspxFactory = JspFactory.getDefaultFactory();
response.setContentType("text/html;charset=ISO-8859-1");
pageContext = _jspxFactory.getPageContext(this,
request, response,
"", true, 8192, true);
application = pageContext.getServletContext();
config = pageContext.getServletConfig();
session = pageContext.getSession();
out = pageContext.getOut();
// HTML // begin [file="/jsp/my_first_jsp.jsp"...]
out.write("" +
"\r\n< html >\r\n< body >\r\n" +
"I Like Cars, Especially < b > Ferrari < / b >.
\r\n");
// end
// HTML // begin [file="/jsp/my_first_jsp.jsp";from=...]
out.write("\r\n ");
// end
// begin [file="/jsp/my_first_jsp.jsp";from=...]
out.print(val1 * val2);
// end
// HTML // begin [file="/jsp/my_first_jsp.jsp";from=...]
out.write("\r\n\r\n\r\n\r\n");
// end
}
As you can see, Tomcat now takes our val1 and val2 variables that were declared at the top of our JSP page and generates declarations as class variables in the servlet.
So, < % - val1 & val2 % > becomes
out.print(val1*val2);
Once the conversion is complete, this servlet will be compiled and loaded to memory. Every call to invoke this JSP will make Tomcat compare the modification date of the loaded servlet with the date of the JSP. If it is the same, the compiled servlet is executed and contents displayed on screen. Else, if it sees that the JSP has changed, it will recompile the JSP and load the newly converted Servlet instead of the older version.
Previous Chapter: Chapter 4 - A Sample JSP
Next Chapter: Quick Recap - Chapters 1 to 5
Chapter 4: A Sample JSP
In the previous chapter, we took a look at how a sample Servlet would look like. In this Chapter, we are going to take a look at a sample JSP file and the contents of the file.
So, lets get started!!!
A JSP File Contents:
A JSP file can contain the following:
a. HTML contents
b. JavaScript
c. Java Code
Combining the features of the above 3 mentioned items; we get a powerful entity called the JSP. JSPs are used for the User Interface layer or the more colloquially called Front End layer of any J2EE application.
JSP Skeleton
Below is how a Skeleton JSP File would look like. (The file has to be saved as .jsp)
As you can see, a JSP file is pretty straightforward. Also, an important point to note here is the fact that, not all of the entities mentioned above are mandatory. You can include or exclude any of the entities mentioned above, based on your requirement and convenience.
Previous Chapter: Chapter 3 - A Sample Servlet
Next Chapter: chapter 5 - JSP to Servlet Conversion
So, lets get started!!!
A JSP File Contents:
A JSP file can contain the following:
a. HTML contents
b. JavaScript
c. Java Code
Combining the features of the above 3 mentioned items; we get a powerful entity called the JSP. JSPs are used for the User Interface layer or the more colloquially called Front End layer of any J2EE application.
JSP Skeleton
Below is how a Skeleton JSP File would look like. (The file has to be saved as .jsp)
// Page Imports
<%@ page import = “com.xyz.ClassName %>
// Tag Library References
<%@ taglib URI = “path to Taglib file” prefix = “xx” %>
// here xx refers to the prefix with which the tag library will be referred to
// HTML Head & Title Content
// Java Script Content
// HTML Body & Form Contents
Note: Java code can be placed within the <% %> tags in the body part of the JSP page within the Body tags.
As you can see, a JSP file is pretty straightforward. Also, an important point to note here is the fact that, not all of the entities mentioned above are mandatory. You can include or exclude any of the entities mentioned above, based on your requirement and convenience.
Previous Chapter: Chapter 3 - A Sample Servlet
Next Chapter: chapter 5 - JSP to Servlet Conversion
Monday, February 28, 2011
Chapter 2: Web Servers and Servlet Containers
In the previous chapter we looked at the history of the Web (Internet) and how JSPs and Servlets came into being. As you might have already guessed by now, any J2EE application needs a server on which it runs. It is called a Web Server. Also, the Servlet needs something in which it would run (Think of the JVM in which all java applications run) and that is called the Servlet container.
In this chapter, we are going to take a look at these two entities.
So, lets get started!!!
Web Servers and Servlet Containers
A servlet is nothing but Java code that runs in a container. It generates HTML & other contents that get displayed in the web page that we see. It is purely coded in Java, so the benefits and restrictions of all regular Java classes apply here too. Servlets are compiled to form a platform neutral bytecode (All java code is platform neutral, isnt it? Serlvet is no different). Upon request, this bytecode file is loaded into a container. Some containers (servlet engines) are integrated with the Web server, while others are plug-ins or extensions to Web servers that run inside the JVM. Servlets look the same as static Web pages to the client, but they really are complete programs capable of complex operations.
The servlet container is an extension of a Web server in the same way CGI, ASP, and PHP are. A servlet functions just like them, but the language in which it is written is Java. That's the main difference. The servlet doesn't talk to the client directly. The Web server functions as the intermediary that does it for the servlet. In a chain of processes, the client sends a request to the Web server, which hands it to the container, which hands it to the servlet. The Servlet processes the request and generates a response. The response starts from the servlet and goes to the container and then to the Web server and back to the client. Of course there are several other steps that happen too but this is just the introduction so this much would suffice I believe.
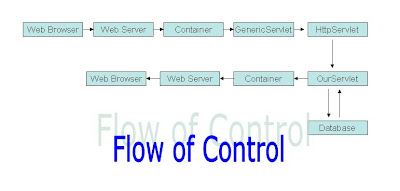
The servlet architecture makes the container manage servlets through their lifecycle. The container invokes a servlet upon receiving an HTTP request, providing that servlet with request information and the container configurations. The servlet uses this to do its job which is processing the data it received as part of the request. When finished, it hands back HTML and objects that hold information about the response. The container then forms an HTTP response and returns it to the client which inturn displays the stuff sent by the Servlet on screen in the web browser.
Below is a simple illustration of the flow of control that starts and ends at the Web Browser. Control starts at the browser, goes to the server and then to the container which in turn invokes the Servlet. Our Servlet happily does the processing (which might involve hitting a database) and returns the data to the container which in turn passes it on to the web server which finally displays the contents on the web browser.
The Servlet container is often written in Java, since it eventually runs inside a JVM. However, some vendors implement their containers in different languages (they aren’t essentially bound to Java). The point here is the fact that, all we need is a servlet container that can read and execute our servlets. The language in which it is implemented is not necessarily important for us.
Previous Chapter: Chapter 1 - Servlet & JSP History
Next Chapter: A Sample Servlet
In this chapter, we are going to take a look at these two entities.
So, lets get started!!!
Web Servers and Servlet Containers
A servlet is nothing but Java code that runs in a container. It generates HTML & other contents that get displayed in the web page that we see. It is purely coded in Java, so the benefits and restrictions of all regular Java classes apply here too. Servlets are compiled to form a platform neutral bytecode (All java code is platform neutral, isnt it? Serlvet is no different). Upon request, this bytecode file is loaded into a container. Some containers (servlet engines) are integrated with the Web server, while others are plug-ins or extensions to Web servers that run inside the JVM. Servlets look the same as static Web pages to the client, but they really are complete programs capable of complex operations.
The servlet container is an extension of a Web server in the same way CGI, ASP, and PHP are. A servlet functions just like them, but the language in which it is written is Java. That's the main difference. The servlet doesn't talk to the client directly. The Web server functions as the intermediary that does it for the servlet. In a chain of processes, the client sends a request to the Web server, which hands it to the container, which hands it to the servlet. The Servlet processes the request and generates a response. The response starts from the servlet and goes to the container and then to the Web server and back to the client. Of course there are several other steps that happen too but this is just the introduction so this much would suffice I believe.
The servlet architecture makes the container manage servlets through their lifecycle. The container invokes a servlet upon receiving an HTTP request, providing that servlet with request information and the container configurations. The servlet uses this to do its job which is processing the data it received as part of the request. When finished, it hands back HTML and objects that hold information about the response. The container then forms an HTTP response and returns it to the client which inturn displays the stuff sent by the Servlet on screen in the web browser.
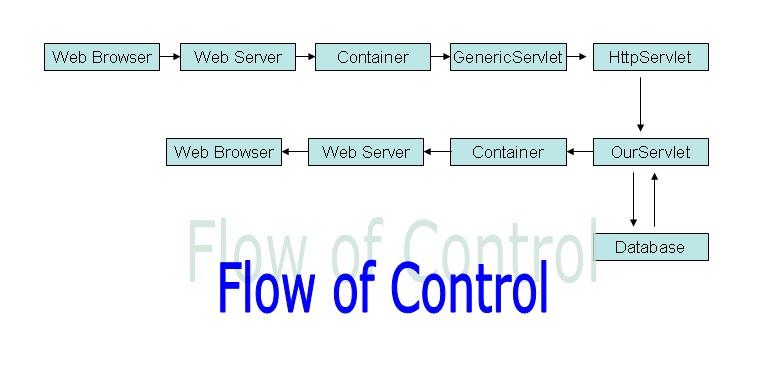
Below is a simple illustration of the flow of control that starts and ends at the Web Browser. Control starts at the browser, goes to the server and then to the container which in turn invokes the Servlet. Our Servlet happily does the processing (which might involve hitting a database) and returns the data to the container which in turn passes it on to the web server which finally displays the contents on the web browser.
The Servlet container is often written in Java, since it eventually runs inside a JVM. However, some vendors implement their containers in different languages (they aren’t essentially bound to Java). The point here is the fact that, all we need is a servlet container that can read and execute our servlets. The language in which it is implemented is not necessarily important for us.
Previous Chapter: Chapter 1 - Servlet & JSP History
Next Chapter: A Sample Servlet
Chapter 1: Servlet & JSP History
Here we are, studying for the SCWCD exam. I would like to congratulate you again for this decision of yours because of which you are going to get yourself SCWCD certified. It's a big step and am gonna be with you step by step to help you get this certification.
Well, it wouldn't be much fun preparing for a certification on JSPs and Servlets without knowing their history. Would it?
This chapter is going to be a history lesson taking you to the humble beginnings of these two wonderful technologies that have made our lives so much more easier & powerful.
How it all Began – Internet
Early in the 1950’s computer scientists in USA were working their backsides off in order to compete with Soviet Unions (The late USSR) advancements in superpower computing. They formed the Advanced Research Projects Agency (ARPA) in the year 1957. In those they still had powerful computers, but they weren’t able to talk or communicate with one another. In 1966 Lawrence G. Roberts (From MIT) proposed the first computer network which was named the ARPANET. The US Department of Defense (DoD) funded the venture and it took them 3 years to implement the network. The ARPANET team rewarded the DoD by establishing the Network Control Protocol (NCP), the first host to host protocol, which made possible for the university and the research center PC’s to communicate with one another.
With the success of the NCP, telco major AT&T installed the first cross country link between UCLA and BBN. It was a humble beginning and by 1973 hundreds of computers were talking to one another.
The real big breakthrough came in the year 1982 when the TCP/IP standard was established by Vint Cerf and Bob Kahn. Based on this development, the Domain Name System was established and by 1984 there were over 1000 hosts registered.
This was the backbone of the current day Internet. It was called NSFNET originally and with multiplying hosts it was becoming difficult to manage. By 1991 there were over a hundred thousand hosts and the system was getting out of control. There was nobody incharge and there was utter chaos all around.
In 1991, Tim Berners Lee created hyperlinks. He invented the whole protocol that made links communicate with one another and the World Wide Web was born. Telnet, email and many other services started using the networks.
In 1993, Marc Anderson and his friends wanted to see what was on the Internet, so they developed a new program called the NCSA Mosaic at the University of Illinois based on Berners Lee’s ideas. (NCSA stands for National Center for Supercomputing Applications)
Mosaic was the catalyst that caused the internet to explode. Nearly 200 million hosts were in use by the end of the decade and more than 1 billion users were using it.
This was not the end of it. Mobile phones, PDAs, GPS, Cars etc started connecting to the internet and the number of users began growing beyond numbers that we can write down or calculate.
It all started with basic HTML pages and hungry scientists created more and more advanced technologies whose powers were unbelievable. JSPs and Servlets just changed the landscape catastrophically and here we are, studying them to become better J2EE web programmers!!!
History of JSP & Servlets
The Internet's original purpose was to access and copy files from one computer to another. While TCP/IP provided a highway layer, the File Transfer Protocol (FTP) specification provided a standard way to exchange those files. It defined a way of shuttling them back and forth, but said nothing about looking at the content. HyperText Markup Language (HTML) allowed us to see the documents on the Internet. FTP can transmit HTML files just as easily as HTTP can. But we use Hypertext Transfer Protocol (HTTP) to act as an FTP specifically for HTML documents because it is a stateless protocol which makes having many short connections more efficient.
HTTP is the plumbing that connects the various computers. Now it is time to discuss about the fluid that flows through it “JSP & Servlets”
Note: JSP & Servlets arent the only technologies that are used in J2EE applications. Struts, Hibernate, Springs etc are other technologies that are used in J2EE Web applications. But, don't worry about them because they arent in the exam.
Using HTTP and HTML people were able to view/browse files and contents on a remote server. This is very useful, but people wanted live data. This is where the CGI (Common Gateway Interface) specification helped us. It helped us connect to databases and display stuff on the fly. The CGI specification was a major breakthrough in Web Application Development. The CGI standards made sure that the same CGI program worked on different Web servers.
CGI became the bread and butter of web developers. It was the most common means of displaying dynamic content on the internet. Though it was good, it wasn't good enough. It was not able to handle the performance requirements of the bursting Internet users. It was literally too much for it.
If you are asking me why CGI couldn't handle the load, the answer is simple. CGI spawned a separate process for every request that it receives. This design was able to sustain during off-peak hours but ate off server resources during peak loads which was eventually too much for it.
With growing numbers of users of web applications, scalability became a key consideration which wasn't CGI’s Middle Name and hence people started exploring other options.
Many CGI derivatives came up as server-side programming solutions that implement business logic, including ASP, ColdFusion, PHP, and Perl. Java surpassed them all due to portability and its object oriented programming design.
Alas, he we are, learning JSPs and Servlets that are the children of the Java Family which make our lives all the more easier in the world of Web Development.
Java was conceptualized in 1991 but it wasn't in the internet programming world until 1997. Servlets were the alternative to CGI and were released in 1997. Unlike CGI, which starts a process for each request, Servlets just spawn a new thread. Servlets had a better or rather efficient architecture which was able to handle the loads of the internet.
Though Servlets were awesome when compared to CGI, they still had some issues when it came to displaying dynamic content on a web page. Thankfully, Sun released the JSP (Java Server Pages) specifications in 1998, which solved all our UI woes. JSPs enabled programmers to display dynamic HTML content that could also use Java features. The combination of JSPs and Servlets was just what the Doctor Prescribed and it just revolutionized the Web Programming industry.
That's it for the history lesson. Now we are all set to dive deep into the world of magical Servlets and JSPs.
Previous Chapter: Introduction to the SCWCD Exam
Next Chapter: Web Servers & Servlet Containers
Subscribe to:
Posts (Atom)