Getting started
Installation
Upload Theme
- Go to Appearance > Themes in the WordPress Dashboard
- Click on the Add New button
- Click on the Upload link
- Select the colormag.zip file
- Click on Install Now button
Activate the theme
Now, hover over the theme thumbnail and press the Activate button
Custom Menu
Set up Custom Menu
- Go to Appearance > Menus in the WordPress menu
- Click on Create a new menu link
- Give a name to your menu in Menu Name and click Create Menu button
- Now choose the pages, categories, custom links from the leftside of your screen by selecting the checkbox and click on Add Menu
- Click Save Menu after adding required pages, categories in the menu
Site Identity
Site Identity
Logo, Site Title, Tagline & Site IconUpload the required logo and favicon to best suit your site, add site title from here as shown in image below:

To show/hide logo, site title & Tagline, go to Header Options
Header Media
Header Media
Header Video, Header ImageYou can upload your own video or add YouTube video URL which displays on header.
There’s also option for uploading header image.

Header Options
Header Options
Choose the required one as to display the logo only or text only or both or none of them as show in figure below:
From this setting in this theme, you can place the header image uploaded in your site in any place as required, which is described in this theme.Breaking News
This theme support the breaking news section, which shows your latest 5 posts from your site. To set it up, please follow the below steps:-
- After you visit Appearance > Customize > Header Options > Breaking News section.
- You need to check on the checkbox saying ‘Check to enable the breaking news section‘, and then, click on Save & Publish button to save the changes.
Here, below is the screenshot on this one:

Show Date
This theme supports to show the current date. To set it up, please follow the below steps:-
- After you visit Appearance > Customize > Header Options > Show Date section.
- You need to check on the checkbox saying ‘Check to show the date in header‘, and then, click on Save & Publish button to save the changes.
Show Home Icon
This theme supports to show the home icon in the menu. To set it up, please follow the below steps:-
- After you visit Appearance > Customize > Header Options > Show Home Icon section.
- You need to check on the checkbox saying ‘Check to show the home icon in the primary menu‘, and then, click on Save & Publish button to save the changes.
Here, below is the screenshot for it:-
![]()
Sticky Menu
This theme supports the menu. To set it up, please follow the below steps:-
- After you visit Appearance > Customize > Header Options > Sticky Menu section.
- You need to check on the checkbox saying ‘Check to enable the sticky behavior of the primary menu‘, and then, click on Save & Publish button to save the changes.
Here, below is the screenshot for it:-

Search Icon
This theme supports to show/hide the search icon in menu. To set it up, please follow the below steps:-
- After you visit Appearance > Customize > Header Options > Search Icon section.
- You need to check on the checkbox saying ‘Check to display the Search Icon in the primary menu‘, and then, click on Save & Publish button to save the changes.
Here, below is the screenshot for it:-
![]()
Random Post
This theme supports to show/hide the search icon in menu. To set it up, please follow the below steps:-
- After you visit Appearance > Customize > Header Options > Random Post section.
- You need to check on the checkbox saying ‘Check to display the Random Post Icon in the primary menu‘, and then, click on Save & Publish button to save the changes
Here, below is the screenshot for it:-

Responsive Menu StyleThis option allows you to choose old and new responsive menu style.
The new menu style looks as shown in figure below on mobile devices:

Header Display Type
The pro of this theme supports Header Display Type option for your site. Here are the options available in the Header Display Type for this theme are:
- Type 1 (Default): Header text & logo on left, header sidebar on right
- Type 2: Header sidebar on left, header text & logo on right
- Type 3: Header text, header sidebar both aligned center
For this option to be changed, you have to visit here and do the required changes:-
- After you visit Appearance > Customize > Header Options > Header Display Type section.
- Then, choose either one of the option mentioned above, which is in this section.
- After changing these options, click on Save & Publish button to save the changes.
Here, below is the screenshot for it:-

Breaking News Extra
This theme has more options for the breaking news option than the free version of this theme. So, to set up these settings, you can do the following:
- After you visit Appearance > Customize > Header Options > Breaking News section.
Here are the added options in this section:-
-
- You now can add any text for this, ie, change the Latest: word to anything you want. For this, you have to change the text under the Enter the text to display for the ticker news to apply.
- It also has the option for the animation type used in the ticker, ie, up and down. For setting this up, there is the label of Choose the animation style for the Breaking News in the Header in this section with the option available in the select options provided there.
- It also has the option of the duration time to be set up for this, which is just under the Enter the duration time for the Breaking News in the Header label. Here, you need to enter the number as your requirement. Note: only enter the number here and it will be converted in seconds.
- It also has the option of the speed time to be set up for this, which is just under the Enter the speed time for the Breaking News in the Header label. Here, you need to enter the number as your requirement. Note: only enter the number here and it will be converted in seconds.
- It also has the option to where to put the breaking news ticker in your site, either Header or just under the Main Menu. This setting is done under the label of Choose the location/area to place the Breaking News, with the option of the Header and Below Navigation.
- After you made the required changes, click on Save & Publish button to save the changes.
Here, below is the screenshot for it:-

Design Options
Design Options
This theme is best built for the magazine/news layout. However, it is also suitable to display your blog post or static page in the home page. But if you want not to display those, then, you can do the following:-
- After you visit Appearance > Customize > Design Options > Front Page Settings section.
- Put the check mark on the checkbox option of Check to hide blog posts/static page on front page
- Now, after you have done with this setting, you can now click on Save & Publish button to save the changes in your site.
This theme supports the wide and boxed layout for your site. To set it up, you can do the following:-
- After you visit Appearance > Customize > Design Options > Site Layout section.
- Choose the layout as you like, here the options available are Wide Layout and Boxed Layout
- After you choose the required layout for your site, you can now click on Save & Publish button to save the changes in your site.
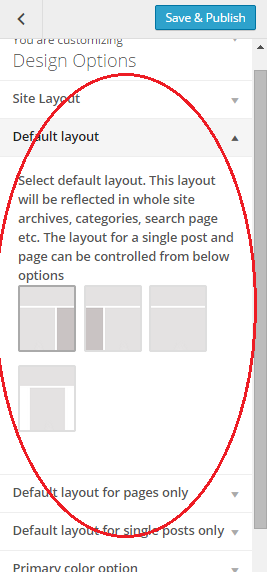
This theme supports the different layout options. You can maintain it via:-
- After you visit Appearance > Customize > Design Options > Default Layout section.
- Now choose the required layout option from here to be used in your site.
- After you choose the required layout for your site, you can now click on Save & Publish button to save the changes in your site.
Note: This layout option will have effect on the archive, blog as well as search pages. Also, it will take effect on the post and pages too, if you have not set any of the layout option for this theme via the other layout option, provided through the Customize Options and Select Layout option via the post editor section.
This theme supports the different layout options. You can maintain it via:-
- After you visit Appearance > Customize > Design Options > Default Layout for pages only section.
- Now choose the required layout option from here to be used in your site.
- After you choose the required layout for your site for the pages, you can now click on Save & Publish button to save the changes in your site.
Note: This layout is for the pages only, which will overwrite the default layout. It can again be overwritten individually through the post editor section. So, if the page does not have selected any layout for it, via the post editor section, in Select Layout option, it will take effect in your site.
This theme supports the different layout options. You can maintain it via:-
- After you visit Appearance > Customize > Design Options > Default layout for single posts only section.
- Now choose the required layout option from here to be used in your site.
- After you choose the required layout for your site for the posts, you can now click on Save & Publish button to save the changes in your site.
Note: This layout is for the posts only, which will overwrite the default layout. It can again be overwritten individually through the post editor section. So, if the post does not have selected any layout for it, via the post editor section, in Select Layout option, it will take effect in your site.
The layout options available for all of the mentioned above are:-
- Right Sidebar
- Left Sidebar
- No Sidebar Full Width
- No Sidebar Content Centered
Here, below is the screenshot for it:-
This theme supports two different layouts to have in your site for the blog, archive and search result pages. To set it up, you can do the following:-
- After you visit Appearance > Customize > Design Options > Blog/Archive and Search Pages Layout section.
- Now, you can choose the required layout option for your blog, archive or search result pages here.
- After you have chose the required layout for those pages, to display them according to your linking in your site, you can now click on Save & Publish button to save the changes in your site.
Here, below is the attached screenshot for the newly added layout, ie, one column layout option:-

This theme supports the option of changing the primary according according to your site need. To set it up, you can do the following:-
- After you visit Appearance > Customize > Design Options > Primary color option section.
- Now, choose the required primary color for your site.
- After you choose the required primary color for your site, you can now click on Save & Publish button to save the changes in your site.
Here, below is the screenshot for it:-

Background Color
Background Color
- Go to Appearance > Customize > Colors > Background Color section.
- Now, choose the required background color for your site there.
- After you have chosen the required background color for your site here, you can now click on Save & Publish button to save the changes in your site.
Note: This will only be applicable when only using the Boxed layout. Also, you can use any image for it instead of the Color.
Social Options
Social Options
- From your WordPress dashboard, go to Appearance > Customize.
- Now, click on the Social Options > Activate Social Links Area section.
- Check on the checkbox saying Check to activate social links area. Remember this is required in order to show the social icons in the footer as well as the header top bar areas.
- Add the social links as required here, in the available social networking sections and if you want to open them on the new tab, you can check the box saying Check to show in new tab.
- After you have filled up the required social links for your site from here, you can now click on Save & Publish button to save the changes in your site.
Here, below is the screenshot for it:-

We have added more social icons in the pro version than the free version of this theme. Also, we have added the option to input the custom Social Icons for your site. For setting up this Custom Social Icons, please do the following:-
- From ypur WordPress dashboard, go to Appearance > Customize.
- Now, click on the Social Options > Additional Social Icons section.
- Now, here you have the following options:-
- Additional Social Link One: It is used for adding the link to the specific social icons you want.
- Preferred Social Link FontAwesome Icon: It is used for generating the social icon image for displaying it in the front-end. Note: You can use any of the fontawesome icon available here, and the link to it is here, and you need to only enter the brand/company name here as described by the fontawesome site.
- Preferred Social Link Color Option: It is used for providing the required color for the social icons used in the social icons.
- Check to show in new tab: This option is just for opening up the required site in the blank page/new tab or not.
- Now, ffter you have filled up the required social links too in the additional social settings for your site from here, you can now click on Save & Publish button to save the changes in your site.
Here, below is the screenshot for it:-
![]()
Typography Options
Typography Options
- From your WordPress dashboard, go to Appearance > Customize section.
- Now, click on the Typography Options section.
- Here are many lists of the typography options, so, check them individually as it has lots of it, so, we could not cover all of them at once here. But, the section available here are:-
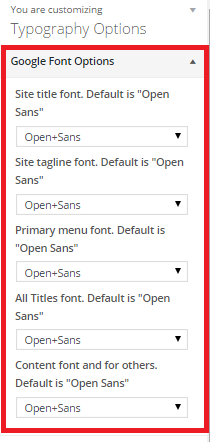
- Google Font Options:This section covers all the google fonts options available in this theme.
Here, below is the screenshot for the google font options:-
- Header Font Size Options:This section covers all the header font size settings, which cover header area.
Here, below is the screenshot for the header font size options:-

- Title Related Font Size Options:This section covers all the Title Related font size settings, which cover title related area.
Here, below is the screenshot for the Title Related font size options:-

- Content Font Size Options:This section covers all the Content font size settings, which cover the content area.
Here, below is the screenshot for the Content font size options:-

- Footer Font Size Options:This section covers all the Footer font size settings, which cover the footer area.
Here, below is the screenshot for the Content font size options:-

- Google Font Options:This section covers all the google fonts options available in this theme.
- After you have chosen all of the required typography options for your site here, you can now click on Save & Publish button to save the changes in your site.
Color Options
Color Options
- From your WordPress dashboard, go to Appearance > Customize section.
- Now, click on the Color Options section.
- Here are many lists of the color options, so, check them individually as it has lots of it, so, we could not cover all of them at once here. But, the section available here are:-
- Header Color Options:This section covers all the color settings, which cover the header area.
Here, below is the screenshot for the google font options:-

- Content part color options:This section covers all the color settings, which cover content area.
Here, below is the screenshot for the header font size options:-

- Footer part color options:This section covers all the color settings, which covers the footer area.
Here, below is the screenshot for the Title Related font size options:-

- Header Color Options:This section covers all the color settings, which cover the header area.
- After you have chosen all of the required color options for your site here, you can now click on Save & Publish button to save the changes in your site.
Additional Options
Additional Options
This theme supports the related posts by category/tags. For setting this up:-
-
- From your WordPress dashboard, go to Appearance > Customize.
- Click on the Additional Options > Related Posts section.
- Check on the checkbox having the option of Check to activate the related posts.
- After doing the above steps, you need to either choose Related Posts By Categories or Related Posts By Tags, to show them as related
- After completing the above steps, click on Save & Publish button to save the changes.
Here, below is the screenshot for it:-

Featured Image Lightbox
This theme supports the lightbox effect for the featured image. For setting this up:-
-
- From your WordPress dashboard, go to Appearance > Customize.
- Click on the Additional Options > Featured Image Lightbox section.
- Check on the checkbox having the option of Check to enable the lightbox for the featured images in single post.
- After completing the above steps, click on Save & Publish button to save the changes.
Here, below is the screenshot for it:-

Unique Post System
This theme supports the unique post system for the bundled widgets within this theme, ie, when you choose the widget to display the post either from the latest or from the specific category, then, already appeared post in one widget will be skipped in other widget, if any. For setting this up:-
- From your WordPress dashboard, go to Appearance > Customize.
- Click on the Additional Options > Unique Post System section.
- Check on the checkbox having the option of Check to activate the unique post system for the bundled widgets.
- After completing the above steps, click on Save & Publish button to save the changes, and then the already shown post from your site in one widget will be skipped by other widget, bundled within this theme.
Post Meta Display
This theme supports the display of the post meta individually or totally, ie, you can display the post author, date of post, comments number, etc as your wish by using this theme. For setting this up:-
-
- From your WordPress dashboard, go to Appearance > Customize.
- Click on the Additional Options > Post Meta Display section.
- Check on the checkbox options there as your wish. The options for those are properly described already in the checkbox option there.
- After completing the above steps, click on Save & Publish button to save the changes.
Here, below is the screenshot for it:-

Change Read More Text
This theme supports the option of having the Read more text to be changed as your site requirement. For setting this up:-
-
- From your WordPress dashboard, go to Appearance > Customize.
- Click on the Additional Options > Change Read More Text section.
- Now, fill up the required text in the text box option there to change the default Read more text to your liking of the site.
- After completing the above steps, click on Save & Publish button to save the changes.
Here, below is the screenshot for it:-

Social Share Button
The pro version of this theme is integrated default with the Social Share buttons, for the single posts. To enable it, please do the following:-
-
- From your WordPress dashboard, go to Appearance > Customize.
- Click on the Additional Options > Social Share Buttons section.
- Now, check on the checkbox option having the option of Check to activate social share buttons in single post in your site.
- After completing the above steps, click on Save & Publish button to save the changes.
Here, below is the screenshot for it:-

Social Profile In Author Bio
This theme support the the option to show the social profile in your author bio. For this, you need to include your Biographical info in your profile page, and the social profile for this theme comes under the User Social Links, in the profile section. For setting up these, please follow the instruction:
-
- From your WordPress dashboard, go to Users > Your Profile.
- Click on the Additional Options > Social Share Buttons section.
- Now, you need to fill up the Biographical Info, which is under the About Yourself section.
- Now, for the required social icons, there is the section of User Social Links, here, you are provided with the social icons and in there, you only need to input only the username of each of the social site there.
- Now, you need to visit Appearance > Customize > Additional Information > Social Profiles In Author Bio section
- Now, just check the checkbox having the option of Check to show the Social Profiles in the Author Bio and it will display the required social icons in your profile.
- After completing the above steps, click on Save & Publish button to save the changes.
Here, below is the screenshot for the social profile for the author bio in the back-end:-

Here, below is the screenshot for it in the front-end:-
![]()
Author URL In Author Bio
This theme supports the option of displaying the total number of post written by the current user in their user profile, via the biographical information of the author. For setting up these, please follow the instruction:
-
- From your WordPress dashboard, go to Appearance > Customize.
- Click on the Additional Options > Author URL In Author Bio section.
- Now, check on the checkbox option having the option of Check to display the link to the author page in the Author Bio section.
- After completing the above steps, click on Save & Publish button to save the changes.
Here, below is the screenshot for it:-

Scroll To Top Button
This theme supports the option of displaying scroll to top button or not according to your site requirement. For setting up these, please follow the instruction:
- From your WordPress dashboard, go to Appearance > Customize.
- Click on the Additional Options > Scroll To Top Button section.
- Now, check on the checkbox option having the option of Check to disable the scroll to top button..
- After completing the above steps, click on Save & Publish button to save the changes.
Footer Copyright Editor
The pro version of this theme has the ability to edit the footer copyright section. For changing the Footer Copyright info, perform the following:-
-
- From your WordPress dashboard, go to Appearance > Customize.
- Click on the Additional Options > Footer Copyright Editor section.
- Now, here, in the textarea for this setting, you can add the info for the footer copyright as your wish.
- After completing the above steps, click on Save & Publish button to save the changes.
Here, below is the screenshot for it:-

Schema Markup
Enable schema markup by checking the checkbox available here.
Category Color Options
Category Color Settings
- Go to Appearance > Customize > Category Color Options > Category Color Settings section.
- Now, choose the required color as you like for each category present in your site.
- After you have chosen the required color for each of the category used in your site here, you can now click on Save & Publish button to save the changes in your site.
Here, below is the screenshot for it:-

Theme Bundled Widgets
Widgets Descriptions
- TG: 728×90 Advertisement
This widget is suitable for displaying the advertisement in your site via the image and the link added for that image. It is best suited for the Header Sidebar area as well as Advertisement Above The Footer sidebar area.
The options available in this widget are as follows:-- Title: Add the required title for this widget in your site.
- Advertisement Image Link Add the link url of the required site here to link it to.
- Advertisement Image Add the url of the image here to display it as the advertisement in your site in the front-end. You can also upload the image via the Upload Image button provided by this widget as its functionality.
Here, the below is the associated image for this widget which is bundled within this theme:-

- TG: 300×250 Advertisement
This widget is suitable for displaying the advertisement in your site via the image and the link added for that image. It is best suited for the Right Sidebar area, Left Sidebar area as well as Contact Page Sidebar sidebar area.
The options available in this widget are as follows:-- Title: Add the required title for this widget in your site.
- Advertisement Image Link Add the link url of the required site here to link it to.
- Advertisement Image Add the url of the image here to display it as the advertisement in your site in the front-end. You can also upload the image via the Upload Image button provided by this widget as its functionality.
Here, the below is the associated image for this widget which is bundled within this theme:-

- TG: 125×125 Advertisement
This widget is suitable for displaying the advertisement in your site via the image and the link added for that image. It is best suited for the Right Sidebar area, Left Sidebar area as well as Contact Page Sidebar sidebar area. This widget allows you to add upto six 125 x 125 pixels images as the advertisement in your site.
The options available in this widget are as follows:-- Title: Add the required title for this widget in your site.
- Advertisement Image Link 1, Advertisement Image Link 2 and so on counting Add the link url of the required site here to link it to.
- Advertisement Image 1, Advertisement Image 2 and so on counting Add the url of the image here to display it as the advertisement in your site in the front-end. You can also upload the image via the Upload Image button provided by this widget as its functionality.
Here, the below is the associated image for this widget which is bundled within this theme:-

- TG: Featured Category Slider
This widget is suitable for displaying the post of your site as the slider either to be displayed via the latest post or via the selected category in the widget. It is best suited for the Front Page: Slider Area area as well as Front Page: Top Full Width Area sidebar area, with the featured image size for this to be chosen as 1400px x 600px for your site.
The options available in this widget are as follows:-- Number of posts to display: Here, add the required number of post to be displayed as the slider using this theme.
- Show latest Posts Select this radio button option if you want to display the latest post as the slider by using this widget bundled within this theme.
- Show posts from a category Select this radio button option if you want to display the post from the specific category chosen from you from your site as the slider by using this widget bundled within this theme.
- Select category: This option helps you to choose the category from your site to be displayed as the slider while using this widget. Note: For this to work, you need to select the radio option of Show posts from a category. Also, the category which does not have any post associated with it, will not be displayed as the select item via this widget.
- Image Size medium (800X445 pixels) This radio option helps you to choose the smaller size of the image to be chosen while displayed the posts associated with the chosen one, either the latest post or from specific category.
- Image Size large (1400X600 pixels, suitable for Front Page: Top Full Width Area) This radio option helps you to choose the larger size of the image to be chosen while displayed the posts associated with the chosen one, either the latest post or from specific category. It is best suitable for the Front Page: Top Full Width Area sidebar area, while the above one is best suited for other sidebar areas, except the sidebar area, which width is smaller like, footer sidebar areas, right sidebar, left sidebar areas, etc.
Here, the below is the associated image for this widget which is bundled within this theme:-

- TG: Highligted Posts
This widget is suitable for displaying the post of your site as the beside the slider area to be displayed via the latest post or via the selected category in the widget. It is best suited for the Front Page: Area Beside Slider area as well as Front Page: Content Top Section and Front Page: Content Bottom Section sidebar area.
The options available in this widget are as follows:--
- Number of posts to display: Here, add the required number of post to be displayed in the front-end while using this theme.
- Show latest Posts Select this radio button option if you want to display the latest post in your site by using this widget, bundled within this theme.
- Show posts from a category Select this radio button option if you want to display the post from the specific category chosen from you from your site by using this widget bundled within this theme.
- Select category: This option helps you to choose the category from your site to be displayed in the front-end as you like, where ever appropriate while using this widget. Note: For this to work, you need to select the radio option of Show posts from a category. Also, the category which does not have any post associated with it, will not be displayed as the select item via this widget.
Here, the below is the associated image for this widget which is bundled within this theme:-

-
- TG: Featured Posts (Style 1)
This widget is suitable for displaying the post of your site in the horizontal layout, displaying the first post as having the bigger featured images with the post excerpt followed by the smaller one, with the smaller featured image and no post excerpt. It is best suited for the Front Page: Content Top Section area as well as Front Page: Content Bottom Section sidebar area.
The options available in this widget are as follows:--
- Title: Here, add the required title of the widget to be displayed in the front-end while using this theme.
- Description Here, add the required description of the same widget to be displayed in the front-end while using this theme.
- Number of posts to display: Here, add the required number of post to be displayed in the front-end while using this theme.
- Show latest Posts Select this radio button option if you want to display the latest post in your site by using this widget, bundled within this theme.
- Show posts from a category Select this radio button option if you want to display the post from the specific category chosen from you from your site by using this widget bundled within this theme.
- Select category: This option helps you to choose the category from your site to be displayed in the front-end as you like, where ever appropriate while using this widget. Note: For this to work, you need to select the radio option of Show posts from a category. Also, the category which does not have any post associated with it, will not be displayed as the select item via this widget.
Note: If you choose the display the post from specific category while using this widget and that category has the color being defined in it via the Customizer Options, then, the title background of the color of the widget will inherit that color.
Here, the below is the associated image for this widget which is bundled within this theme:-

-
- TG: Featured Posts (Style 2)
This widget is suitable for displaying the post of your site in the vertical layout, displaying the first post as having the bigger featured images with the post excerpt followed by the smaller one, with the smaller featured image and no post excerpt. It is best suited for the Front Page: Content Middle Left Section area as well as Front Page: Content Middle Right Section, Right Sidebar, Left Sidebar, Contact Page Sidebar as well as in any of the footer sidebar areas.
The options available in this widget are as follows:--
- Title: Here, add the required title of the widget to be displayed in the front-end while using this theme.
- Description Here, add the required description of the same widget to be displayed in the front-end while using this theme.
- Number of posts to display: Here, add the required number of post to be displayed in the front-end while using this theme.
- Show latest Posts Select this radio button option if you want to display the latest post in your site by using this widget, bundled within this theme.
- Show posts from a category Select this radio button option if you want to display the post from the specific category chosen from you from your site by using this widget bundled within this theme.
- Select category: This option helps you to choose the category from your site to be displayed in the front-end as you like, where ever appropriate while using this widget. Note: For this to work, you need to select the radio option of Show posts from a category. Also, the category which does not have any post associated with it, will not be displayed as the select item via this widget.
Note: If you choose the display the post from specific category while using this widget and that category has the color being defined in it via the Customizer Options, then, the title background of the color of the widget will inherit that color.
Here, the below is the associated image for this widget which is bundled within this theme:-

-
- TG: Featured Posts (Style 3)
This widget is suitable for displaying the post of your site in the vertical layout displaying the smaller featured image but no post excerpt of the posts. It is best suited for the Front Page: Content Middle Left Section area as well as Front Page: Content Middle Right Section, Right Sidebar, Left Sidebar, Contact Page Sidebar as well as in any of the footer sidebar areas.
The options available in this widget are as follows:--
- Title: Here, add the required title of the widget to be displayed in the front-end while using this theme.
- Description Here, add the required description of the same widget to be displayed in the front-end while using this theme.
- Number of posts to display: Here, add the required number of post to be displayed in the front-end while using this theme.
- Show latest Posts Select this radio button option if you want to display the latest post in your site by using this widget, bundled within this theme.
- Show posts from a category Select this radio button option if you want to display the post from the specific category chosen from you from your site by using this widget bundled within this theme.
- Select category: This option helps you to choose the category from your site to be displayed in the front-end as you like, where ever appropriate while using this widget. Note: For this to work, you need to select the radio option of Show posts from a category. Also, the category which does not have any post associated with it, will not be displayed as the select item via this widget.
Note: If you choose the display the post from specific category while using this widget and that category has the color being defined in it via the Customizer Options, then, the title background of the color of the widget will inherit that color.
Here, the below is the associated image for this widget which is bundled within this theme:-

-
- TG: Featured Posts (Style 4)
This widget is suitable for displaying the post of your site in the vertical layout, which displays the featured images of the post along side the excerpt of that post in the right side. It is best suited for the Front Page: Content Top Section area as well as Front Page: Content Bottom Section sidebar areas.
The options available in this widget are as follows:--
- Title: Here, add the required title of the widget to be displayed in the front-end while using this theme.
- Description Here, add the required description of the same widget to be displayed in the front-end while using this theme.
- Number of posts to display: Here, add the required number of post to be displayed in the front-end while using this theme.
- Show latest Posts Select this radio button option if you want to display the latest post in your site by using this widget, bundled within this theme.
- Show posts from a category Select this radio button option if you want to display the post from the specific category chosen from you from your site by using this widget bundled within this theme.
- Select category: This option helps you to choose the category from your site to be displayed in the front-end as you like, where ever appropriate while using this widget. Note: For this to work, you need to select the radio option of Show posts from a category. Also, the category which does not have any post associated with it, will not be displayed as the select item via this widget.
Note: If you choose the display the post from specific category while using this widget and that category has the color being defined in it via the Customizer Options, then, the title background of the color of the widget will inherit that color.

-
- TG: Featured Posts (Style 5)
This widget is suitable for displaying the post of your site in the grid or column layout, which displays the featured images of the post along with the title of the post only. It is best suited for the Front Page: Content Top Section area as well as Front Page: Content Bottom Section sidebar areas.
The options available in this widget are as follows:--
- Title: Here, add the required title of the widget to be displayed in the front-end while using this theme.
- Description Here, add the required description of the same widget to be displayed in the front-end while using this theme.
- Number of posts to display: Here, add the required number of post to be displayed in the front-end while using this theme.
- Show latest Posts Select this radio button option if you want to display the latest post in your site by using this widget, bundled within this theme.
- Show posts from a category Select this radio button option if you want to display the post from the specific category chosen from you from your site by using this widget bundled within this theme.
- Select category: This option helps you to choose the category from your site to be displayed in the front-end as you like, where ever appropriate while using this widget. Note: For this to work, you need to select the radio option of Show posts from a category. Also, the category which does not have any post associated with it, will not be displayed as the select item via this widget.
Note: If you choose the display the post from specific category while using this widget and that category has the color being defined in it via the Customizer Options, then, the title background of the color of the widget will inherit that color.
-
- Check not to have the slider effect for this widget This option in this widget enables you to enable or disable the carousel effect in this widget featured in this theme.
The screenshot on this widget when the checkbox option of Check not to have the slider effect for this widget is checked:

The screenshot on this widget when the checkbox option of Check not to have the slider effect for this widget is unchecked:

-
- TG: Featured Posts (Style 6)
This widget is suitable for displaying the post of your site in the thumbnail layout, which displays the large featured image of the post at the top side, along with the smaller thumbnail of that post in the bottom side, which reacts as the pager for the above posts. It is best suited for the Front Page: Content Top Section area as well as Front Page: Content Bottom Section sidebar areas.
The options available in this widget are as follows:--
- Title: Here, add the required title of the widget to be displayed in the front-end while using this theme.
- Description Here, add the required description of the same widget to be displayed in the front-end while using this theme.
- Number of posts to display: Here, add the required number of post to be displayed in the front-end while using this theme.
- Show latest Posts Select this radio button option if you want to display the latest post in your site by using this widget, bundled within this theme.
- Show posts from a category Select this radio button option if you want to display the post from the specific category chosen from you from your site by using this widget bundled within this theme.
- Select category: This option helps you to choose the category from your site to be displayed in the front-end as you like, where ever appropriate while using this widget. Note: For this to work, you need to select the radio option of Show posts from a category. Also, the category which does not have any post associated with it, will not be displayed as the select item via this widget.
Note: If you choose the display the post from specific category while using this widget and that category has the color being defined in it via the Customizer Options, then, the title background of the color of the widget will inherit that color.
The screenshot on this widget bundled within this is is provided below:

-
- TG: Featured Posts (Style 7)
This widget is suitable for displaying the post of your site in the news ticker layout, which displays the featured image of the post along with its title just below, which moves to the left side always as it is best suited for the ticker layout. It is best suited for almost all of the sidebar areas, which are available via this theme.
The options available in this widget are as follows:--
- Title: Here, add the required title of the widget to be displayed in the front-end while using this theme.
- Description Here, add the required description of the same widget to be displayed in the front-end while using this theme.
- Number of posts to display: Here, add the required number of post to be displayed in the front-end while using this theme.
- Show latest Posts Select this radio button option if you want to display the latest post in your site by using this widget, bundled within this theme.
- Show posts from a category Select this radio button option if you want to display the post from the specific category chosen from you from your site by using this widget bundled within this theme.
- Select category: This option helps you to choose the category from your site to be displayed in the front-end as you like, where ever appropriate while using this widget. Note: For this to work, you need to select the radio option of Show posts from a category. Also, the category which does not have any post associated with it, will not be displayed as the select item via this widget.
Note: If you choose the display the post from specific category while using this widget and that category has the color being defined in it via the Customizer Options, then, the title background of the color of the widget will inherit that color.
-
- Check to display the content in the popup This option in this widget helps you to display the post content of the post in the popup or not according to your site requirement. Also, for this to work, you need to click on the image, not the post title.
The screenshot of this widget when Check to display the content in the popup is unchecked is provided below:

The screenshot of this widget when Check to display the content in the popup is checked is provided below:

-
- TG: Breaking News Widget
This widget is suitable for displaying the latest post of your site as the breaking news from your site. It is best suitable for the Right Sidebar area, Left Sidebar area, Contact Page Sidebar area as well as the footer sidebar areas bundled within this theme.
The options available in this widget are as follows:--
- Title: Here, add the required title of the widget to be displayed in the front-end while using this theme.
- Number of recent posts to show as the breaking news: Here, add the required number of post to be displayed as the latest news from your site.
The screenshot for this widget bundled within this theme is provided below:

-
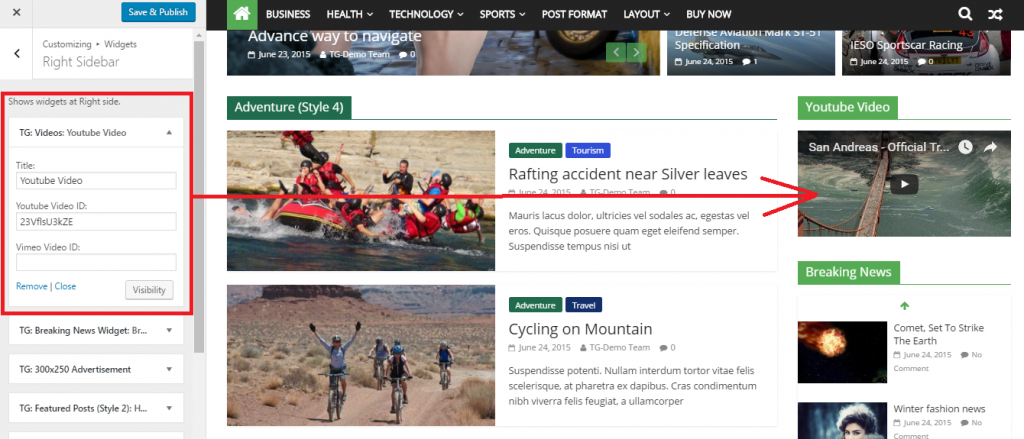
- TG: Videos
This widget is suitable for displaying the videos from the popular website such as YouTube or Vimeo, if you have any, for your site. Since this widget creates the responsive videos for those websites, so, this widget is suitable for any of the sidebar area bundled within this theme.
The options available in this widget are as follows:--
- Title: Here, add the required title of the widget to be displayed in the front-end while using this theme.
- Youtube Video ID: Here, add the required video id of the YouTube video, ie, you need to only add the id of the YouTube video, ie, you can neglect the url upto
https://www.youtube.com/watch?v=from the url. - Vimeo Video ID: Here, add the required video id of the Vimeo video, ie, you need to only add the id of the Vimeo video, ie, you can neglect the url upto
https://vimeo.com/from the url.
The screenshot for this widget bundled within this theme is provided below:
-
- TG: Tabbed Widget
This widget is suitable for displaying the posts and tabs, especially containing the popular post(displayed via the top comment count on the post from the site), latest post and latest comments. This widget is suitable for the Right Sidebar, Left Sidebar, Contact Page Sidebar as well as all of the footer widgets area bundled within this theme.
The options available in this widget are as follows:--
- Number of popular posts, recent posts and comments to display: Here, add the required number of the popular posts, recent post and recent comments to be displayed in the front-end
- Check to enable the popular post by view count. Here, this option enables you to display the popular post in this widget via the number of visits of the post in your site, instead the number of comments for that post.
The screenshot for this widget bundled within this theme is provided below:

-
- TG: Random Posts Widget
This widget is suitable for displaying the random posts from your site. This widget is suitable for the Right Sidebar, Left Sidebar, Contact Page Sidebar as well as all of the footer widgets area bundled within this theme.
The options available in this widget are as follows:--
- Title: Here, add the required title of the widget to be displayed in the front-end while using this theme.
- Number of random posts to display: Here, add the required number of posts to be displayed in the front-end as the random post from your site.
The screenshot for this widget bundled within this theme is provided below:

-
- TG: Weather
This widget is suitable for displaying the weather forecast information of any city. It can be displayed in any other widget area, bundled within this theme.
The options available in this widget are as follows:--
- Title: Here, add the required title of the widget to be displayed in the front-end while using this theme.
- OpenWeatherMap City ID: Here, add the required weather map city id through this link.
- Forecast Days: Select the forecast day from day 1 to 4.
Note: Please, add the weather map API key before using this widget. You can follow the option Appearance->Customize->Additional Options->OpenWeatherMap API key and paste the API key generated through this link
The screenshot for this widget bundled within this theme is provided below:
-
- TG: Currency Exchange
This widget is best suited for displaying the currency exchange rate of different countries. It can be displayed in any other widget area, bundled within this theme.
The options available in this widget are as follows:--
- Title: Here, add the required title of the widget to be displayed in the front-end while using this theme.
- Base Currency: Here, select the currency of country which will be the base currency for other exchange currencies.
- Exchange Currencies:Choose the multiple number of coutries available in the list which exchange rate currencies will be displayed in the front end
- Column:Select the required coulmn to be displayed in the front end for this widget.
The screenshot for this widget bundled within this theme is provided below:

-
Author Box
How to limit the excerpt text?
How to limit the excerpt text?
If you want to reduce or increase the number of words that appear in post. You can easily change that. Just follow the below steps:-
- Go to your post editor screen in the dashboard.
- In post editor screen look for the Screen Options button at top-right part of the screen.
- Click on it and make sure the Excerpt check-box option is checked.
- Now, somewhere below the main post editor box, you should be able to see the the Excerpt option box.
- Add your manual excerpt there with desired amount of text and Update the post.
Recommended Image sizes
Recommended Image sizes
The recommended image sizes for this theme are:-
- 392px * 272px for the TG: Highlighted Posts widget.
- 390px * 205px for the TG: Featured Post (Style 1) widget as well as TG: Featured Post (Style 2) widget too for first image.
- 130px * 90px for the TG: Featured Post (Style 1) widget as well as TG: Featured Post (Style 2) widget too for images which are from the second one, ie, after the first image.
- 800px * 445px for the TG: Featured Category Slider widget as well as for the archive, blog pages too.
- 150px * 150px for the small images in TG: Featured Posts (Style 6) widget as well as for the TG: Featured Posts (Style 7) widget too bundled within this theme.
- 1400px * 600px for the TG: Featured Category Slider widget as an option to make it use as the full width slider.